Type
Crochet
Difficulty
beginner
Category
amigurumi
AI Thinking Process
Planning
Verification
Pattern
CROCHET PUPPY
Step-by-Step Guide
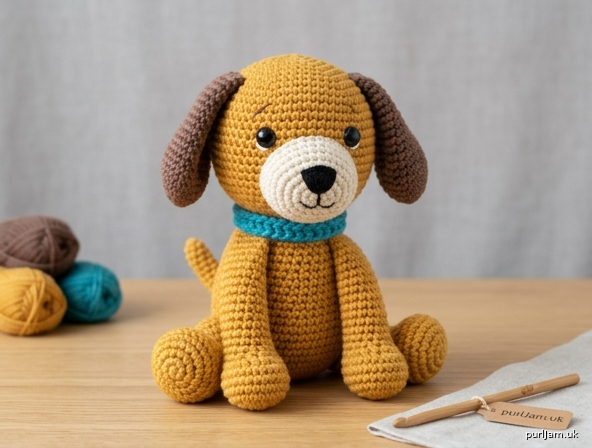
Beginner stitches, big personality — a snuggly sit-down pup in chunky yarn.
Skill level: Beginner
Finished size: About 8½" (22 cm) tall sitting; about 7" (18 cm) long, using the yarn and hook below
Gauge: 11 sc and 11 rnds = 4" (10 cm) in single crochet, worked tightly in the round. Gauge is not critical, but the fabric must be dense so stuffing cannot show through.
Time: About 3–4 hours
Construction: Pieces are worked separately in continuous spirals, stuffed as you go, then sewn into a sitting pose.
Materials | Abbreviations | Extra Features | Notes
Materials
- Yarn: Chunky weight (5)
- Color A (Honey Gold / main): 85 yd / 78 m
- Color B (Cocoa / ears & optional spots): 20 yd / 18 m
- Color C (Cream / snout): 10 yd / 9 m
- Color D (Black / nose & mouth): 3 yd / 3 m scrap
- Optional collar: 5 yd / 5 m in a bright contrast, or 12" (30 cm) grosgrain ribbon
- Hook: US H-8 (5.0 mm) — one to two sizes smaller than the yarn label, for a tight amigurumi fabric. If stitches look loose, drop to US G-6 (4.0 mm).
- Polyester fiberfill stuffing
- Two 12 mm safety eyes or black embroidery yarn for eyes
- Yarn / tapestry needle
- Stitch marker
- Scissors
- Straight pins
- Optional: pink crayon or fabric marker for blush
Abbreviations (US terms)
- MR — magic ring
- ch — chain
- sc — single crochet
- inc — increase (2 sc in the same stitch)
- dec — invisible decrease (insert hook through front loops of next 2 sts, yarn over, pull through both, yarn over, pull through 2)
- sl st — slip stitch
- st(s) — stitch(es)
- rnd(s) — round(s)
- FO — fasten off
- [ ] — stitch count at end of round
- Work in a continuous spiral unless stated. Do not join or turn. Mark the first stitch of every round.
Extra Features
- Floppy Color B ears (left unstuffed and flattened)
- Cream snout with satin-stitch nose and a tiny smile
- Optional round spots
- Optional ribbon or crocheted collar
- Optional blush dots on the cheeks
- Stable sitting pose (stubby legs, weighted bottom)
Notes
- This pattern uses US crochet terms only (sc, not dc-for-UK-sc).
- Work tightly. You should not see stuffing through the stitches.
- Use a stitch marker. Move it up every round.
- Invisible decreases keep the head and body smooth.
- Stuff as you go. It is hard to fill a closed piece later. Stuff the head and body firmly; stuff the legs lightly so they stay squat.
- Pin every piece and check both sides before you sew.
- Safety eyes are a choking hazard for children under 3. Embroider eyes instead if the toy is for a baby or toddler.
- Weave ends in securely; this is a hug toy.
Follow These Steps
Work the pieces in order. Each step is one “tile” on the poster grid. Keep Color A attached until a piece is finished unless a color change is written.
1 — Head: magic ring & increases
Color A. You will have a small cup growing into a round puppy skull.
- R1: 6 sc in MR. [6]
- R2: inc in each st. [12] (6 increases → 6 + 6 = 12 ✓)
- R3: (sc, inc) around. [18] (6 increases → 12 + 6 = 18 ✓)
- R4: (2 sc, inc) around. [24] (6 increases → 18 + 6 = 24 ✓)
- R5: (3 sc, inc) around. [30] (6 increases → 24 + 6 = 30 ✓)
- R6: (4 sc, inc) around. [36] (6 increases → 30 + 6 = 36 ✓)
Do not stuff yet. Leave the marker in the first stitch.
2 — Head: even rounds & eyes
Still Color A. The head becomes a chubby sphere.
- R7–R12: sc around. [36] (6 even rounds)
Eyes: Place 12 mm safety eyes between R9 and R10, 7 stitches apart. Push the washers on firmly from the inside.
If you are embroidering instead, skip the safety eyes and stitch two small satin-stitch ovals in Color D later (Step 8), in the same position.
3 — Head: decrease, stuff & close
Still Color A.
- R13: (4 sc, dec) around. [30] (6 decreases → 36 − 6 = 30 ✓)
- R14: (3 sc, dec) around. [24] (6 decreases → 30 − 6 = 24 ✓)
- R15: (2 sc, dec) around. [18] (6 decreases → 24 − 6 = 18 ✓)
- Stuff the head firmly, filling the cheeks so the face is round. Add more stuffing as you close.
- R16: (sc, dec) around. [12] (6 decreases → 18 − 6 = 12 ✓)
- R17: dec around. [6] (6 decreases → 12 − 6 = 6 ✓)
FO, leaving a 8" (20 cm) tail. Thread the tail through the front loops of the remaining 6 sts, pull the hole closed, and weave in. Head is done.
4 — Body (sitting tummy)
Color A. A slightly smaller, egg-shaped body — the sit-upon.
- R1: 6 sc in MR. [6]
- R2: inc in each st. [12] (6 increases → 6 + 6 = 12 ✓)
- R3: (sc, inc) around. [18] (6 increases → 12 + 6 = 18 ✓)
- R4: (2 sc, inc) around. [24] (6 increases → 18 + 6 = 24 ✓)
- R5: (3 sc, inc) around. [30] (6 increases → 24 + 6 = 30 ✓)
- R6–R12: sc around. [30] (7 even rounds)
- R13: (3 sc, dec) around. [24] (6 decreases → 30 − 6 = 24 ✓)
- R14: (2 sc, dec) around. [18] (6 decreases → 24 − 6 = 18 ✓)
- Stuff firmly, with extra filling in the bottom so the puppy sits without tipping.
- R15: (sc, dec) around. [12] (6 decreases → 18 − 6 = 12 ✓)
- R16: dec around. [6] (6 decreases → 12 − 6 = 6 ✓)
FO, close the hole as for the head, and weave in. The closed R1 end is the bottom (sit surface); the R16 end is the neck, where the head will sit.
5 — Legs (make 4)
Color A. Four matching stubby cylinders. Do not overstuff.
- R1: 6 sc in MR. [6]
- R2: inc in each st. [12] (6 increases → 6 + 6 = 12 ✓)
- R3–R5: sc around. [12] (3 even rounds)
- Stuff lightly — just enough to hold the tube shape.
- FO, leaving a 10" (25 cm) tail for sewing. Leave the top open; you will sew the open edge to the body.
Make four. Set aside.
6 — Ears (make 2)
Color B. Floppy, unstuffed, flattened ovals.
- R1: 6 sc in MR. [6]
- R2: inc in each st. [12] (6 increases → 6 + 6 = 12 ✓)
- R3: (sc, inc) around. [18] (6 increases → 12 + 6 = 18 ✓)
- R4–R7: sc around. [18] (4 even rounds)
- R8: (sc, dec) around. [12] (6 decreases → 18 − 6 = 12 ✓)
FO, leaving a 10" (25 cm) tail. Do not stuff. Flatten each ear so it becomes a rounded teardrop. The R1 end is the tip; the open R8 edge is sewn to the head.
7 — Snout & tail
Snout — Color C
- R1: 6 sc in MR. [6]
- R2: inc in each st. [12] (6 increases → 6 + 6 = 12 ✓)
- R3–R4: sc around. [12] (2 even rounds)
- Stuff lightly. FO, leaving an 8" (20 cm) tail. Leave the top open.
Tail — Color A (or Color B for a tipped tail)
- R1: 6 sc in MR. [6]
- R2–R5: sc around. [6] (4 even rounds)
- Stuff very lightly or not at all. FO, leaving an 8" (20 cm) tail.
Optional spots — Color B (make 2 or 3)
- R1: 6 sc in MR, sl st to first sc to join. [6]
- FO, leaving a 6" (15 cm) tail. These are flat circles.
Optional collar — contrast chunky or ribbon
- Crochet: Ch 28, sc in 2nd ch from hook and in each ch across. [27] FO, leaving tails to sew.
- Or cut 12" (30 cm) of ribbon.
8 — Face, assembly & finishing
Use the yarn tails and a yarn needle. Pin first, sew second. Whip stitch through the stitches closest to the surface so seams stay neat.
A. Snout
Pin the open edge of the snout to the front of the head, centered under the eyes, covering about R11–R14. The top of the snout should sit just below the eyes, not covering them. Whip stitch all the way around, adding a pinch more stuffing before the last 4 stitches if the muzzle looks flat.
B. Nose and mouth (Color D)
On the front of the snout, satin-stitch a small rounded triangle nose (about ½" / 1.5 cm wide). From the bottom point of the nose, backstitch a short vertical line, then a shallow W or a tiny inverted Y for the smile. Tie off inside the head.
C. Embroidered eyes (only if you skipped safety eyes)
Satin-stitch two ovals in Color D between R9 and R10, 7 sts apart. Add a tiny Color C highlight stitch on each eye if you like.
D. Ears
Pin the flattened open edges to the sides of the head over R4–R7, just behind the eye line, about 4 sts back from the side of each eye. They should flop outward and slightly forward. Whip stitch the open edge only; let the rest hang.
E. Head to body
Pin the head onto the neck end of the body (the R16 end), tilted a little forward for a curious look. The head is larger than the body — that is the chibi proportion. Whip stitch around twice for strength. The sit-bottom (R1 of the body) stays flat on the table.
F. Legs — sitting pose
- Front legs (2): Pin open edges to the front of the body, low on the tummy, about 1" (2.5 cm) apart, hanging down so the puppy’s “elbows” rest near the sit line.
- Back legs (2): Pin to the lower sides/back of the body, angled out and slightly forward so they act like sitting haunches. The bottoms of all four legs should touch the table with the body.
Sew each open edge down firmly. If a leg wants to splay, take a tiny tack stitch through the inner side into the body.
G. Tail
Sew the open edge to the lower back of the body, just above the sit line, slightly off-center is fine. A little upward tilt reads as a wag.
H. Spots (optional)
Tack 2–3 Color B circles onto one side of the body or one haunch. A single spot over one eye is extra cute — sew it on the head after the ears.
I. Collar (optional)
Wrap the crocheted strip or ribbon around the neck seam. Sew or tie at the back. Keep it snug but not tight.
J. Blush (optional)
Dot a little pink on each cheek, just below and outside the eyes. Soft lighting loves this.
K. Weave in every remaining end. Give the puppy a squeeze to settle the stuffing. Stand it on a table — it should sit on its own.
Finishing checklist
- Head closed and firmly stuffed
- Eyes secure (washers on, or embroidery locked)
- Snout, ears, legs, and tail all pinned then sewn
- No gaps at the neck seam
- Sits upright without tipping (add stuffing to the body bottom if it wobbles)
- All ends woven in
- If gifting to a child under 3: no safety eyes, no ribbon collar (use embroidered eyes and a sewn-on crochet collar with ends buried)
Size notes
With chunky yarn and a US H-8 (5.0 mm) hook at the stated gauge, the head is about 4¼" (11 cm) across and the sitting toy is about 8½" (22 cm) to the ear tips. A bulkier yarn or a larger hook grows the pup; a tighter gauge or a US G-6 (4.0 mm) hook shrinks it. The stitch counts stay the same.
Enjoy Your Handmade Puppy!
A cozy, sit-down companion in Honey Gold and Cocoa — handmade, hug-ready, and stitched with simple magic. Set it on a shelf, tuck it in a gift bag, or keep it where the tail can (almost) wag.
Soft light, tight stitches, happy pup.
Disclaimer: This pattern was generated by AI and should be reviewed for accuracy before use. While we strive for quality, AI-generated content may contain errors. Please verify measurements, stitch counts, charts, and instructions before beginning your project. Generated by purlJam.uk
Love this pattern?
Save this pattern to your free PurlJam libraryAccess your pattern anytime
Bookmark this page to access your pattern anytime