Type
Crochet
Difficulty
intermediate
Category
amigurumi
AI Thinking Process
Planning
Verification
Pattern
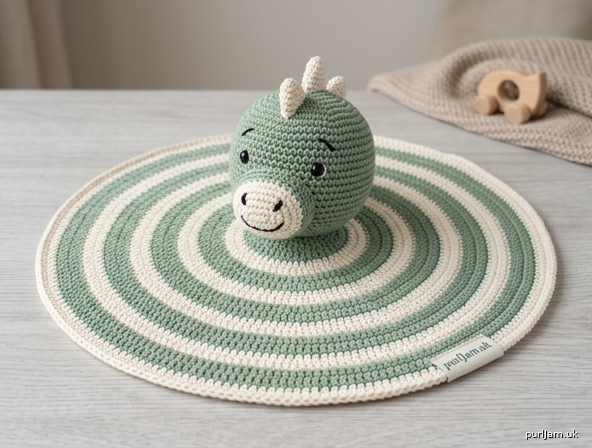
Dexter the Dino Comforter
An Amigurumi Dinosaur Lovey Pattern
A soft, huggable dinosaur head attached to a security-blanket circle — perfect for naptime cuddles, prams, and gifting. Beginner-friendly amigurumi with simple flat spikes and optional color-change stripes.
Skill level: Easy
Finished size
- Blanket: approx. 12" (30 cm) diameter
- Head: approx. 4½" (12 cm) tall
Materials
- Yarn: DK weight (light worsted / 8-ply) cotton or cotton-blend
- Main color (MC) – head & blanket base (e.g. sage green) — approx. 150 g
- Contrast color (CC) – spikes, snout option & blanket stripes (e.g. cream or mustard) — approx. 40 g
- Small scraps of black (and white if desired) for embroidered eyes, nostrils & smile
- Hook: US E-4 / 3.5 mm (or size needed for a tight, dense fabric)
- Notions: Stitch marker, yarn needle, polyester fiberfill, scissors, pins
- Optional: 12 mm safety eyes (only if the lovey is for ages 3+)
Safety note: For children under 3 years, embroider the eyes with yarn. Do not use plastic safety eyes, buttons, or beads — they are a choking hazard if they work loose. Sew every spike and the neck join firmly and tug-test before gifting.
Gauge
Gauge is not critical for fit, but the fabric must be tight and dense so stuffing does not show.
Target: 18 sc × 20 rows/rnds = 4" × 4" (10 cm × 10 cm) in single crochet.
Adjust hook size if your stitches are loose.
Abbreviations (US terms)
| Abbr. | Meaning |
|---|---|
| ch | chain |
| sc | single crochet |
| inc | increase (2 sc in same st) |
| dec | invisible decrease (see tip below) |
| st(s) | stitch(es) |
| sl st | slip stitch |
| MR | magic ring |
| FLO | front loop only |
| rnd(s) | round(s) |
| ( ) | work instructions in parentheses as a set |
| [ ] | stitch count at end of rnd/row |
| * * | repeat instructions between asterisks |
Invisible decrease (dec): Insert hook FLO of next st, then FLO of following st (2 loops on hook), yo, pull through both FLO, yo, pull through 2 loops on hook. (1 st decreased)
Pattern notes
- Head and snout are worked in continuous spirals (do not join rnds). Mark the first st of every rnd and move the marker up as you go.
- Blanket is worked in joined rnds so the circle stays flat and neat for color changes.
- Stuff the head firmly as you decrease; add extra fill at the neck during assembly.
- US terms throughout. Imperial measurements first; metric in parentheses.
Part 1: Head (make 1 — MC)
Worked in continuous rnds.
Rnd 1: MR, 6 sc in ring. [6]
Rnd 2: Inc in each st around. [12] (6 inc → 6 + 6 = 12 ✓)
Rnd 3: Sc 1, inc around. [18] (6 inc → 12 + 6 = 18 ✓)
Rnd 4: Sc 2, inc around. [24] (6 inc → 18 + 6 = 24 ✓)
Rnd 5: Sc 3, inc around. [30] (6 inc → 24 + 6 = 30 ✓)
Rnd 6: Sc 4, inc around. [36] (6 inc → 30 + 6 = 36 ✓)
Rnds 7–14: Sc in each st around. [36] (8 even rnds)
Eye placement (do this before decreasing further):
Embroider eyes (or install safety eyes if age 3+) between Rnds 9–11, spaced about 5–6 sts apart at the front of the head. They will sit just above the snout.
Rnd 15: Sc 4, dec around. [30] (6 dec → 36 − 6 = 30 ✓)
Rnd 16: Sc 3, dec around. [24] (6 dec → 30 − 6 = 24 ✓)
— Stuff firmly now; continue adding small amounts of fill as you close —
Rnd 17: Sc 2, dec around. [18] (6 dec → 24 − 6 = 18 ✓)
Rnd 18: Sc 1, dec around. [12] (6 dec → 18 − 6 = 12 ✓)
Rnd 19: Dec around. [6] (6 dec → 12 − 6 = 6 ✓)
Fasten off, leaving a 12" (30 cm) tail. Thread tail through FLO of remaining 6 sts, pull tight to cinch closed, and weave in securely. The closed end is the top of the head; the open-looking neck edge from the even rnds will be sewn to the blanket (you will stitch through Rnds 14–16 area at the base).
Part 2: Snout (make 1 — MC or CC)
Worked in continuous rnds.
Rnd 1: MR, 6 sc in ring. [6]
Rnd 2: Inc in each st around. [12] (6 + 6 = 12 ✓)
Rnd 3: Sc in each st around. [12]
Rnd 4: Dec around. [6] (12 − 6 = 6 ✓)
Stuff lightly. Flatten into a small oval.
Sew snout to the lower front of the head, covering Rnds 10–13, centered between the eyes.
With black yarn, embroider two small nostrils on the snout tip and a gentle curved smile just under the snout.
Part 3: Back Spikes (make 5 — CC)
Worked flat. Make graduated sizes: 2 small, 2 medium, 1 large. Leave long tails for sewing.
Small spike (make 2)
Row 1: Ch 2, 3 sc in 2nd ch from hook. [3]
Row 2: Ch 1, turn; inc, sc 1, inc. [5] (3 + 2 = 5 ✓)
Row 3: Ch 1, turn; sc in each st across. [5]
Fasten off.
Medium spike (make 2)
Row 1: Ch 2, 3 sc in 2nd ch from hook. [3]
Row 2: Ch 1, turn; inc, sc 1, inc. [5]
Row 3: Ch 1, turn; inc, sc 3, inc. [7] (5 + 2 = 7 ✓)
Row 4: Ch 1, turn; sc in each st across. [7]
Fasten off.
Large spike (make 1)
Row 1: Ch 2, 3 sc in 2nd ch from hook. [3]
Row 2: Ch 1, turn; inc, sc 1, inc. [5]
Row 3: Ch 1, turn; inc, sc 3, inc. [7]
Row 4: Ch 1, turn; inc, sc 5, inc. [9] (7 + 2 = 9 ✓)
Row 5: Ch 1, turn; sc in each st across. [9]
Fasten off.
Spike placement: Pin in a line from just behind the eyes, over the crown, and down the back of the head toward the neck: small → medium → large (center top) → medium → small. Whip-stitch each spike firmly through both layers of the spike base and into the head. Weave ends inside the head.
Part 4: Comforter Blanket (joined rnds — MC & CC)
Worked flat in joined rnds so it lies smooth. Each increase rnd adds 8 sts (correct for a flat sc circle).
Rnd 1: With MC, ch 4, sl st to first ch to form a ring. Ch 1, 8 sc into ring, sl st to first sc to join. [8]
Rnd 2: Ch 1, inc in each st around, sl st to join. [16] (8 + 8 = 16 ✓)
Rnd 3: Ch 1, sc 1, inc around, sl st to join. [24] (16 + 8 = 24 ✓)
Rnd 4: Switch to CC (or continue MC). Ch 1, sc 2, inc around, sl st to join. [32] (24 + 8 = 32 ✓)
Rnd 5: Ch 1, sc 3, inc around, sl st to join. [40] (32 + 8 = 40 ✓)
Rnd 6: Switch to MC. Ch 1, sc 4, inc around, sl st to join. [48] (40 + 8 = 48 ✓)
Rnd 7: Ch 1, sc 5, inc around, sl st to join. [56] (48 + 8 = 56 ✓)
Rnd 8: Ch 1, sc 6, inc around, sl st to join. [64] (56 + 8 = 64 ✓)
Rnd 9: Switch to CC (optional stripe). Ch 1, sc 7, inc around, sl st to join. [72] (64 + 8 = 72 ✓)
Rnd 10: Ch 1, sc 8, inc around, sl st to join. [80] (72 + 8 = 80 ✓)
Rnd 11: Switch to MC. Ch 1, sc 9, inc around, sl st to join. [88] (80 + 8 = 88 ✓)
Rnd 12: Ch 1, sc 10, inc around, sl st to join. [96] (88 + 8 = 96 ✓)
Rnd 13: Switch to CC (optional). Ch 1, sc 11, inc around, sl st to join. [104] (96 + 8 = 104 ✓)
Rnd 14: Ch 1, sc 12, inc around, sl st to join. [112] (104 + 8 = 112 ✓)
Rnd 15: Switch to MC. Ch 1, sc 13, inc around, sl st to join. [120] (112 + 8 = 120 ✓)
Rnd 16: Ch 1, sc 14, inc around, sl st to join. [128] (120 + 8 = 128 ✓)
Rnd 17: Switch to CC (optional). Ch 1, sc 15, inc around, sl st to join. [136] (128 + 8 = 136 ✓)
Rnd 18: Ch 1, sc 16, inc around, sl st to join. [144] (136 + 8 = 144 ✓)
Rnd 19: Switch to MC. Ch 1, sc 17, inc around, sl st to join. [152] (144 + 8 = 152 ✓)
Rnd 20: Ch 1, sc 18, inc around, sl st to join. [160] (152 + 8 = 160 ✓)
Rnd 21: Ch 1, sc 19, inc around, sl st to join. [168] (160 + 8 = 168 ✓)
— At gauge, 168 sts ≈ 12" (30 cm) diameter ✓ —
Rnds 22–24 (edge band): Ch 1, sc in each st around, sl st to join. [168]
Change color every rnd or every other rnd if you want a striped border; or work all three rnds in MC for a solid rim.
Fasten off. Weave in all ends. Lightly steam-block flat (cotton holds blocking well). Do not iron heavily or crush the stitches.
Color-change tip: When switching colors at the join, finish the last yo of the final sc of the rnd with the new color, then ch 1 in the new color to start the next rnd.
Assembly
- Lay the blocked blanket flat. Position the head at one edge so the base of the head (neck area, roughly Rnds 14–16) overlaps the blanket edge by about ¾–1" (2 cm). The snout should face inward over the blanket; spikes run front-to-back along the head.
- Pin securely. With MC and yarn needle, whip-stitch through the head wall and through the blanket stitches all the way around the neck contact zone.
As you sew, tuck a little extra fiberfill into the neck join so the head sits upright and the join feels firm — no gaps. - Tug-test the head and every spike. Reinforce any loose stitches.
- Weave in remaining ends on the blanket underside.
- Steam-block once more if needed so the blanket lies completely flat around the head.
Finishing tips
- Striped tummy look: Work snout and all spikes in CC against an MC head.
- Palette ideas: Sleepy pastel (lilac + mint), jungle (olive + brown), or classic (sage + mustard).
- Size up: For a toddler version, add 2–4 more even rnds on the head after Rnd 14 (before decreasing) and continue blanket increase rnds to 20 sc between incs (or beyond) before the even edge band.
- No-sew eyes: Satin-stitch ovals in black; add a tiny white highlight stitch for a friendly sparkle.
- Gift-ready: Pair with a printed care card — gentle wash, reshape, air dry.
Care
Hand wash or gentle machine wash cool in a mesh bag. Reshape blanket flat; air dry. Do not tumble on high heat if using acrylic blend stuffing near the neck join.
Pattern for personal and small-batch handmade use. Please do not mass-produce or resell this written pattern as your own.
Dexter the Dino Comforter — easy DK lovey amigurumi
Happy stitching!
Disclaimer: This pattern was generated by AI and should be reviewed for accuracy before use. While we strive for quality, AI-generated content may contain errors. Please verify measurements, stitch counts, charts, and instructions before beginning your project. Generated by purlJam.uk
Love this pattern?
Save this pattern to your free PurlJam libraryAccess your pattern anytime
Bookmark this page to access your pattern anytime