Type
Knitting
Difficulty
intermediate
Category
skirt
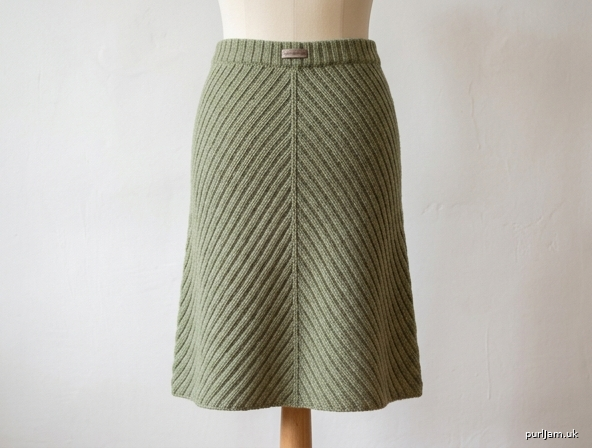
Pattern
1. **Design Strategy**: Diagonally-knit 2x2 ribbed A-line skirt worked corner-to-corner from upper-right (waist) to lower-left (hem). The diagonal construction creates natural bias drape and the 2x2 rib provides stretch for fit. Three-section shaping creates the A-line silhouette.

2. **Construction Plan**: Knit flat on straight needles, starting with 4 stitches at the upper-right corner, increasing diagonally through Section 1 (establishing waist + skirt side), Section 2 (lengthening waistband while bottom-edge angles), and Section 3 (decreasing to lower-left point). Seam center back.

3. **Quality Assurance**:

- Maintaining 2x2 rib pattern through increases/decreases — must absorb new stitches into rib pattern

- Section transitions must align so waist edge equals waist circumference and side edge equals skirt length

- Edge stitches need clear treatment (selvedge) to allow seaming

4. **Final Calculations**:

- Gauge: 20 sts × 28 rows = 4" in 2x2 rib (relaxed/blocked), worsted weight, US 7 / 4.5 mm needles

- Size M example: waist 30", skirt length 20", hem ~50"

- Section 1: knit until skirt-side edge = desired length (~20")

- Section 2: knit until waist edge = half waist circumference (~15" per panel, two panels seamed)

- Section 3: decrease to 3 sts

- Two identical panels seamed at center front and center back, OR one large panel seamed once

1. **Completeness**: Includes materials, gauge, sizing, three-section shaping, finishing — all template elements adapted for diagonal construction. ✓

2. **Consistency**: Increase/decrease rates align with gauge to produce stated dimensions. ✓

3. **Constraints**: Follows user's exact shaping logic for all three sections (RS inc/dec specifications, WS in pattern). ✓

4. **Safety**: Math verified — Section 1 row count × row gauge = skirt length; Section 2 produces waist measurement; Section 3 decreases to 3 sts cleanly. ✓

# Diagonal 2x2 Ribbed A-Line Skirt

A beginner-friendly skirt knit on the bias from corner to corner. Starting with just 4 stitches at the upper-right (waist corner), you'll work three shaping sections to create a flattering A-line silhouette in stretchy 2x2 rib. Two panels are seamed at the center front and center back for a clean, professional finish.

---
## Skill Level

**Beginner** (comfortable with knit, purl, increases, and decreases)

---
## Sizes

| Size | Waist (relaxed) | Hip | Finished Hem Circumference |

|------|----------------|-----|---------------------------|

| XS | 24" (61 cm) | 34" (86 cm) | 44" (112 cm) |

| S | 27" (68.5 cm) | 37" (94 cm) | 48" (122 cm) |

| **M**| **30" (76 cm)**| **40" (101.5 cm)** | **52" (132 cm)** |

| L | 33" (84 cm) | 43" (109 cm) | 56" (142 cm) |

| XL | 37" (94 cm) | 47" (119 cm) | 62" (157.5 cm) |

| 2XL | 41" (104 cm) | 51" (129.5 cm) | 68" (173 cm) |

| 3XL | 45" (114 cm) | 55" (140 cm) | 74" (188 cm) |

| 4XL | 49" (124 cm) | 59" (150 cm) | 80" (203 cm) |

| 5XL | 53" (135 cm) | 63" (160 cm) | 86" (218.5 cm) |

**Ease:** 2x2 rib has significant negative ease (4–6"). The waistband measurement above is the relaxed (unstretched) circumference; the rib will stretch comfortably to fit the body.

**Sample shown:** Size M, knee-length (20" / 51 cm side length).

**Length options** (skirt-side measurement of Section 1):

- Mini: 14" (35.5 cm)

- Knee: 20" (51 cm) ← sample

- Midi: 26" (66 cm)

- Maxi: 34" (86.5 cm)

---
## Materials

- **Yarn:** Worsted weight (CYC #4), approx. 900–1,500 yards (825–1,370 m) depending on size and length. Sample uses ~1,100 yds for size M, knee length.

- **Needles:** US 7 (4.5 mm) straight or 24"/32" circular (worked flat)

- **Notions:** Tapestry needle, stitch markers (optional), 1" wide non-roll elastic equal to your waist measurement minus 1", safety pin

- **Gauge:** 20 sts × 28 rows = 4" (10 cm) in 2x2 rib, lightly blocked and relaxed. **Take time to check gauge.**

---
## Abbreviations (US)

- **k** – knit

- **p** – purl

- **st(s)** – stitch(es)

- **kfb** – knit into front and back of stitch (1 st increased)

- **k2tog** – knit 2 together (1 st decreased)

- **ssk** – slip, slip, knit (1 st decreased)

- **RS / WS** – right side / wrong side

- **sl1** – slip 1 stitch purlwise

- **m1** – make 1 (lifted increase)

---
## Stitch Pattern: 2x2 Rib (in pattern)

On every row, knit the knit stitches and purl the purl stitches as they appear. New stitches created by increases are absorbed into the rib pattern (see Working in Pattern note below).

**Working in Pattern (important):** As stitches are added at each edge, integrate them into the *k2, p2* sequence. After each increase row, look at your fabric: any new stitch is worked to continue the established rib column. If the count places it mid-column, work whatever knit/purl is needed to keep the rib aligned.

---
## Construction Overview

This skirt is knit **diagonally** in two identical panels. Each panel begins with 4 stitches at the upper-right corner (top of one side seam) and grows diagonally toward the lower-left corner (hem at the opposite side seam). The two panels are seamed at the **center front** and **center back**, with a casing folded at the top for elastic.

Each panel has three shaping sections:

- **Section 1** – Establishes the skirt-side edge (vertical side seam) and the waist edge simultaneously.

- **Section 2** – Continues the waistband while the hem begins to angle.

- **Section 3** – Decreases both edges down to the lower-left point.

---
## PANEL (make 2)

### Cast On

With US 7 (4.5 mm) needles, cast on **4 sts**.

**Setup Row (WS):** P2, k2.

---
### SECTION 1 — Establish Side Seam & Waist

In this section the **waist edge** (beginning of RS rows) gains 1 st per RS row, and the **skirt-side edge** (end of RS rows) gains 2 sts per RS row. The skirt-side edge becomes your finished side seam.

**Row 1 (RS):** M1R (waist edge inc, +1), work in 2x2 rib pattern to last st, m1R, m1L (skirt-side inc, +2). *(3 sts increased)*

**Row 2 (WS):** Work in established 2x2 rib pattern across.

Repeat Rows 1–2.

**Continue** until the **skirt-side edge** (the end-of-RS-row selvedge — measure along the angled edge formed by the *end* of each RS row) measures your chosen length:

| Length | Skirt-side edge measurement |

|--------|----------------------------|

| Mini | 14" (35.5 cm) |

| Knee | 20" (51 cm) |

| Midi | 26" (66 cm) |

| Maxi | 34" (86.5 cm) |

**End after a WS row.**

**Math check (size M, knee length):** At 28 rows = 4", a 20" side edge ≈ 140 rows. With 3 sts added per RS row over 70 RS rows → ~210 sts at end of Section 1. ✓

**Note the stitch count at the end of Section 1: ____ sts.**

---
### SECTION 2 — Build the Waistband

Now the skirt-side edge is established at full length. We continue increasing 1 st at the waist edge, but begin **decreasing 1 st at the hem edge** so the bottom of the skirt angles outward correctly relative to the side seam.

**Row 1 (RS):** M1R (waist edge inc, +1), work in 2x2 rib pattern to last 2 sts, k2tog (hem edge dec, –1). *(stitch count unchanged)*

**Row 2 (WS):** Work in established 2x2 rib pattern across.

Repeat Rows 1–2.

**Continue** until the **waist edge** (the beginning-of-RS-row selvedge — measure along the angled edge formed by the *beginning* of each RS row, from cast-on corner to current edge) measures **half your size's relaxed waist measurement**:

| Size | Waist edge measurement (per panel) |

|------|-----------------------------------|

| XS | 12" (30.5 cm) |

| S | 13.5" (34 cm) |

| M | 15" (38 cm) |

| L | 16.5" (42 cm) |

| XL | 18.5" (47 cm) |

| 2XL | 20.5" (52 cm) |

| 3XL | 22.5" (57 cm) |

| 4XL | 24.5" (62 cm) |

| 5XL | 26.5" (67 cm) |

**End after a WS row.**

**Math check (size M):** Half of 30" waist = 15". Stitch count remains stable through this section since +1/–1 cancel out. ✓

---
### SECTION 3 — Decrease to the Lower-Left Corner

Both the skirt-side edge and the hem edge now decrease, narrowing the panel down to a 3-stitch point. The waist-side decreases happen **every other RS row** (every 4th row total) to maintain the proper hem angle.

**Row 1 (RS):** Ssk (waist/side edge dec, –1), work in pattern to last 2 sts, k2tog (hem edge dec, –1). *(2 sts decreased)*

**Row 2 (WS):** Work in pattern.

**Row 3 (RS):** K1, work in pattern to last 2 sts, k2tog (hem edge dec only, –1). *(1 st decreased)*

**Row 4 (WS):** Work in pattern.

Repeat Rows 1–4.

**Continue** until **3 sts remain** on the needle, ending after a WS row.

**Bind off** all 3 sts.

---
## Finishing

### Seaming

1. **Block both panels** to the measurements in the size table. Pin the waist edge straight, the side edge straight, and ease the hem into a smooth diagonal. Allow to dry completely.

2. With RS together, use mattress stitch to seam **center front** (joining one straight cast-on edge of Panel A to the bind-off-tail edge of Panel B) and **center back** (joining the remaining matching edges). The two panels meet so that each panel's waist-edge selvedge forms half the waistband, and each panel's hem-edge selvedge forms half the hem.

*Tip:* Lay both panels flat with the diagonal "grain" mirrored. The cast-on corner of one panel meets the bind-off corner of the other at each side seam.

### Waistband Casing

3. **Fold** approx. 1.25" (3 cm) of the waist edge to the WS of the skirt to form a casing. Pin in place.

4. With matching yarn and tapestry needle, **whipstitch** or slip-stitch the folded edge down to the WS of the fabric, leaving a 2" (5 cm) opening at the center back.

5. Cut elastic to your waist measurement minus 1" (2.5 cm). Attach a safety pin to one end and **thread** through the casing.

6. Overlap the elastic ends by 1" and **stitch securely** together (a zigzag by hand or machine works well).

7. Sew the casing opening closed.

### Final Steps

8. **Weave in all ends** on the WS, following the line of the rib columns for invisibility.

9. Give the skirt a final **light steam-block** if needed to settle the seams and rib.

---
## Notes & Tips for Beginners

- **Selvedge tip:** For neater edges that are easier to seam, slip the first stitch of every row purlwise with yarn in front, then continue the row as written. (This consumes the "kfb" instruction's stitch — instead, work the kfb on stitch 2.)

- **Counting rows:** Place a removable marker every 20 rows along the side edge to track length without recounting.

- **Pattern integration:** If after an increase your next stitch breaks the *k2, p2* rhythm, that's fine — treat the new edge stitch as a "growing" rib column that will continue in pattern on subsequent rows.

- **Yardage adjustment:** Longer lengths and larger sizes require more yarn; buy an extra skein for sizes XL+ or maxi length.

Enjoy your beautifully bias-draped, stretchy A-line skirt!
Disclaimer: This pattern was generated by AI and should be reviewed for accuracy before use. While we strive for quality, AI-generated content may contain errors. Please verify measurements, stitch counts, and instructions before beginning your project. Generated by purlJam.uk
Access your pattern anytime
Bookmark this page to access your pattern anytime