Type
Knitting
Difficulty
intermediate
Category
custom
AI Thinking Process
Planning
Verification
Pattern
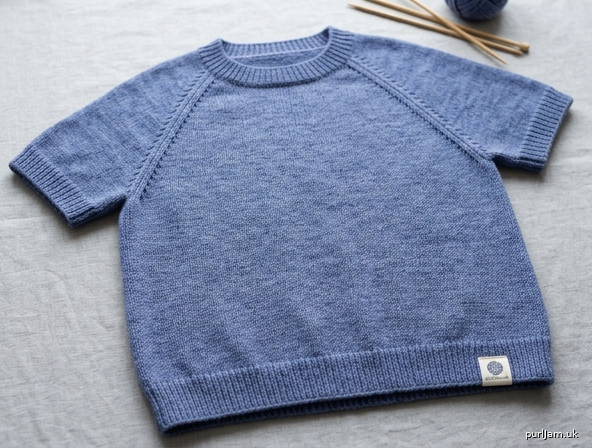
Easy Top-Down Raglan T-Shirt
A relaxed, boxy short-sleeve t-shirt worked seamlessly from the top down. Simple stockinette fabric, classic crew neck, and straightforward raglan shaping make this ideal for beginners who are comfortable knitting in the round and using stitch markers.
Materials
- Yarn: Worsted weight (category 4), approximately 700 (800, 900, 1050, 1200) yards / 640 (730, 820, 960, 1100) m. Smooth wool, cotton, or wool-blend recommended for clear stitch definition and easy care.
- Needles:
- US 8 (5 mm) 16" and 24–32" circular needles (or size needed to obtain gauge)
- US 8 (5 mm) double-pointed needles or magic-loop needle for sleeves
- US 7 (4.5 mm) 16" circular and DPNs (or one size smaller than gauge needle) for ribbing
- Notions: 4 stitch markers (one distinct for beginning of round), stitch holders or waste yarn, tapestry needle, scissors
Gauge
18 stitches and 24 rounds = 4" (10 cm) in stockinette stitch in the round on US 8 (5 mm), measured after blocking. Take time to check gauge. Adjust needle size if necessary to match gauge; fit depends on it.
Sizes
XS (S, M, L, XL) To fit bust: 32 (36, 40, 44, 48)" / 81 (91, 102, 112, 122) cm Finished bust circumference: 36 (40, 44, 48, 52)" / 91 (102, 112, 122, 132) cm Finished length (shoulder to hem): approximately 22 (22.5, 23, 23.5, 24)" / 56 (57, 58.5, 60, 61) cm Short sleeve length from underarm: 4" / 10 cm
Shown with about 4" / 10 cm positive ease. Choose size based on your bust measurement plus desired ease.
Abbreviations (US)
- BO: bind off
- BOR: beginning of round
- CO: cast on
- k: knit
- k2tog: knit 2 together (right-leaning decrease)
- kfb: knit into front and back of stitch (1 stitch increased)
- p: purl
- pm: place marker
- rnd(s): round(s)
- RS: right side
- sm: slip marker
- st(s): stitch(es)
- St st: stockinette stitch (knit every round in the round)
- WS: wrong side
Pattern Notes
- The sweater is worked top-down in one piece. Raglans are increased with easy kfb stitches.
- Markers separate Left Sleeve, Front, Right Sleeve, and Back. The unique BOR marker sits between Back and Left Sleeve.
- When instructions give a single number, it applies to all sizes. Numbers in parentheses are for each size in order.
- Sleeve stitches are placed on hold while the body is completed, then resumed.
- For a neater neckline, use a stretchy cast-on (e.g., long-tail) and do not bind off the neck too tightly.
- Beginner tip: Count your stitches after every increase round until you are comfortable with the raglan rhythm.
Pattern Instructions
Neck Ribbing
With smaller 16" circular needle (US 7 / 4.5 mm) and using a stretchy cast-on, CO 104 (112, 124, 132, 144) sts. Place BOR marker and join to work in the round, being careful not to twist.
Work 1x1 rib for 1" / 2.5 cm: Rib rnd: *K1, p1; repeat from * to end. Work 6 rnds total in rib (or until piece measures 1").
Set Up Raglan Yoke
Change to larger needle (US 8 / 5 mm).
Setup rnd: K26 (28, 31, 33, 36) for Back, pm, k26 (28, 31, 33, 36) for Right Sleeve, pm, k26 (28, 31, 33, 36) for Front, pm, k26 (28, 31, 33, 36) for Left Sleeve. (BOR marker is already in place before Back.) 104 (112, 124, 132, 144) sts total; 26 (28, 31, 33, 36) sts each section.
Yoke Increases
You will increase 8 stitches every other round (2 stitches per raglan “seam”).
Inc rnd: *K1, kfb, knit to 2 sts before next marker, kfb, k1, sm; repeat from * 3 more times.
(8 sts increased — 2 per section)
Next rnd: Knit all stitches, slipping markers.
Repeat the last 2 rounds 20 (22, 24, 26, 28) more times
(21 (23, 25, 27, 29) increase rounds total).
Stitch count after all increases:
- Back: 68 (74, 81, 87, 94) sts
- Front: 68 (74, 81, 87, 94) sts
- Each Sleeve: 68 (74, 81, 87, 94) sts
Total: 272 (296, 324, 348, 376) sts
(Verification: start 104 (112, 124, 132, 144) + 8 × 21 (23, 25, 27, 29) = 272 (296, 324, 348, 376) ✓)
Work even in St st (knit every rnd) if needed until yoke measures approximately 7.5 (8, 8.5, 9, 9.5)" / 19 (20.5, 21.5, 23, 24) cm from cast-on edge, measured straight down at center Back. (Most sizes will already be at or very near depth after the increase rounds; add plain rounds only if short of measurement.)
Divide Body and Sleeves
Divide rnd:
Knit across Back sts, remove marker,
place next 68 (74, 81, 87, 94) Right Sleeve sts onto waste yarn or holder, remove marker,
CO 8 (8, 10, 10, 12) underarm sts using backward-loop or knitted cast-on,
knit across Front sts, remove marker,
place next 68 (74, 81, 87, 94) Left Sleeve sts onto waste yarn or holder, remove marker,
CO 8 (8, 10, 10, 12) underarm sts,
knit to BOR marker.
Body stitch count: 68 + 8 + 68 + 8 = 152 (S: 74+8+74+8=164; M: 81+10+81+10=182; L: 87+10+87+10=194; XL: 94+12+94+12=212).
Final target after optional adjustment knit: we will work the body on 162 (180, 198, 216, 234) sts by increasing evenly on the next round for clean rib later and exact bust measurement.
Next rnd (adjust to final bust count): Knit, increasing 10 (16, 16, 22, 22) sts evenly spaced around the round (use m1 or kfb, spaced roughly every 15–20 sts).
Final body count: 162 (180, 198, 216, 234) sts
(Verification: 152+10=162; 164+16=180; 182+16=198; 194+22=216; 212+22=234 ✓).
These counts equal 36 (40, 44, 48, 52)" at 4.5 sts/inch ✓.
Body
Work even in St st until body measures 14 (14, 14.5, 14.5, 15)" / 35.5 (35.5, 37, 37, 38) cm from underarm, or until desired length before hem (total garment length will be yoke + this measurement + hem).
Hem Ribbing
Change to smaller needle (US 7 / 4.5 mm).
Rib rnd: *K1, p1; repeat from * to end.
(If your stitch count is even this works perfectly; all sizes are even ✓.)
Work in 1x1 rib for 1.5" / 4 cm.
BO loosely in rib pattern (use a larger needle or sewn bind-off if needed for stretch).
Sleeves (make 2 alike)
Return 68 (74, 81, 87, 94) held sleeve sts to larger DPNs or magic-loop needle.
With RS facing, rejoin yarn at center of underarm cast-on.
Pick up and knit 4 (4, 5, 5, 6) sts along first half of underarm CO,
knit across the 68 (74, 81, 87, 94) sleeve sts,
pick up and knit 4 (4, 5, 5, 6) sts along remaining underarm CO.
Place BOR marker at center underarm.
Sleeve count: 76 (82, 91, 97, 106) sts.
Next rnd (decrease to tidy underarm): Knit, decreasing 8 (10, 11, 13, 14) sts evenly around
(use k2tog spaced evenly).
Remaining sleeve sts: 68 (72, 80, 84, 92) sts
(optional further plain decrease rnd if you prefer a slightly closer short sleeve: decrease 4 more sts on next rnd to 64 (68, 76, 80, 88) — both options work; the pattern continues with 68 (72, 80, 84, 92)).
Work even in St st until sleeve measures 3" / 7.5 cm from underarm.
Sleeve Cuff
Change to smaller DPNs (US 7 / 4.5 mm).
If needed, decrease 0 (0, 0, 0, 0) or adjust by 2 sts on first rib rnd so count is even for 1x1 rib. All listed counts are even ✓.
Rib rnd: *K1, p1; repeat from * to end.
Work 1x1 rib for 1" / 2.5 cm.
BO loosely in rib.
Repeat for second sleeve.
Finishing
- Weave in all ends securely on the WS with tapestry needle.
- Block the t-shirt to finished measurements: gently soak in lukewarm water with wool wash, press out water (do not wring), and lay flat to dry, patting into shape. Pin bust, length, and sleeve width to schematic measurements if desired.
- Check that raglan lines lie flat and neck stretches comfortably over the head. If neck is tight, carefully remove bind-off and re-bind with a stretchier method, or add a round of single crochet loosely around the neck edge.
- Optional: steam lightly (if yarn allows) to set the stockinette and reduce any curling at edges before final wear.
Schematic Measurements (after blocking)
- Bust: 36 (40, 44, 48, 52)"
- Yoke depth (neck to underarm): 7.5 (8, 8.5, 9, 9.5)"
- Body length (underarm to hem): 15.5 (15.5, 16, 16, 16.5)" including hem
- Sleeve length (underarm to cuff edge): 4"
- Upper sleeve circumference: approximately 15 (16, 17.5, 18.5, 20.5)"
Enjoy your new hand-knit t-shirt! With only knit, purl, kfb, and simple decreases, this is a satisfying beginner garment that builds confidence for future top-down projects.
Disclaimer: This pattern was generated by AI and should be reviewed for accuracy before use. While we strive for quality, AI-generated content may contain errors. Please verify measurements, stitch counts, charts, and instructions before beginning your project. Generated by purlJam.uk
Love this pattern?
Save this pattern to your free PurlJam libraryAccess your pattern anytime
Bookmark this page to access your pattern anytime