Type
Crochet
Difficulty
intermediate
Category
amigurumi
AI Thinking Process
Planning
Verification
Pattern
Eevee Amigurumi
Unofficial fan-pattern crochet plush
Skill level: Intermediate
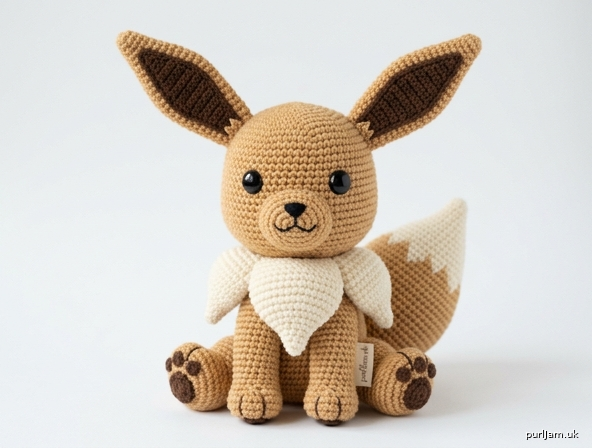
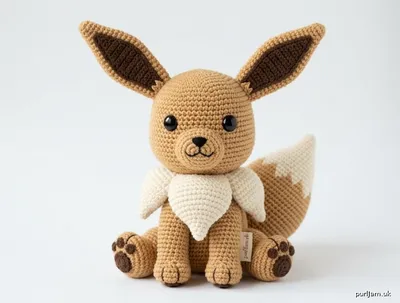
A compact, four-legged Eevee with a large head, pointed ears, a cream neck ruff, and a bushy cream-tipped tail. Pieces are worked separately and sewn together. This pattern is an independent fan design and is not affiliated with Nintendo, Game Freak, or The Pokémon Company.
Finished size: About 8 inches (20 cm) from feet to ear tips, and about 5 inches (13 cm) wide across the ruff, when worked to gauge.
Materials
- Worsted weight yarn (CYC 4):
- Color A — warm tan or light brown: about 250 yards (229 m). Two typical skeins is a safe buy.
- Color B — cream or ivory: about 80 yards (73 m)
- Color C — dark brown: about 25 yards (23 m)
- Black — scrap, about 2 yards (2 m), for the nose and mouth
- Hook: US G/6 (4.0 mm), or the size that gives a tight fabric
- 15 mm (5/8 inch) safety eyes, 1 pair. 12 mm (1/2 inch) also works.
- Polyester fiberfill, about 4 oz (113 g)
- Locking stitch marker, yarn needle, pins, scissors
Safety: Safety eyes and small sewn parts are not suitable for children under 3 years. For a baby gift, embroider the eyes with black yarn and sew every piece on very firmly.
Gauge
5 sc and 6 rounds = 1 inch (2.5 cm) in continuous spiral single crochet, worked tightly.
Gauge is a guide. The fabric must be firm enough that stuffing does not show through. If you can see stuffing, switch to US F/5 (3.75 mm) or US E/4 (3.5 mm). A different gauge changes the finished size, not the stitch counts.
Abbreviations (US)
| Abbreviation | Meaning |
|---|---|
| BLO | back loop only |
| ch | chain |
| dec | invisible decrease (see Notes) |
| FO | fasten off |
| inc | increase — 2 sc in the same stitch |
| MR | magic ring |
| rnd(s) | round(s) |
| RS | right side |
| sc | single crochet |
| sl st | slip stitch |
| st(s) | stitch(es) |
Notes
- US stitch names are used throughout. Sc is the short stitch.
- Unless a round says to join, work in a continuous spiral. Place a marker in the first stitch of the round and move it up each round.
- The collar is the exception: it is worked in joined rounds.
- Inc: 2 sc in the same stitch.
- Dec (invisible decrease): Insert the hook under the front loop only of the next stitch, then under the front loop only of the following stitch, yarn over, pull through both front loops, yarn over, pull through the two loops on the hook. A standard sc2tog may be used instead; the invisible decrease just keeps the surface smoother.
- Magic ring alternative: Ch 2, work the first-round stitches into the second chain from the hook, then tighten the tail.
- Color change: On the last stitch of the old color, insert the hook, yarn over, and pull up a loop. Yarn over with the new color and pull through both loops. Continue with the new color.
- Stuff as you go on any piece that closes completely. The head, body, legs, and tail should be firm. Ears, collar, and tufts are not stuffed.
- Parenthetical counts are the stitches you should have at the end of the round or row. Bracketed checks confirm the increases and decreases.
Piece Checklist
- Head (A) — 1
- Muzzle (A) — 1
- Outer ear (A) — 2
- Inner ear (C) — 2
- Body (A) — 1
- Leg (A) — 4
- Paw pad (C) — 4, optional
- Tail (B, then A) — 1
- Collar (B) — 1
- Standard tuft (B) — 7
- Long chest tuft (B) — 2
Head (Color A)
Worked from the crown down. Stuff firmly before the opening gets small.
Rnd 1: 6 sc in MR. (6) Rnd 2: Inc in each st. (12) [6 inc → 6 + 6 = 12 ✓] Rnd 3: (Sc, inc) 6 times. (18) [6 inc → 12 + 6 = 18 ✓] Rnd 4: (2 sc, inc) 6 times. (24) [6 inc → 18 + 6 = 24 ✓] Rnd 5: (3 sc, inc) 6 times. (30) [6 inc → 24 + 6 = 30 ✓] Rnd 6: (4 sc, inc) 6 times. (36) [6 inc → 30 + 6 = 36 ✓] Rnd 7: (5 sc, inc) 6 times. (42) [6 inc → 36 + 6 = 42 ✓] Rnd 8: (6 sc, inc) 6 times. (48) [6 inc → 42 + 6 = 48 ✓] Rnd 9: (7 sc, inc) 6 times. (54) [6 inc → 48 + 6 = 54 ✓] Rnds 10–16: Sc in each st around. (54) — 7 rounds
Safety eye placement
After Rnd 16, place the eyes before you decrease. Do not snap the washers on until the placement looks right from the front; a locked washer is very hard to remove.
- Insert the posts between Rnds 13 and 14.
- Leave 8 stitches between the posts, centered on the front of the head. Eight stitches is about 1.6 inches (4 cm), a wide, cute set on this head.
- The eye line should sit just above where the muzzle will go.
- Once you are happy, lock the washers on the inside.
Rnd 17: (7 sc, dec) 6 times. (48) [6 dec → 54 − 6 = 48 ✓] Rnd 18: (6 sc, dec) 6 times. (42) [6 dec → 48 − 6 = 42 ✓] Rnd 19: (5 sc, dec) 6 times. (36) [6 dec → 42 − 6 = 36 ✓] Rnd 20: (4 sc, dec) 6 times. (30) [6 dec → 36 − 6 = 30 ✓]
Begin stuffing. Keep the crown round and the cheeks firm.
Rnd 21: (3 sc, dec) 6 times. (24) [6 dec → 30 − 6 = 24 ✓] Rnd 22: (2 sc, dec) 6 times. (18) [6 dec → 24 − 6 = 18 ✓] Rnd 23: (Sc, dec) 6 times. (12) [6 dec → 18 − 6 = 12 ✓] Rnd 24: Dec 6 times. (6) [6 dec → 12 − 6 = 6 ✓]
FO, leaving an 8-inch (20 cm) tail. Thread the tail through the front loop of each remaining stitch, pull tight to close, and weave the end into the head.
Muzzle (Color A)
The muzzle is the same color as the head. It shows as a soft bulge; the black nose supplies the contrast. A shade slightly lighter than Color A may be used if you want a sharper edge.
Rnd 1: 6 sc in MR. (6) Rnd 2: Inc in each st. (12) [6 + 6 = 12 ✓] Rnd 3: (Sc, inc) 6 times. (18) [12 + 6 = 18 ✓] Rnd 4: (2 sc, inc) 6 times. (24) [18 + 6 = 24 ✓] Rnd 5: Sc in each st around. (24)
FO, leaving a 12-inch (30 cm) tail. Stuff lightly, just enough to dome the muzzle. Set aside for assembly.
Outer Ear (Color A) — make 2
Worked in turned rows from the tip down to the base. Ch 1 at the end of a row does not count as a stitch.
Row 1: Ch 2, 3 sc in the 2nd ch from the hook. Ch 1, turn. (3) Row 2: Inc, sc, inc. Ch 1, turn. (5) [3 + 2 = 5 ✓] Row 3: Sc in each st across. Ch 1, turn. (5) Row 4: Inc, 3 sc, inc. Ch 1, turn. (7) [5 + 2 = 7 ✓] Row 5: Sc in each st across. Ch 1, turn. (7) Row 6: Inc, 5 sc, inc. Ch 1, turn. (9) [7 + 2 = 9 ✓] Row 7: Sc in each st across. Ch 1, turn. (9) Row 8: Inc, 7 sc, inc. Ch 1, turn. (11) [9 + 2 = 11 ✓] Row 9: Sc in each st across. Ch 1, turn. (11) Row 10: Inc, 9 sc, inc. Ch 1, turn. (13) [11 + 2 = 13 ✓] Row 11: Sc in each st across. Ch 1, turn. (13) Row 12: Inc, 11 sc, inc. Ch 1, turn. (15) [13 + 2 = 15 ✓] Row 13: Sc in each st across. Do not turn. (15)
Edging: Ch 1. Sc evenly down the first side, work 3 sc in the tip, sc evenly up the second side, and sc in each of the 15 base stitches. Join with a sl st to the first sc. FO, leaving a 12-inch (30 cm) tail for sewing.
The ear is unstuffed. The edging should keep it flat. If an ear curls, pin it flat while you sew the inner ear on.
Inner Ear (Color C) — make 2
Row 1: Ch 2, 3 sc in the 2nd ch from the hook. Ch 1, turn. (3) Row 2: Inc, sc, inc. Ch 1, turn. (5) Row 3: Sc in each st across. Ch 1, turn. (5) Row 4: Inc, 3 sc, inc. Ch 1, turn. (7) Row 5: Sc in each st across. Ch 1, turn. (7) Row 6: Inc, 5 sc, inc. Ch 1, turn. (9) Row 7: Sc in each st across. Ch 1, turn. (9) Row 8: Inc, 7 sc, inc. Ch 1, turn. (11) [9 + 2 = 11 ✓] Row 9: Sc in each st across. Do not turn. (11)
Edging: Ch 1. Sc evenly down the first side, 3 sc in the tip, sc evenly up the second side, and sc in each of the 11 base stitches. Join with a sl st. FO, leaving an 8-inch (20 cm) tail.
Sew each inner ear to an outer ear, centered, with the inner tip about 2 rows below the outer tip. That leaves a tan border of about 2 stitches at each side and about 2 rows at the tip and the base. Weave in the inner-ear ends.
Body (Color A)
Worked from the belly upward. Leave the neck open.
Rnd 1: 6 sc in MR. (6) Rnd 2: Inc in each st. (12) [6 + 6 = 12 ✓] Rnd 3: (Sc, inc) 6 times. (18) [12 + 6 = 18 ✓] Rnd 4: (2 sc, inc) 6 times. (24) [18 + 6 = 24 ✓] Rnd 5: (3 sc, inc) 6 times. (30) [24 + 6 = 30 ✓] Rnd 6: (4 sc, inc) 6 times. (36) [30 + 6 = 36 ✓] Rnd 7: (5 sc, inc) 6 times. (42) [36 + 6 = 42 ✓] Rnds 8–16: Sc in each st around. (42) — 9 rounds Rnd 17: (5 sc, dec) 6 times. (36) [42 − 6 = 36 ✓] Rnd 18: (4 sc, dec) 6 times. (30) [36 − 6 = 30 ✓] Rnd 19: (3 sc, dec) 6 times. (24) [30 − 6 = 24 ✓] Rnd 20: Sc in each st around. (24)
FO, leaving a 24-inch (61 cm) tail for sewing the head on. Stuff the body firmly. Do not close the neck.
Stop here before sewing the head on. The finished ruff must be slid onto this neck first. See Assembly, Steps 4–6.
Leg (Color A) — make 4
Rnd 1: 6 sc in MR. (6) Rnd 2: Inc in each st. (12) [6 + 6 = 12 ✓] Rnd 3: (Sc, inc) 6 times. (18) [12 + 6 = 18 ✓] Rnd 4: Working in BLO, sc in each st around. (18)
The BLO round makes a small ridge where the paw meets the leg. Work through both loops again from Rnd 5 on. The magic-ring side is the sole.
Rnds 5–8: Sc in each st around. (18) — 4 rounds Rnd 9: (Sc, dec) 6 times. (12) [18 − 6 = 12 ✓]
FO, leaving a 12-inch (30 cm) tail. Stuff the paw firmly and the leg moderately. Leave the last round soft so it flattens against the body.
Paw pad (Color C) — make 4, optional
Rnd 1: 6 sc in MR. Join with a sl st to the first sc. (6)
FO, leaving a 6-inch (15 cm) tail. Sew one pad to the sole of each leg, over the magic ring, before the leg is attached to the body.
Tail
Start at the cream tip. Stuff the tip lightly, the bushy middle moderately, and the base a little more firmly so it holds an upward curve. Do not overstuff, or it will stick out straight.
Color B
Rnd 1: 6 sc in MR. (6) Rnd 2: Inc in each st. (12) [6 + 6 = 12 ✓] Rnd 3: (Sc, inc) 6 times. (18) [12 + 6 = 18 ✓] Rnd 4: (2 sc, inc) 6 times. (24) [18 + 6 = 24 ✓] Rnd 5: (3 sc, inc) 6 times. (30) [24 + 6 = 30 ✓] Rnds 6–9: Sc in each st around. (30) — 4 rounds
On the last stitch of Rnd 9, change to Color A. Cut Color B and leave a 6-inch (15 cm) tail to weave in later.
Color A
Rnd 10: (4 sc, inc) 6 times. (36) [30 + 6 = 36 ✓] Rnds 11–16: Sc in each st around. (36) — 6 rounds
For a longer tail, repeat the last round 2 more times (8 even rounds at 36 instead of 6) before decreasing. The decrease math does not change.
Rnd 17: (4 sc, dec) 6 times. (30) [36 − 6 = 30 ✓] Rnd 18: (3 sc, dec) 6 times. (24) [30 − 6 = 24 ✓] Rnd 19: (2 sc, dec) 6 times. (18) [24 − 6 = 18 ✓] Rnd 20: (Sc, dec) 6 times. (12) [18 − 6 = 12 ✓] Rnd 21: Sc in each st around. (12)
FO, leaving a 12-inch (30 cm) tail for sewing. Finish stuffing. Leave the 12-stitch opening open; it is the end that sews to the body.
Ruff
The ruff is a short flared collar with nine pointed tufts. Seven standard tufts ring the neck. Two longer tufts hang at the center of the chest.
Collar (Color B)
Joined rounds. The ch-1 at the start of a round does not count as a stitch.
Ch 24. Sl st in the first ch to form a ring, without twisting.
Rnd 1: Ch 1, sc in each ch around. Sl st in the first sc to join. (24) Rnd 2: Ch 1, (sc, inc) 12 times. Sl st to join. (36) [24 + 12 = 36 ✓] Rnd 3: Ch 1, (2 sc, inc) 12 times. Sl st to join. (48) [36 + 12 = 48 ✓] Rnd 4: Ch 1, sc in each st around. Sl st to join. (48)
FO, leaving an 18-inch (46 cm) tail for sewing the collar over the neck seam. Rnd 1 is the neck edge and matches the 24-stitch body opening. Rnd 4 is the outer edge the tufts sew to.
Standard tuft (Color B) — make 7
Row 1: Ch 2, 2 sc in the 2nd ch from the hook. Ch 1, turn. (2) Row 2: Inc in each st. Ch 1, turn. (4) [2 + 2 = 4 ✓] Row 3: Inc, 2 sc, inc. Ch 1, turn. (6) [4 + 2 = 6 ✓] Row 4: Inc, 4 sc, inc. Ch 1, turn. (8) [6 + 2 = 8 ✓] Row 5: Sc in each st across. Do not turn. (8)
Edging: Ch 1. Sc evenly down the first side, 2 sc in the tip, sc evenly up the second side, and sl st in the first st of Row 5. FO, leaving an 8-inch (20 cm) tail.
Long chest tuft (Color B) — make 2
Rows 1–4: Work as for the standard tuft. You end Row 4 with 8 sc. Ch 1, turn. Row 5: Inc, 6 sc, inc. Ch 1, turn. (10) [8 + 2 = 10 ✓] Row 6: Inc, 8 sc, inc. Ch 1, turn. (12) [10 + 2 = 12 ✓] Row 7: Sc in each st across. Do not turn. (12)
Edging: Ch 1. Sc evenly down the first side, 2 sc in the tip, sc evenly up the second side, and sl st in the first st of Row 7. FO, leaving an 8-inch (20 cm) tail.
Join the tufts to the collar
Sew the tufts to the outer edge (Rnd 4) of the collar, points facing away from the neck. Overlap neighboring bases by about 2 stitches so the fur looks continuous.
- Place the 2 long chest tufts side by side. That pair is the center front.
- Space the 7 standard tufts around the remaining edge.
- Check that nine points radiate outward and that the front pair hangs lower than the rest.
Weave in tuft ends that will be hidden. Leave the collar’s long sewing tail free.
Assembly
Use pins for every piece. Check the face from the front, and the stance from the side, before you commit to sewing. Ladder stitch (mattress stitch) gives the neatest seams. Add a pinch of stuffing to any join that looks dented before you close it.
1. Ears. Pin the ears to the top of the head over about Rnds 4–8, with about 1 inch (2.5 cm) between the inner corners. Tips point up and tilt slightly outward. The inner (dark) panels face the front. Sew them on and weave in the ends.
2. Muzzle and face. Pin the muzzle to the lower front of the head, centered under the eyes, with its top edge about 1 round below the eye posts. It should cover roughly the area of Rnds 16–20. Sew it on.
With black yarn, embroider the face:
- Nose: Satin-stitch a small triangle, about 0.4 inch (1 cm) wide, on the upper center of the muzzle.
- Mouth: A short vertical line about 0.25 inch (6 mm) down from the nose, then a small upward curve on each side, forming a shallow Y. Keep it small. Eevee’s mouth is subtle.
- Optional highlight: If the safety eyes have no molded shine, one short straight stitch in cream or white at the upper outer edge of each eye.
3. Tufts. Confirm the nine tufts are already sewn to the collar, with the long pair at center front.
4. Ruff onto the body. Slide the collar, neck edge first, down over the open neck of the body. Rest it on the shoulders, out of the way of the neck stitches. The long chest tufts point toward the front of the body. Mark center front of the body with a pin so it stays aligned with the muzzle.
5. Head to body. Pin the 24-stitch neck opening to the underside of the head, centered under the muzzle. The opening should sit over about Rnds 18–22 of the head. The face may tilt very slightly downward. Ladder-stitch the opening to the head with the body tail. Before the last 1 inch (2.5 cm) is closed, add stuffing to the neck so the join stays round. Finish the seam and knot securely.
6. Set the ruff. Slide the collar up until Rnd 1 covers the head-body seam and the tufts frame the cheeks. The long pair hangs down the center chest. With the collar tail, sew Rnd 1 to the neck, catching both head and body so the seam stays hidden. Tack any tuft that flops the wrong way with one or two stitches at its base. Do not flatten the points.
7. Legs — standing pose (default). All four feet should meet a flat surface.
- Front legs: Sew to the lower front sides of the body, over about Rnds 7–11, with about 4 stitches of body between the inner edges. Toes point forward.
- Hind legs: Sew to the lower back sides, over about Rnds 7–11, with about 8 stitches of body between the inner edges. A slightly wider back stance keeps the tail from tipping the figure over.
Stand the figure up, repin if one foot floats, then sew.
Seated pose (optional, same pieces): Sew the hind legs out to the sides at the lower body, angled forward, and sew the front legs vertically on the chest. The body rests between the hind legs. The front feet touch the surface.
8. Tail. Pin the open end of the tail to the lower back, centered, over about Rnds 10–14 of the body, just above the hind legs. Angle it up and a little to one side. Sew around the 12-stitch opening. For the classic curl, tack the middle of the tail to the side of the body or the side of the ruff with a few stitches. Do not pull the tack so tight that the tail kinks.
9. Ends. Weave in every remaining end. Gently reshape the head, ruff points, and tail with your hands.
Optional acrylic fluff
If the ruff and tail tip are acrylic, a clean soft toothbrush can fuzz the cream yarn so it looks softer. Test an inconspicuous spot first. Brushing is permanent. Do not brush cotton, wool, or the safety eyes.
Finishing Check
- Eyes are level, between Rnds 13 and 14, with 8 stitches between the posts, and the washers are locked.
- Inner ears are centered, dark side forward, with a tan border showing.
- Ruff covers the neck seam. Long tufts are at center front.
- Cream covers only the tail tip (Rnds 1–9) and the ruff.
- Four feet sit flat in the pose you chose, and the tail is tacked if you want it curled.
- All ends are woven in. No stuffing shows through the fabric.
The finished plush is for display or gentle play. If it will be handled by a young child, embroider the eyes and recheck every seam.
Disclaimer: This pattern was generated by AI and should be reviewed for accuracy before use. While we strive for quality, AI-generated content may contain errors. Please verify measurements, stitch counts, charts, and instructions before beginning your project. Generated by purlJam.uk
Love this pattern?
Save this pattern to your free PurlJam libraryAccess your pattern anytime
Bookmark this page to access your pattern anytime