Type
Crochet
Difficulty
beginner
Category
amigurumi
AI Thinking Process
Planning
Verification
Pattern
Etsy Digital Crochet Pattern
Strawberry Scoop Ice Cream Cone
A kawaii treat that never melts!
Skill level: Beginner
Format: PDF Tutorial (digital download)
Designed by: The Cozy Stitch Studio
Pattern Overview & Introduction
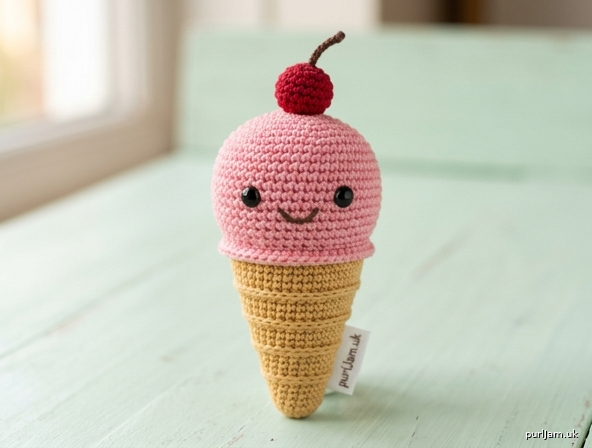
This little ice cream cone is a handful of summer that never melts. A round strawberry-pink scoop sits on a golden waffle cone, finished with a tiny cherry, a chocolate stem, and a sweet embroidered smile. The color palette is candy-shop classic: soft strawberry, warm tan, cherry red, and a touch of cocoa brown, with optional white and lemon french-knot sprinkles. It photographs beautifully, works up quickly, and uses only the basic amigurumi stitches — perfect for a first food plushie or a cheerful market make.
The charm is in the simple shapes: a sphere with a flat open base, a slowly widening cone, and a marble-sized cherry. Tight stitches keep the surface smooth, BLO ridges give the cone a baked waffle look, and a kawaii face turns a dessert into a character. Pin everything before you sew and you will get a straight, bakery-window finish every time.
FINISHED SIZE: Approximately 4 in (10 cm) tall including the cherry × 1¾ in (4.5 cm) wide at the scoop, using sport-weight cotton and a 2.5 mm hook.
ESTIMATED TIME: About 4 hours for a beginner (including first-time sewing and embroidery); about 1½–2 hours for an experienced maker.
Designer note: Please read the entire pattern before you begin. All pieces are worked in continuous spiral rounds (do not join and do not chain up at the end of a round) unless stated otherwise. Place a stitch marker in the first stitch of every round and move it up as you go. Safety eyes are a choking hazard — they are not suitable for children under 3 years. Embroider the eyes if the toy is for a baby or toddler.
Materials & Abbreviations
Yarn
Sport-weight cotton (Fine / category 2), about 125–140 yd (115–128 m) per 1.75 oz (50 g) ball. Exact colors for this design:
| Color | Name in pattern | Use | Approx. amount |
|---|---|---|---|
| A | Strawberry Pink | Scoop | ½ oz / 15 g (about 38 yd / 35 m) |
| B | Golden Tan | Cone | ⅜ oz / 12 g (about 31 yd / 28 m) |
| C | Cherry Red | Cherry | ⅛ oz / 3 g (about 8 yd / 7 m) |
| D | Cocoa Brown | Stem, smile, optional chocolate drizzle | scrap, about 2 g (5 yd / 5 m) |
| E | Cloud White | Optional eye glints and sprinkles | scrap |
| F | Lemon Yellow | Optional sprinkles | scrap |
Other materials
- Crochet hook: 2.5 mm (US B-1 / C-2)
- Safety eyes: 6 mm, 1 pair
- Polyester fiberfill stuffing
- Stitch marker
- Tapestry needle
- Sewing pins
- Scissors
- Optional: black or dark-brown embroidery floss if you prefer floss to yarn for the smile
US abbreviations
| Abbr. | Meaning |
|---|---|
| mr | Magic ring (adjustable loop; work the stated stitches into the ring and pull closed) |
| ch | Chain |
| sl st | Slip stitch |
| sc | Single crochet (US) |
| hdc | Half double crochet (US) |
| dc | Double crochet (US) |
| inc | Increase — 2 sc in the same stitch |
| dec | Decrease — single crochet 2 stitches together (invisible decrease preferred) |
| FLO | Front loop only |
| BLO | Back loop only |
| st(s) | Stitch(es) |
| FO | Fasten off |
Skill Level & Gauge Note
Skill level: Beginner. You only need a magic ring, single crochet, simple increases and decreases, BLO for texture, stuffing, and basic sewing. There is no in-the-round colorwork, no complex animal assembly, and no advanced shaping. If you can make a sphere and a tapered tube, you can make this ice cream.
Gauge note (work tightly): 8 sc × 9 rounds = 1 in (2.5 cm) in sc in the round, unblocked, with a 2.5 mm hook. Amigurumi gauge should be tight — stuffing must not show through the stitches. If your fabric looks gappy, go down to 2.25 mm. If the pieces feel stiff and tiny, relax slightly or try 2.75 mm. Exact gauge is less critical than a firm fabric; a looser gauge will grow the toy a little but must still hide the stuffing.
Detailed Step-by-Step Instructions
Work in a continuous spiral. Mark the first stitch of every round. Stuff as directed. The scoop is worked from the top (magic ring) down to an open 24-st base that matches the cone rim.
Part 1: Ice Cream Scoop
Color A (Strawberry Pink). Make 1.
Round 1: 6 sc in mr. (6 sts)
Round 2: inc in each st around. (12 sts) (6 increases → 6 + 6 = 12 ✓)
Round 3: (1 sc, inc) × 6. (18 sts) (6 increases → 12 + 6 = 18 ✓)
Round 4: (2 sc, inc) × 6. (24 sts) (6 increases → 18 + 6 = 24 ✓)
Round 5: (3 sc, inc) × 6. (30 sts) (6 increases → 24 + 6 = 30 ✓)
Rounds 6–11: sc in each st around. (30 sts) — 6 rounds
Safety eyes: Insert 6 mm safety eyes between Rounds 8 and 9, 5 stitches apart, centered on the face. Do not snap the washers until you are happy with the spacing when viewed from the front. For a child under 3, skip safety eyes and embroider them later.
Round 12: (3 sc, dec) × 6. (24 sts) (6 decreases → 30 − 6 = 24 ✓)
Round 13: sc in each st around. (24 sts)
Stuff the scoop firmly, pushing extra filling up into the magic-ring top so it stays round and does not dent. Leave the bottom open.
FO, leaving a 12 in (30 cm) tail for sewing the scoop to the cone.
📷 PHOTO NOTE: You should have a plump strawberry-pink dome about 1½ in (4 cm) tall and 1¾ in (4.5 cm) wide, open and neat at a 24-st rim, with eyes sitting on the lower half of the face. The open base is flat enough to sit on a table.
Part 2: Waffle Cone
Color B (Golden Tan). Make 1.
Work Round 1 through both loops. From Round 2 onward, work every stitch BLO for waffle ridges. Counts stay the same.
Round 1: 6 sc in mr. (6 sts)
Round 2: sc in each st around. (6 sts)
Round 3: (1 sc, inc) × 3. (9 sts) (3 increases → 6 + 3 = 9 ✓)
Round 4: sc in each st around. (9 sts)
Round 5: (2 sc, inc) × 3. (12 sts) (3 increases → 9 + 3 = 12 ✓)
Round 6: sc in each st around. (12 sts)
Round 7: (3 sc, inc) × 3. (15 sts) (3 increases → 12 + 3 = 15 ✓)
Round 8: sc in each st around. (15 sts)
Round 9: (4 sc, inc) × 3. (18 sts) (3 increases → 15 + 3 = 18 ✓)
Round 10: sc in each st around. (18 sts)
Round 11: (5 sc, inc) × 3. (21 sts) (3 increases → 18 + 3 = 21 ✓)
Round 12: sc in each st around. (21 sts)
Round 13: (6 sc, inc) × 3. (24 sts) (3 increases → 21 + 3 = 24 ✓)
Rounds 14–17: sc in each st around. (24 sts) — 4 rounds
Stuff the cone lightly to moderately — enough to hold the taper, not so much that it becomes a sausage. Leave the top ¼ in (6 mm) slightly under-stuffed so the scoop can nest.
FO, leaving a 6 in (15 cm) tail. Weave this tail to the inside; you will sew with the scoop’s longer tail.
📷 PHOTO NOTE: A golden tapered cone about 2 in (5 cm) tall, narrow at the tip and 24 sts wide at the rim, with faint horizontal waffle ridges. It should stand (or nearly stand) on its tip when empty and look like a mini waffle cone, not a cylinder.
Part 3: Cherry
Color C (Cherry Red). Make 1.
Round 1: 6 sc in mr. (6 sts)
Round 2: inc in each st around. (12 sts) (6 increases → 6 + 6 = 12 ✓)
Round 3: sc in each st around. (12 sts)
Round 4: dec × 6. (6 sts) (6 decreases → 12 − 6 = 6 ✓)
Stuff lightly before the hole closes. FO, leaving an 8 in (20 cm) tail. Thread the tail through the remaining 6 sts, pull closed, and leave the rest of the tail for sewing.
📷 PHOTO NOTE: A marble-sized red ball, about ½ in (1.3 cm) across, fully closed, with a long tail ready to stitch onto the top of the scoop.
Part 4: Stem
Color D (Cocoa Brown). Make 1.
Ch 5. Starting in the 2nd ch from the hook, sl st in each ch across. (4 sl st)
FO, leaving a 6 in (15 cm) tail at each end (or weave one end in and keep one sewing tail).
📷 PHOTO NOTE: A tiny straight brown stick about ½ in (1.3 cm) long — small enough to perch on the cherry, not a tree branch.
Helpful Tips for Success
- Pack the scoop from the top down. Push the first pinch of stuffing firmly into the magic ring so the crown stays spherical; a soft top will dent when you add the cherry.
- Treat the cone as a taper, not a tube. Light stuffing + the ×3 increase rhythm is what keeps the ice-cream silhouette. If it starts looking cylindrical, you are over-stuffing or you accidentally increased by 6.
- BLO is only on the cone. Scoop and cherry are worked through both loops for a smooth “ice cream” skin. If you BLO the scoop, the face looks striped.
- Match 24 to 24. The scoop’s open rim and the cone’s last round are the same count on purpose. Sew stitch-to-stitch so the join is a clean bakery line, not a gathered ruffle.
- Read the face from the front before you lock the eyes. Five stitches apart between Rounds 8 and 9 sits the gaze in the lower half of the scoop — that is the kawaii “looking at you” placement. Too high (near the ring) makes a surprised balloon, not a dessert.
Common Mistakes to Avoid
- Increasing the cone with × 6 repeats. That is sphere math. Cone math is × 3. (sc, inc) × 6 on Round 3 would jump 6 → 12 and ruin the taper.
- Closing the scoop. Do not decrease past 24 sts and do not gather the hole shut. You need that 24-st opening to sit on the cone.
- Snapping safety-eye washers too soon. Check spacing from the front, at eye level, in good light. Once the washer is on, it does not come off cleanly.
- Sewing the scoop on without pins. The heavy scoop rolls. Pin at 12, 3, 6, and 9 o’clock, then fill in. A crooked scoop is the #1 “homemade” look on this design.
- Overstuffing the cone tip. A rock-hard point will poke through Color B and refuse to look baked. Stuff the bottom third just until the tip holds its shape.
Assembly Instructions
Pin every piece before you sew. Use Color A’s 12 in (30 cm) tail for the main join unless noted.
- Seat the scoop. Place the open 24-st rim of the scoop onto the 24-st rim of the cone. Rotate so the eyes face directly forward. Pin at four even points (every 6 sts).
- Sew the join. Whip stitch or mattress stitch through both loops of the scoop and the BLO ridge of the cone, stitch for stitch, all the way around (24 sts). Add a last pinch of stuffing just before you close the last 4 sts if the neck looks thin. Weave the remaining tail inside the scoop.
- Place the cherry. Center it on the magic-ring top of the scoop (or nest it 1 st off-center for a casual sundae look). Pin. Sew around the base with the cherry tail, catching only Color A so stitches do not show on the face.
- Add the stem. Stitch one end of the stem into the top of the cherry so it stands about ⅜ in (1 cm) tall and tilts 10–15 degrees (not ramrod straight). Weave both brown tails into the cherry.
- Embroider the smile. With Color D (or dark-brown floss), stitch a small U-shaped smile centered between the eyes, on Round 10, about 3 sts wide and 1 round below the eye line. One or two satin stitches or a short backstitch curve is enough. Optional: a tiny vertical stitch at each eye corner for a blush-adjacent sparkle, or two small Color A satin blushes on Round 10, just outside each eye.
- Optional sprinkles. With Colors E and F (and leftover C), add 8–12 french knots scattered on Rounds 5–8 of the scoop, keeping them off the face panel between the eyes.
- Optional chocolate drizzle. With Color D, surface slip stitch a wavy line from the scoop onto the top 2 rounds of the cone at one side only.
📷 PHOTO NOTE (assembled): A standing (or slightly leaning) ice cream about 4 in (10 cm) tall: pink dome, tan waffle cone, red cherry with a little brown stem, forward-facing eyes, and a tiny smile. The scoop-to-cone line should be smooth and circular, with no stuffing showing.
Finishing Touches
- Weave in every remaining end on the inside of the piece it belongs to. Tug gently so knots bury in the stuffing, then snip close.
- If the magic ring on the scoop pokes up, thread Color A around the ring and pull slightly to flatten it before sewing on the cherry.
- Amigurumi does not need wet blocking. If the cone leans, roll it gently between your palms and stand it upright overnight, or hover a steam iron 6 in (15 cm) away — do not press.
- Shape the scoop with your thumbs so the cheeks round beside the eyes.
- Safety check: Tug eyes, cherry, and stem. If the toy is for a child under 3, embroider eyes and sew the cherry on extra securely (or omit the stem).
Display & photography for Etsy sellers: Shoot on a pale mint, cream, or marble surface in natural side light. Prop the cone in a tiny cup, next to a teaspoon, or in a child’s hand for scale. Include one overhead “menu” shot, one straight-on face shot, and one detail of the waffle BLO ridges. A three-photo set (plain, styled, in-hand) converts best.
Variations & Customization (Bonus)
- Flavor swap (easiest). Keep the cone in Golden Tan and change only Color A: vanilla cream, mint, chocolate brown, lemon, or lavender. Mix two leftover pinks in the last two scoop rounds for a “berry ripple.”
- Double scoop. Make Part 1 twice (two flavors). Sew the second scoop on top of the first, offset by 2–3 sts toward the back so it perches, then add the cherry to the upper scoop. Add about 15 g extra yarn and 45 minutes.
- Size play. For a chunky desk toy, use DK cotton and a 3.0 mm hook (about 5 in / 12.5 cm tall). For a keychain, stop the scoop at Round 4 (24 sts), work Rounds 5–8 even on 24, decrease to 18, and work a shorter cone that ends at 18 sts; add a jump ring through the cherry.
Final Notes & Copyright
Thank you so much for stitching Strawberry Scoop Ice Cream Cone! It means the world that this little dessert gets to live on your hook and, I hope, on a sunny shelf or in a happy market basket. If you share a photo, I would love to see your flavor choices.
Personal use: You may make as many cones as you like for yourself and as gifts.
Selling finished items: Yes — you may sell handmade finished ice creams at markets, on Etsy, and in your shop. Please credit The Cozy Stitch Studio as the designer (pattern name + designer in the listing is perfect).
Please do not copy, share, translate, resell, or redistribute this pattern (or any part of it), digitally or in print. The instructions, structure, and photos are copyright.
Happy stitching, and may your tension stay tight and your scoops stay round.
Thank You Message
Thank you for supporting an independent pattern designer. Every download helps a small studio keep writing clear, math-checked patterns for makers like you. If this cone made you smile, a star rating and a photo of your finished scoop are the sweetest tips I could ask for. See you in the next pattern — I’ll save you a seat at the ice cream counter.
With gratitude,
The Cozy Stitch Studio
🛍️ Bonus — Etsy Listing Kit
SEO-optimized Etsy listing TITLE
(128 characters)
Strawberry Ice Cream Cone Crochet Pattern PDF Beginner Amigurumi Food Plushie Kawaii Dessert Toy Tutorial Digital Download
Etsy listing DESCRIPTION
(about 175 words)
Treat your hook to a kawaii dessert that never melts! This beginner-friendly PDF teaches a strawberry ice cream cone plushie with a waffle-texture cone, a tiny cherry, and an embroidered smile.
🍦 What’s included
- Instant PDF download — start tonight
- Step-by-step US terms with stitch counts every round
- Exact color list and yarn amounts in grams and yards
- Safety-eye placement, stuffing notes, and assembly photos-in-words
- Tips, common mistakes, and easy flavor variations
🧶 Skill level: Beginner. Magic ring, single crochet, increase, decrease, and simple sewing. No complex colorwork.
📏 Finished size: About 4 in (10 cm) tall in sport cotton with a 2.5 mm hook.
⚡ Instant download: This is a digital crochet pattern, not a finished toy. Files are available as soon as you complete checkout. You will need a PDF reader.
Safety eyes are not for children under 3 — embroider the face instead. Finished items may be sold with designer credit; the pattern itself may not be shared or resold.
Grab your pink yarn and let’s scoop!
13 Etsy TAGS
(each under 20 characters)
- crochet pattern
- amigurumi pattern
- ice cream crochet
- food amigurumi
- beginner crochet
- kawaii crochet
- crochet plushie
- PDF crochet
- ice cream plush
- amigurumi food
- crochet toy PDF
- digital pattern
- cute dessert toy
Suggested price range
$4.99–$6.99 USD. Comparable beginner food-amigurumi PDFs (ice cream, cupcake, mushroom) typically list at $3.99–$7.50. $5.50 is a strong sweet-spot launch price; raise to $6.50 once you have reviews and listing photos of the finished cone.
Disclaimer: This pattern was generated by AI and should be reviewed for accuracy before use. While we strive for quality, AI-generated content may contain errors. Please verify measurements, stitch counts, charts, and instructions before beginning your project. Generated by purlJam.uk
Love this pattern?
Save this pattern to your free PurlJam libraryAccess your pattern anytime
Bookmark this page to access your pattern anytime