Type
Crochet
Difficulty
intermediate
Category
amigurumi
AI Thinking Process
Planning
Verification
Pattern
Fiat 500 Amigurumi Car
Intermediate crochet pattern (US terms)
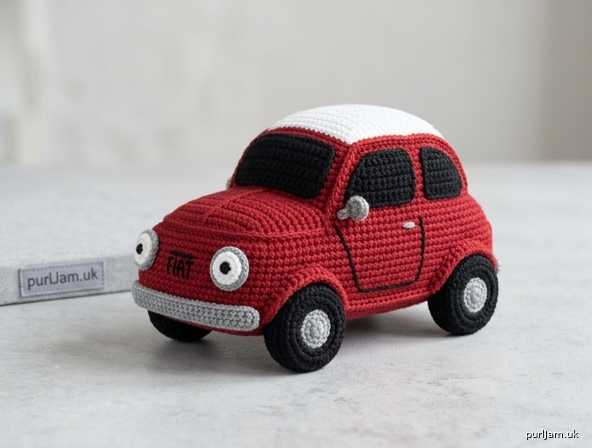
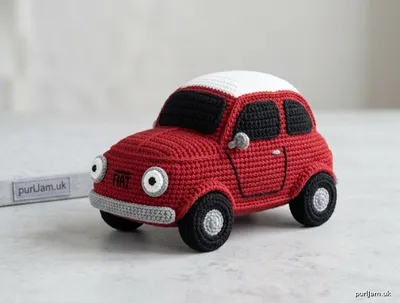
A compact, rounded Fiat 500 worked as separate amigurumi pieces: oval chassis, bubbly cabin, four wheels, and signature round headlights. Finished car is a desk-size toy, not a working model.
Finished size: About 6" long × 4" wide × 3½" tall (15 × 10 × 9 cm), including wheels, using stated yarn and gauge.
Difficulty: Intermediate — oval increases/decreases, many small pieces, and careful assembly.
Materials
Yarn: Worsted weight (category 4), acrylic or cotton blend.
- MC (body — classic red, or white, yellow, or espresso): 90 yd (82 m)
- Black (tires, window option): 40 yd (37 m)
- Gray (bumpers, hubs, mirrors, headlight rings): 20 yd (18 m)
- White (headlights; optional roof): 15 yd (14 m)
- Dark gray or black (windows/embroidery): 10 yd (9 m)
- Red or amber (taillights): 5 yd (5 m)
Hook: US E-4 / 3.5 mm (or size needed to obtain gauge; fabric should be dense so stuffing does not show)
Notions:
- Tapestry needle
- Stitch marker
- Polyester fiberfill
- Pins
- 8 mm safety eyes (optional, for headlight centers) or black embroidery yarn
- Small amount of stiff felt in black or dark gray (optional windows)
Safety note: If the car is for a child under 3 years, do not use safety eyes. Embroider headlight centers instead.
Gauge
5 sc × 5 rnds = 1" (2.5 cm) in single crochet, worked in the round.
Work a tight fabric. If your swatch is larger than 1" (2.5 cm), use a smaller hook.
Abbreviations (US)
- MR — magic ring (magic circle)
- ch — chain
- sc — single crochet
- inc — increase (2 sc in same st)
- dec — invisible decrease (sc 2 sts together through front loops)
- sl st — slip stitch
- st(s) — stitch(es)
- rnd(s) — round(s)
- FO — fasten off
- MC — main color
- rep — repeat
- BLO — back loop only
Work in continuous spirals unless noted. Do not join or turn. Mark the first st of every rnd.
Pattern notes
- Stuff the chassis into a flattened oval, not a ball — that is what makes it read as a car.
- The cabin is the “head” of this pattern: sew it onto the chassis like an animal head, set back to leave a short hood.
- Wheels are sewn to the sides of the chassis so the car sits level. They do not need to roll.
- Color-change idea: work cabin rnds 12–16 in white for a two-tone roof.
Chassis (lower body)
With MC, ch 17.
Rnd 1: 2 sc in 2nd ch from hook, sc in next 14 ch, 4 sc in last ch; rotate and work along the opposite side of the foundation ch: sc in next 14 ch, 2 sc in same ch as beginning 2-sc. [36 sts] (2 + 14 + 4 + 14 + 2 = 36 ✓)
Rnd 2: Inc in next 4 sts, sc in next 14 sts, inc in next 4 sts, sc in next 14 sts. [44 sts] (8 increases → 36 + 8 = 44 ✓)
Rnd 3: (Inc, sc) 4 times, sc in next 14 sts, (inc, sc) 4 times, sc in next 14 sts. [52 sts] (8 increases → 44 + 8 = 52 ✓)
Rnd 4: (Inc, 2 sc) 4 times, sc in next 14 sts, (inc, 2 sc) 4 times, sc in next 14 sts. [60 sts] (8 increases → 52 + 8 = 60 ✓)
Rnds 5–10: Sc in each st around. [60 sts] (6 even rnds ✓)
Rnd 11: (Dec, 2 sc) 4 times, sc in next 14 sts, (dec, 2 sc) 4 times, sc in next 14 sts. [52 sts] (8 decreases → 60 − 8 = 52 ✓)
Rnd 12: (Dec, sc) 4 times, sc in next 14 sts, (dec, sc) 4 times, sc in next 14 sts. [44 sts] (8 decreases → 52 − 8 = 44 ✓)
Stuff firmly into a flattened oval about 5¼" long × 2½" wide × 1½" tall (13.5 × 6.5 × 4 cm). Keep the top and bottom fairly flat.
Rnd 13: Dec in next 4 sts, sc in next 14 sts, dec in next 4 sts, sc in next 14 sts. [36 sts] (8 decreases → 44 − 8 = 36 ✓)
FO, leaving a 18" (45 cm) tail. Flatten the opening so the two long sides meet (18 sts facing 18 sts) and mattress-stitch closed. Weave in end.
Cabin (roof / greenhouse)
With MC, ch 12.
Rnd 1: 2 sc in 2nd ch from hook, sc in next 9 ch, 4 sc in last ch; rotate and work along the opposite side of the foundation ch: sc in next 9 ch, 2 sc in same ch as beginning 2-sc. [26 sts] (2 + 9 + 4 + 9 + 2 = 26 ✓)
Rnd 2: Inc in next 4 sts, sc in next 9 sts, inc in next 4 sts, sc in next 9 sts. [34 sts] (8 increases → 26 + 8 = 34 ✓)
Rnd 3: (Inc, sc) 4 times, sc in next 9 sts, (inc, sc) 4 times, sc in next 9 sts. [42 sts] (8 increases → 34 + 8 = 42 ✓)
Rnds 4–10: Sc in each st around. [42 sts] (7 even rnds ✓)
Begin rounded roof. (Optional: change to white at Rnd 12 for a two-tone roof.)
Rnd 11: (5 sc, dec) 6 times. [36 sts] (6 decreases → 42 − 6 = 36 ✓)
Rnd 12: (4 sc, dec) 6 times. [30 sts] (6 decreases → 36 − 6 = 30 ✓)
Rnd 13: (3 sc, dec) 6 times. [24 sts] (6 decreases → 30 − 6 = 24 ✓)
Stuff firmly, rounding the top like a Fiat 500 roof. Keep the base oval so it sits neatly on the chassis.
Rnd 14: (2 sc, dec) 6 times. [18 sts] (6 decreases → 24 − 6 = 18 ✓)
Rnd 15: (Sc, dec) 6 times. [12 sts] (6 decreases → 18 − 6 = 12 ✓)
Rnd 16: Dec 6 times. [6 sts] (6 decreases → 12 − 6 = 6 ✓)
FO, leaving a 24" (60 cm) tail. Thread tail through remaining 6 sts, pull closed, and hide end inside. Do not weave in the long tail if you prefer to use it to sew the cabin on; otherwise sew with a fresh length of MC.
Wheels (make 4)
With black.
Rnd 1: 6 sc in MR. [6 sts]
Rnd 2: Inc in each st around. [12 sts] (6 increases → 6 + 6 = 12 ✓)
Rnd 3: (Sc, inc) 6 times. [18 sts] (6 increases → 12 + 6 = 18 ✓)
Rnd 4: (2 sc, inc) 6 times. [24 sts] (6 increases → 18 + 6 = 24 ✓)
Rnds 5–6: Sc in each st around. [24 sts]
Rnd 7: (2 sc, dec) 6 times. [18 sts] (6 decreases → 24 − 6 = 18 ✓)
Stuff lightly so the wheel is a plump disc, not a sphere.
Rnd 8: (Sc, dec) 6 times. [12 sts] (6 decreases → 18 − 6 = 12 ✓)
Rnd 9: Dec 6 times. [6 sts] (6 decreases → 12 − 6 = 6 ✓)
FO, thread tail through remaining 6 sts, pull closed, and weave in. Finished wheel is about 1½" (4 cm) across.
Wheel hubs (make 4)
With gray.
Rnd 1: 6 sc in MR. [6 sts]
Rnd 2: Inc in each st around. [12 sts] (6 increases → 6 + 6 = 12 ✓)
Sl st in first sc. FO, leaving a 12" (30 cm) tail. Sew one hub to the center of each wheel.
Headlights (make 2)
With white.
Rnd 1: 6 sc in MR. [6 sts]
Rnd 2: Inc in each st around. [12 sts] (6 increases → 6 + 6 = 12 ✓)
Rnd 3: Sc in each st around. [12 sts]
Sl st in first sc. FO, leaving a 12" (30 cm) tail. Do not stuff (or stuff very lightly). Flatten into a disc.
Headlight centers (choose one):
- Safety eyes: Insert an 8 mm safety eye through the center of the white disc, then through the front of the chassis when you attach the light, and fasten the washer inside the chassis. (Only if the toy is not for children under 3.)
- Embroidered: With gray or black, satin-stitch a ¼" (6 mm) circle in the center of each disc. With gray, work a ring of surface slip stitches around rnd 2 for a chrome rim.
Taillights (make 2)
With red (or amber).
Rnd 1: 6 sc in MR. [6 sts]
Sl st in first sc. FO, leaving an 8" (20 cm) tail. Sew as flat discs to the rear of the chassis, one at each corner, just above the bumper line.
Side mirrors (make 2)
With gray (or MC).
Rnd 1: 6 sc in MR. [6 sts]
Rnd 2: Sc in each st around. [6 sts]
Sl st in first sc. FO, leaving an 8" (20 cm) tail. Flatten slightly. These are tiny — a ½" (1.5 cm) oval is correct.
Front bumper
With gray, ch 22.
Row 1: Sc in 2nd ch from hook and in each ch across. [21 sts] (22 − 1 = 21 ✓)
Row 2: Ch 1, turn; sc in each st across. [21 sts]
FO, leaving an 18" (45 cm) tail.
Rear bumper
With gray, ch 18.
Row 1: Sc in 2nd ch from hook and in each ch across. [17 sts] (18 − 1 = 17 ✓)
Row 2: Ch 1, turn; sc in each st across. [17 sts]
FO, leaving an 16" (40 cm) tail.
Windows
Choose A (crocheted panels) or B (embroidery/felt). Do not do both.
A. Crocheted panels (black or dark gray)
Windshield (make 1): Ch 11. Row 1: Sc in 2nd ch from hook and in each ch across. [10 sts] Rows 2–4: Ch 1, turn; sc in each st across. [10 sts] FO, leaving a 16" (40 cm) tail. Panel is about 2" × ¾" (5 × 2 cm).
Rear window (make 1): Ch 9. Row 1: Sc in 2nd ch from hook and in each ch across. [8 sts] Rows 2–3: Ch 1, turn; sc in each st across. [8 sts] FO, leaving a 12" (30 cm) tail.
Side windows (make 2): Ch 8. Row 1: Sc in 2nd ch from hook and in each ch across. [7 sts] Rows 2–3: Ch 1, turn; sc in each st across. [7 sts] FO, leaving a 12" (30 cm) tail.
B. Embroidery or felt
With dark gray, backstitch a windshield trapezoid on the front of the cabin (about 2" wide × ¾" tall / 5 × 2 cm), a smaller rear rectangle, and one rounded rectangle on each cabin side. Felt cut to the same shapes may be whipstitched on instead.
Assembly
Pin every piece first. Check that the car sits level and that the cabin leaves a short hood — that silhouette is the Fiat 500.
1. Cabin to chassis Place the cabin on top of the chassis with the long axis matching. Set the front edge of the cabin about 1" (2.5 cm) back from the front of the chassis so a short hood remains. The rear of the cabin should sit near the rear of the chassis (about ¼" / 6 mm of body may show). Using MC and mattress or whip stitch, sew all the way around the cabin base. Add a pinch more stuffing under the cabin front if the windshield wall looks sunken.
2. Wheels Pin one wheel to each corner of the chassis, hubs facing out. Align so:
- Front wheels sit just behind the headlight line;
- Rear wheels sit under the rear of the cabin;
- The bottom of each wheel is about ⅛" (3 mm) below the chassis so the car “sits” on its tires and does not rock.
Sew around the inner face of each wheel with black, catching chassis stitches. Wheels should be firm and even.
3. Headlights Sew the two white discs to the front face of the chassis, left and right, just above the bumper line and below the hood/cabin seam — the classic round Fiat lamps. If using safety eyes as centers, insert them now through disc and chassis before the last stitches close.
4. Taillights Sew the two red discs to the rear face of the chassis, one at each side, above the rear bumper.
5. Bumpers Sew the front bumper across the lower front of the chassis, wrapping slightly onto each side. Sew the rear bumper across the lower rear. Keep them straight and snug.
6. Side mirrors Sew one mirror to each side of the cabin, on the front third of the side wall, about halfway up — just behind the windshield line.
7. Windows Sew crocheted panels (or stitch felt/embroidery) in place:
- Windshield centered on the front wall of the cabin;
- Rear window centered on the back wall of the cabin;
- Side windows on each cabin side, behind the mirrors.
8. Optional Fiat details (embroidery, dark gray or black)
- Two or three short vertical stitches between the headlights for a grille.
- A small horizontal dash on each cabin side for a door handle (French knot or 2 wrapped stitches).
- A tiny “500” or circle badge on the hood or rear, if desired.
- A single straight stitch on each side for a door line.
Finishing
Weave in every remaining end. Steam-block lightly from the wrong side of bumpers and window panels only — do not crush the stuffed body. Shape the cabin roof with your fingers so it is rounded, not pointed.
The car should sit flat on its four wheels, show a short rounded hood, a tall greenhouse, and two round headlights. That is your Fiat 500.
Yarn / color variations
- Classic: MC red, black tires, white headlights, gray trim, black windows.
- Gelato: MC cream or pale yellow, white roof (cabin rnds 12–16), gray trim.
- Espresso: MC dark brown or black, white roof, red taillights.
- Vintage two-tone: MC body, white entire cabin.
Using a cotton worsted and the same hook will give slightly crisper edges; acrylic gives a rounder, squishier toy.
Disclaimer: This pattern was generated by AI and should be reviewed for accuracy before use. While we strive for quality, AI-generated content may contain errors. Please verify measurements, stitch counts, charts, and instructions before beginning your project. Generated by purlJam.uk
Love this pattern?
Save this pattern to your free PurlJam libraryAccess your pattern anytime
Bookmark this page to access your pattern anytime