Type
Knitting
Difficulty
intermediate
Category
custom
AI Thinking Process
Planning
Verification
Pattern
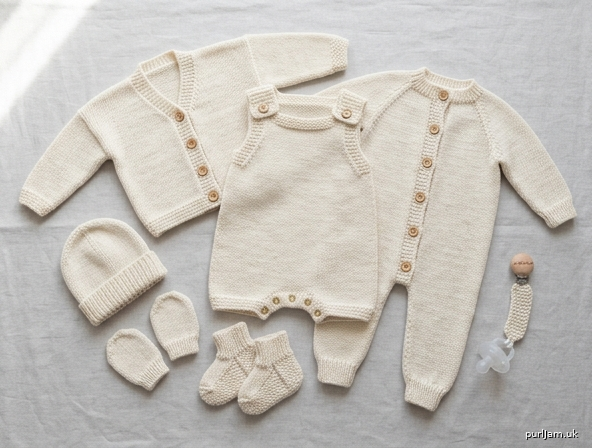
First Days Newborn Collection
A complete, matching flat-knit set for a newborn: drop-shoulder cardigan, sleeveless short-leg romper, long-sleeved jumpsuit, hat, thumbless mittens, booties and a short dummy chain. Every piece is worked on straight needles in stocking stitch with ribbed or garter trims, then seamed. Designed for a first garment project — no knitting in the round, no cables, no colourwork.
To fit: Newborn, 2.3–3.6 kg (5–8 lb)
Body chest: 39.5 cm (15½ in)
Shoulder to shoulder: 19 cm (7½ in)
Height: 43–53 cm (17–21 in)
Finished chest (cardigan, buttoned): 46 cm (18 in)
Materials
Yarn: Aran / worsted-weight (approx. 180–200 m per 100 g). Choose a soft, machine-washable baby merino, merino blend or good-quality acrylic.
| Piece | Amount |
|---|---|
| Cardigan | 100 g / 180 m |
| Romper | 80 g / 150 m |
| Jumpsuit | 150 g / 280 m |
| Hat | 30 g / 55 m |
| Mittens | 20 g / 40 m |
| Booties | 25 g / 45 m |
| Dummy chain | 10 g / 20 m |
| Full set | 450 g / 850 m (buy 5 × 100 g balls) |
Needles
- Pair of 4.5 mm (UK 7 / US 7) straight needles
- Pair of 4 mm (UK 8 / US 6) straight needles
Notions
- Stitch holders or spare yarn
- Tapestry needle
- 5 × 12 mm buttons (cardigan)
- 6 × 12 mm buttons (jumpsuit)
- 2 × 12 mm buttons (romper shoulders)
- 3 poppers / press studs (romper crotch)
- 1 commercially made breakaway dummy clip (dummy chain)
- Small amount of smooth waste yarn for holders
Tension (gauge)
20 stitches and 28 rows = 10 cm (4 in) over stocking stitch on 4.5 mm needles, after light blocking.
Always knit a tension square of at least 12 × 12 cm and measure the centre 10 cm. If you have too many stitches to 10 cm, change to a larger needle; if too few, change to a smaller needle. Rib and garter will measure slightly differently; this does not matter provided stocking stitch matches.
Abbreviations
| Abbrev. | Meaning |
|---|---|
| alt | alternate |
| beg | beginning |
| cm | centimetre(s) |
| cont | continue |
| dec | decrease(s) / decreasing |
| foll | following |
| g st | garter stitch (knit every row) |
| in | inch(es) |
| inc | increase(s) / increasing |
| k | knit |
| k2tog | knit 2 stitches together (right-leaning decrease) |
| kfb | knit into front and back of stitch (1 stitch increased) |
| p | purl |
| p2tog | purl 2 stitches together |
| pm | place marker |
| rem | remain(ing) |
| rep | repeat |
| RS | right side |
| ssk | slip 1 knitwise, slip 1 knitwise, knit both slipped stitches together through the back loops (left-leaning decrease) |
| st(s) | stitch(es) |
| st st | stocking stitch (RS knit, WS purl) |
| tbl | through the back loop |
| tog | together |
| WS | wrong side |
| yo | yarn over (bring yarn forward, then over the needle) |
Pattern notes
- The whole collection is knit flat on two needles and seamed. Never join in the round.
- Stocking stitch curls at the edges; rib and garter borders are included to control this. Seams also settle the fabric.
- Integral garter bands: the first or last 5 stitches of each front are knitted every row. No stitches are picked up for button bands.
- Buttonholes (5-st garter band): on a RS row, work
k2, yo, k2tog, k1over those 5 stitches. - Drop-shoulder sleeves are sewn into a straight armhole — no sleeve-cap shaping.
- Mattress stitch gives the neatest seams. Work with the right sides facing you, one stitch in from the edge.
- Yarn overs in buttonholes: knit the yo through the back loop on the next row if the hole looks too large; otherwise knit it as a normal stitch.
- Do not use long ribbons or ties around wrists, neck or dummy hardware.
- Weave in ends securely on the wrong side; baby garments are chewed and washed hard.
- Lightly block each piece by patting it into shape on a towel. Do not stretch rib.
Size note. These numbers are written for a smaller newborn (5–8 lb). The finished chest of 46 cm (18 in) gives about 6.5 cm (2½ in) of ease over a 39.5 cm chest.
1. Cardigan
A classic drop-shoulder cardigan with integral garter button bands and ribbed hems. Buttons on the left front as worn; buttonholes on the right front.
Finished measurements
- Chest, buttoned: 46 cm (18 in)
- Length: 24 cm (9½ in)
- Sleeve seam: 14 cm (5½ in)
- Upper sleeve: 18 cm (7 in)
Back
With 4 mm needles, cast on 46 sts.
Rib row 1 (RS): *K1, p1; rep from * to end.
Rib row 2 (WS): *K1, p1; rep from * to end.
These 2 rows form 1×1 rib. Work 8 rows in total.
Change to 4.5 mm needles.
Beginning with a knit row, work in st st until the back measures 14 cm (5½ in) from the cast-on edge, ending with a WS row.
Shape armholes
Cast off 3 sts at beg of next 2 rows. 40 sts (46 − 3 − 3 = 40 ✓).
Cont in st st until the armhole measures 10 cm (4 in) and the whole back measures 24 cm (9½ in), ending with a WS row.
Cast-off row (RS): Cast off 12 sts, k until there are 16 sts on the right needle after the cast-off, cast off rem 12 sts. Fasten off. The centre 16 sts are the back neck (12 + 16 + 12 = 40 ✓). Each shoulder is 6 cm; the neck is 8 cm.
Left front (as worn)
With 4 mm needles, cast on 26 sts.
Rib row 1 (RS): *K1, p1; rep from * to last 6 sts, k1, k5.
Rib row 2 (WS): K5, *k1, p1; rep from * to last st, k1.
The last 5 sts of a RS row (first 5 of a WS row) are the garter button band and are knitted every row from now on.
Work 8 rows in this rib/garter set-up.
Change to 4.5 mm needles.
Next row (RS): Knit.
Next row (WS): K5, purl to end.
Rep these 2 rows until the front measures 14 cm (5½ in) from the cast-on edge, ending with a WS row.
Shape armhole
Next row (RS): Cast off 3 sts, knit to end. 23 sts (26 − 3 = 23 ✓).
Next row: K5, purl to end.
Cont as set until the armhole measures 6 cm (2¼ in) and the front measures 20 cm (8 in) from the cast-on edge, ending with a RS row.
Shape neck
Next row (WS): Cast off 6 sts, purl to end. 17 sts (23 − 6 = 17 ✓).
Now decrease 1 st at the neck edge on the next 5 RS rows as follows:
Dec row (RS): Knit to last 2 sts, k2tog.
WS rows: Purl.
12 sts remain (17 − 5 = 12 ✓).
Work straight until the armhole measures 10 cm (4 in) to match the back, ending with a WS row. Cast off 12 sts.
Right front (as worn)
With 4 mm needles, cast on 26 sts.
Rib row 1 (RS): K5, *p1, k1; rep from * to last st, p1.
Rib row 2 (WS): *K1, p1; rep from * to last 6 sts, k1, k5.
The first 5 sts of a RS row are the garter buttonhole band.
Work 8 rows in rib/garter as set, placing the first buttonhole on Rib row 5 (RS): K2, yo, k2tog, k1, rib to end.
Change to 4.5 mm needles.
Next row (RS): K5, knit to end.
Next row (WS): Purl to last 5 sts, k5.
Buttonholes. Work a buttonhole on a RS row at 7 cm, 11.5 cm, 16 cm and 20.5 cm from the cast-on edge (four more holes; five in total with the rib hole). Keep the rest of the fabric in st st with a 5-st garter band.
Cont until the front measures 14 cm (5½ in), ending with a RS row.
Shape armhole
Next row (WS): Cast off 3 sts, purl to last 5 sts, k5. 23 sts (26 − 3 = 23 ✓).
Cont as set until the front measures 20 cm (8 in), ending with a WS row.
Shape neck
Next row (RS): Cast off 6 sts, knit to end. 17 sts (23 − 6 = 17 ✓).
Decrease 1 st at the neck edge on the next 5 RS rows:
Dec row (RS): Ssk, knit to end.
WS rows: Purl to last 5 sts, k5 (once the band stitches have been cast off, purl the whole WS row).
12 sts remain (17 − 5 = 12 ✓).
Work straight to match the left front armhole depth. Cast off 12 sts.
Sleeves (make 2)
With 4 mm needles, cast on 28 sts.
Work 8 rows in 1×1 rib (*k1, p1; rep from * to end).
Change to 4.5 mm needles.
Inc row (RS): K1, kfb, knit to last 2 sts, kfb, k1. 30 sts (28 + 2 = 30 ✓).
Work 5 rows straight in st st.
Rep the last 6 rows (inc row + 5 plain rows) 3 more times. 36 sts (30 + 2 + 2 + 2 = 36 ✓; 4 increase rows in total, 8 sts added).
Work straight in st st until the sleeve measures 14 cm (5½ in) from the cast-on edge, ending with a WS row. Cast off 36 sts.
Finishing the cardigan
- Weave in ends that will be trapped in seams; leave the rest until after seaming.
- Join both shoulder seams with mattress stitch (12 sts to 12 sts each side).
- Fold each sleeve in half to find the centre of the cast-off edge. Pin that centre to the shoulder seam. Pin the sleeve top along the straight armhole (the 10 cm armhole each side of the shoulder, 20 cm in all, eases slightly onto the 18 cm sleeve top). Sew in with mattress stitch.
- Join side seams and sleeve seams in one continuous mattress-stitch line from hem to cuff.
- Sew five buttons to the left front band, opposite the buttonholes.
- Lightly block. Do not stretch the rib.
2. Romper
A sleeveless, short-legged romper. Legs are worked separately, joined at the crotch, then the body is worked up to envelope shoulders that button on the back. The crotch is left open and fastened with poppers so nappy changes are easy.
Finished measurements
- Chest: 46 cm (18 in)
- Shoulder to crotch: 22 cm (8¾ in)
- Leg length: 6 cm (2¼ in)
- Shoulder strap width: 6 cm (2¼ in)
Back
Right leg
With 4.5 mm needles, cast on 20 sts.
Row 1 (RS): Knit.
Row 2 (WS): K2, purl to last 2 sts, k2.
The 2-st garter edges keep the leg hems flat.
Rep these 2 rows until the leg measures 6 cm (2¼ in), ending with a WS row. Break yarn and leave these 20 sts on a holder.
Left leg
Work exactly as the right leg, but do not break the yarn.
Join for body
Next row (RS): Knit 20 sts of the left leg, turn, cable-cast-on 6 sts, turn, knit 20 sts of the right leg from the holder. 46 sts (20 + 6 + 20 = 46 ✓).
Next row (WS): Purl.
Work in st st until the body measures 12 cm (4¾ in) from the join, ending with a WS row.
Shape armholes
Cast off 4 sts at beg of next 2 rows. 38 sts (46 − 4 − 4 = 38 ✓).
Next row (RS): Knit.
Next row (WS): K3, purl to last 3 sts, k3.
The 3-st garter borders neatening the armholes are worked on every WS row from here.
Cont as set until the armhole measures 8 cm (3¼ in), ending with a WS row.
Divide for neck
Next row (RS): K12, cast off centre 14 sts, k12.
(12 + 14 + 12 = 38 ✓).
Working each side separately, keep the 3-st armhole garter edge and work 6 rows straight on the 12 shoulder sts (about 2 cm). Cast off 12 sts. Rejoin yarn to the opposite shoulder, complete to match.
Front
Work both legs and the join exactly as for the Back. 46 sts.
Work in st st until the body measures 12 cm (4¾ in) from the join, ending with a WS row.
Shape armholes
Cast off 4 sts at beg of next 2 rows. 38 sts.
Work the 3-st garter armhole borders as for the Back.
Cont until the armhole measures 4 cm (1½ in), ending with a WS row.
Divide for neck
Next row (RS): K12, cast off centre 14 sts, k12.
Working on the 12 sts of the right shoulder only (leave the left 12 on a holder):
Keep the armhole garter edge. Work 10 rows straight, then place a buttonhole on the next RS row as follows:
Buttonhole row: K3 (armhole edge), k2, yo, k2tog, k3, k2.
Work 5 more rows straight. Cast off 12 sts.
Rejoin yarn to the 12 sts of the left shoulder and work to match, placing the buttonhole as:
Buttonhole row: K2, k3, k2tog, yo, k2, k3 (armhole edge).
Work 5 more rows. Cast off.
(Front armhole 4 cm + 16 rows ≈ 6 cm = 10 cm total, matching the back ✓.)
Finishing the romper
- Join inner-leg seams with mattress stitch, starting at the hem and stopping 1.5 cm short of the centre crotch on each side. This leaves a crotch opening.
- Do not sew the shoulder seams. Overlap each front shoulder over the matching back shoulder and sew a button to the back shoulder, opposite the buttonhole. The head opening is the neck plus the unbuttoned shoulders.
- Overlap the front crotch 2 cm over the back crotch and sew 3 poppers (or buttons if you prefer), evenly spaced across the 6-st crotch panel.
- Weave in ends and lightly block.
3. Jumpsuit
A long-sleeved, long-legged all-in-one with a front button opening from crotch to neck. Legs start with ribbed ankles, increase for the thigh, then join at the crotch. Sleeves match the cardigan.
Finished measurements
- Chest, buttoned: 46 cm (18 in)
- Shoulder to ankle: 39 cm (15¼ in)
- Shoulder to crotch: 22 cm (8¾ in)
- Inseam: 17 cm (6¾ in)
- Sleeve seam: 14 cm (5½ in)
Back
Right leg
With 4 mm needles, cast on 16 sts.
Work 8 rows in 1×1 rib.
Change to 4.5 mm needles.
Inc row (RS): K2, kfb, k3, kfb, k3, kfb, k3, kfb, k2. 20 sts (16 + 4 = 20 ✓).
Beginning with a purl row, work in st st until the leg measures 17 cm (6¾ in) from the cast-on edge, ending with a WS row. Break yarn; leave 20 sts on a holder.
Left leg
Work as the right leg; do not break the yarn.
Join for body
Next row (RS): Knit 20 sts of the left leg, turn, cable-cast-on 8 sts, turn, knit 20 sts of the right leg from the holder. 48 sts (20 + 8 + 20 = 48 ✓).
Next row: Purl.
Work in st st until the body measures 13 cm (5 in) from the join, ending with a WS row.
Shape armholes
Cast off 3 sts at beg of next 2 rows. 42 sts (48 − 3 − 3 = 42 ✓).
Cont in st st until the armhole measures 9 cm (3½ in) and the piece measures 22 cm (8¾ in) from the join, ending with a WS row.
Cast-off row (RS): Cast off 12 sts, k until there are 18 sts on the right needle after the cast-off, cast off rem 12 sts. Fasten off. (12 + 18 + 12 = 42 ✓).
Front
Work both legs exactly as for the Back, including the join. 48 sts.
Next row (WS): Purl.
Divide for button opening
Next row (RS): K24, turn, leaving rem 24 sts on a holder.
You will now work the left front (as worn) on these 24 sts.
Left front
WS row: K5, purl to end. (5-st garter band at the centre front.)
RS row: Knit.
Cont as set until the left front measures 13 cm (5 in) from the join, ending with a WS row.
Shape armhole
Next row (RS): Cast off 3 sts, knit to end. 21 sts (24 − 3 = 21 ✓).
Next row: K5, purl to end.
Cont until the armhole measures 5 cm (2 in), ending with a RS row.
Shape neck
Next row (WS): Cast off 6 sts, purl to end. 15 sts (21 − 6 = 15 ✓).
Decrease 1 st at the neck edge on the next 3 RS rows (knit to last 2 sts, k2tog). 12 sts (15 − 3 = 12 ✓).
Work straight until the armhole measures 9 cm (3½ in) to match the back. Cast off 12 sts.
Right front
With RS facing, rejoin yarn to the 24 sts on the holder.
RS row: K5, knit to end. (5-st garter band at the centre front.)
WS row: Purl to last 5 sts, k5.
Buttonholes. Work a buttonhole (k2, yo, k2tog, k1 over the 5-st band) at 2 cm, 6 cm, 10 cm, 14 cm, 18 cm and 21.5 cm from the join (6 buttonholes).
Cont until the right front measures 13 cm (5 in) from the join, ending with a RS row.
Shape armhole
Next row (WS): Cast off 3 sts, purl to last 5 sts, k5. 21 sts.
Cont until the armhole measures 5 cm (2 in), ending with a WS row.
Shape neck
Next row (RS): Cast off 6 sts, knit to end. 15 sts.
Decrease 1 st at the neck edge on the next 3 RS rows (ssk, knit to end). 12 sts (15 − 6 − 3 = 12 ✓).
Work straight to match the left front. Cast off 12 sts.
The two 5-st bands overlap by 2.5 cm, so the buttoned chest is 24 cm (back) + 12 cm + 12 cm − 2.5 cm = 45.5 cm, matching the cardigan ✓.
Sleeves (make 2)
Work exactly as the Cardigan sleeves (cast on 28, increase to 36, 14 cm long).
Finishing the jumpsuit
- Join both shoulder seams (12 sts to 12 sts).
- Set in the sleeves as for the cardigan (centre of sleeve top to shoulder seam; ease the 18 cm sleeve top into the 18 cm armhole).
- Join inner-leg seams from ankle rib to the crotch cast-on, then join the side/underarm/sleeve seams in one line.
- Sew six buttons to the left front band, opposite the buttonholes. The lowest button sits just above the crotch; the highest sits at the neck.
- Weave in ends and lightly block. Do not stretch the ankle or cuff ribs.
4. Hat
A simple seamed beanie: rib brim, stocking-stitch body, decrease crown. The back seam sits at the centre back.
Finished measurements
- Circumference: 32 cm (12½ in), to fit head 33–36 cm (13–14¼ in) with negative ease
- Length, brim to crown: 14.5 cm (5¾ in)
With 4 mm needles, cast on 64 sts.
Rib row: *K1, p1; rep from * to end.
Work 12 rows in 1×1 rib. Brim measures about 3.5 cm (1½ in).
Change to 4.5 mm needles.
Beginning with a knit row, work 20 rows in st st. Body measures about 7 cm (2¾ in); total so far 10.5 cm (4¼ in). End with a WS (purl) row.
Crown (worked flat; 8 decrease sections)
Row 1 (RS): *K6, k2tog; rep from * to end. 56 sts (8 × 8 = 64; 64 − 8 = 56 ✓).
Row 2 and every WS row: Purl.
Row 3: *K5, k2tog; rep from * to end. 48 sts (56 − 8 = 48 ✓).
Row 5: *K4, k2tog; rep from * to end. 40 sts.
Row 7: *K3, k2tog; rep from * to end. 32 sts.
Row 9: *K2, k2tog; rep from * to end. 24 sts.
Row 11: *K1, k2tog; rep from * to end. 16 sts.
Row 13: *K2tog; rep from * to end. 8 sts (16 − 8 = 8 ✓).
Break yarn, leaving a 40 cm tail. Thread the tail through the remaining 8 sts, pull up firmly, and fasten. Use the same tail to mattress-stitch the back seam from crown to brim, taking in one edge stitch each side so the rib matches.
Weave in ends. The crown decrease section is 13 rows ≈ 4.5 cm; total length 15 cm (6 in) before the top is drawn up, 14.5 cm once closed ✓.
5. Mittens
Thumbless mittens with a long ribbed cuff so they stay on. Worked flat and seamed along the little-finger side. Make 2.
Finished measurements
- Hand circumference: 12 cm (4¾ in)
- Cuff length: 4 cm (1½ in)
- Hand length (including shaping): 5.5 cm (2¼ in)
With 4 mm needles, cast on 24 sts.
Work 12 rows in 1×1 rib (*k1, p1; rep from * to end).
Change to 4.5 mm needles.
Beginning with a knit row, work 10 rows in st st, ending with a WS row.
Shape top
Row 1 (RS): *K2, k2tog; rep from * to end. 18 sts (6 × 4 = 24; 24 − 6 = 18 ✓).
Row 2: Purl.
Row 3: *K1, k2tog; rep from * to end. 12 sts (18 − 6 = 12 ✓).
Row 4: Purl.
Row 5: *K2tog; rep from * to end. 6 sts (12 − 6 = 6 ✓).
Break yarn, thread through the remaining 6 sts, pull up, and fasten. Use the tail to mattress-stitch the side seam from tip to cuff.
Weave in ends. Optional: thread a few rows of fine shirring elastic through the WS of the rib if the cuff feels loose — never use a knitted or ribbon tie around a baby’s wrist.
6. Booties
Garter-stitch booties with a ribbed cuff and a shaped instep, worked flat. The instep is knitted on the centre stitches only; stitches are then picked up along each instep edge to form the foot. Make 2.
Finished measurements
- Sole length: 8.75 cm (3½ in), to fit 5–8 lb
- Cuff circumference (unstretched): 13.5 cm (5¼ in)
With 4 mm needles, cast on 27 sts.
Rib row 1 (RS): K1, *p1, k1; rep from * to end.
Rib row 2 (WS): P1, *k1, p1; rep from * to end.
Work 10 rows in 1×1 rib.
Change to 4.5 mm needles.
Knit 4 rows (garter stitch).
Instep
The centre 9 stitches form the instep; 9 stitches wait on each side.
Next row (RS): K18, turn. (9 sts remain unworked on the left needle.)
Next row: Sl 1, k8, turn. (9 sts remain unworked on the other side; you are now working only the centre 9 instep sts.)
Work 18 more rows in garter stitch on these 9 sts (20 instep rows in total, ending with a WS row). The instep measures about 5 cm (2 in).
Pick up for the foot
Next row (RS): Knit the 9 instep sts, pick up and knit 10 sts evenly down the left edge of the instep (1 st every 2 rows along the 20-row flap), knit the 9 waiting sts.
Next row (WS): K28, pick up and knit 10 sts evenly up the remaining instep edge, knit 9.
47 sts (9 + 10 + 9 + 10 + 9 = 47 ✓).
Sole
Knit 8 rows on all 47 sts.
Shape sole
Row 1 (RS): K2tog, k19, k2tog, k1, k2tog, k19, k2tog. 43 sts (47 − 4 = 43 ✓).
Row 2: Knit.
Row 3: K2tog, k17, k2tog, k1, k2tog, k17, k2tog. 39 sts.
Row 4: Knit.
Row 5: K2tog, k15, k2tog, k1, k2tog, k15, k2tog. 35 sts (39 − 4 = 35 ✓).
Row 6: Knit.
Cast off 35 sts, leaving a 30 cm tail. Fold the cast-off edge in half (heel to toe) and sew the sole seam with mattress stitch — the 35 sts make a sole of 17.5 sts, 8.75 cm at 2 sts per cm ✓. Continue the same yarn up the back of the bootie to close the heel and cuff, matching the rib.
Weave in ends. Make the second bootie to match.
7. Dummy chain
A short, firm garter-stitch strip with a buttonhole at each end. One end attaches to a bought breakaway dummy clip; the other loops through the dummy ring.
Safety (read before you start)
- Knitted length is 18 cm (7 in). With clip hardware, the total length must not exceed 22 cm (8¾ in) — this is the EN 12586 limit used in the UK and EU.
- Use only a commercially manufactured breakaway dummy clip. Do not knit a clip, do not use a badge, brooch, or any fastener that will not snap open under pressure.
- Never put the chain around a baby’s neck. Clip it only to clothing.
- Remove the chain for sleep and whenever the baby is unattended.
- Do not add beads, bells, cords, ribbons or anything a baby could chew off or become tangled in.
- Check your local safety rules; a knitted dummy chain is a fastening, not a toy.
Strip
With 4.5 mm needles, cast on 5 sts.
Work in garter stitch (knit every row) until the strip measures 18 cm (7 in) from the cast-on edge.
Buttonhole row: K1, k2tog, yo, k2.
Knit 3 rows. Cast off 5 sts.
The strip is 2.5 cm (1 in) wide and will not stretch much; that is deliberate.
Finishing the dummy chain
- Weave in ends very securely; stitch over them a second time on the WS.
- Thread one end through the ring of a bought dummy clip and sew that end of the strip into a small closed tab, or fasten it with a 12 mm button through the buttonhole, so the clip cannot slide off.
- Put the other buttonhole through the dummy ring and button it (or sew that end into a small tab around the ring).
- Measure the whole assembly including the clip. If it is longer than 22 cm, shorten the knitted strip.
- Tug-test every join before first use. Inspect before every use.
Collection finishing checklist
- All seams: mattress stitch, one stitch in from the edge, yarn tails woven in on the WS for at least 5 cm.
- Buttons: sewn on with a small shank (wrap the yarn three times under the button) so the band sits flat. Use a tiny reinforcing button on the WS if you wish.
- Poppers on the romper: sew through both layers of fabric, not just one strand of yarn.
- Wash the set according to the ball-band before first wear. Lay flat to dry.
- Recheck the dummy chain length after washing; garter stitch can relax by a few millimetres.
You now have a complete, matching newborn wardrobe, all worked flat, in one tension, on two pairs of needles.
Disclaimer: This pattern was generated by AI and should be reviewed for accuracy before use. While we strive for quality, AI-generated content may contain errors. Please verify measurements, stitch counts, charts, and instructions before beginning your project. Generated by purlJam.uk
Love this pattern?
Save this pattern to your free PurlJam libraryAccess your pattern anytime
Bookmark this page to access your pattern anytime