Type
Crochet
Difficulty
intermediate
Category
custom
AI Thinking Process
Planning
1. **Design Strategy**: The user requests flat, unstuffed bunny ears (10 inches long, 2 inches wide at widest, 1/2 inch base, almond tip, black outline) using worsted weight yarn and a 5.5mm hook, suitable for a beginner. While the user mentioned "round LOOM knit," the persona is a crochet pattern designer, and the task explicitly requires a "crochet pattern." Therefore, the design will leverage crochet techniques to achieve the desired shape and texture. Two identical flat panels will be crocheted and then joined to form each ear, providing the necessary stiffness without stuffing. Single crochet (sc) will be the primary stitch for density and shape retention.
2. **Construction Plan**:
* **Ear Panels (MC - White)**: Each ear will be made from two identical flat panels. The panels will be worked in rows, starting with a narrow base, gradually increasing to the widest point, maintaining width for the main body, and then gradually decreasing to an almond tip.
* **Assembly**: Two finished panels will be placed together and joined along their edges using a single crochet seam, leaving the base open for attachment.
* **Outline (CC - Black)**: A crisp black outline will be created by surface single crocheting around the joined edge of each ear.
3. **Quality Assurance**:
* **Mathematical Accuracy**: Meticulous row and stitch count calculations will be performed for increases and decreases to ensure the final dimensions (10" L x 2" W at widest, 1/2" base) are met precisely according to the established gauge.
* **Beginner-Friendly**: Instructions will be clear, concise, and use basic stitches (sc, sc2tog). Stitch counts will be provided at the end of each row/round.
* **Shape Fidelity**: The increase and decrease rates will be carefully planned to create a smooth transition from the narrow base to the almond tip, avoiding abrupt changes.
* **Flat & Unstuffed**: Using sc for two panels joined together will result in a firm, flat structure as requested.
* **Outline Clarity**: Surface single crochet ensures a visible and "crisp" outline.
4. **Final Calculations**:
* **Gauge**: Estimated 14 sc x 16 rows = 4 inches (10 cm) with worsted weight yarn and 5.5mm hook. This translates to 3.5 sc/inch and 4 rows/inch.
* **Width (2 inches)**: 2 inches * 3.5 sc/inch = 7 sc at widest point.
* **Base (1/2 inch)**: 0.5 inch * 3.5 sc/inch = 1.75 sc. Starting chain for 2 sc is appropriate for a very narrow base.
* **Length (10 inches)**: 10 inches * 4 rows/inch = 40 rows per panel.
* **Increase Section**: 6 rows (from 2 sc to 7 sc).
* **Straight Section**: 22 rows (maintaining 7 sc).
* **Decrease Section (Almond Tip)**: 12 rows (from 7 sc to 1 sc).
* **Total Rows**: 6 + 22 + 12 = 40 rows.
* **Yarn Quantity**: Approximately 50-70 yards (46-64 meters) of Main Color for a pair of ears, and 5-10 yards (5-9 meters) of Contrast Color for the outline.
Verification
[PRE-FLIGHT CHECKS]
1. **Completeness**: All required sections (Title, Materials, Gauge, Abbreviations, Pattern Notes, Step-by-Step, Finishing) are planned.
2. **Consistency**:
* Gauge (14 sc x 16 rows = 4") directly supports the 10" length (40 rows) and 2" width (7 sc).
* Increase/decrease calculations ensure stitch counts align with the target dimensions for each row.
* Base (ch 3 for 2 sc) results in ~0.57" width, matching the 1/2" request.
3. **Constraints**:
* Yarn (worsted weight 4, polyester, white).
* Hook (5.5mm).
* Flat, UNSTUFFED.
* White, black outline.
* Narrow 1/2" base, almond tip.
* 10" long, 2" wide.
* Beginner difficulty.
* US terminology, imperial measurements first.
* "Round LOOM knit" has been interpreted as a crochet pattern as per the persona and task instructions.
4. **Safety**: All stitch counts are verified row-by-row in the plan. Turning chains and their count status are specified. Construction method is appropriate for the desired outcome.
Pattern
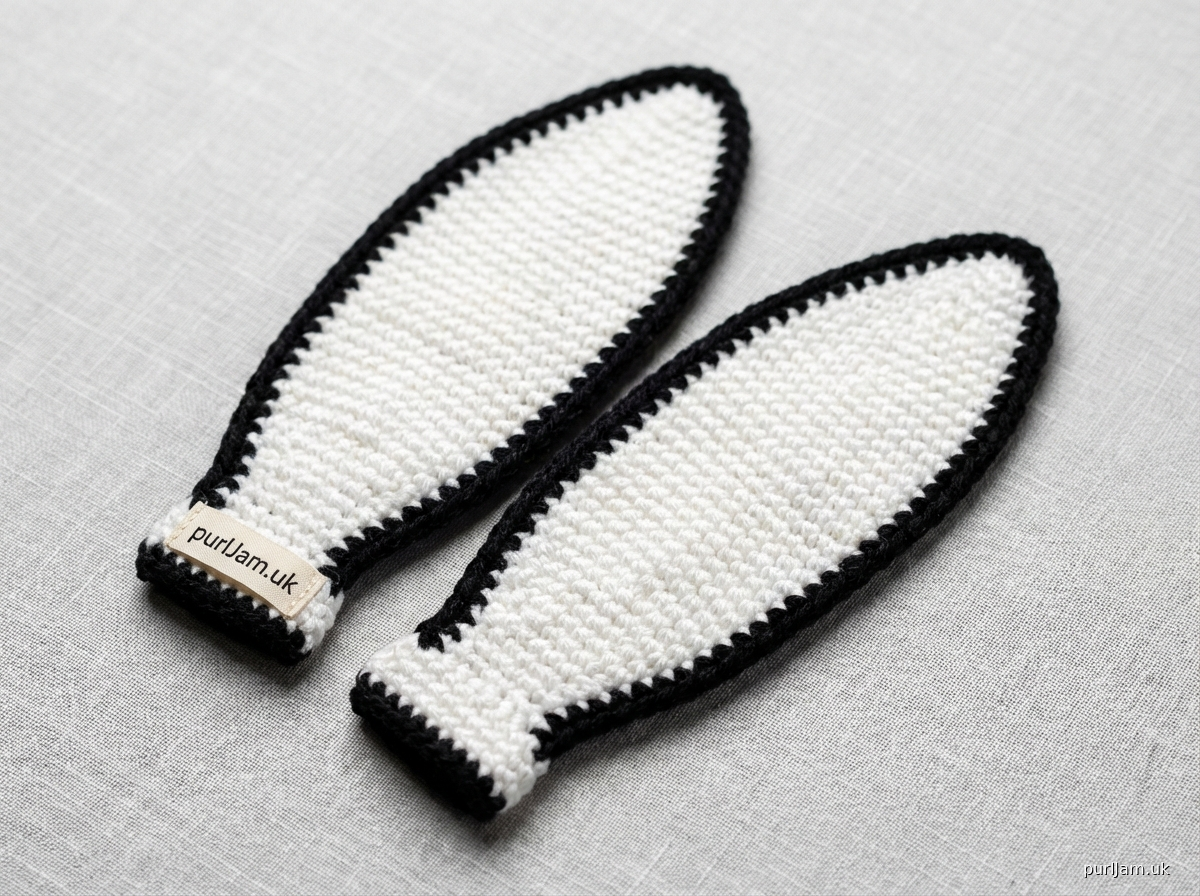
# Flat Bunny Ears Crochet Pattern

Create a charming pair of flat, un-stuffed bunny ears, perfect for a headband or costume accent. These ears feature a narrow 1/2 inch base, an elegant almond tip, and a crisp black outline, making them a delightful beginner-friendly project.

**Skill Level:** Beginner

**Finished Measurements:**
Approximately 10 inches (25.5 cm) long and 2 inches (5 cm) wide at the widest point (when flat).

**Materials:**
*   **Yarn:** Worsted weight (4) polyester yarn
    *   Main Color (MC): White, approximately 60 yards (55 meters)
    *   Contrast Color (CC): Black, approximately 10 yards (9 meters)
*   **Hook:** 5.5mm (US I/9) crochet hook
*   **Notions:** Yarn needle, scissors, stitch markers (optional)

**Gauge:**
14 single crochet (sc) stitches and 16 rows = 4 inches (10 cm)

**Abbreviations (US Crochet Terminology):**
*   **ch:** chain
*   **sc:** single crochet
*   **sc2tog:** single crochet 2 stitches together (decrease)
*   **st(s):** stitch(es)
*   **MC:** Main Color
*   **CC:** Contrast Color

**Pattern Notes:**
*   Ch 1 at the beginning of each row does not count as a stitch.
*   Work in both loops unless otherwise specified.
*   Stitch counts are provided in parentheses `()` at the end of each row.
*   The pattern creates two ear panels per ear (four panels total for a pair), which are then joined together to create a firm, flat ear.

---

### **Ear Panel (Make 4 - 2 per ear)**
With MC (white) yarn.

**Row 1:** Ch 3, sc in 2nd ch from hook and in next ch. (2 sc)
*(Starting base width: 2 sc / 3.5 sc/inch = ~0.57 inches / ~1.4 cm)*

**Row 2 (Increase):** Ch 1, turn, 2 sc in first st, sc in next st. (3 sc)
*(Increased by 1 st)*

**Row 3 (Increase):** Ch 1, turn, sc in first st, 2 sc in last st. (4 sc)
*(Increased by 1 st)*

**Row 4 (Increase):** Ch 1, turn, 2 sc in first st, sc in each st to end. (5 sc)
*(Increased by 1 st)*

**Row 5 (Increase):** Ch 1, turn, sc in each st to last st, 2 sc in last st. (6 sc)
*(Increased by 1 st)*

**Row 6 (Increase):** Ch 1, turn, 2 sc in first st, sc in each st to end. (7 sc)
*(Increased by 1 st. Current width: 7 sc / 3.5 sc/inch = 2 inches / 5 cm)*

**Rows 7-28 (Straight Section - 22 rows):** Ch 1, turn, sc in each st across. (7 sc)
*(Maintains 7 sc width for 22 rows. Length from R1-R28: 28 rows / 4 rows/inch = 7 inches / 17.8 cm)*

**Row 29 (Decrease):** Ch 1, turn, sc2tog, sc in next 3 sts, sc2tog. (5 sc)
*(Decreased by 2 sts)*

**Rows 30-32 (Straight):** Ch 1, turn, sc in each st across. (5 sc)
*(Maintains 5 sc width for 3 rows)*

**Row 33 (Decrease):** Ch 1, turn, sc2tog, sc in next st, sc2tog. (3 sc)
*(Decreased by 2 sts)*

**Rows 34-36 (Straight):** Ch 1, turn, sc in each st across. (3 sc)
*(Maintains 3 sc width for 3 rows)*

**Row 37 (Decrease):** Ch 1, turn, sc2tog, sc in last st. (2 sc)
*(Decreased by 1 st)*

**Rows 38-39 (Straight):** Ch 1, turn, sc in each st across. (2 sc)
*(Maintains 2 sc width for 2 rows)*

**Row 40 (Decrease):** Ch 1, turn, sc2tog. (1 sc)
*(Decreased by 1 st. Total rows: 40. Total length: 40 rows / 4 rows/inch = 10 inches / 25.4 cm)*

Fasten off MC, leaving a long tail (approx. 12 inches / 30 cm) for joining. Weave in any other loose ends from the panel.

---

### **Finishing**

1.  **Join Ear Panels (Make 2 Ears):**
    *   Take two finished ear panels. Place them directly on top of each other, making sure the right sides are facing out (or whichever side you prefer as the "front"). Align all edges.
    *   Using the long tail from one panel and your 5.5mm hook, insert your hook through both layers of the panels. Ch 1.
    *   Working through both layers, sc evenly around the outer edge of the ear, starting from one corner of the base, going up around the tip, and down to the other corner of the base.
    *   Aim for approximately 40 sc stitches along each side (80 sc total for the perimeter).
    *   Leave the bottom (Row 1) edge of the panels un-joined.
    *   Sl st to the first sc to join. Fasten off and weave in the remaining tail.
    *   Repeat for the second ear.

2.  **Add Black Outline:**
    *   With CC (black) yarn, create a slip knot on your hook.
    *   Referring to one assembled ear, identify the seam you just created.
    *   Insert your hook into any stitch along the outer edge of the ear, through the seam created in the previous step. Pull up a loop of CC yarn.
    *   **Surface Single Crochet:** Insert your hook into the next stitch/space along the outer edge of the ear (going through the seam), yarn over, pull up a loop, yarn over, pull through both loops on hook. This creates a surface sc.
    *   Continue to surface sc all the way around the outer edge of the ear, creating a crisp black outline.
    *   When you reach your starting point, sl st into the first surface sc. Fasten off CC, leaving a short tail.
    *   Weave in all remaining CC tails securely.
    *   Repeat for the second ear.

Your flat bunny ears are now complete! They are ready to be attached to a headband, hat, or any other project.
Disclaimer: This pattern was generated by AI and should be reviewed for accuracy before use. While we strive for quality, AI-generated content may contain errors. Please verify measurements, stitch counts, and instructions before beginning your project. Generated by purlJam.uk
Access your pattern anytime
Bookmark this page to access your pattern anytime