Type
Crochet
Difficulty
beginner
Category
amigurumi
AI Thinking Process
Planning
Verification
Pattern
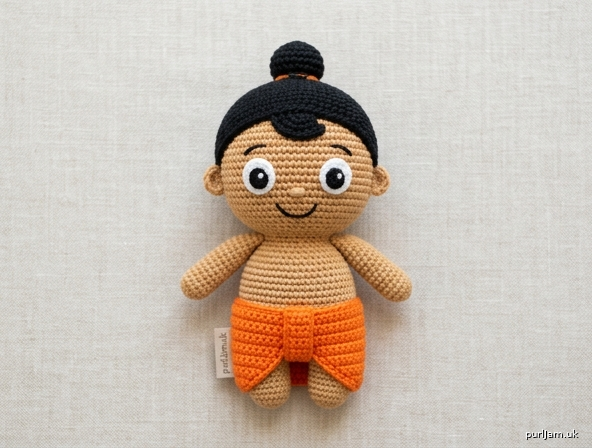
Flat Chhota Bheem
Beginner Crochet Applique Toy (Unofficial Fan-Inspired Pattern)
A flat, front-facing Chhota Bheem figure made from simple single-crochet shapes: a round head, a black hair cap with topknot, a chubby oval body, an orange dhoti, and short rectangular arms and legs. Perfect as a bag applique, nursery wall hanging, or (with an optional back layer) a lightly padded flat toy.
This is an unofficial fan-inspired pattern for personal use only. It is not affiliated with or endorsed by the character’s owners.
Skill level: Beginner
Skills used: Magic ring (or chain-2 start), chain, single crochet, increase, working in joined rounds and in turned rows, whipstitch assembly, simple embroidery.
Finished measurements
- Height: 6½" (16.5 cm)
- Width (arm to arm): 4½" (11.5 cm)
- Head diameter: 3" (7.5 cm)
Size will change if you use a different hook or yarn. The look stays the same as long as all pieces are made with the same hook and yarn.
Materials
Yarn: Worsted weight (4), acrylic or cotton. Approximate amounts:
| Color | Use | Amount |
|---|---|---|
| Warm tan / peach / gold | Skin (head, ears, body, arms, legs) | 40 yd (37 m) |
| Black | Hair, bun, pupils, smile, brows | 25 yd (23 m) |
| Bright orange | Dhoti | 20 yd (18 m) |
| White | Eyes | 8 yd (7 m) |
| Soft pink (optional) | Cheeks | scrap |
Suggested colors: tan or honey for skin, true black for hair, pumpkin or bright orange for the dhoti.
Hook: US F-5 (3.75 mm)
Go down to US E-4 (3.5 mm) if your circles ruffle; go up to US G-6 (4.0 mm) for a slightly larger figure.
Notions:
- Yarn needle
- Stitch marker
- Scissors
- Straight pins
- Black embroidery thread or leftover black yarn for the face
- Optional: matching felt for backing; small amount of fiberfill for the padded version; 6 mm safety eyes only if the piece will not be used by children under 3
Gauge
9 sc and 10 rows = 2" (5 cm) in single crochet with US F-5 (3.75 mm).
Gauge is not critical for an applique, but a firm fabric keeps circles flat. If a 6-round practice circle (36 sts) measures more than 2¾" (7 cm) across and the edge waves, use a smaller hook.
Abbreviations (US)
| Abbreviation | Meaning |
|---|---|
| ch | chain |
| sc | single crochet |
| inc | increase — 2 sc in the same stitch |
| sl st | slip stitch |
| st(s) | stitch(es) |
| rnd | round |
| MR | magic ring |
| FO | fasten off |
| RS | right side |
Special stitch
inc: Work 2 sc into the next stitch (1 st becomes 2).
Pattern notes
- US crochet terms throughout. sc is single crochet (UK: dc).
- Work through both loops unless stated otherwise.
- Rounds are worked in a spiral unless a slip-stitch join is written. Place a stitch marker in the first stitch of every round and move it up.
- Turning ch-1 at the start of a row does not count as a stitch. Work the first sc into the first stitch.
- Leave a 12–18" (30–45 cm) tail on every piece you will sew. Weave in only the starting tails as you go.
- Do not stuff the main version — pieces are meant to lie flat.
- Pin every piece before sewing. One pin in the wrong place will shift the whole face.
- Magic ring alternative: Ch 2, work the Round 1 stitches into the 2nd ch from the hook, then pull the starting tail to close the hole.
Pattern
Head (skin — make 1)
Worked in a spiral.
Rnd 1: 6 sc in MR. [6]
Rnd 2: inc in each st around. (6 increases → 6 + 6 = 12 ✓) [12]
Rnd 3: (sc, inc) 6 times. (6 increases → 12 + 6 = 18 ✓) [18]
Rnd 4: (2 sc, inc) 6 times. (6 increases → 18 + 6 = 24 ✓) [24]
Rnd 5: (3 sc, inc) 6 times. (6 increases → 24 + 6 = 30 ✓) [30]
Rnd 6: (4 sc, inc) 6 times. (6 increases → 30 + 6 = 36 ✓) [36]
Rnd 7: (5 sc, inc) 6 times. (6 increases → 36 + 6 = 42 ✓) [42]
Rnd 8: sc in each st around. [42]
Sl st in the next st. FO, leaving a long tail for sewing the head to the body.
The circle should measure about 3" (7.5 cm) across and lie flat. If the edge cups, your stitches are too tight — relax slightly. If it ruffles, use a smaller hook.
Hair cap (black — make 1)
A semi-circle worked in turned rows. The magic-ring end is the crown (where the bun sits). The last row is the curved hairline.
Row 1: 6 sc in MR. Do not join. Ch 1, turn. [6]
Row 2: (sc, inc) 3 times, ch 1, turn. (3 increases → 6 + 3 = 9 ✓) [9]
Row 3: (2 sc, inc) 3 times, ch 1, turn. (3 increases → 9 + 3 = 12 ✓) [12]
Row 4: (3 sc, inc) 3 times, ch 1, turn. (3 increases → 12 + 3 = 15 ✓) [15]
Row 5: (4 sc, inc) 3 times, ch 1, turn. (3 increases → 15 + 3 = 18 ✓) [18]
Row 6: (5 sc, inc) 3 times. (3 increases → 18 + 3 = 21 ✓) [21]
FO, leaving a long tail. The piece is a half-disk about 2" (5 cm) from crown to hairline. The curved edge (Row 6) should span roughly half the head.
Bun / topknot (black — make 1)
Rnd 1: 6 sc in MR. [6]
Rnd 2: inc in each st around. (6 increases → 6 + 6 = 12 ✓) [12]
Rnd 3: (sc, inc) 6 times. (6 increases → 12 + 6 = 18 ✓) [18]
Sl st in the next st. FO, leaving a long tail. Circle measures about 1¼" (3 cm) across.
Ears (skin — make 2)
Rnd 1: 6 sc in MR. Sl st in the first sc to join. [6]
FO, leaving a 10" (25 cm) tail. Tiny ½" (1.25 cm) circles.
Eyes — whites (white — make 2)
Rnd 1: 6 sc in MR. [6]
Rnd 2: inc in each st around. (6 increases → 6 + 6 = 12 ✓) [12]
Sl st in the first sc. FO, leaving a tail for sewing. Each white is about ⅞" (2.2 cm) across.
Pupils (black — make 2)
Rnd 1: 6 sc in MR. Sl st in the first sc to join. [6]
FO, leaving a tail. About ½" (1.25 cm) across.
Body (skin — make 1)
Worked in a spiral around both sides of the starting chain to form an oval.
Ch 9.
Rnd 1: 2 sc in 2nd ch from hook, sc in next 6 ch, 3 sc in last ch. Rotate the chain and work along the opposite side: sc in next 6 ch, 1 sc in the same ch as the beginning 2 sc. (2 + 6 + 3 + 6 + 1 = 18 ✓) [18]
Rnd 2: inc in next 3 sts, sc in next 6 sts, inc in next 3 sts, sc in next 6 sts. (6 increases → 18 + 6 = 24 ✓) [24]
Rnd 3: (sc, inc) 3 times, sc in next 6 sts, (sc, inc) 3 times, sc in next 6 sts. (6 increases → 24 + 6 = 30 ✓) [30]
Rnd 4: sc in each st around. [30]
Sl st in the next st. FO, leaving a long tail. Oval is about 2¾" (7 cm) long and 2" (5 cm) wide.
Dhoti (orange — make 1)
Worked in rows.
Ch 17.
Row 1: Sc in 2nd ch from hook and in each ch across. [16]
Rows 2–6: Ch 1, turn. Sc in each st across. [16]
FO, leaving a long tail. Rectangle is about 3½" (9 cm) wide and 1¼" (3 cm) tall.
Arms (skin — make 2)
Worked in rows.
Ch 5.
Row 1: Sc in 2nd ch from hook and in each ch across. [4]
Rows 2–8: Ch 1, turn. Sc in each st across. [4]
FO, leaving a long tail. Each arm is about ¾" × 1½" (2 × 3.8 cm).
Legs (skin — make 2)
Worked in rows.
Ch 6.
Row 1: Sc in 2nd ch from hook and in each ch across. [5]
Rows 2–9: Ch 1, turn. Sc in each st across. [5]
FO, leaving a long tail. Each leg is about 1" × 1¾" (2.5 × 4.5 cm).
Face embroidery (do this before assembling the body)
Work on the head with the hair already pinned so you can see how much face is showing.
1. Place the hair.
Pin the hair cap on the upper half of the head, magic-ring end at the crown, Row 6 forming a curved hairline across the forehead. About the lower half of the head should stay tan. Whipstitch the hair in place around all edges with black yarn. Hide stitches on the back.
2. Bun.
Center the bun on the crown so it sits on top of the hair, slightly overlapping the very top edge of the head. Sew around. With the same black yarn, wrap 4–5 tight stitches across the middle of the bun (like a hair tie) and fasten on the back.
3. Ears.
Sew one ear to each side of the head, centered on the hairline, with about half the ear overlapping the head. The ears should stick out ¼" (6 mm).
4. Eyes.
Pin the two white circles on the exposed face, just below the hairline, about ¼" (6 mm) apart. They sit in the middle of the visible face, not down on the chin. Sew in place.
Sew one black pupil onto each white, slightly toward the center and a little below the middle of the white so Bheem looks friendly, not startled.
With white yarn, make 1–2 tiny straight stitches on the upper outer edge of each pupil for a highlight.
5. Smile.
With black yarn, backstitch a small shallow U, about ¾" (2 cm) wide, centered ⅜" (1 cm) below the eyes. Keep it simple — two or three stitches is enough.
6. Eyebrows (optional).
One short curved backstitch above each eye, just under the hairline.
7. Cheeks (optional).
With pink, make a few small satin stitches or sew a 6-sc magic-ring circle on each cheek, outside and slightly below the eyes.
Weave in all face ends on the back of the head before attaching the body.
Assembly
Use matching yarn and a yarn needle. Whipstitch through both loops. Pin first, then sew. Work with the figure face-up.
1. Dhoti on body.
Lay the oval body with the long axis vertical (taller than it is wide). Wrap the orange rectangle around the lower half of the body so it covers from mid-torso to just past the bottom edge. The extra width hangs to the sides like draped cloth. Pin, then sew the top edge of the dhoti across the body (this is the waist). Tack the side edges down; leave the lower edge mostly free so it looks like fabric, not a panel.
2. Head to body.
Center the head on the top of the body so the chin overlaps the body by about ⅜" (1 cm). The head is much larger than the body — that is the cartoon proportion. Sew securely through the overlap.
3. Legs.
Pin the legs under the dhoti, slightly apart, with ¼" (6 mm) of each leg tucked behind the dhoti. They should angle out a little, not hang dead straight. Sew the tucked tops to the back of the dhoti/body.
4. Arms.
Pin one arm to each side of the body, tops level with the upper chest, just below the head. Angle them slightly downward and out. Overlap each arm ¼" (6 mm) onto the body and sew.
5. Check the silhouette.
From the front you should see: black bun, round tan face with large eyes, orange wrap, short arms, short legs. Adjust any piece that looks off before weaving in the last tails.
Finishing
- Weave in every remaining tail on the back.
- Steam-block very lightly from the back if the piece curls (hold an iron above the work; do not press hard or you will flatten the stitches).
- For a wall hanging: sew a 6" (15 cm) chain of tan or black yarn to the back of the bun, or stitch the figure onto a felt circle and add a hanging loop.
- For a bag or sweater applique: sew around the outer edge with small, even whipstitches in matching colors.
Optional: padded flat toy
Make a second copy of the head, body, arms, legs, hair, bun, and dhoti (skip extra eyes). Sew each pair together around the edge, leaving a 1" (2.5 cm) gap, add a pinch of fiberfill so the piece stays flat, then close. Assemble as above. Do not overstuff or it will become a 3D pillow instead of a flat toy.
Alternatively, cut a piece of felt to the finished silhouette and sew the applique onto it for a clean back.
Safety
If this will be given to a child under 3 years, embroider the pupils and smile (do not use safety eyes or glued felt), sew every piece on twice, and weave ends back through the work several times. Check for loose parts before each use.
Make it yours
- Keychain size: Use DK yarn and US E-4 (3.5 mm). Stop the head at Rnd 6 [36], hair at Row 5 [18], and shorten arms to 6 rows and legs to 7 rows. Finished height about 5" (12.5 cm).
- Larger display piece: Use bulky (5) yarn and US H-8 (5 mm). Same stitch counts; figure grows to about 9–10" (23–25 cm) tall.
- Classic extra: Add a tiny flat mace with a brown 12-st circle sewn to a 10-st brown chain, tucked under one hand.
Disclaimer: This pattern was generated by AI and should be reviewed for accuracy before use. While we strive for quality, AI-generated content may contain errors. Please verify measurements, stitch counts, charts, and instructions before beginning your project. Generated by purlJam.uk
Love this pattern?
Save this pattern to your free PurlJam libraryAccess your pattern anytime
Bookmark this page to access your pattern anytime