Type
Knitting
Difficulty
intermediate
Category
custom
AI Thinking Process
Planning
Verification
Pattern
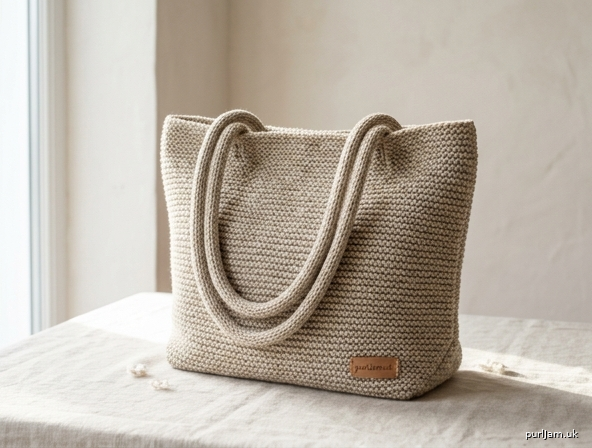
Garter Stitch Tote Bag
A simple, sturdy tote bag perfect for a first knitting project. Worked flat in easy garter stitch (no purling required!), then folded and seamed — with two knitted I-cord straps sewn on at the end. Great for groceries, books, or everyday errands.
Materials
- Yarn: Worsted weight (medium, #4) yarn, approximately 300 yards (275 m). A sturdy cotton, cotton-blend, or wool yarn works well for a bag that needs to hold its shape.
- Needles:
- US 8 (5 mm) straight or circular needles (used flat) — for the bag body
- US 8 (5 mm) double-pointed needles (dpns) — for the I-cord straps
- Notions:
- Tapestry needle (for seaming and weaving in ends)
- Stitch marker (optional, to mark the fold line)
- Measuring tape
- Scissors
Gauge
16 stitches x 32 rows = 4 in (10 cm) in garter stitch (knit every row), on US 8 (5 mm) needles, after light blocking.
Garter stitch gauge swatch tip: Cast on 20 sts, knit every row until the piece measures about 5 in, bind off, and measure your 4 in square in the center. Adjust needle size up or down if your stitch/row count differs.
Sizes
One size. Finished bag measures 14 in wide x 12 in tall (before straps are attached), excluding straps. Straps measure approximately 24 in (61 cm) each and are sewn on to create handles with roughly a 10 in drop.
Abbreviations
- CO — cast on
- BO — bind off
- k — knit
- st(s) — stitch(es)
- rep — repeat
- garter st — knit every row (both sides)
- I-cord — Idiot Cord (knitted cord technique)
- in(s) — inch(es)
- cm — centimeter(s)
Pattern Notes
- Garter stitch is fully reversible, so there is no right side/wrong side to track — every row is simply "knit."
- The entire bag body is worked as one flat piece, then folded in half and seamed up the sides. The fold forms the bottom of the bag, so no bottom seam is needed.
- Straps are worked separately as I-cord, then sewn to the inside top edge of the bag.
- Because I-cord fabric is denser than flat knitting, its row gauge does not match the body gauge — work straps to the stated length, not by counting exact rows.
Instructions
Part 1: Bag Body
Using US 8 (5 mm) needles, CO 56 sts.
Row 1 (and every row): Knit all stitches.
Continue in garter stitch (knit every row) until piece measures 12 in (30.5 cm) from cast-on edge — approximately 96 rows.
Place a stitch marker at each side edge here (or simply note this point) — this is your fold line.
Continue in garter stitch, without further marking, until piece measures 24 in (61 cm) from cast-on edge — approximately 192 rows total.
BO all 56 sts knitwise. Cut yarn, leaving a 24 in (61 cm) tail for seaming.
(Row check: 24 in x 8 rows/in = 192 rows total; fold line at 12 in x 8 rows/in = 96 rows, exactly the halfway point ✓)
Part 2: I-Cord Straps (make 2)
Using US 8 (5 mm) double-pointed needles, CO 4 sts.
I-cord row: Knit 4 sts. Without turning work, slide sts back to the opposite end of the needle. Bring working yarn around behind the work. Rep from * until strap measures 24 in (61 cm) from cast-on (approximately 70 rows — row count will vary; work to the measurement).
BO all 4 sts. Cut yarn, leaving a 6 in (15 cm) tail for sewing.
Repeat to make a second identical strap.
Finishing
- Weave in ends from the cast-on tail of the body piece (leave the BO tail from the body for seaming).
- Fold the body piece in half widthwise at the 12 in fold line, so the cast-on edge meets the bind-off edge. This fold becomes the bottom of the bag; the cast-on and bind-off edges together form the top opening.
- Seam the sides: Using the long tail and a tapestry needle, mattress-stitch (or whip-stitch) the two side edges together, working from the fold up to the top opening. Leave the top open. Weave in the remaining tail.
- Attach the straps: Turn the bag inside out (or leave right-side out, whichever is easier to work with). On the inside top edge, position one end of a strap about 4 in in from a side seam and pin in place; position the other end of the same strap about 4 in in from the same side seam but on the other panel (front or back), so the strap forms a loop over the top when the bag is turned right-side out. Sew securely in place using the strap's tail and a tapestry needle, working several passes through the same spot for strength. Repeat for the second strap on the opposite side of the bag.
- Block lightly: Garter stitch benefits from a light steam block or a gentle wet block to even out the stitches and help the bag lie flat. Pin to finished dimensions (14 in x 12 in) and allow to dry fully before use.
- Weave in any remaining ends.
Your Garter Stitch Tote Bag is complete!
Tip: For a firmer bag, felt a wool version by washing on a hot cycle, or line the inside with fabric for extra structure and to prevent stretching.
Disclaimer: This pattern was generated by AI and should be reviewed for accuracy before use. While we strive for quality, AI-generated content may contain errors. Please verify measurements, stitch counts, and instructions before beginning your project. Generated by purlJam.uk
Love this pattern?
Save this pattern to your free PurlJam libraryAccess your pattern anytime
Bookmark this page to access your pattern anytime