Type
Crochet
Difficulty
intermediate
Category
amigurumi
AI Thinking Process
Planning
Verification
Pattern
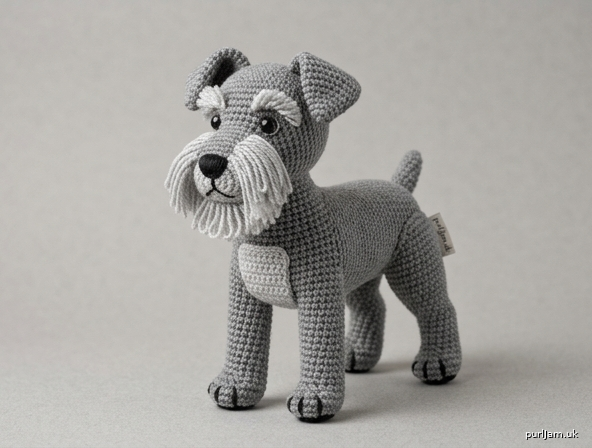
Gray Schnauzer Amigurumi
A compact standing schnauzer with a blunt muzzle, bushy brows, and a silver beard. The body is a simple tube with rounded ends; the breed shape comes from the muzzle, the folded ears, the level back, and the furnishings.
Difficulty: Intermediate
Finished size: About 7 inches (18 cm) tall when standing, and 8 inches (20 cm) from the tip of the nose to the tip of the tail. Paws are slightly full so the dog stands steadily.
Materials
- Worsted-weight yarn (Category 4):
- Main color (MC): medium gray, 120 yards (110 m)
- Contrast color (CC): light silver gray, 25 yards (23 m), for the beard, eyebrows, and chest
- Black: 8 yards (7 m), for the nose, mouth, claws, and paw pads
- Hook: 3.5 mm (US E-4)
- 12 mm black safety eyes, 1 pair
- Polyester fiberfill
- Stitch marker
- Yarn needle
- Pins
- Scissors
A heathered gray suggests a wiry coat better than a flat solid, but any worsted gray is fine. For a one-color dog, work the beard and eyebrows in MC and omit the chest patch. Keep the nose, mouth, and claws black.
Safety: Safety eyes are a choking hazard. This toy is not for children under 3 years. For a baby gift, embroider the eyes with black yarn after the head is stuffed.
Gauge
5 sc and 5 rounds = 1 inch (2.5 cm), worked in a continuous spiral and measured unstuffed.
Gauge does not change a garment-style fit, but the fabric must be tight enough that stuffing does not show. If you can see fiberfill between stitches, change to a 3.25 mm (US D-3) hook and check again.
Abbreviations (US)
- MR — magic ring
- ch — chain
- sc — single crochet
- inc — increase (2 sc in the same stitch)
- dec — decrease (sc 2 together)
- BLO — back loop only
- sl st — slip stitch
- st(s) — stitch(es)
- rnd(s) — round(s)
- RS / WS — right side / wrong side
- FO — fasten off
- loop st — loop stitch (see Notes)
- MC / CC — main color / contrast color
Notes
- US stitch names throughout. Do not substitute UK double crochet for US single crochet.
- Rounds are worked in a continuous spiral. Do not join unless the pattern says to. Move the marker up at the end of every round.
- The turning ch-1 on flat pieces does not count as a stitch.
- Magic ring alternative: Ch 2, work the first-round stitches into the second ch from the hook, then continue in the spiral. Counts do not change.
- Optional invisible decrease: Insert the hook under the front loop only of the next 2 sts, yarn over, pull through both front loops, yarn over, pull through the 2 loops on the hook. This still counts as 1 dec.
- Stuff the head and body firmly. Stuff the legs very firmly so they hold the body. Stuff the muzzle only enough to keep it squared, not ball-shaped.
- Leave an 18-inch (46 cm) yarn tail on every piece that is sewn on. Closed pieces (head, body, tail) need a separate 18-inch (46 cm) length of MC for sewing.
Loop stitch
Loops form on the side facing away from you. On the beard and eyebrows, Row 1 is the RS and every loop-stitch row is worked with the WS facing, so the loops land on the RS.
- Insert the hook into the stitch. Yarn over and pull up a loop (2 loops on the hook).
- With the index finger of your yarn hand held behind the fabric, draw the working yarn into a loop of the length given in the pattern. Place the near strand of that finger-loop on the hook (3 loops on the hook).
- Yarn over with the working yarn and pull through all 3 loops.
- Drop the loop from your finger. That is 1 loop stitch.
Beard loops: 1 inch (2.5 cm). Eyebrow loops: 3/4 inch (2 cm). Each loop should stay put when gently tugged. If a loop pulls out, the locking yarn-over was missed.
Head (MC)
Rnd 1: 6 sc in MR. (6)
Rnd 2: Inc in each st around. (12) (6 inc → 6 + 6 = 12 ✓)
Rnd 3: (Sc, inc) 6 times. (18) (6 inc → 12 + 6 = 18 ✓)
Rnd 4: (2 sc, inc) 6 times. (24) (6 inc → 18 + 6 = 24 ✓)
Rnd 5: (3 sc, inc) 6 times. (30) (6 inc → 24 + 6 = 30 ✓)
Rnd 6: (4 sc, inc) 6 times. (36) (6 inc → 30 + 6 = 36 ✓)
Rnd 7: (5 sc, inc) 6 times. (42) (6 inc → 36 + 6 = 42 ✓)
Rnd 8: (6 sc, inc) 6 times. (48) (6 inc → 42 + 6 = 48 ✓)
Rnds 9–16: Sc in each st around. (48) (8 rounds)
Safety eyes
After Rnd 16, insert the 12 mm safety eyes between Rnds 11 and 12, with 6 stitches between the eyes. Center the pair on the front of the head, not on the sides. The eye line sits a little above the middle of the head so the muzzle can tuck just under it.
Check the expression from the front before you lock the washers. Once you are happy, snap the washers on firmly from the inside. Do not stuff the head until the washers are on.
Rnd 17: (6 sc, dec) 6 times. (42) (each repeat uses 8 sts → 48 − 6 = 42 ✓)
Rnd 18: (5 sc, dec) 6 times. (36) (42 − 6 = 36 ✓)
Rnd 19: (4 sc, dec) 6 times. (30) (36 − 6 = 30 ✓)
Rnd 20: (3 sc, dec) 6 times. (24) (30 − 6 = 24 ✓)
Rnd 21: (2 sc, dec) 6 times. (18) (24 − 6 = 18 ✓)
Stuff firmly. Press the head gently between your palms so it is a little wider than it is tall — a soft rectangle, not a perfect ball.
Rnd 22: (Sc, dec) 6 times. (12) (18 − 6 = 12 ✓)
Rnd 23: Dec 6 times. (6) (12 − 6 = 6 ✓)
FO. Close the remaining hole and weave in the end.
Muzzle (MC)
The foundation-chain oval is the front of the muzzle, where the nose is embroidered. The open edge is sewn to the head.
Ch 7.
Rnd 1: 3 sc in the 2nd ch from the hook, sc in the next 4 ch, 3 sc in the last ch; rotate and work along the opposite side of the chain, sc in the next 4 ch. (14) (3 + 4 + 3 + 4 = 14 ✓)
Do not join. Place a marker in the first sc.
Rnd 2: (Inc) 3 times, sc in the next 4 sts, (inc) 3 times, sc in the next 4 sts. (20) (14 + 6 = 20 ✓)
Rnd 3: (Sc, inc) 3 times, sc in the next 4 sts, (sc, inc) 3 times, sc in the next 4 sts. (26) (20 + 6 = 26 ✓)
Rnds 4–7: Sc in each st around. (26) (4 rounds)
FO, leaving an 18-inch (46 cm) tail. Stuff lightly, keeping the front flat and the sides square.
Nose and mouth
With black yarn and a yarn needle, satin-stitch a rounded rectangle on the center of the oval front, about 1/2 inch (13 mm) wide and 3/8 inch (10 mm) tall. Place it on the upper half of the front so the beard can sit just beneath it.
From the bottom center of the nose, embroider a vertical line 1/4 inch (6 mm) long, then two short stitches angling down and out (an inverted Y). The beard will cover most of the mouth. That is correct.
Ears (MC) — make 2
Worked in turned rows. Leave an 18-inch (46 cm) tail for sewing.
Ch 9.
Row 1: Sc in the 2nd ch from the hook and in each ch across. (8) Ch 1, turn.
Row 2: Dec, sc in the next 4 sts, dec. (6) (8 − 2 = 6 ✓) Ch 1, turn.
Row 3: Sc in each st across. (6) Ch 1, turn.
Row 4: Dec, sc in the next 2 sts, dec. (4) (6 − 2 = 4 ✓) Ch 1, turn.
Row 5: Sc in each st across. (4) Ch 1, turn.
Row 6: Dec, dec. (2) (4 − 2 = 2 ✓) Ch 1, turn.
Row 7: Dec. (1) (2 − 1 = 1 ✓)
Ch 1. Sc evenly around all edges, working 2 sc in each bottom corner and 3 sc in the tip. Join with a sl st to the first sc. FO.
Do not stuff. The wide foundation edge is the base.
Body (MC)
Worked from the chest backward. The starting ring is the center of the chest.
Rnd 1: 6 sc in MR. (6)
Rnd 2: Inc in each st around. (12) (6 + 6 = 12 ✓)
Rnd 3: (Sc, inc) 6 times. (18) (12 + 6 = 18 ✓)
Rnd 4: (2 sc, inc) 6 times. (24) (18 + 6 = 24 ✓)
Rnd 5: (3 sc, inc) 6 times. (30) (24 + 6 = 30 ✓)
Rnd 6: (4 sc, inc) 6 times. (36) (30 + 6 = 36 ✓)
Rnd 7: (5 sc, inc) 6 times. (42) (36 + 6 = 42 ✓)
Rnds 8–19: Sc in each st around. (42) (12 rounds; 19 − 8 + 1 = 12 ✓)
Rnd 20: (5 sc, dec) 6 times. (36) (42 − 6 = 36 ✓)
Rnd 21: (4 sc, dec) 6 times. (30) (36 − 6 = 30 ✓)
Rnd 22: (3 sc, dec) 6 times. (24) (30 − 6 = 24 ✓)
Begin stuffing. Keep the chest round and the back level, not banana-shaped.
Rnd 23: (2 sc, dec) 6 times. (18) (24 − 6 = 18 ✓)
Rnd 24: (Sc, dec) 6 times. (12) (18 − 6 = 12 ✓)
Rnd 25: Dec 6 times. (6) (12 − 6 = 6 ✓)
FO. Add any last stuffing, close the hole, and weave in the end.
Legs (MC) — make 4
All four legs are the same length so the back stays level. Work from the paw upward. The magic ring is the sole.
Rnd 1: 6 sc in MR. (6)
Rnd 2: Inc in each st around. (12) (6 + 6 = 12 ✓)
Rnd 3: (Sc, inc) 6 times. (18) (12 + 6 = 18 ✓)
Rnd 4: In BLO, sc in each st around. (18)
Rnds 5–6: Sc in both loops in each st around. (18)
Rnd 7: (4 sc, dec) 3 times. (15) (3 repeats use 18 sts and remove 3 → 15 ✓)
Rnds 8–13: Sc in each st around. (15) (6 rounds)
FO, leaving an 18-inch (46 cm) tail. Stuff very firmly. Leave the top open.
Claws and pads
With black yarn, embroider 3 short vertical stitches, each about 1/4 inch (6 mm), over the BLO ridge on the front of each paw. On the sole, embroider a small oval pad over the magic ring.
Tail (MC)
Rnd 1: 6 sc in MR. (6)
Rnd 2: Sc in each st around. (6)
Rnd 3: (Sc, inc) 3 times. (9) (6 + 3 = 9 ✓)
Rnds 4–5: Sc in each st around. (9)
Rnd 6: (Sc, dec) 3 times. (6) (9 − 3 = 6 ✓)
Rnds 7–9: Sc in each st around. (6) (3 rounds)
FO, leaving an 18-inch (46 cm) tail. Stuff the wider base lightly. Leave the tip soft so it can stand up.
Docked option: FO after Rnd 6 and sew the open end flat to the rump instead of continuing.
Eyebrows (CC) — make 2
Ch 7.
Row 1 (RS): Sc in the 2nd ch from the hook and in each ch across. (6) Ch 1, turn.
Row 2 (WS): Loop st in each st across, loops 3/4 inch (2 cm). (6) Ch 1, turn.
Row 3: Sc in each st across. (6) Ch 1, turn.
Row 4: Loop st in each st across. (6)
FO, leaving a 12-inch (30 cm) tail. Do not cut the loops.
Beard (CC)
Ch 13.
Row 1 (RS): Sc in the 2nd ch from the hook and in each ch across. (12) Ch 1, turn.
Row 2 (WS): Loop st in each st across, loops 1 inch (2.5 cm). (12) Ch 1, turn.
Row 3: Dec, sc in the next 8 sts, dec. (10) (12 − 2 = 10 ✓) Ch 1, turn.
Row 4: Loop st in each st across. (10) Ch 1, turn.
Row 5: Dec, sc in the next 6 sts, dec. (8) (10 − 2 = 8 ✓) Ch 1, turn.
Row 6: Loop st in each st across. (8)
FO, leaving an 18-inch (46 cm) tail. Row 1 is the sewing edge. The decreased edge hangs at the chin. Leave the loops uncut for a sturdy toy. For a wirier look, cut the loops after the beard is sewn on and brush them lightly with a clean toothbrush. Do not cut them before sewing; short ends are harder to control.
Chest patch (CC)
Omit this piece if you are working in one color.
Ch 7.
Row 1: Sc in the 2nd ch from the hook and in each ch across. (6) Ch 1, turn.
Row 2: Inc, sc in the next 4 sts, inc. (8) (6 + 2 = 8 ✓) Ch 1, turn.
Row 3: Sc in each st across. (8) Ch 1, turn.
Row 4: Inc, sc in the next 6 sts, inc. (10) (8 + 2 = 10 ✓) Ch 1, turn.
Row 5: Sc in each st across. (10) Ch 1, turn.
Row 6: Dec, sc in the next 6 sts, dec. (8) (10 − 2 = 8 ✓) Ch 1, turn.
Row 7: Dec, sc in the next 4 sts, dec. (6) (8 − 2 = 6 ✓)
FO, leaving a 12-inch (30 cm) tail. Row 4–5 is the widest part and sits across the chest. The Row 7 edge points down.
Assembly
Pin every piece and look at the dog from the front and the side before you sew. A schnauzer should be level across the back, with the muzzle pointing forward and slightly down, not up.
Use whipstitch and the yarn tails. Sew through both layers. When a piece is already closed, catch surface stitches only, about 1 stitch deep, so the stuffing stays inside. Weave in every end as you finish each seam.
-
Muzzle. Pin the open edge of the muzzle to the front of the head so the top of the muzzle sits just under the safety eyes, almost touching them, and the nose is centered between the eyes. The muzzle should cover the lower front of the head and project about 3/4 inch (2 cm). Whipstitch all the way around. Add a pinch more stuffing before you close the last inch (2.5 cm) of the seam if the muzzle looks hollow.
-
Beard. Sew Row 1 of the beard along the underside of the muzzle and a short way up each side, centered under the nose. The loops hang down and slightly forward. Take the stitches through the sc edge only, not through the loops. The side ends of the beard should reach the corners of the muzzle, not the eyes.
-
Eyebrows. Sew one eyebrow above each eye, about 1/2 inch (13 mm) up, angled outward so the outer end points toward the ear. Loops face forward and slightly down over the top of the eye. Tack the center of each eyebrow; do not flatten the loops.
-
Ears. Pinch the foundation edge of each ear. Sew the pinched base to the side of the head between Rnds 5 and 8, with the inner corners of the two ears about 1.5 inches (4 cm) apart across the top of the skull. The ears should stand at the base and fall forward beside the cheeks. If they stick straight out, the pinch is too wide; fold a little more of the base under and sew again.
-
Head to body. Set the head on the upper front of the chest so the chest supports the chin and the top of the head rises above the back. The contact patch should be about 2 inches (5 cm) across. Sew through the center of the join several times first, to make a firm neck, then whipstitch around the outer edge. The muzzle stays clear of the chest.
-
Legs. Sew the open tops to the underside of the body, not to the side walls.
- Front legs: just behind the chest curve, with about 1 inch (2.5 cm) between them.
- Hind legs: under the rear third, same spacing, so the four feet make a rectangle a little longer than it is wide.
Flatten each open top into a small oval as you sew, and stitch around twice. Stand the dog up. All four feet should touch at once. If one leg is short, it is understuffed or sewn too far up the side; unpick that leg and reset it.
-
Tail. Sew the base of the tail to the top of the rump, centered, over about Rnds 20–21. Pose it straight up. A few extra stitches through the front of the tail base will hold it upright.
-
Chest patch. Sew the patch to the center of the chest, wide edge up, point down, between the front legs and the head. Keep it flat.
Finishing
- Brush the eyebrow loops forward with your fingers. If you cut the beard loops, trim them into a blunt chin shape, longer at the center and shorter toward the cheeks. Do not trim above the nose.
- Check that every washer is locked, every opening is closed, and every yarn tail is buried inside a stuffed piece.
- If the dog tips forward, move the hind legs a scant 1/4 inch (6 mm) farther back, or add a little more stuffing to the rump before you would have closed it. If you have already closed the body, a few extra stitches pulling the hind-leg tops slightly rearward will usually level it.
The finished dog is a display or gentle-play toy. Spot-clean only. Safety eyes can work loose in the wash, so do not machine-wash it.
Disclaimer: This pattern was generated by AI and should be reviewed for accuracy before use. While we strive for quality, AI-generated content may contain errors. Please verify measurements, stitch counts, charts, and instructions before beginning your project. Generated by purlJam.uk
Love this pattern?
Save this pattern to your free PurlJam libraryAccess your pattern anytime
Bookmark this page to access your pattern anytime