Type
Crochet
Difficulty
beginner
Category
amigurumi
AI Thinking Process
Planning
Verification
Pattern
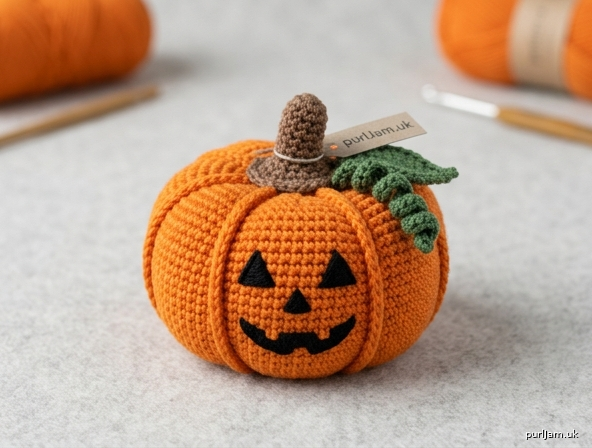
Halloween Ridge Pumpkin
An intermediate amigurumi pumpkin with eight deeply defined lobes, a flared stem, a leaf, a curling tendril and an optional jack-o’-lantern face. Worked in worsted-weight yarn with UK terms.
Skill level: Intermediate
Finished size: Approximately 8.5 cm (3¼ in) wide × 5.5 cm (2¼ in) tall for the body; 7.5 cm (3 in) tall including stem. Size will vary with tension and how firmly the ridges are pulled.
Yarn
Worsted weight (UK Aran / 10-ply); approx. 100 g = 200 m.
| Colour | Use | Amount |
|---|---|---|
| A Orange | Body and ridge wraps | 30 g |
| B Brown | Stem | 5 g |
| C Green | Leaf and tendril | 5 g |
| D Black | Optional face | small amount |
A bright pumpkin orange is traditional for Halloween; a cream or grey-green yarn makes a ghost or heirloom pumpkin.
Hook
3.5 mm crochet hook (or a hook 1–2 sizes smaller than the yarn label, to produce a dense fabric that does not show the stuffing).
Notions
- Polyester fibre fill
- Yarn needle
- Stitch marker
- Pins
- Scissors
- Optional: 8 locking stitch markers to mark ridge lines
Tension (gauge)
11 dc and 12 rnds = 5 cm (2 in) in dc, worked in the round, unblocked, using a 3.5 mm hook.
Tension is for fabric density, not fit. A slightly tighter fabric is better than a looser one. If your swatch is larger than 5 cm, go down a hook size.
Abbreviations (UK)
| Abb. | Meaning |
|---|---|
| BLO | back loop only |
| ch | chain |
| dc | double crochet (US sc) |
| dc2tog | double crochet 2 together (invisible decrease; see Special stitches) |
| dtr | double treble (US tr) |
| FLO | front loop only |
| htr | half treble (US hdc) |
| inc | increase — 2 dc in the same stitch |
| rnd(s) | round(s) |
| sl st | slip stitch |
| st(s) | stitch(es) |
| tr | treble (US dc) |
| yrh | yarn round hook |
| [ ] | stitch count at end of round |
Special stitches
Invisible decrease (dc2tog): Insert hook through the front loop of the next st, then through the front loop of the following st (3 loops on hook). Yrh, pull through both front loops (2 loops on hook). Yrh, pull through both loops. Use this decrease throughout the body so the surface stays smooth.
Magic ring: Adjustable ring. Work the stated stitches into the ring, then pull the tail to close.
Pattern notes
- This pattern uses UK crochet terms throughout. UK dc = US sc.
- The body is worked in a continuous spiral. Do not join and do not turn at the end of a round. Place a stitch marker in the first stitch of every round and move it up as you go.
- Work tightly so the stuffing cannot show.
- Stuff as directed, firmly, shaping the piece into a slightly flattened sphere. Soft stuffing will not hold the lobes.
- Stitch counts are given in square brackets. Each increase or decrease round includes an inline check.
- The eight ridges are structural, not decorative embroidery: a long strand of yarn A is wrapped through the centre of the pumpkin and pulled tight. Mark the eight meridians before wrapping.
- Safety: embroider the face. Do not use beads, buttons or safety eyes if the pumpkin may be used by children under 36 months.
Body (make 1 in A)
Worked in a continuous spiral.
Rnd 1: 6 dc in magic ring. [6] Rnd 2: Inc in each st around. [12] (6 increases → 6 + 6 = 12 ✓) Rnd 3: (1 dc, inc) 6 times. [18] (6 increases → 12 + 6 = 18 ✓) Rnd 4: (2 dc, inc) 6 times. [24] (6 increases → 18 + 6 = 24 ✓) Rnd 5: (3 dc, inc) 6 times. [30] (6 increases → 24 + 6 = 30 ✓) Rnd 6: (4 dc, inc) 6 times. [36] (6 increases → 30 + 6 = 36 ✓) Rnd 7: (5 dc, inc) 6 times. [42] (6 increases → 36 + 6 = 42 ✓) Rnd 8: (6 dc, inc) 6 times. [48] (6 increases → 42 + 6 = 48 ✓)
Rnds 9–16: 1 dc in each st around. [48] (8 rounds even; 48 stitches remain ✓)
The equator of the pumpkin is now established. If you wish, clip eight locking markers on Rnd 12, placing one marker every 6 stitches (48 ÷ 8 = 6 ✓). These mark the future ridge lines.
Rnd 17: (6 dc, dc2tog) 6 times. [42] (6 decreases → 48 − 6 = 42 ✓) Rnd 18: (5 dc, dc2tog) 6 times. [36] (6 decreases → 42 − 6 = 36 ✓) Rnd 19: (4 dc, dc2tog) 6 times. [30] (6 decreases → 36 − 6 = 30 ✓) Rnd 20: (3 dc, dc2tog) 6 times. [24] (6 decreases → 30 − 6 = 24 ✓)
Stuff firmly now, pressing the filling outwards so the sides are plump and the top and bottom are slightly flattened. Continue stuffing as you decrease. The piece should feel solid, not squashy.
Rnd 21: (2 dc, dc2tog) 6 times. [18] (6 decreases → 24 − 6 = 18 ✓) Rnd 22: (1 dc, dc2tog) 6 times. [12] (6 decreases → 18 − 6 = 12 ✓) Rnd 23: Dc2tog 6 times. [6] (6 decreases → 12 − 6 = 6 ✓)
Fasten off, leaving a 20 cm tail. Thread the tail through the front loops of the remaining 6 stitches and pull until a small dimple remains at the centre — do not close the hole completely flat. Weave in the tail around the dimple, leaving a tiny hollow for the stem. The matching dimple at the magic-ring end is the base.
Stem (make 1 in B)
Worked in a continuous spiral. The BLO round forms a small bark-like rim that sits in the top dimple.
Rnd 1: 6 dc in magic ring. [6] Rnd 2: Inc in each st around. [12] (6 increases → 6 + 6 = 12 ✓) Rnd 3: 1 dc BLO in each st around. [12] Rnd 4: (2 dc, dc2tog) 3 times. [9] (3 decreases → 12 − 3 = 9 ✓) Rnds 5–7: 1 dc in each st around. [9] (3 rounds even; 9 stitches remain ✓)
Stuff the stem lightly — just enough to hold the cylinder, not enough to stretch the stitches. Fasten off, leaving a 25 cm tail for sewing.
Leaf (make 1 in C)
Worked in rows around a foundation chain, in one pass.
Ch 9. Working into the back bumps of the chain: sl st in 2nd ch from hook, 1 dc, 1 htr, 1 tr, 1 tr, 1 htr, 1 dc, (1 dc, ch 2, 1 dc) in last ch. Rotate and work along the remaining loops of the foundation chain: 1 dc, 1 htr, 1 tr, 1 tr, 1 htr, 1 dc, sl st in the same ch as the first sl st.
Fasten off, leaving a 20 cm tail. The ch-2 tip is the pointed end of the leaf; the starting end is the base that sits against the stem. (8 sts each side of the tip plus the ch-2 picot ✓)
Tendril (make 1 in C)
Ch 20. 2 dc in 2nd ch from hook and in each ch to end. [38] (19 chains worked × 2 dc = 38 ✓)
The strip will coil on itself as you work. Fasten off, leaving a 15 cm tail. Gently stretch and release so the coil sits in a loose corkscrew.
Jack-o’-lantern face (optional, colour D)
Embroider the face after the ridges are set, so the features sit on the finished lobes.
Using a yarn needle and a long strand of D, work satin stitch (or closely packed backstitch) on the front two or three lobes:
- Eyes: two inverted triangles, each about 1.2 cm wide at the top and 1.5 cm tall, set roughly 1.5 cm apart. Keep them on the upper half of the body.
- Nose: a smaller inverted triangle, about 0.8 cm wide, centred below the eyes.
- Mouth: a shallow upward or downward crescent spanning two lobes, 3–4 cm wide, with two or three V-shaped notches along the upper or lower edge to suggest a carved grin.
Take the needle through the stuffing (not just under the surface stitches) so the embroidery cannot be picked loose. Tie off inside a ridge valley and bury the ends.
For a harvest pumpkin rather than a jack-o’-lantern, omit the face.
Assembly
1. Set the eight ridges (the structure of the pumpkin)
Cut a 1 m length of A. Thread it on a yarn needle.
Identify the centre of the base (the magic-ring dimple) and the centre of the top (the remaining dimple). If you did not mark them earlier, divide Rnd 12 into eight equal parts of 6 stitches and mark those meridians.
Take the needle in at the base centre, straight up through the middle of the stuffing, and out at the top centre. Carry the yarn down the outside of the pumpkin along the first marked meridian, back in at the base centre, and up through the top again. Pull firmly until a deep valley forms. Repeat for the remaining seven meridians, always travelling through the same two centre points and always exiting along a marked line.
After the eighth wrap, the pumpkin should have eight plump lobes and a clearly indented top and base, like a real squash. Tie the two ends together at the base with a surgeon’s knot, tug once more to equalise the valleys, and bury the ends inside the body.
If one lobe is larger than its neighbours, release that wrap a little and re-tension; 48 stitches allow exactly 6 stitches per lobe when the wraps sit on the marks.
2. Attach the stem
Pin the BLO rim of the stem into the top dimple, covering the hole and the ridge knots. Using the brown tail, sew around Rnd 3 of the stem with small whip stitches, catching pumpkin stitches in the valley of the dimple. The stem should sit slightly sunken, not perched on top.
3. Attach the leaf and tendril
Pin the base of the leaf against one side of the stem so the leaf lies along a ridge or slightly over a lobe. Sew with the green tail through the first two stitches of the leaf and into the stem and pumpkin. Pin the uncoiled end of the tendril under the leaf at the same point and sew securely. Allow the coil to spring around the stem.
4. Face
Embroider the jack-o’-lantern face as directed above, or leave the pumpkin plain.
Finishing
Weave in every remaining end, taking the needle through the stuffing for several centimetres before trimming. Roll the pumpkin gently between your palms to round the lobes. If a lobe looks under-filled, work a little extra fibre fill in through a valley with the blunt end of the needle, then re-tension that wrap.
Do not wet-block; amigurumi should keep its dense, stuffed shape. A brief shot of steam from a kettle, held well above the work, will settle the leaf if needed — do not press.
Size notes
- Larger display pumpkin: work two extra increase rounds after Rnd 8 — Rnd 9: (7 dc, inc) 6 times [54]; Rnd 10: (8 dc, inc) 6 times [60] — then work 10 even rounds at 60 sts and reverse the decreases. Use 6 ridges (every 10 sts) or 10 ridges (every 6 sts), not 8, so the count divides evenly.
- Keychain size: stop increasing at Rnd 6 [36], work 5 even rounds, decrease to close, and use 6 ridges (every 6 sts).
Colour ideas for Halloween
- Classic: orange body, brown stem, forest-green leaf, black face.
- Ghost pumpkin: cream or white body, pale-brown stem, no face or a simple grey smile.
- Witching-hour: deep purple or black body, green stem, lime leaf, no face.
- Candy corn: work Rnds 1–8 in yellow, Rnds 9–16 in orange, Rnds 17–23 in white, then ridge as usual.
Disclaimer: This pattern was generated by AI and should be reviewed for accuracy before use. While we strive for quality, AI-generated content may contain errors. Please verify measurements, stitch counts, charts, and instructions before beginning your project. Generated by purlJam.uk
Love this pattern?
Save this pattern to your free PurlJam libraryAccess your pattern anytime
Bookmark this page to access your pattern anytime