Type
Crochet
Difficulty
beginner
Category
amigurumi
AI Thinking Process
Planning
Pattern
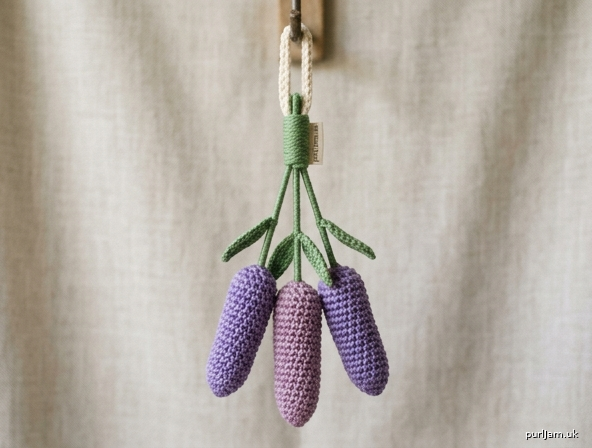
Hanging Lavender Bundle
A beginner amigurumi sprig bundle that hangs like drying lavender. Three slim flower spikes are worked as simple tubes, given tiny leaves, then wrapped together at the stem ends so the blossoms dangle. Hang it on a hook, cabinet knob, or rearview mirror. Optional dried lavender in the flower heads turns it into a scented sachet.
Skill level: Beginner
Techniques: Magic ring, single crochet in the round, increase, decrease, color change, simple flat leaf, sewing pieces together.
Finished Size
- One sprig: about 7" (18 cm) long
- Flower spike: about 2½" (6.5 cm) long × ⅝" (1.5 cm) diameter
- Stem: about 4½" (11.5 cm) long × ⅜" (1 cm) diameter
- Assembled bundle: about 7" (18 cm) long, not including the loop
- Hanging loop drop: about 3" (7.5 cm)
- Leaf: about 1½" (4 cm) long
Size varies with gauge and stuffing. A US G-6 (4.0 mm) hook yields a bundle about 8–9" (20.5–23 cm) long.
Materials
Yarn — worsted weight (4), cotton or acrylic
- Color A (lavender / purple): 25 yd (23 m) — 2 sprigs
- Color B (light purple or mauve): 15 yd (14 m) — 1 sprig
- Color C (leaf green): 40 yd (37 m) — stems, leaves, and wrapping
- Color D (cream, sage, or natural): 10 yd (9 m) — hanging loop and optional bow
If you have only one purple, use Color A for all 3 sprigs (about 35 yd / 32 m).
Hook: US E-4 (3.5 mm), or 1–2 sizes smaller than the yarn label, for firm amigurumi fabric
Notions:
- Polyester fiberfill (small amount)
- Yarn needle
- Stitch marker
- Scissors
- Optional: dried lavender buds to mix into the flower stuffing
- Optional: 6" (15 cm) pipe cleaner or floral wire per sprig if you want posable stems
Gauge
5 sc × 5 rnds = 1" (2.5 cm) worked in the round, unstuffed, with US E-4 (3.5 mm).
Gauge is not critical for a hanging decoration, but a firm fabric (no stuffing showing through) is. If the fabric is loose or holey, go down a hook size.
Abbreviations (US terms)
- ch — chain
- sc — single crochet
- hdc — half double crochet
- dc — double crochet
- inc — increase (2 sc in the same stitch)
- dec — decrease (sc2tog; invisible decrease recommended)
- sl st — slip stitch
- st(s) — stitch(es)
- rnd(s) — round(s)
- MR — magic ring (magic circle)
- FO — fasten off
- BLO — back loop only
Special Stitches
Invisible decrease (recommended): Insert hook under the front loop of the next st, then under the front loop of the following st, yarn over, pull through both front loops, yarn over, pull through both loops on hook.
Magic ring: Wrap yarn around a finger to form a ring, work the stated sc into the ring, then pull the tail to close. If you prefer not to use a magic ring, ch 2 and work Rnd 1 into the 2nd ch from the hook.
Pattern Notes
- Work sprigs in continuous spirals. Do not join or turn at the end of a round. Mark the first stitch of every round and move the marker up as you go.
- US crochet terms throughout (sc = UK dc).
- Work tightly so the flower heads hold their shape and the stems stay slim.
- Stuff only the flower. Leave the stem empty so the three stems cinch together.
- Change color in the last yarn-over of the last stitch of the old color: yarn over with the new color and complete the stitch. Drop the old color and weave it in later.
- Parentheses ( ) mean a sequence to repeat. Brackets [ ] are the stitch count at the end of the round.
- The checkmarks confirm the math for that round.
Sprig (make 3)
Make 2 in Color A and 1 in Color B, each with a Color C stem.
Begin at the flower tip with Color A or B.
Rnd 1: 6 sc in MR. Pull ring closed. [6]
Rnd 2: (sc, inc) around. [9] (3 sc + 3 inc = 9 ✓)
Rnds 3–12: sc around. [9] (10 rnds at 9 sts ✓)
The flower now measures about 2¼" (5.5 cm) from the tip. Stuff the flower firmly but not so full that the stitches stretch. Mix a pinch of dried lavender into the fiberfill if you want a scented bundle. Do not stuff past this point.
Rnd 13: (sc, dec) around. [6] (3 sc + 3 dec = 6 ✓)
Change to Color C in the last yarn-over of the last dec.
Rnds 14–35: sc around. [6] (22 rnds at 6 sts ✓)
The stem measures about 4½" (11.5 cm). The whole sprig measures about 7" (18 cm).
FO, leaving a 6" (15 cm) tail. Do not close the stem end — the open end will be hidden inside the wrapping. Weave in the starting tail at the flower tip, pulling it to the inside.
Optional ridge texture: Work Rnds 3–12 in BLO for stacked-floret ridges. Counts stay [9].
Optional posable stem: After Rnd 14, slide a 6" (15 cm) pipe cleaner into the stem, folded in half if needed so no wire pokes out. Keep the flower stuffing above the wire.
Leaf (make 6)
Worked flat in Color C. Make 2 leaves per sprig.
Ch 8.
Work in the 2nd ch from the hook and in each ch across, then continue around the other side of the foundation chain:
Sc in 2nd ch from hook, hdc in next ch, dc in next 3 ch, hdc in next ch, 3 sc in last ch; rotate to work along the opposite side of the chain: hdc in next ch, dc in next 3 ch, hdc in next ch, sc in last ch. Sl st to the first sc to join.
FO, leaving an 8" (20 cm) tail for sewing.
The leaf is a small pointed oval, about 1½" (4 cm) long. Weave in the starting tail. Keep the long tail for assembly.
Hanging Loop
With Color D (or Color C).
Ch 30, sl st in the first ch to form a ring, being careful not to twist. Ch 1, sl st in each ch around to make a firm cord. [30 sl st]
FO, leaving a 10" (25 cm) tail for sewing.
Folded in half, the loop drops about 3" (7.5 cm). For a longer drop, ch 40 instead; for a shorter drop, ch 20.
Assembly
Use the yarn needle and matching tails. Pin pieces first if it helps.
1. Attach the leaves
On each sprig, sew 2 leaves onto the green stem, about ½–¾" (1.5–2 cm) below the purple-to-green color change. Angle them slightly downward and offset them so they are not directly opposite each other. Stitch through the center of the leaf base several times. Weave in ends.
2. Bundle the sprigs
Hold all 3 sprigs together with the open stem ends even. Slide the sprigs so the three flower tips sit at slightly different heights — about ½" (1.5 cm) apart — for a natural dried-bunch look. The Color B sprig looks best as the middle or shortest spike.
3. Wrap the stem ends
With Color C (or D), wrap the lower 1" (2.5 cm) of the three stems tightly, 18–25 times, covering the open ends completely. Tie a firm square knot. Thread both wrap tails onto the needle and bury them under the wrapping so nothing shows or snags.
4. Attach the hanging loop
The bundle hangs flowers down, from the wrapped stem ends. Sew both cut ends of the hanging loop into the center of the wrapping. Pass the needle through the wrapping and through at least one stem wall 4–5 times so the loop cannot pull out. Weave in the remaining tail under the wrap.
5. Optional bow
With Color D, ch 40 and FO. Tie around the wrapping as a small bow. Tack the knot with a couple of stitches so it cannot slip.
Finishing
- Steam-block the leaves lightly if they curl (hold an iron above them; do not press stuffed flowers).
- Trim every stray end.
- Check that the hanging loop is secure by lifting the bundle from the loop before hanging it.
- Hang from a hook, peg, cabinet knob, or suction hook, out of direct sun so the purple stays bright.
Safety note: This is a decorative hanging piece. If you added dried lavender or wire, it is not a toy and is not for children under 3.
Variations
- Single sprig: Make 1 sprig, close the stem with (dec around) to [3], FO, and sew a small ch-20 loop to the stem end.
- Mini / keychain size: Stop the flower after Rnd 8, work the stem for 12 rnds only (Rnds 9–20), and add a keychain finding to the loop. Finished sprig about 4" (10 cm).
- Larger bundle: Add a 4th sprig, or work 2 extra even flower rounds (Rnds 3–14 at [9]) and 6 extra stem rounds (Rnds 14–41 at [6]) for an 8½" (21.5 cm) sprig.
- Two-tone florets: Work Rnds 1–7 in Color A and Rnds 8–13 in Color B before changing to green.
- Scented sachet: Stuff each flower with a 1:1 mix of fiberfill and dried lavender buds. Do not overfill or the dried material will show through.
Stitch-Count Recap
| Piece | Start | Key counts | End |
|---|---|---|---|
| Flower tip | MR [6] | Rnd 2 → [9] (6 + 3 = 9 ✓) | Rnds 3–12 stay [9] |
| Calyx | Rnd 13 | (sc, dec) × 3 | [6] (9 − 3 = 6 ✓) |
| Stem | Rnds 14–35 | 22 even rnds | [6] |
| Full sprig | 35 rnds | 35 ÷ 5 rnds per inch | 7" (18 cm) ✓ |
| Hanging loop | ch 30 | sl st around | 3" (7.5 cm) drop |
Enjoy your hanging lavender.
Disclaimer: This pattern was generated by AI and should be reviewed for accuracy before use. While we strive for quality, AI-generated content may contain errors. Please verify measurements, stitch counts, charts, and instructions before beginning your project. Generated by purlJam.uk
Love this pattern?
Save this pattern to your free PurlJam libraryAccess your pattern anytime
Bookmark this page to access your pattern anytime