Type
Crochet
Difficulty
beginner
Category
amigurumi
AI Thinking Process
Planning
Verification
Pattern
Haunted House Plush
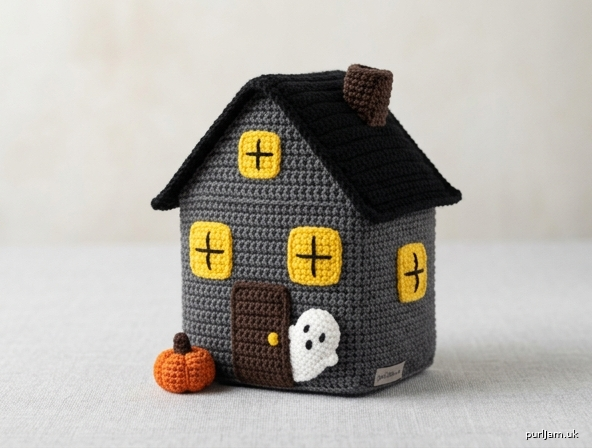
A beginner amigurumi haunted house worked from simple single-crochet shapes: four walls, a floor, a folded roof, and a tiny chimney. Yellow windows glow against charcoal walls; add the optional ghost and pumpkin for extra Halloween charm.
Skill level: Beginner
Skills used: Chain, single crochet, increase, decrease, magic ring (or ch-2 start), sewing pieces together, simple embroidery
Finished Size
Approximately 4 inches wide × 2¾ inches deep × 5½ inches tall (10 cm × 7 cm × 14 cm), including chimney, using the stated gauge and worsted yarn.
Materials
Yarn: Worsted weight (category 4)
- Color A (house): Charcoal gray — 55 yd / 50 m (about 1 oz / 30 g)
- Color B (roof): Black — 40 yd / 37 m
- Color C (door, chimney): Dark brown — 15 yd / 14 m
- Color D (windows): Bright yellow — 8 yd / 7 m
- Color E (ghost, optional highlights): White — 15 yd / 14 m
- Color F (pumpkin): Orange — 8 yd / 7 m
One skein of Color A and leftover balls of the others are plenty.
Hook: US E-4 (3.5 mm), or two sizes smaller than the yarn label so stitches are tight and stuffing does not show
Notions:
- Polyester fiberfill stuffing
- Yarn needle
- Stitch marker (for pieces worked in the round)
- Pins
- Scissors
- Black embroidery floss or a short length of Color B (faces, window panes, “RIP”)
- Optional: 6 mm safety eyes for the ghost (use embroidery instead if the toy is for a child under 3)
Gauge
5 sc and 6 rows = 1 inch (2.5 cm) in single crochet, worked tightly.
Gauge is important for a firm toy that stands up. If your swatch is larger than 1 inch, go down a hook size. A small difference will change the finished size but will not break the pattern.
Abbreviations (US)
- ch — chain
- sc — single crochet
- inc — 2 sc in the same stitch
- dec — single crochet 2 stitches together (invisible decrease preferred)
- sl st — slip stitch
- st(s) — stitch(es)
- rnd(s) — round(s)
- MR — magic ring
- FO — fasten off
- RS — right side
Invisible decrease: Insert hook through the front loop of the next st, then through the front loop of the following st, yarn over, pull through both loops, yarn over, pull through 2. A regular sc2tog is fine if you prefer it.
Pattern Notes
- Work panel rows tightly. Turning chain 1 does not count as a stitch.
- The first sc of each row is worked in the first stitch (the same stitch as the turning chain sits beside).
- Magic-ring alternative for all round pieces: ch 2, work the Rnd 1 stitches into the 2nd ch from the hook, then pull the tail to close the hole.
- Leave long tails (12–18 inches / 30–45 cm) on every piece for sewing.
- Sew windows and door onto the walls before assembling the box — it is much easier on a flat piece.
- Stuff the house firmly, pushing fiberfill into all four bottom corners so the toy stands.
- Pin every seam before sewing. Use whip stitch or mattress stitch with matching yarn.
- If the toy is for a child under 3 years, embroider all faces and sew pieces on very securely. Do not use safety eyes or glued felt.
House Panels
Front (make 1 in Color A)
Ch 21.
Row 1: Sc in 2nd ch from hook and in each ch across. [20 sc]
Rows 2–18: Ch 1, turn, sc in each st across. [20 sc]
Begin gable (decrease 2 stitches every row: 20 − 2 = 18 ✓):
Row 19: Ch 1, turn, dec, sc in next 16 sts, dec. [18]
Row 20: Ch 1, turn, dec, sc in next 14 sts, dec. [16] (18 − 2 = 16 ✓)
Row 21: Ch 1, turn, dec, sc in next 12 sts, dec. [14]
Row 22: Ch 1, turn, dec, sc in next 10 sts, dec. [12]
Row 23: Ch 1, turn, dec, sc in next 8 sts, dec. [10]
Row 24: Ch 1, turn, dec, sc in next 6 sts, dec. [8]
Row 25: Ch 1, turn, dec, sc in next 4 sts, dec. [6]
Row 26: Ch 1, turn, dec, sc in next 2 sts, dec. [4]
Row 27: Ch 1, turn, dec, dec. [2] (4 − 2 = 2 ✓)
FO, leaving a long tail.
Back (make 1 in Color A)
Work exactly as for Front.
Sides (make 2 in Color A)
Ch 15.
Row 1: Sc in 2nd ch from hook and in each ch across. [14 sc]
Rows 2–18: Ch 1, turn, sc in each st across. [14 sc]
FO, leaving a long tail.
Bottom (make 1 in Color A)
Ch 21.
Row 1: Sc in 2nd ch from hook and in each ch across. [20 sc]
Rows 2–14: Ch 1, turn, sc in each st across. [20 sc]
FO, leaving a long tail.
The 20-st edges match the front and back. The 14-row edges match the 14 sts of each side.
Roof (make 1 in Color B)
Ch 19.
Row 1: Sc in 2nd ch from hook and in each ch across. [18 sc]
Rows 2–34: Ch 1, turn, sc in each st across. [18 sc]
FO, leaving a long tail.
The rectangle folds in half (17 rows + 17 rows) to form both roof slopes, with a little overhang at the eaves.
Chimney (make 1 in Color C)
Worked in continuous rounds. Mark the first stitch of each round.
Rnd 1: 6 sc in MR. [6]
Rnd 2: Inc in each st around. [12] (6 increases → 6 + 6 = 12 ✓)
Rnds 3–6: Sc in each st around. [12]
Stuff lightly. FO, leaving a long tail.
Windows and Door
Main windows (make 3 in Color D)
Ch 6.
Row 1: Sc in 2nd ch from hook and in each ch across. [5 sc]
Rows 2–5: Ch 1, turn, sc in each st across. [5 sc]
FO, leaving a tail for sewing.
Attic window (make 1 in Color D)
Ch 4.
Row 1: Sc in 2nd ch from hook and in each ch across. [3 sc]
Rows 2–3: Ch 1, turn, sc in each st across. [3 sc]
FO, leaving a tail for sewing.
Door (make 1 in Color C)
Ch 8.
Row 1: Sc in 2nd ch from hook and in each ch across. [7 sc]
Rows 2–10: Ch 1, turn, sc in each st across. [7 sc]
FO, leaving a tail for sewing.
Optional Extras
Little Ghost (Color E)
Worked in continuous rounds.
Rnd 1: 6 sc in MR. [6]
Rnd 2: Inc in each st around. [12] (6 increases → 6 + 6 = 12 ✓)
Rnd 3: (Sc in next st, inc) around. [18] (6 increases → 12 + 6 = 18 ✓)
Rnds 4–6: Sc in each st around. [18]
Rnd 7: (Sc in next st, dec) around. [12] (6 decreases → 18 − 6 = 12 ✓)
Stuff firmly.
Rnd 8: Dec around. [6] (6 decreases → 12 − 6 = 6 ✓)
FO. Thread tail through the front loops of the remaining 6 sts, pull closed, and weave in.
With black yarn or floss, embroider two small oval eyes and a tiny round mouth.
Tiny Pumpkin (Color F)
Rnd 1: 6 sc in MR. [6]
Rnd 2: Inc in each st around. [12] (6 increases → 6 + 6 = 12 ✓)
Rnds 3–4: Sc in each st around. [12]
Rnd 5: Dec around. [6] (6 decreases → 12 − 6 = 6 ✓)
Stuff lightly. FO and close the hole as for the ghost.
To make ridges, thread a long tail of Color F on a yarn needle, take the needle through the center of the pumpkin from bottom to top, wrap the yarn tightly down one side, and return through the center. Repeat 5 more times around (6 segments). Tie off at the bottom.
Stem: With Color C, ch 4. Sl st in 2nd ch from hook and in each remaining ch. [3 sl st] FO. Sew the stem to the top of the pumpkin.
Tombstone (optional, Color A or leftover gray)
Ch 7.
Row 1: Sc in 2nd ch from hook and in each ch across. [6 sc]
Rows 2–8: Ch 1, turn, sc in each st across. [6 sc]
Row 9: Ch 1, turn, dec, sc in next 2 sts, dec. [4] (6 − 2 = 4 ✓)
FO. Embroider RIP in black. Sew to the base beside the house if you like.
Appliqué (do this before joining the walls)
All placement is measured on the right side, with Row 1 at the bottom.
Front:
- Door: Center the 7-st door along the bottom edge. (20 − 7 = 13 leftover sts → about 6 sts of wall show on the left and 7 on the right, or shift it slightly off-center for a crooked haunted look.) Sew with Color C.
- Doorknob: French knot or a few small stitches in Color B (or yellow) on the left or right edge of the door.
- Two main windows: Sew one yellow 5 × 5 window on each side of the door, about 3 rows above the door top and 2 sts in from each side edge.
- Attic window: Center the 3 × 3 window on the gable, about 2 rows above the start of the decreases.
One side wall:
- Sew the remaining 5 × 5 window, slightly off-center and a little high — crooked windows look more haunted.
Window panes: With Color B (or black floss), embroider a plus sign (+) on each yellow window — one vertical stitch and one horizontal stitch through the center.
Boarded window (optional): On the side window only, embroider a large X in Color C instead of a plus sign, so that window looks boarded up.
Weave in appliqué tails on the wrong side of each wall.
Assembly
1. Build the box
Lay the Bottom flat, RS up. Pin the Front, Back, and two Sides around it:
- 20-st bottom edge of Front to one 20-st edge of Bottom
- 20-st bottom edge of Back to the opposite 20-st edge of Bottom
- 14-st bottom edge of each Side to each 14-row edge of Bottom
Whip stitch these four seams with Color A.
Stand the walls up. Pin and sew the four vertical corners (18 rows each), matching Front/Back to the Sides. The gables on Front and Back stand above the side walls — that is correct.
2. Stuff
Stuff the house firmly. Push extra stuffing into all four bottom corners and along the top of each side wall so the walls stay straight. The house should stand on its own.
3. Attach the roof
Fold the Roof rectangle in half so you have two 18-st × 17-row layers. The fold is the ridge.
Pin the fold along the line that joins the two gable peaks (Front peak to Back peak). Drape each half down a gable slope. The 18-st width runs from front overhang to back overhang (house depth is 14 sts, so you have about 2 sts of overhang at each gable). The extra rows hang slightly over the side walls as eaves.
With Color B, sew each short (18-st) end of the roof to the matching gable slope of Front and Back. Then sew the long eave edges to the top of each Side wall, leaving the overhang free. Take a few stitches through the ridge into the stuffing if the roof wants to lift.
4. Chimney
Place the chimney on one roof slope, about ½ inch (1.5 cm) down from the ridge and a little off-center. Sew around the base with Color C, adding a pinch of stuffing if needed as you close.
5. Optional characters
- Sit the ghost on the roof ridge, peeking over the attic, or beside the door. Tack it down with a few stitches in Color E.
- Set the pumpkin next to the door and tack it in place with Color F.
- Sew the tombstone to the Bottom, just beside one front corner.
Finishing
Weave in every remaining tail.
If the house leans, massage more stuffing into the low corner through a seam, then restitch.
For a spookier night-time look, add a second French knot as a porch light above the door in Color D.
Your haunted house is ready to lurk on a shelf, a mantel, or a Halloween table.
Disclaimer: This pattern was generated by AI and should be reviewed for accuracy before use. While we strive for quality, AI-generated content may contain errors. Please verify measurements, stitch counts, charts, and instructions before beginning your project. Generated by purlJam.uk
Love this pattern?
Save this pattern to your free PurlJam libraryAccess your pattern anytime
Bookmark this page to access your pattern anytime