Type
Crochet
Difficulty
beginner
Category
amigurumi
AI Thinking Process
Planning
Verification
Pattern
Hello Kitty–Style Head (Beginner Amigurumi)
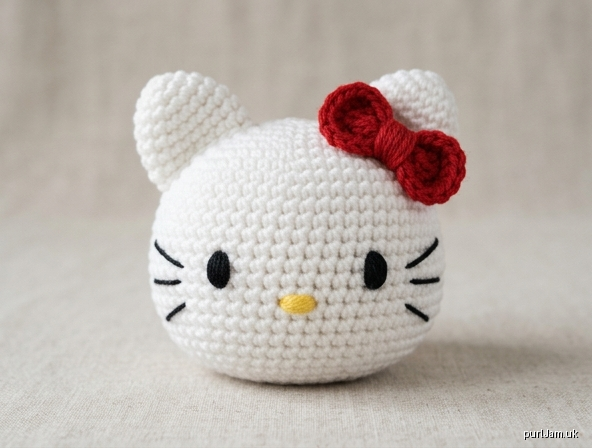
A simple stuffed head with oval ears, a bow, and an embroidered face. Uses only single crochet, increases, and decreases.
Skill level: Beginner
Finished size: About 3–3.5" (8–9 cm) head diameter; about 4–4.5" (10–11.5 cm) tall including ears, with worsted yarn.
Materials
- Worsted weight (4) yarn: white (MC) ~40 yd (37 m); red (bow) ~8 yd (7 m); small amounts black and yellow for face
- US E-4 / 3.5 mm hook (go down 1–2 sizes from the yarn label for tight fabric)
- Polyester fiberfill
- Yarn needle
- Stitch marker
- Optional: 9 mm safety eyes (or embroider eyes)
- Optional: pink yarn or embroidery floss for cheeks
Gauge
5 sc and 5 rnds = 1" (2.5 cm) in sc in the round, unstretched. Gauge is for size, not drape. If your fabric is loose or stuffing shows, go down a hook size.
Abbreviations (US)
ch = chain
sc = single crochet
inc = 2 sc in same stitch
dec = sc2tog (invisible decrease preferred)
st(s) = stitch(es)
rnd = round
sl st = slip stitch
FO = fasten off
MC = main color (white)
Work in continuous spirals unless noted. Use a stitch marker in the first stitch of each round. Do not join rounds.
Head (white)
Rnd 1: 6 sc in magic ring. [6]
Rnd 2: inc in each st. [12] (6 inc → 6 + 6 = 12 ✓)
Rnd 3: (sc, inc) around. [18] (6 inc → 12 + 6 = 18 ✓)
Rnd 4: (2 sc, inc) around. [24] (6 inc → 18 + 6 = 24 ✓)
Rnds 5–10: sc around. [24] (6 even rounds)
Rnd 11: (2 sc, dec) around. [18] (6 dec → 24 − 6 = 18 ✓)
Insert safety eyes now if using, between Rnds 7 and 8, about 6 sts apart, centered on the face. Stuff firmly.
Rnd 12: (sc, dec) around. [12] (6 dec → 18 − 6 = 12 ✓)
Add more stuffing.
Rnd 13: dec around. [6] (6 dec → 12 − 6 = 6 ✓)
FO, leaving a 8" (20 cm) tail. Thread tail through remaining 6 sts, pull closed, weave in.
Ears (white, make 2)
Rnd 1: 6 sc in magic ring. [6]
Rnd 2: (sc, inc) around. [9] (3 inc → 6 + 3 = 9 ✓)
Rnds 3–4: sc around. [9]
FO, leaving a 10" (25 cm) tail for sewing. Do not stuff (or stuff very lightly). Flatten each ear into a rounded triangle/oval.
Bow (red)
Center band
Ch 6.
Row 1: sc in 2nd ch from hook and in each ch across. [5]
Rows 2–3: ch 1, turn, sc across. [5]
FO, leaving a tail. Wrap the long tail tightly around the center 4–5 times to cinch a bow shape; knot at back.
Alternatively, make two small ovals:
Rnd 1: 6 sc in magic ring. [6]
Rnd 2: inc around. [12]
FO. Pinch each oval in the middle and wrap yarn around the pinch; sew the two halves together at the wrap.
Face (embroidery)
Use black yarn or embroidery floss and a yarn needle.
- Eyes: If not using safety eyes, satin-stitch or French-knot two ovals between Rnds 7–8, about 6 sts apart.
- Nose: Small yellow oval or 3–4 satin stitches, centered, 1 rnd below the eyes.
- Whiskers: Three straight stitches on each side of the face, about ½" (1.3 cm) long, radiating from beside the nose.
- Mouth: Optional tiny black line under the nose.
- Cheeks: Optional small pink French knots or felt circles below and outside the eyes.
Assembly
- Pin ears on top of the head, slightly toward the back, about 4–5 sts apart at the inner edges, sitting on Rnds 3–5. Sew with whip stitch through both layers of each ear.
- Pin bow on the left ear (wearer’s left) or just in front of the left ear. Sew securely through the cinched center.
- Weave in all ends. Shape the head with your hands so it is round.
Finishing notes
- Work tightly so stuffing does not show.
- Stuff as you go; the last decrease rounds are hard to stuff later.
- For a keychain, add a jump ring through a stitch at the top of the head after assembly.
- For young children, embroider all features (no safety eyes or glued felt).
Enjoy your Hello Kitty–style head!
Disclaimer: This pattern was generated by AI and should be reviewed for accuracy before use. While we strive for quality, AI-generated content may contain errors. Please verify measurements, stitch counts, charts, and instructions before beginning your project. Generated by purlJam.uk
Love this pattern?
Save this pattern to your free PurlJam libraryAccess your pattern anytime
Bookmark this page to access your pattern anytime