Type
Crochet
Difficulty
beginner
Category
amigurumi
AI Thinking Process
Planning
Verification
Pattern
Hiccup the Dragon Trainer
Crochet Toy — Simple Shapes (How to Train Your Dragon inspired)
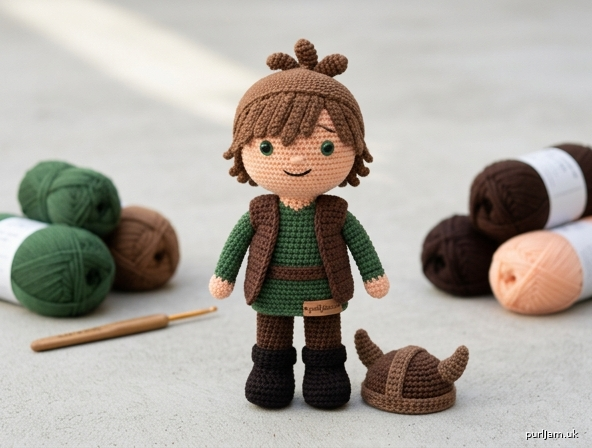
An unofficial fan-made amigurumi of Hiccup: a small standing figure built from a sphere head, cylinder body, and tube limbs. Color-blocked green tunic, brown belt, and brown pants, with a sewn hair cap, optional vest panels, and an optional horned helmet. Beginner-friendly — single crochet in the round, simple rectangles, and basic sewing.
Skill level: Beginner
Finished size: About 5½" (14 cm) tall, using worsted yarn and a US E-4 (3.5 mm) hook.
Materials
Yarn: Worsted weight (4), acrylic or cotton. Approximate amounts:
- Color A (skin / peach): 20 yd (18 m)
- Color B (hair / medium brown): 20 yd (18 m)
- Color C (tunic / forest green): 25 yd (23 m)
- Color D (pants, vest, belt / dark brown): 30 yd (27 m)
- Color E (boots / darker brown or black-brown): 15 yd (14 m)
- Color F (helmet / warm brown or gray-brown): 20 yd (18 m) — optional
- Scraps of black and forest green for embroidery
Hook: US E-4 (3.5 mm), or 1–2 sizes smaller than the yarn label so stitches are tight and stuffing does not show.
Notions:
- Polyester fiberfill stuffing
- Yarn needle
- Stitch marker
- 8 mm green safety eyes (or embroider eyes — required if the toy is for a child under 3)
- Pins for assembly
- Optional: small amount of light brown for freckles
Gauge
5 sc and 5 rnds = 1" (2.5 cm) in single crochet, worked tightly in the round.
Gauge is a guide for size, not a fit garment. A slightly tighter fabric is better than a looser one. If your fabric is loose and stuffing shows, go down a hook size.
Abbreviations (US)
- ch — chain
- sc — single crochet
- inc — increase (2 sc in the same stitch)
- dec — invisible decrease (single crochet 2 stitches together)
- sl st — slip stitch
- st(s) — stitch(es)
- rnd(s) — round(s)
- MR — magic ring
- BLO — back loop only
- FO — fasten off
- [ ] — stitch count at end of round or row
Pattern notes
- Work in continuous spirals unless a row is specified. Do not join at the end of each round. Mark the first stitch of every round and move the marker up as you go.
- Use the invisible decrease for a smoother surface.
- Stuff firmly as you go. It is hard to add stuffing after a piece is closed.
- Change color on the last yarn over of the last stitch of the old color.
- Weave in starting tails as you work when you can; leave long tails (about 12" / 30 cm) for sewing.
- This is an unofficial fan pattern inspired by the character and is not affiliated with DreamWorks.
Head (Color A)
Rnd 1: 6 sc in MR [6]
Rnd 2: inc in each st around [12] (6 increases → 6 + 6 = 12 ✓)
Rnd 3: (sc, inc) around [18] (6 increases → 12 + 6 = 18 ✓)
Rnd 4: (2 sc, inc) around [24] (6 increases → 18 + 6 = 24 ✓)
Rnd 5: (3 sc, inc) around [30] (6 increases → 24 + 6 = 30 ✓)
Rnds 6–10: sc around [30] (5 rounds)
Eyes: Insert 8 mm green safety eyes between Rnds 7 and 8, about 6 stitches apart, centered on the face. If you are embroidering eyes instead, skip this and add them after stuffing.
Rnd 11: (3 sc, dec) around [24] (6 decreases → 30 − 6 = 24 ✓)
Rnd 12: (2 sc, dec) around [18] (6 decreases → 24 − 6 = 18 ✓)
Stuff the head firmly, shaping it into a smooth sphere.
Rnd 13: (sc, dec) around [12] (6 decreases → 18 − 6 = 12 ✓)
Rnd 14: dec around [6] (6 decreases → 12 − 6 = 6 ✓)
FO, leaving a 8" (20 cm) tail. Thread the tail through the front loops of the remaining 6 stitches, pull closed, and weave in.
Face (after hair is placed, or now if you prefer): With black yarn, embroider a small straight or slightly curved smile, 2 stitches wide, about 2 rounds below the eyes. For a nose, make 2–3 small vertical stitches in Color A (or a slightly darker peach) centered between the eyes. Optional freckles: 3 tiny French knots in light brown on each cheek.
Hair cap (Color B)
The cap covers the top, back, and sides of the head and leaves the face open.
Rnd 1: 6 sc in MR [6]
Rnd 2: inc in each st around [12] (6 increases → 6 + 6 = 12 ✓)
Rnd 3: (sc, inc) around [18] (6 increases → 12 + 6 = 18 ✓)
Rnd 4: (2 sc, inc) around [24] (6 increases → 18 + 6 = 24 ✓)
Rnd 5: (3 sc, inc) around [30] (6 increases → 24 + 6 = 30 ✓)
Rnds 6–9: sc around [30] (4 rounds)
FO, leaving a 24" (60 cm) tail for sewing.
Bangs (worked in rows on the cap, before sewing it down):
Join Color B with a sl st at the front edge of Rnd 9, in the stitch that will sit at the left temple.
Row 1: sc in next 10 sts, turn [10]
Row 2: ch 1, sc in each st across, turn [10]
Row 3: ch 1, sc in each st across [10]
FO, leaving a 12" (30 cm) tail. These 10 stitches are the forehead bangs; the remaining 20 stitches of the cap stay as the hairline around the sides and nape.
Messy tufts (make 3):
Ch 7, sl st in 2nd ch from hook and in each ch across [6 sl st]. FO, leaving a tail. Sew the three tufts in a small cluster at the back crown for Hiccup’s shaggy back hair. (For the later-movie look, cluster them into a tiny ponytail at the nape instead.)
Body (Colors C and D)
Begin at the neck with Color C (green).
Rnd 1: 6 sc in MR [6]
Rnd 2: inc in each st around [12] (6 increases → 6 + 6 = 12 ✓)
Rnd 3: (sc, inc) around [18] (6 increases → 12 + 6 = 18 ✓)
Rnd 4: (2 sc, inc) around [24] (6 increases → 18 + 6 = 24 ✓)
Rnds 5–10: sc around [24] (6 rounds of tunic)
Change to Color D (dark brown) for the belt.
Rnd 11: sc around [24]
Stay in Color D for the pants.
Rnds 12–14: sc around [24] (3 rounds)
Rnd 15: (2 sc, dec) around [18] (6 decreases → 24 − 6 = 18 ✓)
Stuff the body firmly, especially the neck (Rnd 1–3) so the head sits stably.
Rnd 16: (sc, dec) around [12] (6 decreases → 18 − 6 = 12 ✓)
Rnd 17: dec around [6] (6 decreases → 12 − 6 = 6 ✓)
FO, close the hole as for the head, and weave in.
Arms (make 2)
Begin with Color A (hands).
Rnd 1: 6 sc in MR [6]
Rnd 2: sc around [6]
Change to Color C (sleeves).
Rnds 3–9: sc around [6] (7 rounds)
Stuff lightly — a pencil-thin filling is enough. Do not overstuff or the arms will stick out stiffly. FO, leaving a 12" (30 cm) tail for sewing.
Legs (make 2)
Begin with Color E (boots).
Rnd 1: 6 sc in MR [6]
Rnd 2: inc in each st around [12] (6 increases → 6 + 6 = 12 ✓)
Rnds 3–5: sc around [12] (3 rounds of boot)
Change to Color D (pants).
Rnds 6–11: sc around [12] (6 rounds)
Stuff firmly, more in the boot than at the top. FO, leaving a 12" (30 cm) tail for sewing. Leave the top open.
Vest panels (make 2, Color D) — optional
Worked in rows.
Row 1: Ch 6, sc in 2nd ch from hook and in each ch across [5]
Rows 2–8: Ch 1, turn, sc in each st across [5]
FO, leaving a 14" (35 cm) tail. These two small rectangles sit on the front of the torso like Hiccup’s open vest.
Helmet (Color F) — optional
Worked slightly larger than the head so it can sit over the hair cap.
Rnd 1: 6 sc in MR [6]
Rnd 2: inc in each st around [12] (6 increases → 6 + 6 = 12 ✓)
Rnd 3: (sc, inc) around [18] (6 increases → 12 + 6 = 18 ✓)
Rnd 4: (2 sc, inc) around [24] (6 increases → 18 + 6 = 24 ✓)
Rnd 5: (3 sc, inc) around [30] (6 increases → 24 + 6 = 30 ✓)
Rnd 6: (4 sc, inc) around [36] (6 increases → 30 + 6 = 36 ✓)
Rnds 7–10: sc around [36] (4 rounds)
Rnd 11: sc in BLO around [36] (creates a slight brim)
FO, weave in the starting tail, and leave a short tail at the brim or weave it in — the helmet is not sewn down unless you want it permanent.
Horns (make 2, Color F or a slightly lighter brown):
Rnd 1: 4 sc in MR [4]
Rnd 2: (sc, inc) around [6] (2 increases → 4 + 2 = 6 ✓)
Rnd 3: sc around [6]
Rnd 4: (2 sc, inc) around [8] (2 increases → 6 + 2 = 8 ✓)
Rnd 5: sc around [8]
Stuff the tip lightly. FO, leaving a 10" (25 cm) tail. Flatten the open edge slightly and sew each horn to the helmet at Rnds 4–6, about 8–10 stitches apart, angling them up and a little back.
Assembly
Pin every piece before sewing. Use matching yarn and a yarn needle. Whip stitch or mattress stitch through the outside loops.
-
Hair. Pull the hair cap over the head so Rnd 1 sits at the crown. The 20-stitch back/side edge should sit around the nape and temples; the 10-stitch bang flap should fall onto the forehead, stopping just above the eyes. Sew the cap edge to the head all the way around. Tack the bangs down in a few places so they stay messy but do not cover the eyes. Sew the three tufts to the back crown (or nape ponytail).
-
Head to body. Sew the closed neck (body Rnds 1–2) to the underside of the head, slightly toward the back of the head so Hiccup looks like he has a chin. The face should tilt a little forward, not stare at the ceiling. Add a pinch of extra stuffing in the neck as you close if the joint feels loose.
-
Arms. Sew one arm to each side of the body at Rnds 4–5, about 8 stitches apart across the chest. Attach them just below the neck, angled slightly forward.
-
Legs. Sew the open top of each leg to the bottom of the body (around Rnds 15–17), about 2 stitches apart at the inner edges so he can stand. Keep both boots pointing forward. If he wobbles, add a little more stuffing in the hips through a gap before the last stitches.
-
Vest (optional). Pin one panel on each side of the chest, inner edges about 2 stitches from the center front, top edges at about body Rnd 5, bottom edges just above the belt (Rnd 11). Sew around three sides of each panel (outer, top, bottom), leaving the inner edge free so it reads as an open vest.
-
Helmet (optional). Set it on the head over the hair. It should rest by itself. Tack it at two or three points under the brim if you want it permanently on.
Finishing
- Embroider eyes now if you did not use safety eyes: two small green satin-stitch ovals with a tiny black pupil (or a French knot) on each.
- Weave in every remaining tail on the inside or under a sewn seam.
- Roll the figure between your hands to even out the stuffing.
- If the hair looks too smooth, pull a few Color B loops up with the needle for extra mess.
Safety: Safety eyes and small sewn pieces are a choking hazard. For children under 3 years, embroider the eyes and sew all parts extra securely. This toy is not a teether.
Color and character notes
Young Hiccup reads clearly with peach skin, medium-brown shaggy hair, a forest-green tunic, a dark-brown belt, brown pants, and darker boots. Green eyes are the character’s signature — use green safety eyes or green embroidery if you can. Skip the helmet for the “in the forge” look; add it for the classic Viking silhouette. The vest is optional but helps the tunic look layered without any extra shaping.
Disclaimer: This pattern was generated by AI and should be reviewed for accuracy before use. While we strive for quality, AI-generated content may contain errors. Please verify measurements, stitch counts, charts, and instructions before beginning your project. Generated by purlJam.uk
Love this pattern?
Save this pattern to your free PurlJam libraryAccess your pattern anytime
Bookmark this page to access your pattern anytime