Type
Crochet
Difficulty
intermediate
Category
amigurumi
AI Thinking Process
Planning
Verification
Pattern
Holiday Goat Amigurumi
Modular No-Sew Pattern — Four Interchangeable Bodies
Skill level: Intermediate
Terminology: US crochet terms throughout
Construction: Continuous spiral rounds (do not join or turn unless stated). Modular no-sew: shared head and limbs are crocheted into each body as you work.
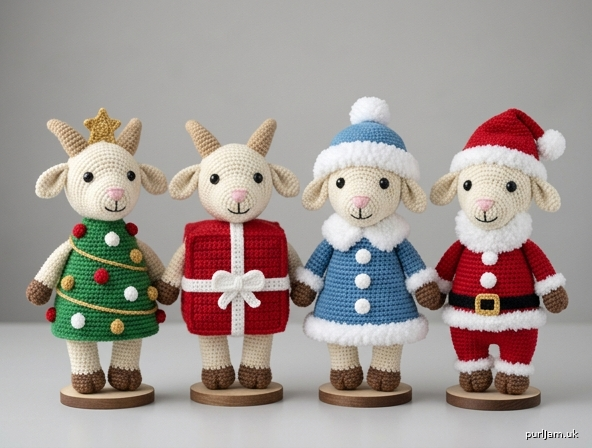
A cream goat with identical head, ears, horns, snout, arms, legs, and tail, plus four costume bodies that all fit the same 24-stitch neck and the same 6-stitch limb joins:
- Christmas Tree — conical green tree with popcorn ornaments, garland, and a star
- Christmas Present — square gift-box body with crocheted ribbon and bow
- Snow Maiden — blue winter coat, loop-stitch fur trim, and a winter hat
- Santa Claus — red suit, loop-stitch trim, belt and buckle, and a Santa hat
The shared parts are pattern modules. Each finished goat is joined as you crochet; bodies are not meant to be unsnapped later. Make one set of shared components per goat, then work the body of your choice.
Finished size
Measured with stated gauge, standing, including hats where used:
- Christmas Tree Goat: about 7½ in (19 cm)
- Christmas Present Goat: about 7 in (18 cm)
- Snow Maiden Goat: about 8½ in (21.5 cm)
- Santa Goat: about 9 in (23 cm)
Yarn
Worsted weight (4), acrylic or wool-blend. Amounts are per complete goat; leftovers cover embroidery.
| Color | Use | Approx. amount |
|---|---|---|
| Cream (MC) | Head, ears, snout, arms, legs, tail | 80 yd (73 m) |
| Brown | Hooves | 20 yd (18 m) |
| Tan | Horns | 10 yd (9 m) |
| Pink | Nose embroidery | scrap |
| Black | Mouth embroidery; Santa belt | 15 yd (14 m) |
| Green | Tree body | 60 yd (55 m) |
| Red | Tree ornaments; Present box; Santa suit and hat | 60 yd (55 m) |
| Gold / yellow | Star, buckle, ornaments, ribbon option | 15 yd (14 m) |
| White | Trims, hat brims, pompom, ribbon option | 30 yd (27 m) |
| Blue | Snow Maiden coat and hat | 50 yd (46 m) |
Yarn notes: Sample look uses cream body parts with brown hooves on every version, so the goat stays a goat and the bodies read as costumes.
Hook and notions
- Hook: US E-4 / 3.5 mm (go down to 3.25 mm if stuffing shows through)
- 8 mm safety eyes, 1 pair per goat (or black yarn to embroider eyes)
- Polyester fiberfill
- Stitch markers
- Yarn needle for weaving ends and embroidering the face only
- Scissors
- Optional: ½ in (1.25 cm) cardboard strip to keep loop-stitch loops even
Do not use felt, fabric, glue, buttons as eyes, or sewn-on patches.
Gauge
5 sc and 5 rnds = 1 in (2.5 cm) in continuous single crochet, worked tightly.
Gauge matters for a firm fabric that hides stuffing and for the 24-st neck to match every body. If your swatch is larger than 1 in, drop a hook size.
Abbreviations
- MR — magic ring (adjustable ring)
- ch — chain
- sc — single crochet
- hdc — half double crochet
- inc — 2 sc in same stitch
- dec — invisible decrease (see Special Stitches)
- sc3tog — single crochet 3 together
- pc — popcorn
- lp st — loop stitch
- sl st — slip stitch
- st(s) — stitch(es)
- rnd — round
- BLO — back loop only
- FLO — front loop only
- MC — main color (cream)
- RS — right side
- [ ] — stitch count at end of round
- ( ) × N — work the parentheses N times
Special stitches
Invisible decrease (dec): Insert hook through FLO of the next 2 sts, yo, pull through both loops, yo, pull through 2 loops on hook.
Popcorn (pc): 4 sc in the same st. Drop the loop. Insert hook in the first of those 4 sc, pick up the dropped loop, pull through. Counts as 1 st. Push the popcorn to the outside (RS).
Loop stitch (lp st): Insert hook in the next st. With the yarn-hand index finger, pull the working yarn up into a ½ in (1.25 cm) loop. Yo with the strand behind the loop, pull through the stitch (2 loops on hook), yo, pull through both loops. Keep loop length even. The loops must sit on the outside of the toy; if they fall inside, reverse the wrap.
sc3tog: [Insert hook in next st, yo, pull up a loop] 3 times (4 loops on hook), yo, pull through all 4.
Color change: Work the last stitch of the old color until 2 loops remain, drop the old color, yo with the new color, pull through both loops. Carry unused colors only for 1–2 sts; otherwise fasten off and weave in.
No-sew joining methods (read before you start)
1. Join a body to the 24-st neck
Fasten off the head. Hold the goat with the face toward you. Insert the hook in the center-back neck stitch, pull up a loop of the body color, ch 1 (does not count as a st). Work Rnd 1 of the body into each of the 24 open neck stitches. This round is the join.
2. Flatten-and-join a limb (arms, legs, tail)
Stuff the limb as directed and leave the last round open. At the body’s join round, hold the limb against the body (hooves pointing down). Flatten the open edge so you have 6 aligned pairs of stitches (12 limb sts become 6 double-layer sts). For each of the next 6 body stitches: insert the hook through both layers of the limb and the body stitch, yo, complete 1 sc. Body stitch count does not change.
3. Join a hat, star, or bow
Place the piece. Slip stitch through both the accessory and the matching stitches of the head or body. This is a crochet join, not a sewn seam.
4. Embroidery
Nose and mouth are embroidered with yarn after the head is stuffed. This is surface stitching, not assembling pieces.
Construction order (every version)
- Horns (2), ears (2), snout (1), arms (2), legs (2), tail (1)
- Head, joining horns, ears, and snout as you go; insert eyes; stuff; leave neck open
- Chosen body, joining to the neck, then joining arms, tail, and legs on the marked rounds; stuff; close
- Version extras: star and garland or ribbon and bow or winter hat or Santa hat
Shared Components
Work these in cream (MC) unless a color is named. Make one full set per goat.
Horns (make 2)
Tan. Do not stuff, or push in a pea-sized bit of fill at the base.
Rnd 1: 4 sc in MR. [4]
Rnd 2: (sc, inc) × 2. [6] (2 increases → 4 + 2 = 6 ✓)
Rnd 3: sc around. [6]
Rnd 4: sc 2, hdc 2, sc 2. [6] (hdc pair makes a slight curve)
Rnd 5: sc around. [6]
Fasten off. Flatten the last round to 3 sts. Set aside.
Ears (make 2)
Cream. Do not stuff.
Rnd 1: 6 sc in MR. [6]
Rnd 2: (sc, inc) × 3. [9] (3 increases → 6 + 3 = 9 ✓)
Rnds 3–5: sc around. [9]
Fasten off. Flatten the last round to 4 sts (the 9th st sits at one edge). Set aside.
Snout (make 1)
Cream.
Rnd 1: 6 sc in MR. [6]
Rnd 2: (sc, inc) × 3. [9] (3 increases → 6 + 3 = 9 ✓)
Rnd 3: sc around. [9]
Stuff lightly. Do not close. Set aside.
Arms (make 2)
Leave the last round open for joining.
Rnd 1: With brown, 6 sc in MR. [6]
Rnd 2: inc in each st. [12] (6 increases → 6 + 6 = 12 ✓)
Rnds 3–4: sc around. [12]
Rnd 5: Change to cream, sc around. [12]
Rnds 6–13: sc around. [12] (8 even rounds)
Stuff the hoof firmly and the rest of the arm lightly; leave the last ½ in (1.25 cm) unstuffed so the join lies flat. Fasten off. Set aside with 12 sts open.
Legs (make 2)
Leave the last round open for joining.
Rnd 1: With brown, 6 sc in MR. [6]
Rnd 2: inc in each st. [12] (6 increases → 6 + 6 = 12 ✓)
Rnd 3: (sc, inc) × 6. [18] (6 increases → 12 + 6 = 18 ✓)
Rnds 4–5: sc around. [18]
Rnd 6: (sc, dec) × 6. [12] (6 decreases → 18 − 6 = 12 ✓)
Rnd 7: Change to cream, sc around. [12]
Rnds 8–15: sc around. [12] (8 even rounds)
Stuff the hoof firmly and the leg moderately; leave the last ½ in (1.25 cm) unstuffed. Fasten off. Set aside with 12 sts open.
Tail (make 1)
Cream. Do not stuff.
Rnd 1: 6 sc in MR. [6]
Rnds 2–3: sc around. [6]
Fasten off. Flatten the last round to 3 sts. Set aside.
Head (make 1)
Cream. Work from the crown down. Marker at the start of the round; treat the start as center back.
Rnd 1: 6 sc in MR. [6]
Rnd 2: inc in each st. [12] (6 increases → 6 + 6 = 12 ✓)
Rnd 3: (sc, inc) × 6. [18] (6 increases → 12 + 6 = 18 ✓)
Rnd 4: (2 sc, inc) × 6. [24] (6 increases → 18 + 6 = 24 ✓)
Rnd 5: (3 sc, inc) × 6. [30] (6 increases → 24 + 6 = 30 ✓)
Rnd 6 (join horns): (4 sc, inc) × 6. [36] (6 increases → 30 + 6 = 36 ✓)
On this same round, replace two 3-st groups with horn joins, evenly toward the front-top:
sc 14, join one horn over the next 3 sts (sc through both layers of the horn and the next 3 head sts), sc 4, join the second horn over the next 3 sts, sc 12.
(14 + 3 + 4 + 3 + 12 = 36 ✓)
Horns curve slightly outward (hdc side toward the outside).
Rnd 7: sc around. [36]
Rnd 8 (join ears): sc 7, join one ear over the next 4 sts, sc 14, join the second ear over the next 4 sts, sc 7. [36]
(7 + 4 + 14 + 4 + 7 = 36 ✓)
Ears sit at the sides, 14 sts apart at both front and back.
Rnds 9–12: sc around. [36] (4 even rounds)
Eyes: Insert 8 mm safety eyes between Rnds 9 and 10, 7 sts apart, centered on the face (the 14-st front span between the ears). Lock the washers on the inside before the opening gets small. For children under 3, skip safety eyes and embroider them later.
Rnd 11–12 extra (join snout): After Rnd 10, pin the snout on the front, covering Rnds 10–12, centered under the eyes. With cream, work sc through each snout stitch and the matching head stitch all the way around the snout (9 sc). Stuff the snout as you close the last 2 sts of this join. Continue Rnds 11–12 of the head as written.
Rnd 13: (4 sc, dec) × 6. [30] (6 decreases → 36 − 6 = 30 ✓)
Rnd 14: (3 sc, dec) × 6. [24] (6 decreases → 30 − 6 = 24 ✓)
Stuff the head firmly, filling cheeks and the area behind the snout.
Rnd 15: sc around. [24] (neck)
Fasten off. Leave the 24 neck stitches open. Weave the tail on the inside.
Face embroidery (yarn needle, cream-pink-black only):
With pink, embroider a small inverted triangle on the snout, 3–4 vertical satin stitches wide. With black, add a short vertical stitch down from the nose and a tiny curved mouth. Weave all ends inside the head.
The head is now the reusable module for every body.
Interchangeable Bodies
Join every body to the same 24-st neck. Start at center back unless a body says otherwise. Stuff the body as soon as the arms are joined, and keep stuffing through the leg round.
Body 1 — Christmas Tree
Green. The neck is the top of the tree; the goat head is the tree topper. The body widens to a cone, then closes into a sitting base.
Join green to the 24 neck sts at center back.
Rnd 1: sc around. [24]
Rnd 2: (3 sc, inc) × 6. [30] (6 increases → 24 + 6 = 30 ✓)
Rnd 3: (4 sc, inc) × 6. [36] (6 increases → 30 + 6 = 36 ✓)
Rnd 4 (join arms): sc 6, join one arm over the next 6 sts, sc 12, join the second arm over the next 6 sts, sc 6. [36]
(6 + 6 + 12 + 6 + 6 = 36 ✓)
Arms point down and slightly forward.
Rnd 5: (5 sc, inc) × 6. [42] (6 increases → 36 + 6 = 42 ✓)
Rnd 6 (ornaments): sc 9, pc in red, sc 10, pc in gold, sc 10, pc in red, sc 9, pc in white. [42]
(9 + 1 + 10 + 1 + 10 + 1 + 9 + 1 = 42 ✓)
Push every popcorn to the RS.
Rnd 7: (6 sc, inc) × 6. [48] (6 increases → 42 + 6 = 48 ✓)
Rnd 8: BLO sc around. [48] (ridge for a tree tier)
Rnd 9: (7 sc, inc) × 6. [54] (6 increases → 48 + 6 = 54 ✓)
Rnd 10 (ornaments): sc 9, pc in gold, sc 10, pc in white, sc 10, pc in red, sc 10, pc in gold, sc 10, pc in red, sc 1. [54]
(9 + 1 + 10 + 1 + 10 + 1 + 10 + 1 + 10 + 1 + 1 = 54 ✓)
Rnds 11–12: sc around. [54]
Rnd 13 (join tail and legs): Flatten the tail, sc 3 through both layers of the tail and the next 3 body sts (center back), sc 13, join one leg over the next 6 sts, sc 8, join the second leg over the next 6 sts, sc 18. [54]
(3 + 13 + 6 + 8 + 6 + 18 = 54 ✓)
Front gap between legs = 8 sts. Stuff the body firmly into a cone.
Rnd 14: (7 sc, dec) × 6. [48] (6 decreases → 54 − 6 = 48 ✓)
Rnd 15: (6 sc, dec) × 6. [42] (6 decreases → 48 − 6 = 42 ✓)
Rnd 16: (5 sc, dec) × 6. [36] (6 decreases → 42 − 6 = 36 ✓)
Rnd 17: (4 sc, dec) × 6. [30] (6 decreases → 36 − 6 = 30 ✓)
Rnd 18: (3 sc, dec) × 6. [24] (6 decreases → 30 − 6 = 24 ✓)
Rnd 19: (2 sc, dec) × 6. [18] (6 decreases → 24 − 6 = 18 ✓)
Rnd 20: (sc, dec) × 6. [12] (6 decreases → 18 − 6 = 12 ✓)
Rnd 21: dec × 6. [6] (6 decreases → 12 − 6 = 6 ✓)
Fasten off. Weave the tail through FLO of the remaining 6 sts, pull closed, hide the end.
Star (tree topper)
Gold. Small, flat, no stuffing.
Make a MR. (ch 3, sl st in 2nd ch from hook, sc in next ch, sl st in MR) 5 times. Pull the ring closed. Fasten off with a 8 in (20 cm) tail.
Join: Sit the star at the back-top of the tree, just behind the neck. Sl st through the star center and 2–3 green sts at the back of Rnd 1 of the body. Weave in.
Garland
Gold or white. Surface slip stitch a loose spiral around the tree, starting under the neck and ending near the base, weaving between popcorns. Fasten off and weave in. No sewing.
Body 2 — Christmas Present
Box color red. Ribbon white (or gold). The body is a cube: square top ledge around the neck, straight sides, square bottom. Start at the back-left corner so the four 3-sc corners stay easy to see. Mark every corner stitch (the center st of each 3-sc group) and move the markers up each round.
Join red to the 24 neck sts.
Rnd 1 (top of lid): (3 sc in next st, 5 sc) × 4. [32] (4 corners add 2 sts each → 24 + 8 = 32 ✓)
Rnd 2: (3 sc in the corner st, 7 sc) × 4. [40] (32 + 8 = 40 ✓)
Rnd 3: (3 sc in the corner st, 9 sc) × 4. [48] (40 + 8 = 48 ✓)
Rnd 4: (3 sc in the corner st, 11 sc) × 4. [56] (48 + 8 = 56 ✓)
You now have 4 sides of 14 sts. 14 sts ÷ 5 sc per inch ≈ 2.8 in (7 cm) per side.
Rnds 5–6: sc around. [56] (sides begin; work even, no corner increases)
Rnd 7 (join arms): sc 18, join one arm over the next 6 sts, sc 22, join the second arm over the next 6 sts, sc 4. [56]
(18 + 6 + 22 + 6 + 4 = 56 ✓)
Arms should exit the left and right faces of the box. If an arm sits on a corner, rotate the work by 1–2 sts next time; counts stay 56.
Rnds 8–10: sc around in red. [56]
Rnds 11–12 (horizontal ribbon): Change to white, sc around. [56]
Rnds 13–16: Change to red, sc around. [56]
Rnd 17 (join tail and legs): sc 6, join tail over the next 3 sts, sc 17, join one leg over the next 6 sts, sc 8, join the second leg over the next 6 sts, sc 10. [56]
(6 + 3 + 17 + 6 + 8 + 6 + 10 = 56 ✓)
Legs sit toward the front corners of the box.
Rnd 18: sc around. [56]
Stuff firmly. Press each side against the table as you stuff so the box stays square, not round.
Bottom (decrease at the 4 corner markers only):
Rnd 19: (11 sc, sc3tog) × 4. [48] (4 × 2 sts removed → 56 − 8 = 48 ✓)
Rnd 20: (9 sc, sc3tog) × 4. [40] (48 − 8 = 40 ✓)
Rnd 21: (7 sc, sc3tog) × 4. [32] (40 − 8 = 32 ✓)
Add extra stuffing into each corner.
Rnd 22: (5 sc, sc3tog) × 4. [24] (32 − 8 = 24 ✓)
Rnd 23: (3 sc, sc3tog) × 4. [16] (24 − 8 = 16 ✓)
Rnd 24: (sc, sc3tog) × 4. [8] (16 − 8 = 8 ✓)
Fasten off. Weave through FLO of remaining 8 sts, pull closed, hide the end.
Vertical ribbon
With white, surface sl st a straight line from the neck edge (Rnd 4) down the center front to the bottom, and a matching line down the center back. Fasten off. Weave in.
Bow
White. One piece, no sewing.
Make a MR.
(ch 6, 4 dc in 4th ch from hook, sl st in MR) twice — two loops.
(ch 5, sl st in 2nd ch from hook, sl st in next 3 ch, sl st in MR) twice — two tails.
Pull the ring closed tight. Ch 1, sc 4 over the center of the ring to wrap it. Sl st to the first sc. Fasten off with a 8 in (20 cm) tail.
Join: Place the bow on the front, where the vertical and horizontal ribbons cross, just below the head. Sl st through the bow wrap and 2–3 sts of the box. Weave in.
Body 3 — Snow Maiden
White collar and hem, blue coat. Loop stitch is the fluffy fur.
Join white to the 24 neck sts at center back.
Rnd 1: sc around. [24]
Rnd 2 (fur collar): (3 lp st, 2 lp st in next st) × 6. [30] (6 increases → 24 + 6 = 30 ✓)
Keep loops on the outside.
Rnd 3: Change to blue, (4 sc, inc) × 6. [36] (6 increases → 30 + 6 = 36 ✓)
Rnd 4 (join arms): sc 6, join one arm over the next 6 sts, sc 12, join the second arm over the next 6 sts, sc 6. [36]
(6 + 6 + 12 + 6 + 6 = 36 ✓)
Rnd 5: (5 sc, inc) × 6. [42] (6 increases → 36 + 6 = 42 ✓)
Rnd 6: sc around. [42]
Rnd 7 (front button): sc 20, pc in white, sc 21. [42] (20 + 1 + 21 = 42 ✓)
Rnd 8: sc around in blue. [42]
Rnd 9 (front button): sc 20, pc in white, sc 21. [42]
Rnd 10: sc around in blue. [42]
Rnd 11 (front button): sc 20, pc in white, sc 21. [42]
Rnd 12 (skirt): (6 sc, inc) × 6. [48] (6 increases → 42 + 6 = 48 ✓)
Rnds 13–17: sc around. [48] (5 even rounds)
Rnd 18 (fur hem): Change to white, lp st around. [48]
Rnd 19: With white, (6 sc, dec) × 6. [42] (6 decreases → 48 − 6 = 42 ✓)
Rnd 20 (join tail and legs): Flatten the tail, sc 3 through tail and body (center back), sc 9, join one leg over the next 6 sts, sc 10, join the second leg over the next 6 sts, sc 8. [42]
(3 + 9 + 6 + 10 + 6 + 8 = 42 ✓)
Front gap between legs = 10 sts. Stuff the coat firmly; put extra fill in the skirt so it stands.
Rnd 21: (5 sc, dec) × 6. [36] (6 decreases → 42 − 6 = 36 ✓)
Rnd 22: (4 sc, dec) × 6. [30] (6 decreases → 36 − 6 = 30 ✓)
Rnd 23: (3 sc, dec) × 6. [24] (6 decreases → 30 − 6 = 24 ✓)
Rnd 24: (2 sc, dec) × 6. [18] (6 decreases → 24 − 6 = 18 ✓)
Rnd 25: (sc, dec) × 6. [12] (6 decreases → 18 − 6 = 12 ✓)
Rnd 26: dec × 6. [6] (6 decreases → 12 − 6 = 6 ✓)
Fasten off. Weave through FLO of remaining 6 sts, pull closed, hide the end.
Snow Maiden winter hat
Blue crown, white fur brim. Lightly stuff the crown only.
Rnd 1: With blue, 6 sc in MR. [6]
Rnd 2: inc in each st. [12] (6 increases → 6 + 6 = 12 ✓)
Rnd 3: (sc, inc) × 6. [18] (6 increases → 12 + 6 = 18 ✓)
Rnd 4: (2 sc, inc) × 6. [24] (6 increases → 18 + 6 = 24 ✓)
Rnd 5: (3 sc, inc) × 6. [30] (6 increases → 24 + 6 = 30 ✓)
Rnd 6: (4 sc, inc) × 6. [36] (6 increases → 30 + 6 = 36 ✓)
Rnds 7–11: sc around. [36] (5 even rounds)
Rnd 12 (fur brim): Change to white, lp st around. [36]
Do not fasten off.
Join the hat (no-sew): Put the hat on the head so the brim sits around Head Rnds 6–8. Ears stay in front of the brim; horns poke in front of the brim or through it. Matching 36 hat sts to 36 head sts, sl st through the BLO of each hat brim st and the matching head st. If a horn sits in the way, sl st through hat only for those 3 sts (a horn slit). Fasten off. Weave in.
Body 4 — Santa Claus
White fur collar and hem, red suit, black belt, gold buckle.
Join white to the 24 neck sts at center back.
Rnd 1: sc around. [24]
Rnd 2 (fur collar): (3 lp st, 2 lp st in next st) × 6. [30] (6 increases → 24 + 6 = 30 ✓)
Rnd 3: Change to red, (4 sc, inc) × 6. [36] (6 increases → 30 + 6 = 36 ✓)
Rnd 4 (join arms): sc 6, join one arm over the next 6 sts, sc 12, join the second arm over the next 6 sts, sc 6. [36]
(6 + 6 + 12 + 6 + 6 = 36 ✓)
Rnd 5: (5 sc, inc) × 6. [42] (6 increases → 36 + 6 = 42 ✓)
Rnds 6–8: sc around in red. [42]
Rnd 9 (belt and buckle): Change to black, sc 18, change to gold, sc 6, change to black, sc 18. [42] (18 + 6 + 18 = 42 ✓)
The gold 6 sts are center front (opposite the marker).
Rnd 10: Repeat Rnd 9. [42]
Rnds 11–15: Change to red, sc around. [42] (5 even rounds)
Rnd 16 (fur hem): Change to white, lp st around. [42]
Rnd 17 (join tail and legs): Flatten the tail, sc 3 through tail and body (center back), sc 9, join one leg over the next 6 sts, sc 10, join the second leg over the next 6 sts, sc 8. [42]
(3 + 9 + 6 + 10 + 6 + 8 = 42 ✓)
Stuff the suit firmly.
Rnd 18: With white or red (under the hem), (5 sc, dec) × 6. [36] (6 decreases → 42 − 6 = 36 ✓)
Rnd 19: (4 sc, dec) × 6. [30] (6 decreases → 36 − 6 = 30 ✓)
Rnd 20: (3 sc, dec) × 6. [24] (6 decreases → 30 − 6 = 24 ✓)
Rnd 21: (2 sc, dec) × 6. [18] (6 decreases → 24 − 6 = 18 ✓)
Rnd 22: (sc, dec) × 6. [12] (6 decreases → 18 − 6 = 12 ✓)
Rnd 23: dec × 6. [6] (6 decreases → 12 − 6 = 6 ✓)
Fasten off. Weave through FLO of remaining 6 sts, pull closed, hide the end.
Santa hat
White pompom is worked first, then the red cone. Stuff the pompom firmly; do not stuff the cone so the hat can flop.
Rnd 1: With white, 6 sc in MR. [6]
Rnd 2: inc in each st. [12] (6 increases → 6 + 6 = 12 ✓)
Rnds 3–4: sc around. [12]
Rnd 5: dec × 6. [6] (6 decreases → 12 − 6 = 6 ✓)
Stuff the pompom now.
Rnd 6: Change to red, (sc, inc) × 3. [9] (3 increases → 6 + 3 = 9 ✓)
Rnd 7: sc around. [9]
Rnd 8: (2 sc, inc) × 3. [12] (3 increases → 9 + 3 = 12 ✓)
Rnd 9: sc around. [12]
Rnd 10: (3 sc, inc) × 3. [15] (3 increases → 12 + 3 = 15 ✓)
Rnd 11: sc around. [15]
Rnd 12: (4 sc, inc) × 3. [18] (3 increases → 15 + 3 = 18 ✓)
Rnd 13: sc around. [18]
Rnd 14: (2 sc, inc) × 6. [24] (6 increases → 18 + 6 = 24 ✓)
Rnd 15: sc around. [24]
Rnd 16: (3 sc, inc) × 6. [30] (6 increases → 24 + 6 = 30 ✓)
Rnd 17: sc around. [30]
Rnd 18: (4 sc, inc) × 6. [36] (6 increases → 30 + 6 = 36 ✓)
Rnds 19–21: sc around. [36] (3 even rounds)
Rnd 22 (fur brim): Change to white, lp st around. [36]
Do not fasten off.
Join the hat: Same method as the Snow Maiden hat — sl st BLO of the 36 brim sts to Head Rnds 6–8, ears in front, horns in front or through small slits. Fasten off. Weave in.
Floppy tip (optional, still no-sew): Fold the red cone to one side. Sl st 2 sts of the cone to 2 sts of the cone lower down (hat-to-hat only) so the pompom droops. Do not sl st the hat to the face.
Finishing (all versions)
- Weave in every remaining tail on the inside or under a loop-stitch round.
- Check that each flatten-and-join (arms, legs, tail) is snug. If a limb feels loose, work 2 extra sl sts through both layers of the limb and the matching body sts — still crochet, not sewing.
- Steam is optional and light only; do not crush loop-stitch fur. Shape the present into a cube and the tree into a cone with your hands.
- Add extra fiberfill through any small gap at a limb join using the hook tip, then close the gap with 1 sl st.
- Confirm safety-eye washers are tight and all embroidered face stitches are locked on the inside.
Safety
- Safety eyes are a choking hazard for children under 3 years. Embroider eyes with black yarn instead.
- Pull every join and embroidered feature firmly. Nothing on this toy should twist off.
- Use only yarn and fiberfill — no beads, no glued trims, no felt.
Pattern checklist (one goat)
Shared (identical every time)
☐ 2 horns, 2 ears, 1 snout, 2 arms, 2 legs, 1 tail
☐ 1 head with 24-st open neck, eyes in, face embroidered
Then choose one body
☐ Tree: green cone, 4+ popcorns, star, garland
☐ Present: 56-st cube, white ribbon, bow
☐ Snow Maiden: blue coat, 3 white buttons, loop-stitch collar and hem, winter hat
☐ Santa: red suit, black/gold belt, loop-stitch collar and hem, Santa hat
Neck always 24. Arm joins always 6 flattened sts. Leg joins always 6 flattened sts. Hat brims always 36 to match the head. Those four numbers are the whole modular system.
Disclaimer: This pattern was generated by AI and should be reviewed for accuracy before use. While we strive for quality, AI-generated content may contain errors. Please verify measurements, stitch counts, charts, and instructions before beginning your project. Generated by purlJam.uk
Love this pattern?
Save this pattern to your free PurlJam libraryAccess your pattern anytime
Bookmark this page to access your pattern anytime