Type
Crochet
Difficulty
beginner
Category
amigurumi
AI Thinking Process
Planning
Verification
Pattern
Jolly Christmas Gnome
Beginner Amigurumi Crochet Toy
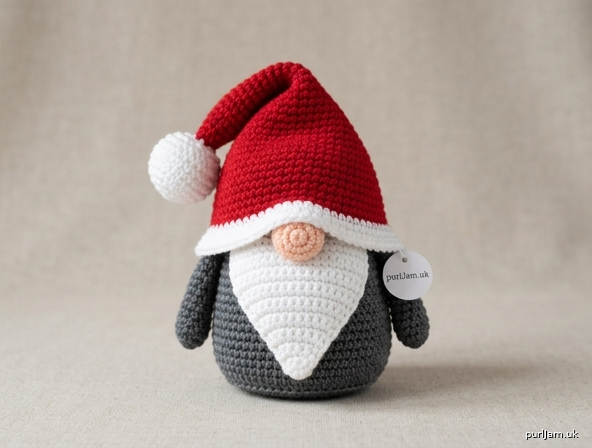
A classic Scandinavian-style Christmas gnome with a plump sitting body, tall red hat, round nose, and triangular beard. The hat hides the eyes, so there is no face embroidery — just simple shapes sewn together. Perfect for a shelf, a gift, or a holiday table.
Skill level: Beginner
Skills used: Magic ring, single crochet, increase, decrease, working in continuous rounds, working in turned rows, sewing pieces together.
Finished Size
Approximately 6 inches (15 cm) tall including the hat, and 2½ inches (6.5 cm) wide at the base, using worsted yarn and the stated hook. Size will change if you use a different yarn or hook.
Materials
Yarn: Worsted weight (Category 4), acrylic or wool-blend. Approximate amounts:
- Color A (body): 50 yards (46 m) — gray, beige, navy, or forest green
- Color B (hat): 55 yards (50 m) — red
- Color C (beard, hat brim, pom-pom): 30 yards (27 m) — white
- Color D (nose): 8 yards (7 m) — peach, beige, or light pink
- Color E (optional holly leaves): 5 yards (5 m) — green
Hook: US E-4 (3.5 mm) — one to two sizes smaller than the yarn label, for a tight fabric that hides stuffing.
Notions:
- Polyester fiberfill stuffing
- Yarn needle
- Stitch marker
- Scissors
- Optional: 2-inch (5 cm) cardboard circle to stiffen the base
- Optional: small amount of red yarn or embroidery floss for holly berries
Gauge
5 sc × 6 rnds = 1 inch (2.5 cm) in single crochet, worked tightly in the round.
Gauge is not critical for this toy, but the fabric should be firm enough that stuffing does not show through. If your fabric is loose, go down a hook size.
Abbreviations (US terms)
- BLO — back loop only
- ch — chain
- dec — single crochet 2 together (sc2tog); invisible decrease may be used
- FO — fasten off
- hdc — half double crochet
- inc — 2 sc in the same stitch
- MR — magic ring (adjustable ring)
- rnd(s) — round(s)
- sc — single crochet
- sc3tog — single crochet 3 together
- sl st — slip stitch
- st(s) — stitch(es)
- YO — yarn over
Special stitches
- Invisible decrease (optional): Insert hook in front loop of next st, insert hook in front loop of following st, YO, pull through both front loops, YO, pull through 2 loops.
- Magic ring alternative: Ch 2, work the stated number of sc into the 2nd ch from the hook. Pull the tail to close the hole.
Pattern Notes
- Body, hat, nose, arms, and pom-pom are worked in continuous spirals. Do not join or chain at the end of a round. Mark the first stitch of each round and move the marker up as you go.
- The beard (and optional holly leaves) are worked in turned rows.
- Work tightly for a smooth amigurumi surface.
- Stuff the body firmly as you go, especially the base, so the gnome stands.
- Stuff only the top 1 inch (2.5 cm) of the hat so the cone can bend to one side.
- Stitch counts appear in brackets at the end of each round or row, for example
[36]. - Color changes are made in the last yarn-over of the previous stitch.
Body
With Color A, work in continuous rnds.
Rnd 1: 6 sc in MR. [6]
Rnd 2: Inc in each st around. (6 increases → 6 + 6 = 12 ✓) [12]
Rnd 3: (Sc 1, inc) around. (6 increases → 12 + 6 = 18 ✓) [18]
Rnd 4: (Sc 2, inc) around. (6 increases → 18 + 6 = 24 ✓) [24]
Rnd 5: (Sc 3, inc) around. (6 increases → 24 + 6 = 30 ✓) [30]
Rnd 6: (Sc 4, inc) around. (6 increases → 30 + 6 = 36 ✓) [36]
Rnd 7: BLO sc in each st around. [36]
(This back-loop round makes a neat sitting edge. If you prefer a fully rounded bottom, work this round through both loops.)
Optional: Cut a 2-inch (5 cm) cardboard circle and set it against the inside of Rnd 7 after you begin stuffing.
Rnds 8–18: Sc in each st around. (11 rounds) [36]
Rnd 19: (Sc 4, dec) around. (6 decreases → 36 − 6 = 30 ✓) [30]
Rnd 20: Sc in each st around. [30]
Rnd 21: (Sc 3, dec) around. (6 decreases → 30 − 6 = 24 ✓) [24]
Rnd 22: Sc in each st around. [24]
Stuff the body firmly, filling the base well so the gnome stands. Continue stuffing as you close.
Rnd 23: (Sc 2, dec) around. (6 decreases → 24 − 6 = 18 ✓) [18]
Rnd 24: (Sc 1, dec) around. (6 decreases → 18 − 6 = 12 ✓) [12]
Rnd 25: Dec around. (6 decreases → 12 − 6 = 6 ✓) [6]
FO, leaving a 8-inch (20 cm) tail. Thread the tail through the remaining 6 front loops, pull closed, and weave in.
Hat
With Color B, work in continuous rnds.
Rnd 1: 6 sc in MR. [6]
Rnd 2: Sc in each st around. [6]
Rnd 3: (Sc 1, inc) 3 times. (3 increases → 6 + 3 = 9 ✓) [9]
Rnd 4: Sc in each st around. [9]
Rnd 5: (Sc 2, inc) 3 times. (3 increases → 9 + 3 = 12 ✓) [12]
Rnd 6: Sc in each st around. [12]
Rnd 7: (Sc 3, inc) 3 times. (3 increases → 12 + 3 = 15 ✓) [15]
Rnd 8: Sc in each st around. [15]
Rnd 9: (Sc 4, inc) 3 times. (3 increases → 15 + 3 = 18 ✓) [18]
Rnd 10: Sc in each st around. [18]
Rnd 11: (Sc 5, inc) 3 times. (3 increases → 18 + 3 = 21 ✓) [21]
Rnd 12: Sc in each st around. [21]
Rnd 13: (Sc 6, inc) 3 times. (3 increases → 21 + 3 = 24 ✓) [24]
Rnd 14: Sc in each st around. [24]
Rnd 15: (Sc 7, inc) 3 times. (3 increases → 24 + 3 = 27 ✓) [27]
Rnd 16: Sc in each st around. [27]
Rnd 17: (Sc 8, inc) 3 times. (3 increases → 27 + 3 = 30 ✓) [30]
Rnd 18: Sc in each st around. [30]
Rnd 19: (Sc 9, inc) 3 times. (3 increases → 30 + 3 = 33 ✓) [33]
Rnd 20: Sc in each st around. [33]
Rnd 21: (Sc 10, inc) 3 times. (3 increases → 33 + 3 = 36 ✓) [36]
Rnds 22–26: Sc in each st around. (5 rounds) [36]
Stuff the top 1 inch (2.5 cm) of the hat lightly so the point holds its shape. Leave the rest unstuffed so the hat can flop.
Change to Color C.
Rnd 27: Sc in each st around. [36]
Rnd 28: (Sc 5, inc) around. (6 increases → 36 + 6 = 42 ✓) [42]
Rnd 29: Sc in each st around. [42]
Sl st in the first st of the rnd. FO, leaving a 18-inch (46 cm) tail for sewing.
Nose
With Color D, work in continuous rnds.
Rnd 1: 6 sc in MR. [6]
Rnd 2: Inc in each st around. (6 increases → 6 + 6 = 12 ✓) [12]
Rnds 3–4: Sc in each st around. (2 rounds) [12]
Rnd 5: Dec around. (6 decreases → 12 − 6 = 6 ✓) [6]
Stuff firmly. FO, leaving a 12-inch (30 cm) tail. Thread the tail through the remaining 6 front loops, pull almost closed (leave a tiny gap if you want a flatter sew-on surface), and keep the tail for attaching.
Beard
With Color C, work in turned rows. The starting chain is the wide top of the beard (the edge that sits under the nose).
Ch 18.
Row 1: Sc in 2nd ch from hook and in each ch across, ch 1, turn. [17]
Row 2: Dec, sc 13, dec, ch 1, turn. (17 − 2 = 15 ✓) [15]
Row 3: Dec, sc 11, dec, ch 1, turn. (15 − 2 = 13 ✓) [13]
Row 4: Dec, sc 9, dec, ch 1, turn. (13 − 2 = 11 ✓) [11]
Row 5: Dec, sc 7, dec, ch 1, turn. (11 − 2 = 9 ✓) [9]
Row 6: Dec, sc 5, dec, ch 1, turn. (9 − 2 = 7 ✓) [7]
Row 7: Dec, sc 3, dec, ch 1, turn. (7 − 2 = 5 ✓) [5]
Row 8: Dec, sc 1, dec, ch 1, turn. (5 − 2 = 3 ✓) [3]
Row 9: Sc3tog. [1]
FO, leaving a 14-inch (36 cm) tail for sewing. Weave in the starting tail.
Arms (make 2, optional)
With Color A (or Color B for mittens), work in continuous rnds.
Rnd 1: 6 sc in MR. [6]
Rnds 2–8: Sc in each st around. (7 rounds) [6]
FO, leaving a 10-inch (25 cm) tail. Do not stuff, or stuff only the first 2 rounds lightly so the arms stay thin.
Pom-Pom (hat tip)
With Color C, work in continuous rnds.
Rnd 1: 6 sc in MR. [6]
Rnd 2: Inc in each st around. (6 increases → 6 + 6 = 12 ✓) [12]
Rnd 3: Sc in each st around. [12]
Rnd 4: Dec around. (6 decreases → 12 − 6 = 6 ✓) [6]
Stuff lightly. FO, leaving an 8-inch (20 cm) tail. Thread through the remaining 6 front loops, pull closed, and keep the tail for sewing.
(Alternative: wrap Color C around a 1-inch / 2.5 cm fork or pom-pom maker, tie tightly, trim into a ball, and sew to the hat tip.)
Optional Holly (hat decoration)
Leaf (make 2) with Color E:
Ch 6. Working in the 2nd ch from the hook: sl st, sc, hdc, sc, sl st. FO, leaving a 6-inch (15 cm) tail.
Sew both leaves to one side of the hat brim, slightly overlapping. With red yarn or embroidery floss, add 2 or 3 French knots at the base of the leaves for berries:
- Bring the needle up, wrap the yarn twice around the needle, insert the needle back down next to the starting point, and pull through while holding the wraps.
Assembly
Pin all pieces before sewing. Use matching yarn tails and a yarn needle. Small, even whip stitches (or mattress stitch) give the cleanest joins.
- Nose. Center the nose on the upper front of the body, covering approximately Rnds 20–23. Sew around the base several times so it sits firmly and cannot be pulled off.
- Beard. Place the wide edge (Row 1) directly under the nose, centered, with the point hanging down the front of the body. The top corners should wrap slightly toward the sides. Sew the top edge and the side edges to the body, leaving the lower point free so it can fluff forward.
- Hat. Slide the hat over the top of the body so the Color C brim sits just above the nose, covering the area where eyes would be. Tilt the hat slightly to one side. Using the long Color C tail, sew around the inside of Rnd 27 (the first white round) to the body. Do not sew the flared brim (Rnds 28–29) down — let it stand out.
- Bend the hat. Fold the unstuffed middle of the hat to one side and, if you like, tack it in place with a couple of hidden stitches so the slouch holds.
- Pom-pom. Sew the pom-pom (or yarn ball) to the tip of the hat.
- Arms (optional). Sew one arm to each side of the body, about 2 rounds below the hat brim, angled slightly forward.
- Holly (optional). Sew to the hat brim as described above.
Weave in every remaining end securely, burying them inside the stuffing.
Finishing
- Roll the body between your hands to round it.
- Shape the hat point and set the slouch.
- Smooth the beard downward; if you want a fluffier look, you may gently separate the plies of the white yarn on the beard surface with the tip of a needle — go slowly so you do not cut the stitches.
- Check that the gnome stands. If it tips, add a bit more stuffing through a small opening in the base (close again with a few stitches) or restuff the base more firmly.
Safety Note
If this gnome will be given to a child, sew the nose, hat, arms, and pom-pom on very securely and weave ends inside the body. Do not add buttons, beads, or other small parts. This pattern uses no safety eyes. Toys for children under 3 years should be checked often for loose pieces.
Color Ideas
- Classic Santa gnome: gray body, red hat, white beard and brim, peach nose.
- Forest gnome: forest green body, red hat, white beard, beige nose.
- Snow gnome: cream body, icy blue or red hat, white beard.
- Scandinavian: beige/oatmeal body, bright red hat, extra-full white beard.
Enjoy your Jolly Christmas Gnome!
Disclaimer: This pattern was generated by AI and should be reviewed for accuracy before use. While we strive for quality, AI-generated content may contain errors. Please verify measurements, stitch counts, charts, and instructions before beginning your project. Generated by purlJam.uk
Love this pattern?
Save this pattern to your free PurlJam libraryAccess your pattern anytime
Bookmark this page to access your pattern anytime