Type
Crochet
Difficulty
intermediate
Category
amigurumi
AI Thinking Process
Planning
Verification
Pattern
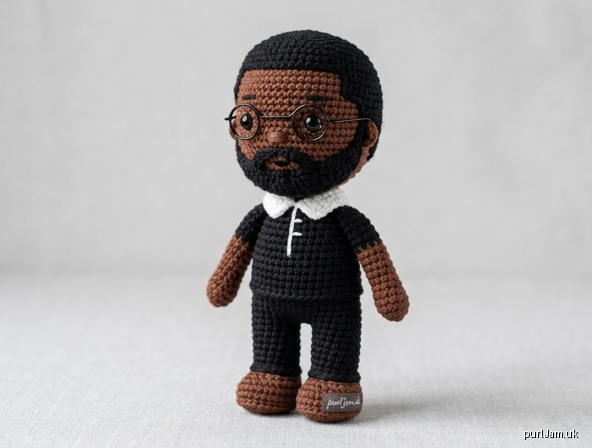
Jones Manoel–Inspired Amigurumi Doll
Skill level: Intermediate
Finished size: about 5 in (13 cm) tall
Terminology: US crochet
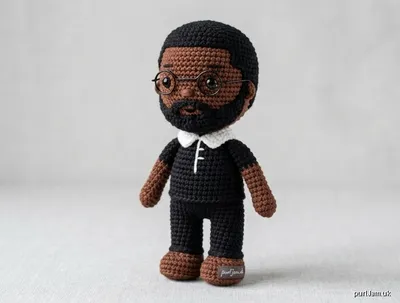
A small standing figure with dark skin, short textured hair, full beard, round glasses, and a collared shirt. Worked in continuous spirals unless noted. Do not join rounds.
Materials
- Worsted-weight yarn (approx. 50 g total):
- Color A (skin, deep brown): 20 g
- Color B (shirt, black or charcoal): 15 g
- Color C (hair/beard, black): 10 g
- Color D (collar/trim, white or cream): 5 g
- Scrap dark gray or black for glasses
- US E-4 / 3.5 mm hook
- 6 mm safety eyes (1 pair)
- Polyester fiberfill
- Tapestry needle, stitch marker, scissors
- Optional: thin black wire or plastic-coated floral wire for glasses (about 6 in / 15 cm)
Gauge
18 sc and 20 rnds = 4 in (10 cm) in sc, unblocked.
A slightly tight fabric is preferred so stuffing does not show. Adjust hook if needed.
Abbreviations
ch – chain
sc – single crochet
inc – 2 sc in same stitch
inv-dec – invisible decrease (sc2tog through front loops)
sl st – slip stitch
st(s) – stitch(es)
rnd – round
BLO – back loop only
FO – fasten off
Notes
- Mark the first stitch of every round.
- Stuff firmly as you go, especially the neck so the head does not wobble.
- Color changes: work last yarn-over of the previous stitch in the new color.
- Safety eyes are for ages 3+; embroider eyes for younger children.
Head (Color A)
Stuff as you go.
Rnd 1: 6 sc in magic ring. (6)
Rnd 2: inc in each st. (12; 6 increases → 6 + 6 = 12 ✓)
Rnd 3: (sc, inc) 6 times. (18; 6 increases → 12 + 6 = 18 ✓)
Rnd 4: (2 sc, inc) 6 times. (24; 6 increases → 18 + 6 = 24 ✓)
Rnds 5–10: sc in each st. (24) — 6 rounds even (height ≈ 1.2 in / 3 cm)
Place 6 mm safety eyes between Rnds 7 and 8, about 5 sts apart, centered on the face. Do not snap washers until beard/hair placement looks right; snap before closing.
Rnd 11: (2 sc, inv-dec) 6 times. (18)
Rnd 12: (sc, inv-dec) 6 times. (12)
Stuff head firmly.
Rnd 13: inv-dec 6 times. (6)
FO, leaving a long tail. Weave through remaining 6 sts and pull closed. Weave in.
Face embroidery (after hair/beard or before, as you prefer):
With Color A or a slightly darker brown, embroider a small straight nose between the eyes (2–3 vertical sts). With black scrap, a tiny mouth (1 short horizontal stitch) about 2 rnds below the nose.
Ears (make 2, Color A)
Rnd 1: 6 sc in magic ring. (6)
Rnd 2: sc in each st. (6)
FO, leaving a tail. Flatten. Sew to sides of head at Rnds 7–9, slightly behind the eye line.
Hair cap (Color C)
Worked as a snug cap, then textured.
Rnd 1: 6 sc in magic ring. (6)
Rnd 2: inc in each st. (12)
Rnd 3: (sc, inc) 6 times. (18)
Rnd 4: (2 sc, inc) 6 times. (24)
Rnds 5–7: sc in each st. (24)
Rnd 8 (hairline): (sc, sl st) around, or sc around for a blunt hairline. FO, leaving a long tail.
Sew cap onto head so the front hairline sits about 1 rnd above the eyes. With Color C, embroider short overlapping sts (or French knots) along the hairline and crown for cropped texture. Leave the face, ears, and lower cheeks free for the beard.
Beard and mustache (Color C)
Using tapestry needle and Color C:
- Mustache: 4–6 small horizontal sts just under the nose, slightly wider than the nose.
- Chin/cheeks: Fill from just under the mouth down to Rnd 11–12 of the head, wrapping onto the jaw. Use short, slightly random sts so the beard looks full but not cartoon-long.
- Keep a small gap under the lower lip if you want a defined mouth.
Trim stray fibers. The silhouette should read as a full, close beard.
Glasses
Option A (yarn): With gray or black, ch 16. Sl st in 2nd ch from hook and in next 2 ch (first lens rim), ch 2 (bridge), sl st in next 3 ch (second lens), FO. Shape into two small ovals and sew at the outer corners of the eyes, bridge on the nose.
Option B (wire): Bend wire into two ⅜ in (1 cm) circles joined by a ¼ in (6 mm) bridge and short temples. Seat on the nose and tack temples to the sides of the head with a few sts in Color C or A.
Body (start Color A for a short neck, then Color B)
Rnd 1: 6 sc in magic ring. (6)
Rnd 2: inc in each st. (12)
Rnd 3: (sc, inc) 6 times. (18)
Rnds 4–5: Color A, sc in each st. (18) — neck/upper chest
Change to Color B.
Rnds 6–12: sc in each st. (18) — 7 rounds shirt (height ≈ 1.4 in / 3.5 cm)
Rnd 13: (sc, inv-dec) 6 times. (12)
Stuff firmly.
Rnd 14: inv-dec 6 times. (6)
FO, leaving a long tail for sewing to the head. Close remaining hole if needed, or leave slightly open to sew to head.
Collar (Color D):
Join Color D at the Color A/B join (Rnd 6). Work 1 rnd of sl st or sc in BLO around (18). FO. With Color D, embroider a short vertical placket (3–4 sts) down the center chest.
Arms (make 2)
Start Color A (hands), then Color B (sleeves).
Rnd 1: 6 sc in magic ring. (6)
Rnds 2–3: Color A, sc in each st. (6)
Change to Color B.
Rnds 4–9: sc in each st. (6)
Lightly stuff the hand only; leave the upper arm lightly stuffed or empty so it hangs. FO, leaving a tail. Flatten the top and sew to the sides of the body at Rnds 6–7.
Legs (make 2, Color A for shoes/pants look: use Color B if you want matching trousers, or Color A for skin-tone pants; recommended: Color B for trousers and a few rnds Color A or black for shoes)
Shoes / lower legs — Color A or black scrap:
Rnd 1: 6 sc in magic ring. (6)
Rnd 2: (sc, inc) 3 times. (9)
Rnd 3: sc in each st. (9)
Change to Color B (trousers).
Rnds 4–8: sc in each st. (9)
Stuff firmly. FO first leg. Do not FO second leg.
Join legs (Color B):
On second leg, after Rnd 8, ch 2, sc in each of 9 sts of first leg, sc in each of 2 ch, sc in each of 9 sts of second leg, sc in opposite side of 2 ch. (22)
If 22 is bulky for this scale, use ch 1 join: 9 + 1 + 9 + 1 = 20 sts.
Preferred join for 13 cm scale: ch 1 between legs. (9 + 1 + 9 + 1 = 20 ✓)
Rnd 9 (hips, Color B): sc in each of 20 sts. (20)
Rnd 10: (8 sc, inv-dec) 2 times. (18)
FO, leaving a long tail. Stuff the join. Sew this 18-st opening to the bottom of the body (body Rnd 13 is 12 sts — ease the 18 sts evenly around the body base, gathering slightly, or sew body closed and stitch legs as a unit to the underside).
Cleaner assembly for this size: FO each leg after Rnd 8 and sew both legs separately to the underside of the body, inner edges almost touching. This avoids a bulky hip join on a 13 cm doll.
Assembly
- Sew head to body: pin so the face looks forward; the Color A neck (body Rnds 4–5) should disappear under the head. Ladder-stitch with Color A, adding a pinch of stuffing in the neck.
- Sew arms at a slight forward angle, thumbs (if you marked a side) toward the body.
- Sew legs so the doll stands; take extra stitches through the inner thighs if needed for stance.
- Attach ears, hair cap, beard, glasses as written.
- Weave in all ends. Steam the shirt area very lightly if it puckers; do not flatten the hair.
Finishing check
- Height should be about 5 in (13 cm) from shoe to crown.
- Eyes level, 5 sts apart.
- Beard does not cover the mouth stitch.
- Glasses sit on the nose bridge, not over the eyes.
This is an original amigurumi inspired by a public figure’s typical appearance (skin tone, glasses, beard, short hair, dark shirt). It is not an official likeness or licensed product.
Disclaimer: This pattern was generated by AI and should be reviewed for accuracy before use. While we strive for quality, AI-generated content may contain errors. Please verify measurements, stitch counts, charts, and instructions before beginning your project. Generated by purlJam.uk
Love this pattern?
Save this pattern to your free PurlJam libraryAccess your pattern anytime
Bookmark this page to access your pattern anytime