Type
Crochet
Difficulty
intermediate
Category
amigurumi
AI Thinking Process
Planning
Verification
Pattern
Kangaskhan Amigurumi
Mother and Removable Baby — Intermediate Crochet Pattern
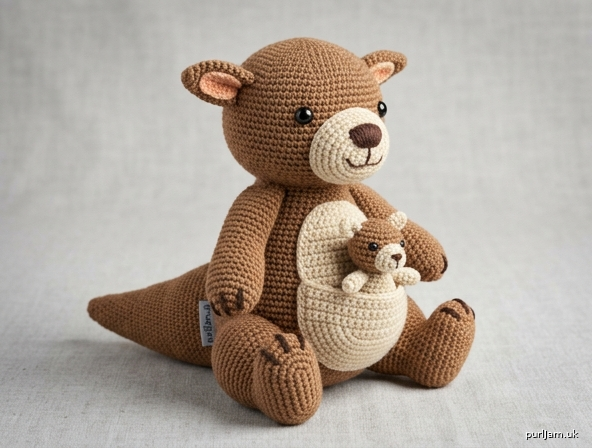
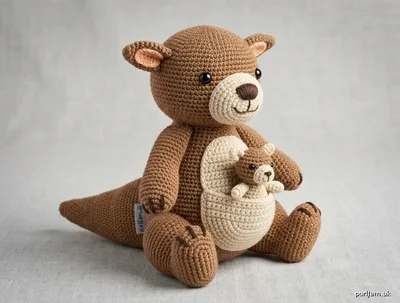
A seated, kangaroo-style stuffed animal inspired by Kangaskhan: a bulky brown mother with a cream muzzle, cream belly, open pouch, sturdy hind legs, and a thick tapering tail, plus a tiny cream baby that tucks into the pouch.
Fan-made original pattern for personal, non-commercial use. Not affiliated with Nintendo, Game Freak, or The Pokémon Company.
Difficulty: Intermediate
Finished size: Mother about 8 inches (20 cm) tall seated; baby about 2½ inches (6.5 cm) tall
Yarn weight: Worsted (4)
Gauge: 5 sc and 5 rnds = 1 inch (2.5 cm) in unstuffed single crochet, worked tightly. Gauge is important — loose stitches will show stuffing and distort the shape. Adjust hook size if needed.
Materials
- Color A (medium brown): 110 yd / 100 m worsted — main body, head, ears, limbs, tail, baby ears
- Color B (cream / beige): 55 yd / 50 m worsted — muzzle, belly, pouch, baby head/body/arms
- Color C (dark brown or black): 5 yd / 5 m — nose, mouth, claws, nostrils
- Color D (light pink), optional: 3 yd / 3 m — inner ears
- US E-4 / 3.5 mm crochet hook (go down a size from the yarn label for a dense fabric)
- 9 mm safety eyes (mother) — 1 pair
- 6 mm safety eyes (baby) — 1 pair
(Embroider eyes instead if the toy is for a child under 3.) - Polyester fiberfill
- Yarn needle
- Stitch marker
- Pins
- Scissors
Abbreviations (US)
| Abbreviation | Meaning |
|---|---|
| ch | chain |
| sc | single crochet |
| inc | increase — 2 sc in the same stitch |
| dec | invisible decrease — insert hook in front loop only of next 2 sts, yarn over, pull through both, yarn over, pull through all 3 loops |
| st(s) | stitch(es) |
| rnd | round |
| MR | magic ring (adjustable ring) |
| FLO | front loop only |
| FO | fasten off |
| [...] | stitch count at end of round or row |
Work in continuous spirals unless a piece is written in turned rows. Do not join rounds. Place a stitch marker in the first stitch of every round and move it up as you go.
Pattern Notes
- Tight, even single crochet is the whole fabric. If you can see stuffing through the stitches, go down a hook size.
- Invisible decreases keep the head and body smooth.
- Stuff as you go, and stuff the head and body firmly. Limbs are stuffed lightly to moderately. The tail is stuffed firmly so it can act as a kickstand.
- Insert safety eyes before the opening is too small to reach inside.
- Magic-ring alternative: ch 2, work the Rnd 1 stitches into the 2nd ch from the hook, then pull the tail to close.
- Pin every piece in place and check proportions from the front and both sides before sewing.
- This pattern uses US stitch names only (sc, hdc, dc).
Mother
Head
Color A. Worked from the top of the head down.
Rnd 1: 6 sc in MR. [6]
Rnd 2: inc in each st around. [12] (6 inc → 6 + 6 = 12 ✓)
Rnd 3: (sc, inc) around. [18] (6 inc → 12 + 6 = 18 ✓)
Rnd 4: (2 sc, inc) around. [24] (6 inc → 18 + 6 = 24 ✓)
Rnd 5: (3 sc, inc) around. [30] (6 inc → 24 + 6 = 30 ✓)
Rnd 6: (4 sc, inc) around. [36] (6 inc → 30 + 6 = 36 ✓)
Rnd 7: (5 sc, inc) around. [42] (6 inc → 36 + 6 = 42 ✓)
Rnds 8–14: sc in each st around. [42] (7 rounds even)
Insert 9 mm safety eyes between Rnds 11 and 12, 8 stitches apart, centered on the face. Do not fasten the washers until you have checked spacing with the muzzle held in place.
Rnd 15: (5 sc, dec) around. [36] (6 dec → 42 − 6 = 36 ✓)
Rnd 16: sc in each st around. [36]
Rnd 17: (4 sc, dec) around. [30] (6 dec → 36 − 6 = 30 ✓)
Rnd 18: (3 sc, dec) around. [24] (6 dec → 30 − 6 = 24 ✓)
Stuff the head firmly, pushing filling into a round sphere.
Rnd 19: (2 sc, dec) around. [18] (6 dec → 24 − 6 = 18 ✓)
Rnd 20: (sc, dec) around. [12] (6 dec → 18 − 6 = 12 ✓)
Rnd 21: dec around. [6] (6 dec → 12 − 6 = 6 ✓)
FO. Weave the tail through FLO of the remaining 6 sts, pull closed, and hide the end.
Muzzle
Color B.
Rnd 1: 6 sc in MR. [6]
Rnd 2: inc in each st around. [12] (6 inc → 6 + 6 = 12 ✓)
Rnd 3: (sc, inc) around. [18] (6 inc → 12 + 6 = 18 ✓)
Rnd 4: (2 sc, inc) around. [24] (6 inc → 18 + 6 = 24 ✓)
Rnd 5: (3 sc, inc) around. [30] (6 inc → 24 + 6 = 30 ✓)
Rnds 6–7: sc in each st around. [30]
FO, leaving a 18 inch (45 cm) tail for sewing. Stuff lightly so the muzzle stays a flattened oval, not a ball.
Ears (make 2)
Color A. Do not stuff (or stuff only the base very lightly).
Rnd 1: 6 sc in MR. [6]
Rnd 2: (sc, inc) around. [9] (3 inc → 6 + 3 = 9 ✓)
Rnd 3: (2 sc, inc) around. [12] (3 inc → 9 + 3 = 12 ✓)
Rnd 4: (3 sc, inc) around. [15] (3 inc → 12 + 3 = 15 ✓)
Rnds 5–7: sc in each st around. [15]
Rnd 8: (3 sc, dec) around. [12] (3 dec → 15 − 3 = 12 ✓)
FO, leaving a 12 inch (30 cm) tail. Flatten each ear into a rounded triangle.
Inner ears (make 2)
Color B or Color D. Worked flat.
Ch 4.
Row 1: sc in 2nd ch from hook, hdc in next ch, dc in last ch. [3]
FO, leaving a tail. Sew one inner-ear triangle onto the front of each ear before attaching the ears to the head.
Body
Color A. Worked from the bottom up so the base is the widest point (better for sitting).
Rnd 1: 6 sc in MR. [6]
Rnd 2: inc in each st around. [12] (6 inc → 6 + 6 = 12 ✓)
Rnd 3: (sc, inc) around. [18] (6 inc → 12 + 6 = 18 ✓)
Rnd 4: (2 sc, inc) around. [24] (6 inc → 18 + 6 = 24 ✓)
Rnd 5: (3 sc, inc) around. [30] (6 inc → 24 + 6 = 30 ✓)
Rnd 6: (4 sc, inc) around. [36] (6 inc → 30 + 6 = 36 ✓)
Rnd 7: (5 sc, inc) around. [42] (6 inc → 36 + 6 = 42 ✓)
Rnd 8: (6 sc, inc) around. [48] (6 inc → 42 + 6 = 48 ✓)
Rnds 9–18: sc in each st around. [48] (10 rounds even — bulky torso)
Rnd 19: (6 sc, dec) around. [42] (6 dec → 48 − 6 = 42 ✓)
Rnds 20–21: sc in each st around. [42]
Rnd 22: (5 sc, dec) around. [36] (6 dec → 42 − 6 = 36 ✓)
Rnds 23–24: sc in each st around. [36]
Rnd 25: (4 sc, dec) around. [30] (6 dec → 36 − 6 = 30 ✓)
Rnd 26: sc in each st around. [30]
Rnd 27: (3 sc, dec) around. [24] (6 dec → 30 − 6 = 24 ✓)
FO, leaving a 20 inch (50 cm) tail for sewing the head on.
Stuff very firmly, especially Rnds 1–12. While stuffing, press the bottom flat against the table so the figure can sit. Leave the 24-st neck opening unclosed.
Belly Patch
Color B. Worked in turned rows, then edged.
Ch 11.
Row 1: sc in 2nd ch from hook and in each ch across. [10]
Row 2: ch 1, turn, inc, 8 sc, inc. [12] (10 + 2 = 12 ✓)
Row 3: ch 1, turn, inc, 10 sc, inc. [14] (12 + 2 = 14 ✓)
Row 4: ch 1, turn, inc, 12 sc, inc. [16] (14 + 2 = 16 ✓)
Rows 5–12: ch 1, turn, sc in each st across. [16] (8 rows even)
Row 13: ch 1, turn, dec, 12 sc, dec. [14] (16 − 2 = 14 ✓)
Row 14: ch 1, turn, dec, 10 sc, dec. [12] (14 − 2 = 12 ✓)
Row 15: ch 1, turn, dec, 8 sc, dec. [10] (12 − 2 = 10 ✓)
FO. Join Color B at any edge stitch and sc evenly around the entire oval (work 3 sc in each end-of-row “corner” so the edge lies flat). FO, leaving an 18 inch (45 cm) tail.
Pouch
Color B. Worked in turned rows. The starting-chain edge is the open top.
Ch 13.
Row 1: sc in 2nd ch from hook and in each ch across. [12]
Rows 2–10: ch 1, turn, sc in each st across. [12]
Row 11: ch 1, turn, dec, 8 sc, dec. [10] (12 − 2 = 10 ✓)
Row 12: ch 1, turn, dec, 6 sc, dec. [8] (10 − 2 = 8 ✓)
FO. Join Color B at one top corner and sc down the side, around the rounded bottom, and up the other side — do not sc across the 12-st top edge. FO, leaving an 18 inch (45 cm) tail.
Arms (make 2)
Color A.
Rnd 1: 6 sc in MR. [6]
Rnd 2: inc in each st around. [12] (6 inc → 6 + 6 = 12 ✓)
Rnd 3: (3 sc, inc) around. [15] (3 inc → 12 + 3 = 15 ✓)
Rnds 4–5: sc in each st around. [15]
Rnd 6: (3 sc, dec) around. [12] (3 dec → 15 − 3 = 12 ✓)
Rnds 7–12: sc in each st around. [12] (6 rounds)
Stuff Rnds 1–6 (the hand) moderately. Leave Rnds 7–12 unstuffed or only very lightly stuffed so the arms hang. FO, leaving a 12 inch (30 cm) tail. Flatten the open end.
Legs (make 2)
Color A. Hind legs — wider foot, then a narrower upper leg.
Rnd 1: 6 sc in MR. [6]
Rnd 2: inc in each st around. [12] (6 inc → 6 + 6 = 12 ✓)
Rnd 3: (sc, inc) around. [18] (6 inc → 12 + 6 = 18 ✓)
Rnd 4: (2 sc, inc) around. [24] (6 inc → 18 + 6 = 24 ✓)
Rnds 5–7: sc in each st around. [24]
Rnd 8: (2 sc, dec) around. [18] (6 dec → 24 − 6 = 18 ✓)
Rnd 9: (sc, dec) around. [12] (6 dec → 18 − 6 = 12 ✓)
Rnds 10–16: sc in each st around. [12] (7 rounds)
Stuff the foot (Rnds 1–8) firmly and the upper leg moderately. FO, leaving a 14 inch (35 cm) tail.
Tail
Color A. Worked from the tip to the base. Stuff firmly as you go.
Rnd 1: 4 sc in MR. [4]
Rnd 2: (sc, inc) around. [6] (2 inc → 4 + 2 = 6 ✓)
Rnd 3: (sc, inc) around. [9] (3 inc → 6 + 3 = 9 ✓)
Rnd 4: sc in each st around. [9]
Rnd 5: (2 sc, inc) around. [12] (3 inc → 9 + 3 = 12 ✓)
Rnds 6–7: sc in each st around. [12]
Rnd 8: (3 sc, inc) around. [15] (3 inc → 12 + 3 = 15 ✓)
Rnds 9–10: sc in each st around. [15]
Rnd 11: (4 sc, inc) around. [18] (3 inc → 15 + 3 = 18 ✓)
Rnds 12–14: sc in each st around. [18]
Rnd 15: (5 sc, inc) around. [21] (3 inc → 18 + 3 = 21 ✓)
Rnds 16–17: sc in each st around. [21]
Rnd 18: (6 sc, inc) around. [24] (3 inc → 21 + 3 = 24 ✓)
Rnds 19–22: sc in each st around. [24]
Stuff all the way to the base so the tail is rigid enough to rest on the table. FO, leaving an 18 inch (45 cm) tail for sewing.
Baby
Use Color B for the head, body, and arms, and Color A for the ears.
Baby Head
Color B.
Rnd 1: 6 sc in MR. [6]
Rnd 2: inc in each st around. [12] (6 inc → 6 + 6 = 12 ✓)
Rnd 3: (sc, inc) around. [18] (6 inc → 12 + 6 = 18 ✓)
Rnds 4–7: sc in each st around. [18]
Insert 6 mm safety eyes between Rnds 5 and 6, 4 stitches apart.
Rnd 8: (sc, dec) around. [12] (6 dec → 18 − 6 = 12 ✓)
Stuff firmly.
Rnd 9: dec around. [6] (6 dec → 12 − 6 = 6 ✓)
FO. Close through FLO of remaining 6 sts.
Baby Muzzle (tiny)
Color B.
Rnd 1: 6 sc in MR. [6]
Rnd 2: sc in each st around. [6]
FO, leaving a tail. Flatten slightly, sew to the face just below the eyes, and embroider a tiny Color C nose with 3–4 satin stitches.
Baby Ears (make 2)
Color A.
Rnd 1: 6 sc in MR. [6]
Rnd 2: sc in each st around. [6]
FO, leaving a tail. Flatten and sew to the sides of the head, in line with Rnds 3–5.
Baby Body
Color B.
Rnd 1: 6 sc in MR. [6]
Rnd 2: inc in each st around. [12] (6 inc → 6 + 6 = 12 ✓)
Rnd 3: (3 sc, inc) around. [15] (3 inc → 12 + 3 = 15 ✓)
Rnds 4–7: sc in each st around. [15]
Rnd 8: (3 sc, dec) around. [12] (3 dec → 15 − 3 = 12 ✓)
Stuff.
Rnd 9: (sc, dec) around. [8] (4 dec → 12 − 4 = 8 ✓)
FO, leaving a 10 inch (25 cm) tail. Sew the open edge to the underside of the baby head, adding a pinch of stuffing at the neck.
Baby Arms (make 2)
Color B. Do not stuff.
Rnd 1: 6 sc in MR. [6]
Rnds 2–4: sc in each st around. [6]
FO, leaving a tail. Sew to the sides of the body at Rnds 3–4, angled slightly forward so they can rest on the rim of the pouch.
Assembly
Use matching yarn and a yarn needle. Pin first, then sew with whip stitch or ladder stitch. Check the figure from the front and both sides after every piece.
1. Muzzle. Center the cream muzzle on the lower face so the top edge sits just under the safety eyes and the piece covers roughly Rnds 12–20 of the head. Sew all the way around, adding a little extra stuffing just before closing so the snout stays full but not spherical.
2. Face embroidery (Color C). Satin-stitch a wide oval nose on the upper half of the muzzle. Add two tiny straight-stitch nostrils. Below the nose, embroider a short, shallow U for the mouth.
3. Ears. Sew the inner-ear triangles on first. Attach the ears to the sides of the head over Rnds 6–10, tilted slightly backward. They should sit above the eye line.
4. Belly. Center the cream belly oval on the front of the body, covering approximately Rnds 10–25. Sew all the way around.
5. Pouch. Place the pouch on top of the lower two-thirds of the belly, rounded (decreased) end at the bottom, 12-st chain edge at the top. Sew both sides and the bottom only. Leave the top open. Take two extra reinforcing stitches at each top corner so the opening does not stretch when the baby is inserted.
6. Head to body. Add extra stuffing through the 24-st neck opening until the neck is packed and the head sits level. Sew the closed head over the body opening with Color A, hiding the join under the muzzle/chin line as much as possible. The head should face slightly forward, not straight up.
7. Arms. Sew the flattened tops of the arms to the sides of the body at Rnds 24–26 (just below the neck), about 4 stitches back from the belly edge, so they hang forward along the pouch.
8. Legs (seated kangaroo pose). Sew the open tops of the legs to the lower sides of the body over Rnds 8–14. Angle each leg forward and slightly out so the feet rest flat on the table. The figure should look as if it is sitting back on its haunches.
9. Tail. Sew the 24-st base of the tail to the lower back of the body over Rnds 8–16, centered. The tail should rest on the table behind the body, forming a tripod with the two feet. Adjust the sewing angle until the mother sits upright without tipping.
10. Claws (Color C). On each hand, embroider 3 short straight stitches over Rnds 3–4. On each foot, embroider 3 short stitches across the front of Rnds 5–6.
11. Baby. Settle the baby into the pouch so the head, ears, and arms peek over the opening. The baby is meant to be removable. If you prefer it fixed, tack the baby body to the inside of the pouch with a few hidden stitches.
Finishing
- Weave in every remaining end.
- Tug and smooth the stuffing from the outside so there are no lumps at the neck, muzzle, or tail base.
- If the mother leans, add a little more stuffing to the tail or restitch one leg a fraction farther forward.
- For a child under 3 years, omit safety eyes and embroider them with Color C; sew every piece on extra firmly and tug-test limbs, ears, and the baby.
Care: Surface-clean only. Do not machine wash — safety eyes and dense stuffing do not tolerate it.
Yarn amounts and size are based on worsted weight at the stated gauge. A looser gauge or a larger hook will produce a bigger, softer figure; keep the stitch fabric tight enough that stuffing does not show.
Disclaimer: This pattern was generated by AI and should be reviewed for accuracy before use. While we strive for quality, AI-generated content may contain errors. Please verify measurements, stitch counts, charts, and instructions before beginning your project. Generated by purlJam.uk
Love this pattern?
Save this pattern to your free PurlJam libraryAccess your pattern anytime
Bookmark this page to access your pattern anytime