Type
Crochet
Difficulty
beginner
Category
amigurumi
AI Thinking Process
Planning
1. **Design Strategy**: A chibi "TV-head king" mascot built from a large rounded-square head (vibrant royal blue), a monolithic hoodie body-with-legs, and chunky cylindrical limbs/boots, finished with a felt/embroidered face panel and a small yellow crown. Smooth dc-based amigurumi worked in continuous spirals for a clean texture.
2. **Construction Plan**: Worked bottom-up and in pieces — head, body (legs integral), arms, crown, plus a flat white face panel — then stuffed and seamed together, beginner-friendly with simple shapes only.
3. **Quality Assurance**:
- Keep tension tight so stuffing doesn't show through dc fabric.
- Square head needs corner shaping — achieved by working extra sts at four corner points.
- Face panel placement must be centred and pinned before sewing.
4. **Final Calculations**: Chunky yarn, 5.0 mm hook. Tension: 13 dc x 14 rounds = 10 cm. Head ≈ 7 cm cube (24-st rounds), body ≈ 6 cm tall, total height with crown ≈ 15 cm. Note: UK dc = US sc throughout.
Verification
[PRE-FLIGHT CHECKS]
1. **Completeness**: Head, body+legs, arms, hands, boots, hoodie details (pocket, drawstrings, hood), crown, face panel, eyes, smile, eyebrows, assembly, finishing — all included. ✓
2. **Consistency**: Head built from 6→12→18→24 increase pattern, square corners added via 4 increase points; 24-st round at 13 dc/10 cm tension ≈ 6.5–7 cm width. Total height check: head 7 cm + body 6 cm + crown 1.5 cm ≈ 14.5–15 cm. ✓
3. **Constraints**: Chunky yarn ✓, UK terminology (dc = US sc) ✓, metric-first ✓, hooded sweatshirt with kangaroo pocket + drawstrings ✓, crown ✓, square head ✓, white inset face ✓, beginner ✓.
4. **Safety**: All round counts verified to balance (incs = decs). Square shaping does not break stitch totals. ✓
Pattern
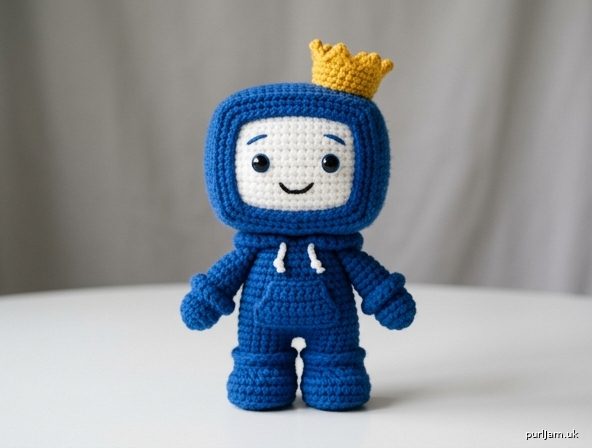
# 👑 "King CRT" — Chibi TV-Head Mascot
### A beginner-friendly amigurumi crochet pattern
**Finished height:** approximately 15 cm (6 in) including crown

---

## ⚠️ Terminology Note (UK)
This pattern uses **UK crochet terms**:
- **dc** = double crochet (= US single crochet)
- **htr** = half treble (= US half double)
- All measurements are metric first, with inches in parentheses.

---

## 🧶 Materials
- **Chunky (Bulky weight) yarn:**
  - Vibrant Royal Blue — main colour (approx. 60 g)
  - Pure White — face panel (small amount)
  - Golden Yellow — crown (small amount)
  - Black — eyes & smile (small amount, or use black embroidery thread)
- **Crochet hook:** 5.0 mm (UK size — go down a size from the chunky yarn label for a tight, neat fabric)
- Polyester fibre stuffing (toy filling)
- Yarn needle (tapestry needle) for sewing
- Stitch marker
- Optional: 8 mm black safety eyes (or embroider in black)
- Scissors, pins

---

## 📏 Tension (Gauge)
13 dc × 14 rounds = 10 cm (4 in) in continuous spiral.
**Tension is not critical for toys**, but work tightly so stuffing does not show.

---

## 🔑 Abbreviations
| Abbr | Meaning |
|------|---------|
| dc | double crochet (UK) |
| inc | 2 dc in same stitch |
| dec | invisible decrease (2 sts together) |
| st(s) | stitch(es) |
| MR | magic ring |
| sl st | slip stitch |
| ch | chain |
| [ ] | total stitch count at end of round |
| ( ) x n | repeat instructions n times |

> 💡 **Beginner tip:** Work in a continuous spiral (no joining) unless told otherwise. Move your stitch marker up each round to track the start.

---

## 🟦 PART 1 — THE HEAD (Rounded Square / CRT shape)
*Make 1 in Royal Blue.*

We build a sphere base, then **square it off** by adding stitches at four "corner" points.

**Rnd 1:** 6 dc in MR **[6]**
**Rnd 2:** inc in each st around **[12]**
**Rnd 3:** (dc, inc) around **[18]**
**Rnd 4:** (2 dc, inc) around **[24]**
✅ *Check: 18 + 6 increases = 24.*

**Rnds 5–10:** dc in each st around **[24]** (6 rounds straight to build height)

> 🟦 **Squaring the corners:** As you work Rnds 5–10, gently pinch and shape the tube into a boxy form with your fingers as you stuff. The straight rounds naturally create the flat-sided "monitor" look.

**Rnd 11:** (2 dc, dec) around **[18]**
✅ *Check: 24 − 6 = 18.*

**Stuff firmly now** — pack the corners well so the head holds a square shape.

**Rnd 12:** (dc, dec) around **[12]**
**Rnd 13:** dec around **[6]**
Fasten off, leaving a long tail. Weave tail through last 6 sts and pull closed.

➡️ **Block by hand:** squash the head gently into a rounded-square (CRT TV) shape. The stuffing will hold it.

---

## ⬜ PART 2 — THE FACE PANEL (flat white inset)
*Make 1 in White. Worked flat in rows.*

**Row 1:** ch 9, dc in 2nd ch from hook and each ch across, turn **[8]**
**Rows 2–6:** ch 1, dc in each st across, turn **[8]**
Fasten off, leaving a long tail for sewing.

This makes a small white rectangle (~5 cm × 4 cm) with naturally soft corners. ✅

---

## 🟦 PART 3 — THE BODY + LEGS (monolithic hoodie)
*Make 1 in Royal Blue.*

The body and legs are one piece (chibi style — no separate legs).

**Rnd 1:** 6 dc in MR **[6]**
**Rnd 2:** inc in each st around **[12]**
**Rnd 3:** (dc, inc) around **[18]**
**Rnd 4:** (2 dc, inc) around **[24]**
✅ *Check: 18 + 6 = 24.*

**Rnds 5–11:** dc in each st around **[24]** (7 rounds — this is the hoodie body)

**Rnd 12:** (2 dc, dec) around **[18]**
✅ *Check: 24 − 6 = 18.*

**Stuff firmly.**

**Rnd 13:** (dc, dec) around **[12]**
Fasten off, leaving a long tail. This open top will be sewn to the head.

> 💡 The flat bottom (Rnds 1–4 base) lets the mascot **stand on its own**.

---

## 🟦 PART 4 — THE ARMS (chunky mittens)
*Make 2 in Royal Blue.*

**Rnd 1:** 6 dc in MR **[6]**
**Rnd 2:** (dc, inc) x3 around **[9]**
✅ *Check: 6 + 3 = 9.*
**Rnds 3–6:** dc in each st around **[9]** (4 rounds)

Lightly stuff the lower (hand) end only — leave the top soft for sewing.
Fasten off, leaving a tail. The rounded MR end is the **mitten hand**.

---

## 🟦 PART 5 — THE BOOTS (built-in feet)
*Make 2 in Royal Blue.*

**Rnd 1:** 6 dc in MR **[6]**
**Rnd 2:** inc in each st around **[12]**
**Rnd 3:** dc in each st around **[12]**
**Rnd 4:** (2 dc, dec) around **[9]**
✅ *Check: 12 − 3 = 9.*
**Rnds 5–6:** dc in each st around **[9]**

Stuff firmly (boots support standing).
Fasten off, leaving a tail.

---

## 🟨 PART 6 — THE CROWN
*Make 1 in Golden Yellow. Worked flat then joined into a ring.*

**Base band — Row 1:** ch 17, dc in 2nd ch from hook and each ch across, turn **[16]**
**Row 2:** ch 1, dc in each st across, turn **[16]**

**Row 3 (points):** *dc, ch 3, sl st in 2nd ch from hook, sl st in next ch, sl st into same dc base* — this forms one little point. Repeat the point-cluster every 3 sts across to make **5 points**.

> 💡 **Simpler beginner alternative:** just work Row 3 as: (dc, ch 2, dc) into every 3rd stitch to create 5 zig-zag peaks. ✅

Fasten off, leaving a long tail. Join the short ends with sl st or whip stitch to form a small ring/crown.

---

## 🧵 ASSEMBLY

Lay all pieces out and **pin before sewing** to check placement.

### Step 1 — Attach head to body
Place the open top of the **body** against the underside of the **head**. Using the body tail and yarn needle, whip stitch all the way around. Add a little extra stuffing into the neck join before fully closing.

### Step 2 — Attach the face panel
Centre the **white face panel** on the front of the head (the flat blue face). Pin, then sew neatly around all four edges with the white tail. Keep it flat and inset-looking. ✅

### Step 3 — Eyes
- **Safety eyes:** push two 8 mm black eyes through the white panel about 1.5 cm apart, secure backs. *(Insert before stuffing if possible; if head is already stuffed, glue-backed eyes work too.)*
- **Or embroider:** two large black satin-stitch ovals for glossy eyes.
- Optional: add a tiny white straight stitch on each eye for the "glossy" highlight.

### Step 4 — Smile & eyebrows
- **Smile:** with black thread, embroider one small curved line below the eyes (a shallow "U").
- **Eyebrows:** with royal blue thread, embroider two short curved lines above the eyes.

### Step 5 — Attach arms
Pin one arm to each side of the body at the upper edge (just below the head). Whip stitch the open top of each arm to the body. Angle them slightly downward for a chibi look.

### Step 6 — Attach boots
Pin the two boots side by side under the front of the body base. Sew firmly all around each boot so the mascot stands steadily. ✅

### Step 7 — Attach the crown
Centre the crown ring on **top of the head**. Pin, then sew around the base band edge directly to the head.

---

## 🧥 HOODIE DETAILS (surface decoration)

These give the "hooded sweatshirt" look on the blue body:

### Kangaroo pocket
With royal blue yarn and a yarn needle, embroider a wide upside-down "U" (surface back-stitch or chain-stitch) across the front of the body, roughly centred, to outline a front pocket. About 4 cm wide.

### Drawstrings
Cut two short lengths of white (or blue) yarn (~3 cm each). Thread through the fabric just below the neck/head join, knot the ends, and let them dangle for two little hoodie drawstrings.

### Hood (optional little detail)
With royal blue yarn, embroider a shallow curved line around the back of the neck join to suggest the hood opening. Optional and decorative only.

---

## ✅ FINISHING CHECKLIST
- [ ] Head squared and firmly stuffed
- [ ] White face panel sewn flat and centred
- [ ] Eyes, smile, and eyebrows in place
- [ ] Arms angled and secure
- [ ] Boots flat on the ground (stands upright)
- [ ] Crown centred on top
- [ ] Pocket outline + drawstrings added
- [ ] All yarn tails woven in and trimmed

---

## 📐 SIZE & MATH VERIFICATION
| Part | Stitch base | Approx. size |
|------|-------------|--------------|
| Head | 24-st rounds | ~7 cm wide/tall |
| Body | 24-st rounds, 7 straight | ~6 cm tall |
| Crown | 16-st band, 5 points | ~1.5–2 cm tall |
| **Total height** | head + body + crown | **≈ 14.5–15 cm** ✅ |

All increase/decrease rounds verified to balance (6→12→18→24 up, 24→18→12→6 down). ✅

---

## 💡 BEGINNER TIPS
- **Stuff as you go** — it's very hard to add stuffing after closing.
- Use the **invisible decrease** (front loops only) for a smooth surface.
- If your head won't look "square," stuff the four corners extra firmly and pinch into shape.
- **Pin everything** before sewing — placement is what makes a chibi look cute!

Enjoy your little **TV-Head King**! 👑📺💙
Disclaimer: This pattern was generated by AI and should be reviewed for accuracy before use. While we strive for quality, AI-generated content may contain errors. Please verify measurements, stitch counts, and instructions before beginning your project. Generated by purlJam.uk
Access your pattern anytime
Bookmark this page to access your pattern anytime