Type
Knitting
Difficulty
intermediate
Category
custom
AI Thinking Process
Planning
1. **Design Strategy**: A flat-knit rectangular wall sign in chunky white yarn (stocking stitch ground) with the slogan "KNIT FAST DIE WARM" added afterwards by black duplicate-stitch/embroidery, per user's clarification. Beginner-friendly: simple garter border, straight knitting, lettering added post-knit so colourwork skills aren't required.
2. **Construction Plan**: Worked flat in one piece, bottom-up, with a garter-stitch border framing a stocking-stitch panel; lettering embroidered after blocking.
3. **Quality Assurance**:
- Keep stitch count fixed so the chart grid maps cleanly to columns/rows.
- Garter border must be even on all four sides for a tidy frame.
- Embroidery placement must be centred and legible at chunky gauge.
4. **Final Calculations**: Tension 14 sts & 20 rows = 10 cm st st on 6 mm needles. Cast on 56 sts → finished width 56/14×10 = 40 cm. Total rows 80 → 80/20×10 = 40 cm tall. 5-st garter border each side; centre panel = 46 sts × 64 rows for lettering area.
Verification
[PRE-FLIGHT CHECKS]
1. **Completeness**: Title, description, materials, tension, size, abbreviations, notes, attached-chart section, instructions, finishing — all present.
2. **Consistency**: 56 sts ÷ 14 sts/10cm × 10 = 40 cm width ✓. 80 rows ÷ 20 rows/10cm × 10 = 40 cm height ✓. Border 5+5 = 10 sts, centre panel = 46 sts ✓.
3. **Constraints**: Chunky yarn ✓; black-on-white ✓; embroidery method honoured ✓; beginner level ✓; UK terminology/metric-first ✓; attached chart referenced, not reproduced ✓.
4. **Safety**: Garter rows (top/bottom 6 rows each) + 68 body rows = 80 total ✓. Embroidery panel 64 rows fits within 68 body rows with margin ✓.
Pattern
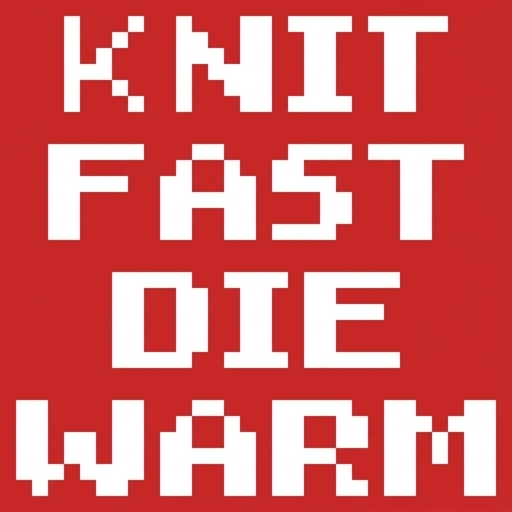
# "Knit Fast, Die Warm" — Knitted Wall Sign

A cheeky chunky-knit wall hanging: a crisp white stocking-stitch panel framed by a tidy garter border, with the slogan **KNIT FAST DIE WARM** added afterwards in black embroidery (duplicate stitch). Because the lettering is embroidered on top of the finished knitting, this is a genuinely beginner-friendly make — no colourwork, no carrying yarns, just plain knitting plus a little stitching at the end.

**Finished size:** approx. 40 cm wide × 40 cm tall (15¾" × 15¾"), unstretched after blocking.

---

## Materials

- **Main colour (MC – white):** Chunky weight yarn, approx. 120 m (130 yds) / roughly 100–110 g. Choose a smooth, light-coloured chunky yarn so the black lettering reads clearly.
- **Contrast colour (CC – black):** Small amount of chunky or aran weight yarn for embroidery, approx. 25 m (28 yds). A slightly thinner yarn (aran) can give neater letters; chunky gives bolder ones.
- **Needles:** 6 mm (UK old size 4 / US 10) straight or circular needles, used flat.
- **Notions:**
  - Blunt-tipped tapestry/darning needle (for embroidery and weaving in)
  - Stitch markers (optional)
  - A length of dowel or a thin branch, approx. 50 cm, for hanging (optional)
  - Scrap yarn or ribbon for a hanging loop (optional)
  - Rust-proof pins and a blocking surface

---

## Tension (Gauge)

**14 sts and 20 rows = 10 cm (4")** over stocking stitch on 6 mm needles, after blocking.

Tension matters here for the lettering to sit squarely — please knit a small swatch and adjust needle size if needed.

---

## Size

One size: **56 sts × 80 rows**, giving approx. **40 cm × 40 cm**.

*Width check:* 56 sts ÷ 14 sts/10 cm × 10 = **40 cm** ✓
*Height check:* 80 rows ÷ 20 rows/10 cm × 10 = **40 cm** ✓

---

## Abbreviations (UK terminology)

- **k** – knit
- **p** – purl
- **st(s)** – stitch(es)
- **RS** – right side
- **WS** – wrong side
- **st st** – stocking stitch (k on RS, p on WS)
- **g st** – garter stitch (k every row)
- **MC** – main colour (white)
- **CC** – contrast colour (black)
- **rep** – repeat

---

## Pattern Notes

- The sign is worked **flat in one piece**, from the bottom up.
- A **5-stitch garter border** is worked at each side, plus **6 garter rows** top and bottom, framing a central **46-st × 68-row** stocking-stitch panel.
- The lettering is **NOT knitted in** — it is added afterwards using **duplicate stitch (Swiss darning)** embroidery in black. This keeps the knitting simple and lets beginners place the letters precisely.
- Centre panel maths: 56 total sts − (5 + 5 border sts) = **46 sts** of stocking stitch available for lettering. ✓
- Keep an even tension and don't pull the embroidery yarn tight, or the fabric will pucker.

---

## Attached Stitch Chart

**Use the separate attached chart panel** for the visual letter grid — do not look for a grid drawn inside these written instructions; it is supplied as its own asset.

- **Placement:** The attached chart corresponds to the **central 46-stitch-wide × 64-row-tall embroidery area** of the panel. It is positioned to sit centred within the stocking-stitch field, leaving a 2-row stocking-stitch margin top and bottom inside the body and the 5-st garter frame at each side.
- **How to read it (for embroidery / duplicate stitch):** Each square on the chart = **one knitted stitch (one "V")** on your finished white panel. Read the chart the same way you read your knitting: **start at the bottom-left** square and work the bottom row of letters first, moving **upward** row by row. Because this is embroidery rather than knitting, there is no need to alternate direction — simply match each filled (black) square on the chart to the corresponding V on your fabric.
- **Colour handling:** Filled squares = **CC (black) duplicate stitch**; blank squares = leave as **MC (white)** background, no stitching. There is no stranding or carrying of yarn through the knitting itself.
- **Yarn management:** Work each letter (or each short colour run) with a comfortable length of CC (about 60–80 cm at a time) to avoid tangling. Secure starts and ends on the **wrong side** with a couple of small stitches; do not carry long floats across the back where they may show through a light background.
- **Stitch-count integration:** Centre your chart by counting in **5 garter sts + 0–1 plain sts** from each edge so that 46 chart columns align with your 46 stocking-stitch columns. Vertically, begin the chart on **body row 3** (i.e. after the lower garter border + 2 st st margin rows) so the 64 chart rows finish with a 2-row margin before the top garter border. (6 + 2 + 64 + 2 + 6 = 80 rows ✓.)

---

## Instructions

### Lower border
With MC and 6 mm needles, **cast on 56 sts.**

Work **6 rows in garter stitch** (k every row), ending after a WS row.
*Row count so far: 6.*

### Main panel
Set up the side borders with garter stitch and a stocking-stitch centre:

- **Row 1 (RS):** k5, k46, k5. (56 sts)
- **Row 2 (WS):** k5, p46, k5. (56 sts)

Repeat Rows 1–2 until you have worked **68 rows** of the main panel, ending after a WS (Row 2) row.

*Centre panel maths check:* 5 + 46 + 5 = **56 sts** every row ✓.
*Row count so far: 6 + 68 = 74.*

### Upper border
Work **6 rows in garter stitch** (k every row), ending after a WS row.

*Total rows: 74 + 6 = 80 ✓ → 40 cm tall.*

**Cast off** all 56 sts loosely knitwise.

---

## Embroidering the Lettering (Duplicate Stitch)

1. **Block first.** Pin the finished piece to 40 × 40 cm, mist with water, and leave to dry. Blocking flattens the Vs and makes them easy to follow.
2. **Find your grid.** With the RS facing, identify the 46-stitch-wide stocking-stitch field. Lightly mark, with removable pins or contrast scrap thread, the lower-left corner of the chart area: **5 sts in from the left edge, and 2 st st rows up from the lower garter border.**
3. **Thread** the tapestry needle with CC (black). Anchor on the WS.
4. **Work each filled square as a duplicate stitch:** bring the needle up at the base of the V you are covering, pass it under the two legs of the stitch one row above, then back down where you came up. This lays a new black "V" exactly over the white one.
5. **Follow the attached chart**, working bottom-to-top, one row of letters at a time, until **KNIT FAST DIE WARM** is complete.
6. Keep tension relaxed and even. Weave ends into the WS.

*Tip:* If you prefer, the slogan can instead be worked in simple **backstitch / chain stitch** following the same chart outline — duplicate stitch gives the crispest "knitted-look" letters.

---

## Finishing

1. **Weave in** all loose ends (MC and CC) neatly on the wrong side.
2. **Re-block** gently if the embroidery has distorted the fabric; pin square and allow to dry.
3. **Hanging (optional):**
   - **Dowel method:** Fold the top garter border to the WS to form a casing and slip-stitch in place, leaving the ends open; insert the dowel and tie a length of yarn to each end for hanging.
   - **Loop method:** Make a twisted cord or plait from MC, fold into a loop, and stitch securely to the two top corners on the WS.
4. Display your finished sign with pride — and knit responsibly.

---

**Verification summary:** 56 sts cast on = 40 cm wide ✓ · 80 total rows = 40 cm tall ✓ · borders 5 + 46 + 5 = 56 sts every body row ✓ · chart area 46 × 64 sits centred (6+2+64+2+6 = 80 rows; 5+46+5 = 56 sts) ✓.
Disclaimer: This pattern was generated by AI and should be reviewed for accuracy before use. While we strive for quality, AI-generated content may contain errors. Please verify measurements, stitch counts, and instructions before beginning your project. Generated by purlJam.uk
Access your pattern anytime
Bookmark this page to access your pattern anytime