Type
Crochet
Difficulty
beginner
Category
amigurumi
AI Thinking Process
Planning
Verification
Pattern
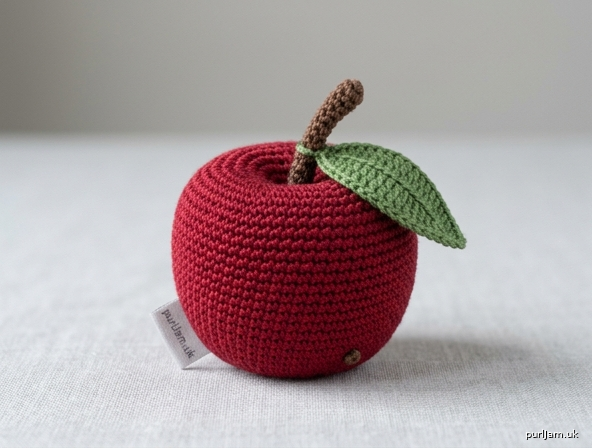
Little Lace Apple
Crochet Toy Pattern – Intermediate
A petite realistic apple worked in lace-weight yarn. Perfect as a keychain, ornament, or play-food accent. Uses basic amigurumi spheres with a shaped crown, separate stem, and simple leaf.
Finished size: Approximately 4.5 cm tall × 4 cm wide (including stem), using lace yarn and 2 mm hook.
Materials
- Yarn: Lace weight (approx 2-ply / 600–800 m per 100 g)
- Main colour (MC): Red, deep red, or apple green – 10 g
- Contrast A (CA): Brown – 2 g (stem)
- Contrast B (CB): Mid green – 2 g (leaf)
- Hook: 2.0 mm (or size needed to obtain firm fabric; go down if stitches look loose)
- Polyester fibre fill (small amount)
- Yarn needle
- Stitch marker
- Optional: keychain finding, embroidery thread for blossom end
Tension (Gauge)
9 dc and 10 rounds = 2.5 cm square, worked in continuous spiral with 2.0 mm hook.
Fabric must be dense so stuffing does not show. Adjust hook size if necessary.
Abbreviations (UK terminology)
- ch – chain
- dc – double crochet (US single crochet)
- htr – half treble
- tr – treble
- inc – increase (2 dc in same stitch)
- dc2tog – double crochet 2 together (invisible decrease preferred)
- sl st – slip stitch
- st(s) – stitch(es)
- rnd(s) – round(s)
- MC / CA / CB – main colour / contrast A / contrast B
- [ ] – stitch count at end of round
- ( ) – work instructions in brackets the number of times stated
-
- … * – repeat between asterisks
Notes
- Work in continuous spiral rounds unless stated. Do not join at end of rounds; mark first stitch of each round with a stitch marker and move it up as you go.
- Use invisible decrease (dc2tog through front loops only) for a smoother surface.
- Stuff firmly as you go, especially before the final decrease rounds.
- All measurements are metric first; imperial approximations in parentheses.
- Colour changes: finish the last yarn-over of the previous stitch with the new colour.
Apple Body (MC)
Worked from the blossom end upward.
Rnd 1: 6 dc in magic ring. [6]
Rnd 2: inc in each st around. [12] (6 increases → 6 + 6 = 12 ✓)
Rnd 3: (1 dc, inc) around. [18] (6 increases → 12 + 6 = 18 ✓)
Rnd 4: (2 dc, inc) around. [24] (6 increases → 18 + 6 = 24 ✓)
Rnd 5: (3 dc, inc) around. [30] (6 increases → 24 + 6 = 30 ✓)
Rnd 6: (4 dc, inc) around. [36] (6 increases → 30 + 6 = 36 ✓)
Rnds 7–12: 1 dc in each st around. [36] (6 plain rounds)
Rnd 13: (4 dc, dc2tog) around. [30] (6 decreases → 36 − 6 = 30 ✓)
Rnd 14: (3 dc, dc2tog) around. [24] (6 decreases → 30 − 6 = 24 ✓)
Rnd 15: (2 dc, dc2tog) around. [18] (6 decreases → 24 − 6 = 18 ✓)
Stuff firmly, shaping into a slightly flattened sphere. Continue stuffing as you close.
Rnd 16: (1 dc, dc2tog) around. [12] (6 decreases → 18 − 6 = 12 ✓)
Rnd 17: (dc2tog) around. [6] (6 decreases → 12 − 6 = 6 ✓)
Do not fasten off yet. To create the apple crown indent: thread the yarn tail onto a needle, weave through the front loops of the remaining 6 stitches, pull gently to close the hole, then push the needle down through the centre of the apple and out at the blossom end (Rnd 1). Pull firmly to create a dimple at the top, secure with a small stitch at the base, and weave in end. This indent holds the stem naturally.
Stem (CA)
Rnd 1: 4 dc in magic ring. [4]
Rnd 2: (1 dc, inc) around. [6]
Rnds 3–5: 1 dc in each st around. [6]
Fasten off, leaving a 15 cm tail for sewing. Lightly stuff the tip only (or leave unstuffed for a thinner stem).
Leaf (CB)
Worked flat in rows.
Ch 8.
Row 1: 1 dc in 2nd ch from hook, 1 htr in next ch, 1 tr in each of next 3 ch, 1 htr in next ch, 3 dc in last ch.
Rotate to work along the opposite side of the foundation chain: 1 htr in next ch, 1 tr in each of next 3 ch, 1 htr in next ch, 1 dc in last ch.
Sl st to first dc to join.
Fasten off, leaving a 12 cm tail.
Optional vein: with yarn needle and same yarn, make one straight stitch down the centre of the leaf from tip toward base.
Assembly
- Pin stem into the centre of the top indent. Sew securely with the brown tail, catching stitches around the base of the stem and into the apple body. Weave in ends.
- Pin leaf at a slight angle next to the stem. Sew the base of the leaf to the apple and/or stem with a few firm stitches. Weave in ends.
- Optional blossom end: with a short length of brown or tan embroidery thread, make a small French knot or tiny “×” at the centre of Rnd 1 (bottom of apple).
- Weave in any remaining ends. Gently roll the apple between your palms to even the stuffing and round the shape.
Finishing
- Steam-block lightly if desired (hold iron above work; do not press flat).
- For a keychain: attach a jump ring or keychain finding through a stitch at the top of the stem.
- Care: surface clean only; do not machine wash.
Pattern Checklist (math validation summary)
- Body increases: 6 → 12 → 18 → 24 → 30 → 36 (each +6 ✓)
- Body decreases: 36 → 30 → 24 → 18 → 12 → 6 (each −6 ✓)
- Stem: 4 → 6, then 3 plain rounds
- Leaf: 8-chain foundation, worked both sides for pointed oval
Enjoy your little lace apple!
Disclaimer: This pattern was generated by AI and should be reviewed for accuracy before use. While we strive for quality, AI-generated content may contain errors. Please verify measurements, stitch counts, charts, and instructions before beginning your project. Generated by purlJam.uk
Love this pattern?
Save this pattern to your free PurlJam libraryAccess your pattern anytime
Bookmark this page to access your pattern anytime