Type
Crochet
Difficulty
beginner
Category
amigurumi
AI Thinking Process
Planning
Verification
Pattern
Little Sitting Fox
Beginner amigurumi • DK yarn • Simple shapes
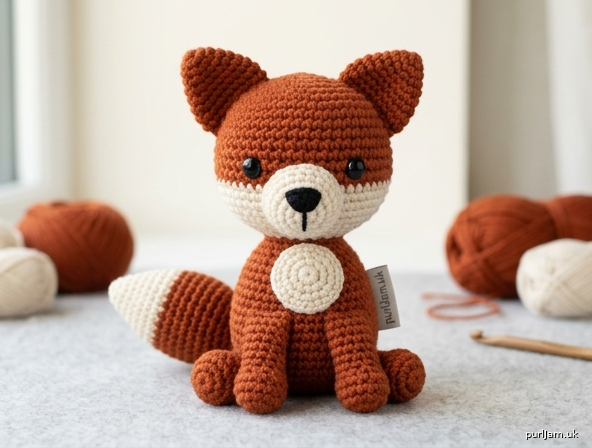
A small sitting fox worked from basic amigurumi shapes: two spheres (head and body), two cones (ears and tail), four short cylinders (legs), and two small circles (muzzle and chest). Only single crochet, increases, and decreases are used, with one color change on the tail.
Skill level: Beginner
Finished Size
Height (sitting, including ears): 4½ inches (11.5 cm) Width at body: about 2 inches (5 cm)
Size will vary with yarn, hook, and how tightly you crochet.
Materials
Yarn: DK weight (category 3), any fiber with good stitch definition
- Color A (rust / fox orange): 45 yards (41 m)
- Color B (cream / white): 20 yards (18 m)
- Color C (black): 2 yards (2 m) for nose (and optional embroidered eyes)
Hook: US E-4 (3.5 mm), or a size that gives a dense fabric with no gaps If stuffing shows through, drop to US D-3 (3.25 mm).
Notions
- Polyester fiberfill stuffing
- Pair of 6 mm safety eyes (or Color C for embroidered eyes)
- Yarn needle
- Stitch marker
- Straight pins
- Scissors
Gauge
6 sc and 7 rnds = 1 inch (2.5 cm) in single crochet worked in the round.
Gauge is not critical, but the fabric must be dense enough that stuffing does not show. Adjust hook size as needed.
Abbreviations (US terms)
- ch — chain
- dec — single crochet 2 together (invisible decrease recommended)
- FO — fasten off
- inc — 2 sc in the same stitch
- MR — magic ring (magic circle)
- rnd(s) — round(s)
- sc — single crochet
- st(s) — stitch(es)
- yo — yarn over
- [ ] — stitch count at the end of the round
Pattern Notes
- Use US crochet terms throughout.
- Work in a continuous spiral. Do not join rounds or turn unless stated. Place a stitch marker in the first stitch of each round and move it up as you go.
- Numbers in brackets are the stitch count at the end of that round.
- Stuff as directed. Firm stuffing keeps the fox sitting upright and the spheres round.
- Leave long yarn tails on every piece for sewing (8–12 inches / 20–30 cm).
- Pin pieces in place before sewing. Check both sides for symmetry.
Safety: Safety eyes are a choking hazard for children under 3 years. For babies and toddlers, embroider the eyes with Color C instead, and sew all parts on very securely.
Special Techniques
Magic ring (MR): Wrap yarn around your index finger, insert the hook under the wrap, yo and pull up a loop, ch 1 (does not count as a stitch), work the round-1 stitches into the ring, then pull the tail to close the hole.
Magic-ring alternative (if the ring is awkward): Ch 2, work all of round 1 into the 2nd ch from the hook, then pull the starting tail to close the hole as much as possible.
Invisible decrease: Insert the hook under the front loop only of the next stitch, then under the front loop only of the following stitch (2 loops on hook). Yo and pull through both front loops (2 loops on hook). Yo and pull through both loops. This sits flatter than a regular sc2tog.
Closing a small hole: Thread the yarn tail onto a yarn needle. Weave under the front loop of each remaining stitch, pull tight like a drawstring, and weave in the end.
Head
With Color A.
Rnd 1: 6 sc in MR. [6] Rnd 2: Inc in each st around. [12] (6 inc → 6 + 6 = 12 ✓) Rnd 3: (Sc, inc) around. [18] (6 inc → 12 + 6 = 18 ✓) Rnd 4: (2 sc, inc) around. [24] (6 inc → 18 + 6 = 24 ✓) Rnds 5–9: Sc around. [24] (5 rounds) Rnd 10: (2 sc, dec) around. [18] (6 dec → 24 − 6 = 18 ✓)
Place eyes now. Insert 6 mm safety eyes between rnds 6 and 7, 5 stitches apart, centered on the face. Snap the washers on the inside before continuing. (If embroidering eyes, skip this step and add them during finishing.)
Rnd 11: (Sc, dec) around. [12] (6 dec → 18 − 6 = 12 ✓) Stuff the head firmly, filling the top and shaping a round ball. Add more stuffing as you close. Rnd 12: Dec around. [6] (6 dec → 12 − 6 = 6 ✓)
FO, leaving a 10 inch (25 cm) tail. Close the hole. Weave in the closing tail; keep the long tail if you prefer to use it later to sew the head to the body.
Body
With Color A.
Rnd 1: 6 sc in MR. [6] Rnd 2: Inc in each st around. [12] (6 inc → 6 + 6 = 12 ✓) Rnd 3: (Sc, inc) around. [18] (6 inc → 12 + 6 = 18 ✓) Rnd 4: (2 sc, inc) around. [24] (6 inc → 18 + 6 = 24 ✓) Rnd 5: (3 sc, inc) around. [30] (6 inc → 24 + 6 = 30 ✓) Rnds 6–12: Sc around. [30] (7 rounds) Rnd 13: (3 sc, dec) around. [24] (6 dec → 30 − 6 = 24 ✓) Rnd 14: Sc around. [24] Rnd 15: (2 sc, dec) around. [18] (6 dec → 24 − 6 = 18 ✓) Stuff firmly, with extra filling in the bottom so the fox sits flat and does not tip. Rnd 16: (Sc, dec) around. [12] (6 dec → 18 − 6 = 12 ✓) Rnd 17: Dec around. [6] (6 dec → 12 − 6 = 6 ✓)
FO. Close the hole and weave in the end.
Ears
Make 2. With Color A. Do not stuff.
Rnd 1: 4 sc in MR. [4] Rnd 2: (Sc, inc) around. [6] (2 inc → 4 + 2 = 6 ✓) Rnd 3: (2 sc, inc) around. [8] (2 inc → 6 + 2 = 8 ✓) Rnd 4: (3 sc, inc) around. [10] (2 inc → 8 + 2 = 10 ✓) Rnd 5: Sc around. [10]
FO, leaving an 8 inch (20 cm) tail. Flatten each ear into a triangle (the magic-ring point is the tip).
Muzzle
With Color B.
Rnd 1: 6 sc in MR. [6] Rnd 2: Inc in each st around. [12] (6 inc → 6 + 6 = 12 ✓) Rnds 3–4: Sc around. [12] (2 rounds)
FO, leaving a 10 inch (25 cm) tail. Stuff lightly so the muzzle stays a shallow dome, not a ball.
Chest Patch
With Color B. Do not stuff.
Rnd 1: 6 sc in MR. [6] Rnd 2: Inc in each st around. [12] (6 inc → 6 + 6 = 12 ✓) Rnd 3: (Sc, inc) around. [18] (6 inc → 12 + 6 = 18 ✓)
FO, leaving a 12 inch (30 cm) tail. Flatten into a circle.
Tail
Begin with Color B (white tip).
Rnd 1: 4 sc in MR. [4] Rnd 2: (Sc, inc) around. [6] (2 inc → 4 + 2 = 6 ✓) Rnd 3: Sc around. [6]
Change to Color A. Fasten off Color B.
Rnd 4: (2 sc, inc) around. [8] (2 inc → 6 + 2 = 8 ✓) Rnd 5: Sc around. [8] Rnd 6: (3 sc, inc) around. [10] (2 inc → 8 + 2 = 10 ✓) Rnd 7: Sc around. [10] Rnd 8: (4 sc, inc) around. [12] (2 inc → 10 + 2 = 12 ✓) Rnds 9–16: Sc around. [12] (8 rounds)
Stuff lightly as you go — enough to hold the cone shape, not so much that it stands stiff. Do not close the open end. FO, leaving a 10 inch (25 cm) tail for sewing.
Legs
Make 4. With Color A.
Rnd 1: 6 sc in MR. [6] Rnd 2: Inc in each st around. [12] (6 inc → 6 + 6 = 12 ✓) Rnds 3–6: Sc around. [12] (4 rounds)
Stuff firmly. Do not close the open end. FO, leaving a 10 inch (25 cm) tail for sewing.
Assembly
Use matching yarn tails and a yarn needle. Whip stitch unless noted. Pin every piece first, then sew.
1. Muzzle. Pin the muzzle to the head so it sits just below the eyes, covering rnds 8–11, centered on the face. The stuffed side faces out. Sew all the way around.
2. Nose. With Color C, embroider a small filled triangle on the front of the muzzle. Add one short vertical stitch down from the center of the triangle. Weave in ends inside the muzzle/head.
3. Ears. Pin the flattened ears to the top of the head over rnds 3–5. Inner edges about 2 stitches apart; outer edges angled outward. Sew along the open (flattened) edge of each ear. The ear tips should point up and slightly out.
4. Chest. Pin the flattened chest patch to the front of the body, on the upper half. Sew around the edge.
5. Head to body. Pin the head on top of the body, slightly toward the front so the fox looks forward (not straight up). Whip stitch around the join, catching stitches on both pieces. Add a pinch of stuffing at the neck if the join looks sunken, then finish sewing.
6. Front legs. Pin two legs to the upper front of the body, one on each side of the chest, angled slightly forward and down. Sew the open end of each leg to the body.
7. Hind legs. Pin the remaining two legs to the lower sides of the body so the fox sits stably on a table (legs acting as a base, not sticking straight down). Sew the open ends in place. Sit the fox up and adjust before the stitches are final.
8. Tail. Pin the open end of the tail to the lower back of the body, just above the sitting line, angled slightly upward. Sew around the opening.
Finishing
- If you did not use safety eyes, embroider two small eyes with Color C, level with rnds 6–7, 5 stitches apart.
- Weave in every remaining end, burying them inside the stuffed pieces.
- Shape the fox with your fingers: round the head, settle the body onto its hind legs, and curve the tail along one side.
- Optional: one or two tiny stitches of Color B above each eye as highlights.
Your sitting fox is finished.
Disclaimer: This pattern was generated by AI and should be reviewed for accuracy before use. While we strive for quality, AI-generated content may contain errors. Please verify measurements, stitch counts, charts, and instructions before beginning your project. Generated by purlJam.uk
Love this pattern?
Save this pattern to your free PurlJam libraryAccess your pattern anytime
Bookmark this page to access your pattern anytime