Type
Crochet
Difficulty
beginner
Category
amigurumi
AI Thinking Process
Planning
Verification
Pattern
Chibi Sitting Loaf Base Bunny
Self-Standing Bottom-Heavy Amigurumi in Bulky Velvet Yarn
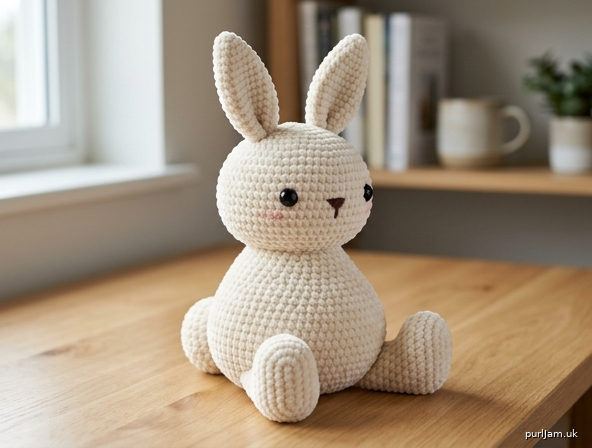
A chubby, perky desk bunny that sits upright on its own. The pear-shaped body is a solid, bottom-heavy base; the head perches on a wide 24-stitch neck so it will not wobble; cone ears stand straight up; forward boot legs with flat soles and a dense pom-pom tail act as a kickstand. Beginner construction: single crochet, increases, decreases, and simple seaming only.
Skill Level: Beginner
Finished Size: Approximately 7½" (19 cm) tall sitting to the top of the head; 10½" (27 cm) to the ear tips. Approximately 4½" (11.5 cm) wide at the belly and 6" (15 cm) deep from tail to soles. Size will vary with yarn, hook, and stuffing.
Materials
- Yarn: Bulky weight (5) velvet or chenille yarn
- MC (main color): 160 yd / 146 m (cream, beige, gray, or any favorite plush color). A light color makes stitches easier to see.
- Scrap yarn: Small amount of black or dark brown for the nose/mouth; optional light pink for blush
- Hook: US H-8 / 5.0 mm, or size needed to obtain a dense fabric with no stuffing showing. If the fabric is loose, drop to US G-6 / 4.0 mm.
- Notions:
- 14 mm safety eyes (1 pair)
- Polyester fiberfill stuffing
- Yarn needle
- Stitch marker
- Straight pins
- Scissors
Safety note: Safety eyes are a choking hazard. Do not use them on a toy for a child under 3 years; embroider the eyes instead.
Gauge
14 sc and 14 rnds = 4" (10 cm) in single crochet worked in the round.
Gauge is important for a dense, non-see-through fabric and for the stuffed pieces to hold their engineered sit. Adjust hook size until a 2" (5 cm) swatch in the round measures about 7 sc × 7 rnds.
Abbreviations (US)
- BLO — back loop only
- ch — chain
- dec — invisible decrease (insert hook through front loop of next st, then front loop of following st, yarn over, pull through both front loops, yarn over, pull through 2 loops)
- FO — fasten off
- inc — increase (2 sc in the same stitch)
- MC — main color
- MR — magic ring
- rnd(s) — round(s)
- sc — single crochet
- st(s) — stitch(es)
- [ ] — stitch count at end of round
- ( ) — work instructions in parentheses the number of times stated
Pattern Notes
- Work all pieces in a continuous spiral unless stated. Do not join or chain at the start of rounds. Mark the first stitch of every round and move the marker up as you go.
- Velvet yarn hides stitches. Work in bright light, feel for the two legs of each sc, and never rip back more than a round or two (velvet pills and sheds).
- Work tightly. The fabric must be dense enough that stuffing cannot peek through.
- Stuff as instructed. The sit depends on a rock-hard lower body, packed flat soles, a firm tail, and a slightly softer neck.
- Magic-ring alternative: ch 2, work the Rnd 1 stitches into the 2nd ch from the hook, then pull the starting tail to close the hole.
- Parenthetical math confirms the new stitch count after increases or decreases.
Body (make 1)
Pear-shaped, bottom-heavy torso. Worked from the sitting base up to the wide neck.
With MC, make a magic ring.
Rnd 1: 6 sc in MR. [6]
Rnd 2: Inc in each st around. [12] (6 increases → 6 + 6 = 12 ✓)
Rnd 3: (Sc, inc) around. [18] (6 increases → 12 + 6 = 18 ✓)
Rnd 4: (2 sc, inc) around. [24] (6 increases → 18 + 6 = 24 ✓)
Rnd 5: (3 sc, inc) around. [30] (6 increases → 24 + 6 = 30 ✓)
Rnd 6: (4 sc, inc) around. [36] (6 increases → 30 + 6 = 36 ✓)
Rnd 7: (5 sc, inc) around. [42] (6 increases → 36 + 6 = 42 ✓)
Rnd 8: (6 sc, inc) around. [48] (6 increases → 42 + 6 = 48 ✓)
Rnds 9–16: Sc around. [48] — 8 even rounds. This is the chubby belly. Begin stuffing now and pack the bottom very firmly so the base sits flat.
Rnd 17: (6 sc, dec) around. [42] (6 decreases → 48 − 6 = 42 ✓)
Rnd 18: Sc around. [42]
Rnd 19: (5 sc, dec) around. [36] (6 decreases → 42 − 6 = 36 ✓)
Rnd 20: Sc around. [36]
Rnd 21: (4 sc, dec) around. [30] (6 decreases → 36 − 6 = 30 ✓)
Rnd 22: Sc around. [30]
Rnd 23: (3 sc, dec) around. [24] (6 decreases → 30 − 6 = 24 ✓)
Rnd 24: Sc around. [24]
Stuff the lower two-thirds until the belly feels solid and bottom-heavy. Leave the neck only moderately stuffed so the head can seat onto it. FO, leaving a 24" (61 cm) tail for sewing. Do not close the 24-st opening.
Head (make 1)
Worked from the crown down. Left open at 24 sts to match the body neck.
With MC, make a magic ring.
Rnd 1: 6 sc in MR. [6]
Rnd 2: Inc in each st around. [12] (6 increases → 6 + 6 = 12 ✓)
Rnd 3: (Sc, inc) around. [18] (6 increases → 12 + 6 = 18 ✓)
Rnd 4: (2 sc, inc) around. [24] (6 increases → 18 + 6 = 24 ✓)
Rnd 5: (3 sc, inc) around. [30] (6 increases → 24 + 6 = 30 ✓)
Rnd 6: (4 sc, inc) around. [36] (6 increases → 30 + 6 = 36 ✓)
Rnds 7–12: Sc around. [36] — 6 even rounds.
Place eyes now: Insert 14 mm safety eyes between Rnds 9 and 10, with 6 stitches visible between the inner edges (wide, open chibi spacing). Check that both eyes sit on the same round before pressing the washers on.
Rnd 13: (4 sc, dec) around. [30] (6 decreases → 36 − 6 = 30 ✓)
Rnd 14: Sc around. [30]
Rnd 15: (3 sc, dec) around. [24] (6 decreases → 30 − 6 = 24 ✓)
Stuff the head firmly, filling the cheeks and crown so the face is round, not dented. FO, leaving a 24" (61 cm) tail. Do not close the 24-st opening.
Ears (make 2)
Perky standing cones. Work these extra tightly.
With MC, make a magic ring.
Rnd 1: 4 sc in MR. [4]
Rnd 2: (Sc, inc) around. [6] (2 increases → 4 + 2 = 6 ✓)
Rnd 3: Sc around. [6]
Rnd 4: (2 sc, inc) around. [8] (2 increases → 6 + 2 = 8 ✓)
Rnd 5: Sc around. [8]
Rnd 6: (3 sc, inc) around. [10] (2 increases → 8 + 2 = 10 ✓)
Rnd 7: Sc around. [10]
Rnd 8: (4 sc, inc) around. [12] (2 increases → 10 + 2 = 12 ✓)
Rnd 9: Sc around. [12]
Rnd 10: (5 sc, inc) around. [14] (2 increases → 12 + 2 = 14 ✓)
Rnds 11–13: Sc around. [14] — 3 even rounds.
Stuff firmly all the way to the pointed tip and down to the last round — under-stuffed ears will flop. FO, leaving an 18" (46 cm) tail. Leave the 14-st opening open.
Legs (make 2)
Thick boot columns with flat soles. The magic ring is the center of the sole; the open end sews to the belly.
With MC, make a magic ring.
Rnd 1: 6 sc in MR. [6]
Rnd 2: Inc in each st around. [12] (6 increases → 6 + 6 = 12 ✓)
Rnd 3: (Sc, inc) around. [18] (6 increases → 12 + 6 = 18 ✓)
Rnd 4: (2 sc, inc) around. [24] (6 increases → 18 + 6 = 24 ✓)
Flatten this circle against the table — it is the sole.
Rnd 5: Sc in BLO around. [24] — this ridge keeps the sole flat and defined.
Rnds 6–10: Sc around. [24] — 5 even rounds for the boot shaft.
Pack fiberfill into the sole first, pressing it flat against the table so the foot will sit level. Then stuff the shaft firmly. FO, leaving an 18" (46 cm) tail. Leave the 24-st opening open (this is the end that attaches to the body).
Tail (make 1)
Large dense cotton-tail that doubles as a kickstand.
With MC, make a magic ring.
Rnd 1: 6 sc in MR. [6]
Rnd 2: Inc in each st around. [12] (6 increases → 6 + 6 = 12 ✓)
Rnd 3: (Sc, inc) around. [18] (6 increases → 12 + 6 = 18 ✓)
Rnd 4: (2 sc, inc) around. [24] (6 increases → 18 + 6 = 24 ✓)
Rnds 5–7: Sc around. [24] — 3 even rounds.
Rnd 8: (2 sc, dec) around. [18] (6 decreases → 24 − 6 = 18 ✓)
Rnd 9: (Sc, dec) around. [12] (6 decreases → 18 − 6 = 12 ✓)
Stuff very firmly — a hard, round ball. The tail must be dense enough to prop the bunny from behind.
Rnd 10: Dec around. [6] (6 decreases → 12 − 6 = 6 ✓)
FO, leaving an 18" (46 cm) tail. Thread the yarn through the remaining 6 front loops, pull closed, and weave in the starting ring tail. Do not weave in the long sewing tail yet.
Face Details
Work these before sewing the head to the body, while you can still hold the head in both hands.
Nose: With black, dark brown, or pink yarn, embroider a small inverted triangle or a short horizontal satin-stitch oval, centered on Rnd 11, just below and between the eyes. Keep it tiny — about ⅜" (1 cm) wide — so the oversized eyes stay the focus.
Mouth (optional): A single straight stitch or a tiny V, 1 rnd below the nose.
Blush (optional): With light pink yarn, make 3–4 small horizontal stitches on each cheek, outside and slightly below the eyes. Do not pull tight or the face will pucker.
Weave all embroidery tails to the underside of the head opening.
Assembly
Pin every piece and test the sit on a table before you sew. Velvet does not like to be ripped out.
1. Head to body (wide neckline). Match the 24-st head opening to the 24-st body opening, face forward. The join is a full circle about 2¼" (5.5 cm) across — this is the sturdy neck that stops wobbling. Whip stitch through both loops of each corresponding stitch, adding a pinch more stuffing at the join if the neck looks dented. Knot securely and bury the tail.
2. Ears. Place both ears on the crown, centered over Rnds 3–6 of the head. Inner edges sit about 2 sts apart; the ears tilt just slightly back so they read as alert, not forward-falling. Sew each ear on as a circle, stitching all 14 sts around the opening. Do not flatten the opening into a line — a round base is what keeps the cone standing. Add a last wisp of stuffing just before closing each ear if the base feels soft.
3. Legs (forward boot platform). Sit the body on the table. Pin the open end of each leg to the lower front curve of the belly, roughly on Body Rnds 6–10, one leg on each side of center with about 4–6 sts between them. Angle the shafts straight forward so both soles rest flat on the table at the same time as the belly. The two soles plus the body bottom should already form a stable tripod. Whip stitch each 24-st opening to the body, catching a full ring of body stitches so the legs cannot twist. If a sole lifts off the table, remove pins and re-angle before sewing.
4. Tail kickstand. Pin the tail to the lower back of the body, centered, on Body Rnds 6–9, low enough that the bottom of the tail touches the table. It should meet the surface at the same moment as the belly and the two soles — that contact is what stops a backward tip. Sew firmly all the way around.
Sitting Balance Check
Place the bunny on a hard, level desk.
- It should rest on four contacts: chubby belly, left sole, right sole, and tail.
- If it tips backward, the tail is too high — resew it lower — or the tail needs more stuffing.
- If it tips forward, the legs are too high on the belly or not packed flat; resew them a round lower and restuff the soles against the table.
- If it rolls sideways, the legs are not level with each other; even them up.
- A last handful of stuffing pushed into the very bottom of the body (through a stitch, then closed) will correct a soft sit without resewing.
Finishing
Weave in every remaining tail, pulling them deep into the stuffing so they cannot work back out of velvet fabric. Steam is not recommended on chenille/velvet — it can crush the pile. Shape with your hands: round the belly, press the soles flat, pinch the ear points, and fluff the tail.
Care: Spot clean only. Do not machine wash velvet amigurumi; the pile mats and the stuffing shifts, which will ruin the engineered sit.
Your Chibi Sitting Loaf Base Bunny is ready to perch on a desk or shelf — chubby, wide-eyed, ears up, and standing on its own.
Disclaimer: This pattern was generated by AI and should be reviewed for accuracy before use. While we strive for quality, AI-generated content may contain errors. Please verify measurements, stitch counts, charts, and instructions before beginning your project. Generated by purlJam.uk
Love this pattern?
Save this pattern to your free PurlJam libraryAccess your pattern anytime
Bookmark this page to access your pattern anytime