Type
Crochet
Difficulty
intermediate
Category
amigurumi
AI Thinking Process
Planning
Verification
Pattern
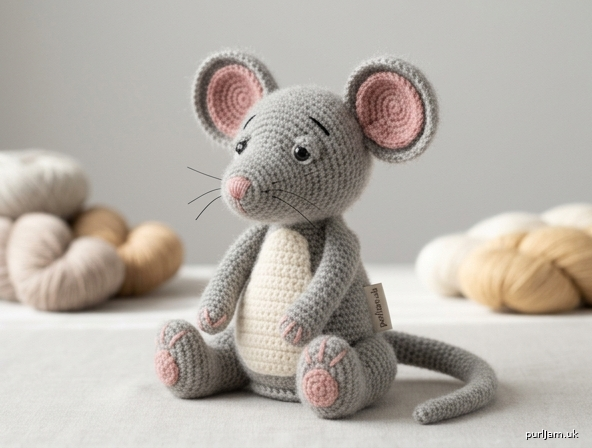
Mallow the Mouse
Sitting amigurumi mouse in DK alpaca
Skill level: Advanced
Terminology: UK crochet terms throughout (UK dc = US sc).
Construction: Worked in continuous spirals unless stated. Do not join rounds. Mark the first stitch of every round and move the marker up as you go.
A compact sitting mouse with a pointed snout, oversized cupped ears and a long tapering tail. Alpaca’s halo hides the stitches and gives a velvety coat; work tightly so the fabric stays gap-free.
Finished size
Approximately 14 cm (5½ in) tall sitting, 18 cm (7 in) to the ear tips, using the stated yarn and tension. Tail approximately 17 cm (6¾ in) long.
Materials
- MC (main colour): 45 g DK (8-ply) alpaca or alpaca-blend yarn, approx. 150 m / 165 yd — grey, cream, fawn or brown
- CC1 (inner ears, paws, nose option): 8 g DK in dusty pink
- CC2 (belly): 5 g DK in cream or pale grey (a cotton DK is fine here if you prefer a smoother patch)
- Scraps of dark grey or black yarn (or stranded embroidery cotton) for nose and brows
- Scraps of white yarn for optional teeth
- Hook: 2.75 mm (US C-2). Use 3.00 mm only if your fabric is already board-stiff
- 1 pair 8 mm safety eyes (or embroider eyes — see Safety)
- Polyester fibre filling
- Stitch marker
- Tapestry needle
- Glass-headed pins
- Small sharp scissors
- Optional: 20 cm (8 in) of 0.8–1.0 mm floral wire or a pipe cleaner for a poseable tail
- Optional: nylon sewing thread or 0.25 mm fishing line for whiskers
- Optional: metal hook (alpaca clings less to metal than to wood)
One 50 g ball of a typical alpaca DK (e.g. approx. 50 g / 167 m) is enough for MC.
Tension (gauge)
26 dc and 28 rounds = 10 cm (4 in) square, worked in a spiral with 2.75 mm hook, before stuffing.
Fabric must be dense: no holes, stuffing invisible. If you see gaps, go down to 2.5 mm. Alpaca has little spring and will stretch once stuffed — tighter than garment tension is essential.
Abbreviations (UK)
| Abbreviation | Meaning |
|---|---|
| BLO | back loop only |
| CC | contrast colour |
| ch | chain |
| dc | double crochet (US single crochet) |
| dc2tog | double crochet 2 together (ordinary decrease) |
| FLO | front loop only |
| FO | fasten off |
| htr | half treble (US hdc) |
| inc | increase — 2 dc in the next stitch |
| invdec | invisible decrease (see Notes) |
| MC | main colour |
| MR | magic ring (adjustable ring) |
| rnd(s) | round(s) |
| sl st | slip stitch |
| st(s) | stitch(es) |
| yrh | yarn round hook |
| [ ] | stitch count at end of round |
Repeat format: (… ) × n means work the stitches in brackets n times.
Pattern notes
- Work dc in every stitch unless a stitch is named otherwise.
- Invisible decrease: insert hook through FLO of the next st, then through FLO of the following st (2 loops on hook plus the original loop = 3), yrh, pull through both front loops, yrh, pull through 2 loops on hook. This sits flatter than dc2tog.
- Magic ring: wrap yarn around two fingers, insert hook under the loop, pull up a loop, ch 1 (does not count as a st), work the stated dc into the ring, then pull the tail to close. Weave the tail in immediately — alpaca slips.
- Colour change: work the last yrh of the previous stitch in the new colour. Carry or cut, leaving a 10 cm tail to weave.
- Stuffing: stuff as directed, a little at a time, pushing filling right into the snout and the sitting base. Alpaca stretches; stop when the piece is plump but the stitches are not yawning.
- Ends: weave each tail through the fabric at least three times in different directions. Alpaca is slippery.
- Do not steam-block stuffed pieces. You may hover a cool iron over the flat ear discs to relax them before joining — do not press, or alpaca will go limp.
Special techniques (advanced)
Needle sculpting (eye sockets): after the head is closed and stuffed, thread a 30 cm length of MC. Enter at the nape, come out at the inner corner of one eye, take a tiny stitch, go in at the inner corner of the other eye, and exit at the nape. Pull gently until the eyes nestle into shallow wells. Tie off inside the nape stitches.
Sitting shelf: Rnd 8 of the body is worked BLO. The unused front loops form a ridge on the outside so the base sits flat.
Cupped ears: inner disc is sewn onto the outer disc, then the lower edge is pinched (folded) as you sew it to the head so the ear stands in a shallow cup.
Pattern
Head
Worked from the snout tip to the nape, in MC. Do not stuff until directed.
Rnd 1: 6 dc in MR. [6]
Rnd 2: 6 dc. [6]
Rnd 3: (1 dc, inc) × 3. (3 increases → 6 + 3 = 9 ✓) [9]
Rnd 4: 9 dc. [9]
Rnd 5: (2 dc, inc) × 3. (3 increases → 9 + 3 = 12 ✓) [12]
Rnd 6: 12 dc. [12]
Rnd 7: (3 dc, inc) × 3. (3 increases → 12 + 3 = 15 ✓) [15]
Rnd 8: (4 dc, inc) × 3. (3 increases → 15 + 3 = 18 ✓) [18]
Rnd 9: (2 dc, inc) × 6. (6 increases → 18 + 6 = 24 ✓) [24]
Rnd 10: (3 dc, inc) × 6. (6 increases → 24 + 6 = 30 ✓) [30]
Rnd 11: (4 dc, inc) × 6. (6 increases → 30 + 6 = 36 ✓) [36]
Rnds 12–17: 36 dc. (6 rounds even) [36]
Safety eyes: insert between Rnds 10 and 11, 7 stitches apart, centred over the snout (count 7 sts along the front between posts). Push the washers on firmly. If you prefer embroidery, skip this and work the eyes at finishing.
Rnd 18: (4 dc, invdec) × 6. (6 decreases → 36 − 6 = 30 ✓) [30]
Rnd 19: 30 dc. [30]
Rnd 20: (3 dc, invdec) × 6. (6 decreases → 30 − 6 = 24 ✓) [24]
Stuff the snout firmly now, using the blunt end of the hook to pack filling into Rnds 1–8. Continue stuffing the skull as you close.
Rnd 21: (2 dc, invdec) × 6. (6 decreases → 24 − 6 = 18 ✓) [18]
Rnd 22: (1 dc, invdec) × 6. (6 decreases → 18 − 6 = 12 ✓) [12]
Rnd 23: invdec × 6. (6 decreases → 12 − 6 = 6 ✓) [6]
FO, leaving a 15 cm tail. Thread the tail through the front loops of the remaining 6 sts, pull closed, and weave in. The head should feel firm, with a distinct pointed muzzle.
Body
Worked from the sitting base up to the neck, in MC.
Rnd 1: 6 dc in MR. [6]
Rnd 2: inc × 6. (6 increases → 6 + 6 = 12 ✓) [12]
Rnd 3: (1 dc, inc) × 6. (6 increases → 12 + 6 = 18 ✓) [18]
Rnd 4: (2 dc, inc) × 6. (6 increases → 18 + 6 = 24 ✓) [24]
Rnd 5: (3 dc, inc) × 6. (6 increases → 24 + 6 = 30 ✓) [30]
Rnd 6: (4 dc, inc) × 6. (6 increases → 30 + 6 = 36 ✓) [36]
Rnd 7: (5 dc, inc) × 6. (6 increases → 36 + 6 = 42 ✓) [42]
Rnd 8: 42 dc BLO. [42]
This BLO round is the sitting shelf. The unused front loops sit on the outside, just above the base.
Rnds 9–14: 42 dc. (6 rounds even) [42]
Rnd 15: (5 dc, invdec) × 6. (6 decreases → 42 − 6 = 36 ✓) [36]
Rnd 16: 36 dc. [36]
Rnd 17: (4 dc, invdec) × 6. (6 decreases → 36 − 6 = 30 ✓) [30]
Rnd 18: 30 dc. [30]
Begin stuffing. Pack the base (Rnds 1–8) very firmly so the mouse will sit; keep the upper body firm but slightly softer at the neck.
Rnd 19: (3 dc, invdec) × 6. (6 decreases → 30 − 6 = 24 ✓) [24]
Rnd 20: (2 dc, invdec) × 6. (6 decreases → 24 − 6 = 18 ✓) [18]
FO, leaving a 40 cm tail for sewing the head on. Top up the stuffing so the neck opening is full and rounded. Do not close the 18-st opening.
Arms (make 2)
Start in CC1 (paw).
Rnd 1: 6 dc in MR. [6]
Rnd 2: (1 dc, inc) × 3. (3 increases → 6 + 3 = 9 ✓) [9]
Rnd 3: 9 dc. [9]
Change to MC. Cut CC1, leaving a 8 cm tail to weave.
Rnds 4–12: 9 dc. (9 rounds even) [9]
Stuff the paw (Rnds 1–4) lightly; leave the upper arm unstuffed so it sits softly against the body. Flatten the opening (about 4 sts across). FO, leaving a 25 cm tail. Do not close.
Hind legs (make 2)
Worked as a plump foot that tapers into a leg tube, in MC. These are sewn in a sitting position.
Rnd 1: 6 dc in MR. [6]
Rnd 2: inc × 6. (6 increases → 6 + 6 = 12 ✓) [12]
Rnd 3: (1 dc, inc) × 6. (6 increases → 12 + 6 = 18 ✓) [18]
Rnds 4–6: 18 dc. (3 rounds even — the foot) [18]
Rnd 7: (1 dc, invdec) × 6. (6 decreases → 18 − 6 = 12 ✓) [12]
Rnds 8–15: 12 dc. (8 rounds even — the leg) [12]
Stuff the foot (Rnds 1–6) firmly and the leg only moderately, leaving the last 2 rounds almost empty so the hip sews flat. FO, leaving a 30 cm tail. Do not close.
Outer ears (make 2)
In MC. Do not stuff. Worked as a flat disc.
Rnd 1: 6 dc in MR. [6]
Rnd 2: inc × 6. (6 increases → 6 + 6 = 12 ✓) [12]
Rnd 3: (1 dc, inc) × 6. (6 increases → 12 + 6 = 18 ✓) [18]
Rnd 4: (2 dc, inc) × 6. (6 increases → 18 + 6 = 24 ✓) [24]
Rnd 5: (3 dc, inc) × 6. (6 increases → 24 + 6 = 30 ✓) [30]
Rnds 6–7: 30 dc. (2 rounds even) [30]
FO, leaving a 30 cm tail for sewing.
Inner ears (make 2)
In CC1. Do not stuff.
Rnd 1: 6 dc in MR. [6]
Rnd 2: inc × 6. (6 increases → 6 + 6 = 12 ✓) [12]
Rnd 3: (1 dc, inc) × 6. (6 increases → 12 + 6 = 18 ✓) [18]
Rnd 4: (2 dc, inc) × 6. (6 increases → 18 + 6 = 24 ✓) [24]
Rnd 5: 24 dc. [24]
FO and weave in the ends (the outer-ear tail will do the joining).
Belly patch
In CC2, worked as a flat oval.
Foundation: ch 9.
Rnd 1: 1 dc in 2nd ch from hook, 6 dc, 3 dc in last ch, rotate to work along the other side of the foundation, 6 dc, 2 dc in the same ch as the first dc of this round. [18]
Rnd 2: inc, 6 dc, inc × 3, 6 dc, inc × 2. (6 increases → 18 + 6 = 24 ✓) [24]
Rnd 3: 1 dc, inc, 6 dc, (1 dc, inc) × 3, 6 dc, (1 dc, inc) × 2. (6 increases → 24 + 6 = 30 ✓) [30]
FO, leaving a 30 cm tail.
Paw pads (make 2)
In CC1, for the hind soles.
Rnd 1: 6 dc in MR, sl st to first dc to join. [6]
FO, leaving a 15 cm tail.
Tail
Worked from the tip to the base, in MC. Do not stuff (or stuff only the last 4 rounds very lightly). Keep stitches tight so the tube does not collapse into a ribbon.
Rnd 1: 4 dc in MR. [4]
Rnds 2–15: 4 dc. (14 rounds even) [4]
Rnd 16: (1 dc, inc) × 2. (2 increases → 4 + 2 = 6 ✓) [6]
Rnds 17–45: 6 dc. (29 rounds even) [6]
Rnd 46: (2 dc, inc) × 2. (2 increases → 6 + 2 = 8 ✓) [8]
Rnds 47–52: 8 dc. (6 rounds even) [8]
FO, leaving a 25 cm tail.
Optional armature: bend one end of the floral wire into a tiny closed loop (so no sharp point remains). Slide the wire into the tail, looped end at the tip, and trim the other end 1 cm short of the open base. If the mouse is for a child, omit the wire.
Optional eyelids (make 2)
In MC, worked in a row.
Ch 6. Starting in 2nd ch from hook: sl st, 1 dc, 1 htr, 1 dc, sl st. FO, leaving a 15 cm tail.
These are crescents sewn over the top third of each safety eye.
Assembly
Use matching yarn and a tapestry needle. Pin every piece and check the seated pose from the front and both sides before sewing. Ladder stitch (mattress stitch) gives the cleanest seams; whip stitch is acceptable on the ears and pads.
Work in this order.
1. Face on the head (do this before attaching the head)
Needle sculpt the eye sockets as described in Special techniques.
Nose: with CC1 or black, satin-stitch a small inverted triangle covering Rnds 1–3 of the snout, about 6 mm wide at the top. Add a single straight stitch down from the centre point, 3 mm long, for the philtrum.
Mouth: a tiny V or a shallow curve in black, 2 sts below the philtrum.
Optional teeth: two vertical white stitches, 2 mm long, side by side under the nose.
Optional eyelids: curve each crescent over the top of the eye and catch it down at both corners and at the centre.
Brows (optional): one small angled stitch in dark grey above each eye, slanting slightly outward.
Whiskers: thread nylon or sewing thread on a sharp needle. Take 3 long stitches through the snout, exiting on both sides (6 whiskers in total), each 3–4 cm long. Knot invisibly inside the stuffing or take a tiny locking stitch at the skin. Trim to length. Omit whiskers for children under 3.
2. Ears
Place one inner ear on one outer ear, CC1 facing you, slightly closer to the lower edge so a MC rim shows all round. Whip-stitch the inner disc down with MC, catching FLO of the inner and the matching stitches of the outer.
Repeat for the second ear.
Pinch the lower edge of each finished ear (fold about 4 sts of the outer disc together) and ladder-stitch the fold closed for 1 cm — this is the cup.
Sew the pinched edge to the head over Rnds 13–16, inner edges 4 stitches apart at the crown, ears tilting slightly outward and a little backward. They should sit behind the eye line, not above the snout.
3. Head to body
Add a last pinch of filling at the neck. Seat the head on the 18-st body opening, snout facing forward, with the sitting shelf of the body as the floor. The chin should sit just above body Rnd 19.
Ladder-stitch around twice, pulling firmly. The join is a common failure point on alpaca — go around a second time.
4. Belly patch
Centre the oval on the front of the body, top edge at Rnd 16, bottom edge just above the BLO shelf (Rnd 8). Whip-stitch with CC2.
5. Arms
Flattened opening against the body at Rnds 17–19, 7–8 stitches apart, angled 15° forward so the paws rest toward the belly. Sew around the opening and add 3 extra tacking stitches through the upper arm into the body so they cannot be pulled off.
6. Hind legs (sitting pose)
This placement is what keeps the mouse upright.
Hold the body on a table. Pin each leg so:
- the foot sits on the table, sole down, toes pointing forward and slightly out;
- the leg tube runs up the side of the body covering Rnds 8–13;
- the two feet are about 3 cm apart at the heels.
The unused front loops of body Rnd 8 should sit just above the table, in line with the soles.
Sew all around the flattened top of each leg, then take several stitches through the side of the foot into Rnds 8–9 of the body so the feet cannot swing. The mouse should now sit without support. If it tips, add stuffing through the neck (if still accessible) or restitch the legs 1 rnd further forward.
7. Paw pads
Sew one 6-dc pad to the sole of each hind foot, slightly toward the heel.
Front paws: embroider 3 short radiating stitches in CC1 on each CC1 paw for toes.
8. Tail
Sew the 8-st base to the centre back, covering Rnds 8–10, just above the sitting shelf. Curve the tail around the mouse to one side. If wired, bend a gentle S-curve.
Finishing
- Weave in every remaining end through the filling, not just under surface stitches.
- Roll the stuffed pieces firmly between your palms to even the alpaca halo.
- Check that safety-eye washers are tight and that no wire ends are exposed.
- Do not wash. Spot-clean with a damp cloth. Alpaca felts with agitation.
Safety
- Under 3 years: do not use safety eyes, wire, fishing-line whiskers or any detachable trim. Embroider the eyes with satin stitch (a 6 mm oval in black or dark grey, with a tiny white highlight stitch). Omit the armature and whiskers. Sew every limb on with a double pass of yarn and tug-test.
- Safety eyes, if used, must have the washer pressed fully home before the head is closed.
- All parts must withstand a firm pull. Re-sew anything that shifts.
- This toy is not intended as a teether; alpaca fibres can shed.
Size and yarn notes
DK alpaca + 2.75 mm hook, at the stated tension, yields a 14 cm sitting mouse. A cotton or wool DK at the same tension will look slightly smaller and crisper, with more visible stitch definition. A heavier alpaca-blend may need a 3 mm hook; re-check tension and expect a mouse up to 16 cm tall.
Colour ideas: natural grey (agouti), undyed cream, chocolate, or white with CC1 pink (albino — use pale pink-brown embroidered eyes rather than black).
Stitch-count summary (for checking as you work)
| Piece | Start | Max | End | Rounds |
|---|---|---|---|---|
| Head | 6 | 36 | 6 (closed) | 23 |
| Body | 6 | 42 | 18 (open) | 20 |
| Arm | 6 | 9 | 9 (open, flattened) | 12 |
| Hind leg | 6 | 18 | 12 (open) | 15 |
| Outer ear | 6 | 30 | 30 (flat) | 7 |
| Inner ear | 6 | 24 | 24 (flat) | 5 |
| Belly | 18 | 30 | 30 (flat oval) | 3 |
| Tail | 4 | 8 | 8 (open) | 52 |
| Paw pad | 6 | 6 | 6 (joined) | 1 |
Increase rounds always add 6 sts on head (from Rnd 9), body, ears and the wide part of the legs; the snout uses 3-point increases (+3). Decrease rounds always subtract 6 sts. If a count is wrong, stop and check the previous round before continuing.
Disclaimer: This pattern was generated by AI and should be reviewed for accuracy before use. While we strive for quality, AI-generated content may contain errors. Please verify measurements, stitch counts, charts, and instructions before beginning your project. Generated by purlJam.uk
Love this pattern?
Save this pattern to your free PurlJam libraryAccess your pattern anytime
Bookmark this page to access your pattern anytime