Type
Crochet
Difficulty
intermediate
Category
amigurumi
AI Thinking Process
Planning
Verification
Pattern
Medium Dragon Amigurumi
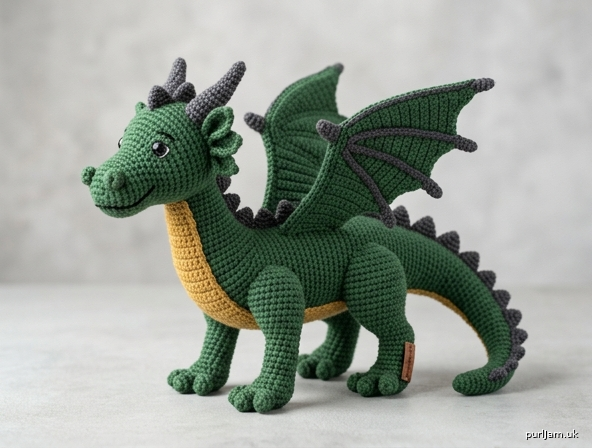
A four-legged sitting/standing dragon with a shaped snout, fingered wings, a curving tail, and a full spike ridge. Pieces are worked separately and sewn together.
Skill level: Intermediate
Finished size: About 11 in (28 cm) from snout to tail tip; about 4½ in (11.5 cm) tall at the shoulder. Size will vary with gauge and stuffing.
Materials
- Worsted weight yarn (medium / category 4)
- MC (body, head, legs, tail, wings): 160 yd (146 m). Suggested: forest green.
- CCA (belly): 25 yd (23 m). Suggested: cream or antique gold.
- CCB (spikes, horns, optional wing edging): 40 yd (37 m). Suggested: charcoal or deep burgundy.
- US E-4 / 3.5 mm crochet hook
- Pair of 12 mm safety eyes
- Polyester fiberfill
- Yarn needle
- Stitch markers
- Scissors
- Black yarn or embroidery floss (mouth and brows)
- Optional: a small amount of pink yarn for a tongue
Safety note: Safety eyes are a choking hazard. Do not use them on toys for children under 3 years; embroider eyes instead.
Gauge
20 sc and 22 rnds = 4 in (10 cm) in single crochet worked in the round, unstretched.
Work tightly enough that stuffing does not show through the fabric. Change hook size if needed to match gauge and get a dense fabric.
Abbreviations (US)
- MR — magic ring
- ch — chain
- sc — single crochet
- inc — 2 sc in the same stitch
- dec — invisible single-crochet decrease (see Special Stitches)
- hdc — half double crochet
- dc — double crochet
- tr — treble crochet
- sl st — slip stitch
- st(s) — stitch(es)
- rnd(s) — round(s)
- FO — fasten off
- MC / CCA / CCB — main color / contrast A / contrast B
Special Stitches
Invisible decrease (dec): Insert hook under the front loop only of the next 2 stitches, yarn over, pull through both front loops (2 loops on hook), yarn over, pull through both loops.
5-dc bobble (bobble): Yarn over, insert hook in indicated st, yarn over, pull up a loop, yarn over, pull through 2 loops; repeat this 4 more times in the same stitch (6 loops on hook), yarn over, pull through all 6 loops. Ch 1 to close if the bobble feels loose, and skip that ch-1 when counting stitches.
Pattern Notes
- Head, body, legs, tail, and horns are worked in continuous spirals. Do not join rounds. Mark the first stitch of each round and move the marker up.
- Wings, spikes, belly, and ear frills are worked in turned rows (belly is an oval in joined-looking rounds but is worked as a flat oval).
- Stuff as instructed. Firm stuffing in the head and body holds the pose; stuff feet firmly and upper legs only moderately so they sew flat against the body.
- Parentheses and “×” mean repeat the group that many times:
(sc, inc) × 6is six repeats. - Leave long tails on pieces that will be sewn.
Head
With MC, start at the snout.
Rnd 1: 6 sc in MR. (6)
Rnd 2: Inc in each st around. (6 inc → 6 + 6 = 12 ✓)
Rnd 3: (Sc, inc) × 6. (18)
Rnd 4: (2 sc, inc) × 6. (24)
Rnd 5 (nostrils): Sc 9, bobble, sc 4, bobble, sc 9. (24) Shift the start of the round if needed so the two bobbles sit on top of the snout, 4 stitches apart.
Rnd 6: Sc in each st around. (24)
Rnd 7: (3 sc, inc) × 6. (30)
Rnd 8: (4 sc, inc) × 6. (36)
Rnd 9: (5 sc, inc) × 6. (42)
Rnds 10–15: Sc in each st around. (42) — 6 rounds
Safety eyes: Insert 12 mm safety eyes between Rnds 10 and 11, 8 stitches apart, centered above the snout and aligned with the gap between the nostril bobbles. Lock the washers on the inside before continuing.
Rnd 16: (5 sc, dec) × 6. (36)
Rnd 17: (4 sc, dec) × 6. (30)
Rnd 18: (3 sc, dec) × 6. (24)
Stuff the head firmly, filling the snout well so it does not collapse. FO, leaving a 12 in (30 cm) tail for sewing.
Body
With MC, start at the rear and work toward the neck.
Rnd 1: 6 sc in MR. (6)
Rnd 2: Inc in each st around. (12)
Rnd 3: (Sc, inc) × 6. (18)
Rnd 4: (2 sc, inc) × 6. (24)
Rnd 5: (3 sc, inc) × 6. (30)
Rnd 6: (4 sc, inc) × 6. (36)
Rnd 7: (5 sc, inc) × 6. (42)
Rnd 8: (6 sc, inc) × 6. (48)
Rnds 9–18: Sc in each st around. (48) — 10 rounds
Rnd 19: (6 sc, dec) × 6. (42)
Rnds 20–21: Sc in each st around. (42)
Rnd 22: (5 sc, dec) × 6. (36)
Rnds 23–24: Sc in each st around. (36)
Rnd 25: (4 sc, dec) × 6. (30)
Rnd 26: Sc in each st around. (30)
Rnd 27: (3 sc, dec) × 6. (24)
Rnd 28: Sc in each st around. (24)
Stuff firmly, with extra filling toward the chest and belly so the body is a rounded oval, not a tube. FO, leaving a 12 in (30 cm) tail. The 24-st opening is the neck.
Belly Patch
With CCA, worked as a flat oval.
Rnd 1: Ch 9, sc in 2nd ch from hook, sc in next 6 ch, 3 sc in last ch; rotate and work along the opposite side of the chain: sc in next 6 ch, 2 sc in the same ch as the first sc. (18)
Rnd 2: Inc in first st, sc 6, inc in next 3 sts, sc 6, inc in next 2 sts. (6 inc → 18 + 6 = 24 ✓)
Rnd 3: Sc, inc, sc 6, (sc, inc) × 3, sc 6, (sc, inc) × 2. (30)
Rnd 4: 2 sc, inc, sc 6, (2 sc, inc) × 3, sc 6, (2 sc, inc) × 2. (36)
FO, leaving a long tail for sewing.
Hind Legs (make 2)
With MC, start at the foot.
Rnd 1: 6 sc in MR. (6)
Rnd 2: Inc in each st around. (12)
Rnd 3: (Sc, inc) × 6. (18)
Rnd 4 (toes): Sc 6, bobble, sc 2, bobble, sc 2, bobble, sc 5. (18) The three bobbles are the front toes.
Rnd 5: Sc in each st around. (18)
Rnd 6: (Sc, dec) × 6. (12)
Rnds 7–13: Sc in each st around. (12) — 7 rounds
Stuff the foot firmly and the upper leg only moderately. FO, leaving a long tail.
Front Legs (make 2)
With MC, start at the foot.
Rnd 1: 6 sc in MR. (6)
Rnd 2: Inc in each st around. (12)
Rnd 3 (toes): Sc 4, bobble, sc 1, bobble, sc 1, bobble, sc 3. (12)
Rnd 4: Sc in each st around. (12)
Rnd 5: (2 sc, dec) × 3. (9)
Rnds 6–12: Sc in each st around. (9) — 7 rounds
Stuff as for the hind legs. FO, leaving a long tail.
Tail
With MC, start at the tip. On every increase round, work both increases next to each other on the same side of the tail (the inside of the intended curve) so the tail bends instead of staying straight. Mark that side and keep it consistent.
Rnd 1: 4 sc in MR. (4)
Rnd 2: (Sc, inc) × 2. (6)
Rnds 3–4: Sc in each st around. (6)
Rnd 5: Inc, inc, sc 4. (8) — both inc on the curve side
Rnds 6–7: Sc in each st around. (8)
Rnd 8: Inc, inc, sc 6. (10)
Rnds 9–10: Sc in each st around. (10)
Rnd 11: Inc, inc, sc 8. (12)
Rnds 12–13: Sc in each st around. (12)
Rnd 14: Inc, inc, sc 10. (14)
Rnds 15–16: Sc in each st around. (14)
Rnd 17: Inc, inc, sc 12. (16)
Rnds 18–19: Sc in each st around. (16)
Rnd 20: Inc, inc, sc 14. (18)
Rnds 21–23: Sc in each st around. (18)
Rnd 24: Inc, inc, sc 16. (20)
Rnds 25–27: Sc in each st around. (20)
Stuff as you go: very lightly in the first 8 rounds, then gradually firmer toward the base. Do not overstuff or the curve will straighten. FO, leaving a long tail.
Wings (make 2)
Worked flat in rows with MC. The starting chain is the body edge; the last row is the outer edge that receives the fingers.
Row 1: Ch 9, sc in 2nd ch from hook and in each ch across. (8) Ch 1, turn.
Row 2: Inc, sc 6, inc. (10) Ch 1, turn.
Row 3: Sc in each st across. (10) Ch 1, turn.
Row 4: Inc, sc 8, inc. (12) Ch 1, turn.
Row 5: Sc in each st across. (12) Ch 1, turn.
Row 6: Inc, sc 10, inc. (14) Ch 1, turn.
Row 7: Sc in each st across. (14) Ch 1, turn.
Row 8: Inc, sc 12, inc. (16) Ch 1, turn.
Row 9: Sc in each st across. (16) Ch 1, turn.
Row 10: Inc, sc 14, inc. (18) Ch 1, turn.
Row 11: Sc in each st across. (18) Do not turn.
Fingers: Work across the 18 stitches of Row 11. Each finger uses skip 2 + sl st 1 (3 sts); 6 fingers × 3 = 18 ✓. Change to CCB here if you want darker wing bones.
- Finger 1 (top, short): Ch 5, sl st in 2nd ch from hook, sc in next, hdc in next, dc in next, skip 2 sts of Row 11, sl st in next st.
- Finger 2: Ch 7, sl st in 2nd ch from hook, sc in next, hdc in next, dc in next 2, tr in next, skip 2 sts, sl st in next st.
- Finger 3 (longest): Ch 9, sl st in 2nd ch from hook, sc in next, hdc in next, dc in next 2, tr in next 3, skip 2 sts, sl st in next st.
- Finger 4: Ch 8, sl st in 2nd ch from hook, sc in next, hdc in next, dc in next 2, tr in next 2, skip 2 sts, sl st in next st.
- Finger 5: Ch 6, sl st in 2nd ch from hook, sc in next, hdc in next, dc in next 2, skip 2 sts, sl st in next st.
- Finger 6 (bottom, short): Ch 4, sl st in 2nd ch from hook, sc in next, hdc in next, skip 2 sts, sl st in last st.
Do not FO. Rotate the work and sc evenly down the side of the rows (about 10 sc), 3 sc in the foundation corner, sc 8 across the foundation chain, 3 sc in the next corner, sc evenly up the other side, sl st to the base of Finger 1. FO and weave in ends.
Make the second wing the same way. When sewing, flip one wing so the longest finger points backward on both sides of the body.
Horns (make 2)
With CCB.
Rnd 1: 4 sc in MR. (4)
Rnd 2: (Sc, inc) × 2. (6)
Rnds 3–4: Sc in each st around. (6)
Rnd 5: (2 sc, inc) × 2. (8)
Rnds 6–7: Sc in each st around. (8)
Stuff lightly. FO, leaving a tail for sewing.
Ear Frills (make 2)
With MC or CCB.
Ch 6, sl st in 2nd ch from hook, sc in next, hdc in next, dc in next, tr in last. FO, leaving a tail. The tr end is the outer tip.
Spikes
All spikes are worked in CCB, in turned rows. The last row is the base that sews to the dragon.
Large spikes (make 5) — along the back
Row 1: Ch 2, 2 sc in 2nd ch from hook. (2) Ch 1, turn.
Row 2: Inc in each st. (4) Ch 1, turn.
Row 3: Inc, sc 2, inc. (6) Ch 1, turn.
Row 4: Inc, sc 4, inc. (8)
FO, leaving a long tail.
Medium spikes (make 3) — neck and tail base
Row 1: Ch 2, 2 sc in 2nd ch from hook. (2) Ch 1, turn.
Row 2: Inc in each st. (4) Ch 1, turn.
Row 3: Inc, sc 2, inc. (6)
FO, leaving a long tail.
Small spikes (make 5) — tail and forehead
Row 1: Ch 2, 2 sc in 2nd ch from hook. (2) Ch 1, turn.
Row 2: Inc in each st. (4)
FO, leaving a long tail.
Assembly
Use the yarn tails and a yarn needle. Pin every piece before sewing, and check that the dragon sits or stands the way you want before you lock the stitches down.
1. Head to body. Match the 24-st head opening to the 24-st body neck. Whipstitch around, adding a pinch of stuffing in the neck as you close so it does not dent. The snout should point straight forward, with the nostril bobbles on top.
2. Belly patch. Center the oval on the underside of the body, wide end toward the chest, narrow end toward the tail. The patch should cover roughly Body Rnds 8–22. Sew around the edge with CCA.
3. Hind legs. Sew to the sides of the lower body (about Body Rnds 8–12), toes pointing forward. The tops of the legs sit just below the widest part of the body. Angle them slightly outward so the dragon balances.
4. Front legs. Sew to the sides of the chest (about Body Rnds 22–26), just behind the neck join, toes forward. Keep them a little closer together than the hind legs.
5. Tail. Sew the 20-st base over the closed rear of the body (Body Rnds 1–4), with the curve sweeping to one side or slightly upward. Add stuffing at the join if the rump looks flat.
6. Wings. Sew the 8-st foundation edge of each wing to the upper back, just behind the shoulders (about Body Rnds 20–24), one on each side of the spine, angled back and slightly up. The longest finger points toward the tail.
7. Horns. Sew to the top of the head over Rnds 12–14, about 4–6 stitches apart, tilting them slightly back.
8. Ear frills. Sew one to each side of the head, just behind the eyes and below the horns, tr tip pointing up and out.
9. Spikes. Sew in a single line down the center of the back, bases against the body, points standing up. Pinch each base as you sew so the spike stands rather than lying flat. Suggested order, forehead to tail tip:
- 1 small spike on the forehead, between the horns
- 2 medium spikes down the back of the head and neck
- 5 large spikes along the body
- 1 medium spike at the tail base
- 4 small spikes along the tail, getting farther apart toward the tip
10. Face. With black yarn or floss, embroider a short straight or slightly curved mouth under the snout, and optional small brows over the eyes. If you skipped safety eyes, embroider ovals or French-knot pupils now.
11. Optional tongue. With pink yarn, ch 5, sl st in 2nd ch from hook and in each ch across. (4) Sew under the mouth so a little tip shows.
Weave in every remaining end. Steam the wings lightly if they curl (do not press the stuffed body).
Finishing Checklist
- Head opening (24) sewn to body neck (24)
- Eyes locked between Head Rnds 10 and 11, 8 sts apart
- Four legs, tail, and both wings attached and balanced
- Belly patch centered on the underside
- Spike ridge complete from forehead to tail
- All ends woven in; fabric dense enough that stuffing does not show
Your medium dragon is ready.
Disclaimer: This pattern was generated by AI and should be reviewed for accuracy before use. While we strive for quality, AI-generated content may contain errors. Please verify measurements, stitch counts, charts, and instructions before beginning your project. Generated by purlJam.uk
Love this pattern?
Save this pattern to your free PurlJam libraryAccess your pattern anytime
Bookmark this page to access your pattern anytime