Type
Crochet
Difficulty
intermediate
Category
pullover
AI Thinking Process
Planning
Verification
Pattern
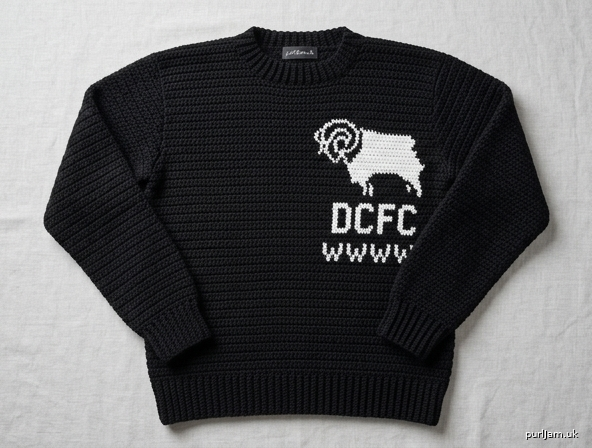
Men’s Classic Crochet Pullover (Jumper)
Black with White Ram Chest Motif
A classic crew-neck pullover worked flat in pieces from the bottom up and seamed. The fabric is simple double crochet with stretchy single-crochet ribbing. A white stylized ram’s head (Derby County Rams motif) is placed on the wearer’s left chest.
Skill level: Beginner (basic stitches; optional simple colorwork or embroidery for the motif)
Sizes
S (M, L, XL, 2XL)
Instructions are written for size S with M, L, XL, and 2XL in parentheses. When only one number is given, it applies to all sizes.
To fit chest: 34–36 (38–40, 42–44, 46–48, 50–52)" [86.5–91.5 (96.5–101.5, 106.5–112, 117–122, 127–132) cm]
The sample size requested is L (to fit 42–44").
Finished measurements
- Chest: 40 (44, 48, 52, 56)" [101.5 (112, 122, 132, 142) cm]
- Length from shoulder: 26 (27, 28, 29, 30)" [66 (68.5, 71, 73.5, 76) cm]
- Length to underarm: 17 (17.5, 18, 18.5, 19)" [43 (44.5, 45.5, 47, 48.5) cm]
- Armhole depth: 9 (9.5, 10, 10.5, 11)" [23 (24, 25.5, 26.5, 28) cm]
- Upper sleeve: 16 (18, 20, 22, 24)" [40.5 (45.5, 51, 56, 61) cm]
- Sleeve length (underarm to cuff edge): 20 (20.5, 21, 21.5, 22)" [51 (52, 53.5, 54.5, 56) cm]
- Hem/cuff ribbing: 2½" [6.5 cm]
Ease is about 4–6" [10–15 cm] at the chest — a classic men’s jumper fit, not skin-tight.
Materials
Yarn: Worsted weight (Category 4 / medium), wool, acrylic, or blend that meets gauge.
- MC (black): 1250 (1450, 1650, 1900, 2150) yd [1145 (1325, 1510, 1740, 1965) m]
- CC (white): 70 yd [64 m] for the ram motif
Hook: US I-9 (5.5 mm), or size needed to obtain gauge. Optional US H-8 (5 mm) for denser ribbing if your sc BLO flares.
Notions: Yarn needle, 4 stitch markers, scissors, tape measure. Extra yarn needle if you add the motif in duplicate stitch.
Gauge
12 dc and 8 rows = 4" [10 cm] in double crochet with US I-9 (5.5 mm), blocked.
Swatch (do not skip): Chain 20. Dc in 4th ch from hook and in each ch across (18 dc). Work 10 rows of dc. Block. Measure the center 4".
- Too few stitches in 4" → go down a hook size.
- Too many stitches in 4" → go up a hook size.
This pullover will not fit if gauge is off. Recheck after 4–6" [10–15 cm] of the Back.
Abbreviations (US terms)
- beg — beginning
- BLO — back loop only
- CC — contrast color (white)
- ch — chain
- dc — double crochet
- dc2tog — double crochet 2 together (see Special stitches)
- MC — main color (black)
- rep — repeat
- rnd(s) — round(s)
- RS — right side
- sc — single crochet
- sl st — slip stitch
- st(s) — stitch(es)
- WS — wrong side
Special stitches
dc2tog: Yarn over, insert hook in next st, yarn over, pull up a loop, yarn over, pull through 2 loops (2 loops on hook); yarn over, insert hook in following st, yarn over, pull up a loop, yarn over, pull through 2 loops (3 loops on hook); yarn over, pull through all 3 loops. (1 st decreased)
Color change (if working the motif as you go): Finish the last yarn over of the previous stitch with the new color, then work the next stitch in the new color.
Notes
- US crochet terms throughout (dc is the tall stitch; this is not UK dc).
- Ch 3 at the start of a dc row counts as the first dc. Work the last dc into the top of the turning ch unless told otherwise.
- The pullover is worked flat, then seamed.
- Black yarn hides stitches — use strong light and count at the end of every row until the fabric is automatic.
- Keep the same stitch count unless a row says to decrease or increase. Count: 60 (66, 72, 78, 84) on Back/Front before armholes.
- Motif colors: MC black for the jumper; CC white for the ram’s head only.
- Do not print or copy a trademarked club badge as a commercial product; this pattern describes placement of a personal ram’s-head chest motif.
Stitch patterns
Ribbing (sc BLO): Ch 1 (does not count as a st), sc in BLO of each st across, turn.
Body fabric (dc): Ch 3 (counts as dc), dc in each st across, turn.
BACK
With MC and 5.5 mm hook, ch 61 (67, 73, 79, 85).
Row 1 (RS): Sc in 2nd ch from hook and in each ch across, turn — 60 (66, 72, 78, 84) sc. (61 − 1 = 60 ✓; 67 − 1 = 66 ✓; 73 − 1 = 72 ✓; 79 − 1 = 78 ✓; 85 − 1 = 84 ✓)
Rows 2–10: Ch 1, sc in BLO of each st across, turn.
Piece measures about 2½" [6.5 cm] from the foundation chain.
Row 11: Ch 3 (counts as dc here and throughout), dc in each st across, turn — 60 (66, 72, 78, 84) dc.
Row 12: Ch 3, dc in each dc across, turn.
Rep Row 12 until piece measures 17 (17.5, 18, 18.5, 19)" [43 (44.5, 45.5, 47, 48.5) cm] from the beginning, ending after a WS row.
(About 29 (30, 31, 32, 33) dc rows after the ribbing at 8 rows = 4".)
Shape armholes
Next row (RS): Sl st loosely across first 3 (4, 5, 6, 7) sts, ch 3, dc in each st to last 3 (4, 5, 6, 7) sts, leave remaining sts unworked, turn — 54 (58, 62, 66, 70) dc.
(60 − 3 − 3 = 54 ✓; 66 − 4 − 4 = 58 ✓; 72 − 5 − 5 = 62 ✓; 78 − 6 − 6 = 66 ✓; 84 − 7 − 7 = 70 ✓)
Decrease row: Ch 3, dc2tog over next 2 sts, dc across to last 2 sts, dc2tog, turn — 2 sts decreased.
Rep Decrease row 1 (1, 2, 2, 3) more time(s) — 50 (54, 56, 60, 62) dc.
(54 − 2×2 = 50 ✓; 58 − 2×2 = 54 ✓; 62 − 3×2 = 56 ✓; 66 − 3×2 = 60 ✓; 70 − 4×2 = 62 ✓)
Work even in dc on 50 (54, 56, 60, 62) sts until armhole measures 9 (9.5, 10, 10.5, 11)" [23 (24, 25.5, 26.5, 28) cm], ending after a WS row. Fasten off.
Place markers on the center 20 (22, 24, 26, 28) sts for the back neck. Each shoulder is 15 (16, 16, 17, 17) sts.
(50 − 20 = 30, 30 ÷ 2 = 15 ✓; 54 − 22 = 32, 32 ÷ 2 = 16 ✓; 56 − 24 = 32, 32 ÷ 2 = 16 ✓; 60 − 26 = 34, 34 ÷ 2 = 17 ✓; 62 − 28 = 34, 34 ÷ 2 = 17 ✓)
FRONT
Work as for Back until armholes are shaped and you have 50 (54, 56, 60, 62) sts, then work even until armhole measures 6 (6.5, 7, 7.5, 7.5)" [15 (16.5, 18, 19, 19) cm], ending after a WS row.
(Neck begins about 3–3½" [7.5–9 cm] before the shoulder line.)
Left-chest ram motif
Motif: A white stylized ram’s head (Derby County Rams) on black. Horns and profile face toward the wearer’s center chest.
Placement: Wearer’s left chest (the left side as the garment is worn; that is the right-hand side of the Front when the RS faces you). Keep the motif on plain dc fabric — above the hem ribbing, below the neck shaping, and in from the armhole edge, with black fabric showing on all sides.
If a colorwork chart is provided: When the Front reaches the row where the motif should begin, work MC across the right-chest stitches, work the chart stitches in CC (white) using intarsia (a small separate ball of white; do not carry white across the whole row), then finish the row in MC. Read RS chart rows from right to left and WS rows from left to right, matching each chart square to one dc. Return to MC only when the chart rows are complete.
If no chart is used (recommended for beginners): Work the entire Front in MC. Add the ram’s head later in CC with duplicate stitch or surface slip stitch (see Finishing). The written pattern is complete without a chart.
Do not work colorwork into ribbing, armhole bind-offs, or neck decreases.
Shape front neck
Dividing row (RS): Ch 3, dc in next 19 (20, 21, 22, 23) sts (20 (21, 22, 23, 24) dc including the turning ch), sl st across next 10 (12, 12, 14, 14) sts, ch 3, dc in remaining 19 (20, 21, 22, 23) sts, turn.
You now have two sides. Place the unused side on a holder or leave it waiting. Work the side you just finished first (this is the wearer’s right shoulder as worn).
Right neck edge (as worn): Decrease row: Ch 3, dc2tog, dc to end, turn — 1 st decreased at neck.
Rep Decrease row 4 (4, 5, 5, 6) more times — 15 (16, 16, 17, 17) dc.
(20 − 5 = 15 ✓; 21 − 5 = 16 ✓; 22 − 6 = 16 ✓; 23 − 6 = 17 ✓; 24 − 7 = 17 ✓)
Work even on 15 (16, 16, 17, 17) sts until the Front armhole matches the Back armhole. Fasten off.
Left neck edge (as worn): Join MC at the neck edge of the remaining side.
Decrease row: Ch 3, dc to last 2 sts, dc2tog, turn — 1 st decreased at neck.
Rep Decrease row 4 (4, 5, 5, 6) more times — 15 (16, 16, 17, 17) dc.
Work even until the armhole matches the Back. Fasten off.
SLEEVES (make 2)
With MC, ch 29 (31, 33, 35, 37).
Row 1 (RS): Sc in 2nd ch from hook and in each ch across, turn — 28 (30, 32, 34, 36) sc. (29 − 1 = 28 ✓)
Rows 2–10: Ch 1, sc in BLO of each st across, turn.
Cuff measures about 2½" [6.5 cm].
Row 11: Ch 3, dc in each st across, turn — 28 (30, 32, 34, 36) dc.
Increase row: Ch 3, 2 dc in next st, dc across to last 2 sts, 2 dc in next st, dc in top of turning ch, turn — 2 sts increased.
Work Increase row every 3rd row 10 (12, 0, 0, 0) times, then every 2nd row 0 (0, 14, 16, 18) times — 48 (54, 60, 66, 72) dc.
(28 + 2×10 = 48 ✓; 30 + 2×12 = 54 ✓; 32 + 2×14 = 60 ✓; 34 + 2×16 = 66 ✓; 36 + 2×18 = 72 ✓)
Work even in dc until sleeve measures 20 (20.5, 21, 21.5, 22)" [51 (52, 53.5, 54.5, 56) cm] from the beginning, ending after a WS row.
Shape sleeve cap
Next row (RS): Sl st across first 3 (4, 5, 6, 7) sts, ch 3, dc to last 3 (4, 5, 6, 7) sts, leave remaining sts unworked, turn — 42 (46, 50, 54, 58) dc.
(48 − 6 = 42 ✓; 54 − 8 = 46 ✓; 60 − 10 = 50 ✓; 66 − 12 = 54 ✓; 72 − 14 = 58 ✓)
Decrease row: Ch 3, dc2tog, dc to last 2 sts, dc2tog, turn — 2 sts decreased.
Rep Decrease row 3 (3, 4, 4, 5) more times — 34 (38, 40, 44, 46) dc.
(42 − 2×4 = 34 ✓; 46 − 2×4 = 38 ✓; 50 − 2×5 = 40 ✓; 54 − 2×5 = 44 ✓; 58 − 2×6 = 46 ✓)
Work 6 (7, 6, 7, 6) rows even.
Rep Decrease row 7 (8, 8, 9, 10) times — 20 (22, 24, 26, 26) dc.
(34 − 2×7 = 20 ✓; 38 − 2×8 = 22 ✓; 40 − 2×8 = 24 ✓; 44 − 2×9 = 26 ✓; 46 − 2×10 = 26 ✓)
Fasten off.
FINISHING
Weave in ends that will be trapped in seams. Block pieces to measurements, RS down, without stretching the ribbing.
Motif (if the Front was worked in MC only)
With CC and a yarn needle, duplicate-stitch (or surface-slip-stitch) a ram’s head on the wearer’s left chest. Keep the motif clear of the neckband, armhole seam, and hem ribbing. If a chart is provided, follow it for the shape; if not, sketch the ram’s head on tissue, pin it in place, and stitch over the outline, filling horns and head in white. Weave in CC on the WS.
Shoulders
With RS together, whipstitch or mattress-stitch each Front shoulder to the matching Back shoulder — 15 (16, 16, 17, 17) sts each side. The center 20 (22, 24, 26, 28) Back sts remain open for the neck.
Set in sleeves
Pin the sleeve cap into the armhole, matching the underarm bind-offs and the cap center to the shoulder seam. Ease the cap to fit. Whipstitch or sl st in place. Repeat for the second sleeve.
Side and sleeve seams
Seam each side from hem to underarm, then continue down the sleeve to the cuff, using whipstitch or mattress stitch. Match ribbing rows carefully.
Neckband
With RS facing, join MC at the left shoulder seam.
Rnd 1: Ch 1, sc evenly around the neck edge, working 1 sc in each st across the back neck, about 1 sc in each row-end down the front neck slopes, 1 sc in each bound-off front-neck st, and about 1 sc in each row-end up the other slope. Join with sl st to first sc. Do not twist.
Aim for a multiple of 2 if you want optional BLO texture; a little stretch is more important than an exact count. If the neck is tight, add a few extra sc on the slopes; if it flares, sc2tog 2–4 times on the next round at the corners.
Rnds 2–5: Ch 1, sc in BLO of each sc around, join with sl st to first sc.
Rnd 6: Ch 1, sc in BLO of each sc around, join. Fasten off.
For a slightly higher crew, work 2 more rounds the same way.
Weave in remaining ends. Steam the seams lightly if the yarn allows; do not flatten the BLO ribbing.
Fit notes
- Length: Add or subtract even dc rows before the armhole if you want a longer or shorter body. Keep Front and Back the same.
- Sleeves: Try on before seaming the cuff side; add even dc rows after the increases if you need extra length.
- Neck: The BLO sc band is meant to hug and stretch over the head. If it must pass over glasses or a larger head, add 4–8 sc on Rnd 1.
Care
Follow the yarn ball-band. Many worsted acrylics are machine-wash cool, gentle, lay flat to dry. Wool: hand wash cool, lay flat. Store folded, not on a hanger, so the dc fabric does not grow.
Disclaimer: This pattern was generated by AI and should be reviewed for accuracy before use. While we strive for quality, AI-generated content may contain errors. Please verify measurements, stitch counts, charts, and instructions before beginning your project. Generated by purlJam.uk
Love this pattern?
Save this pattern to your free PurlJam libraryAccess your pattern anytime
Bookmark this page to access your pattern anytime