Type
Crochet
Difficulty
intermediate
Category
amigurumi
AI Thinking Process
Planning
Verification
Pattern
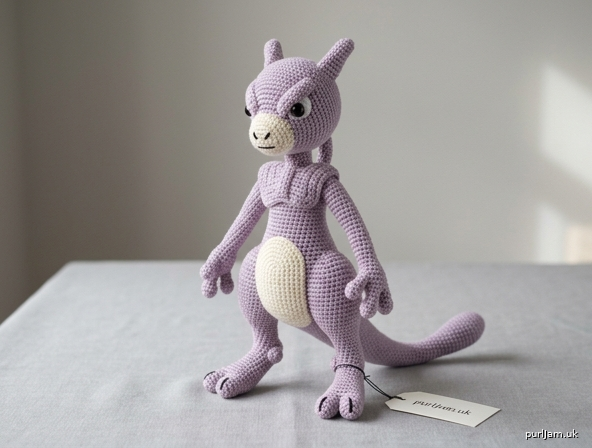
Mewtwo Amigurumi
Fan-made pattern for personal use. Not affiliated with Nintendo, Game Freak, or The Pokémon Company.
A slender, bipedal psychic-cat amigurumi with an elongated skull, built-in neck tube, pointed ears, cream muzzle and belly, three-fingered hands, and a long tapering tail.
Skill level: Intermediate
Finished size: About 10 in (25.5 cm) tall standing, measured from feet to top of head; about 11½ in (29 cm) including ears. Tail adds about 5 in (12.5 cm).
Materials
- Worsted weight yarn (category 4)
- Color A (lavender / light purple): 110 yd (100 m)
- Color B (cream / off-white): 30 yd (27 m)
- Small amount of black worsted or embroidery floss (mouth)
- US E-4 / 3.5 mm crochet hook (use US D-3 / 3.25 mm if your fabric is loose)
- 10 mm safety eyes (1 pair)
- Polyester fiberfill
- Stitch marker
- Tapestry needle
- Straight pins
- Optional: 18-gauge craft wire or pipe cleaners for posable tail and legs
- Optional: blush or pink pastel for cheeks
Safety note: Safety eyes are a choking hazard. Do not use them on toys for children under 3 years; embroider eyes instead.
Gauge
5 sc and 5 rnds = 1 in (2.5 cm) in single crochet worked in the round.
Gauge is for size, not drape. Fabric should be dense so stuffing does not show. Change hook size to match gauge.
Abbreviations (US)
- MR – magic ring
- ch – chain
- sc – single crochet
- inc – 2 sc in same stitch
- dec – single crochet 2 together (invisible decrease recommended)
- blo – back loop only
- sl st – slip stitch
- st(s) – stitch(es)
- rnd(s) – round(s)
- FO – fasten off
Notes
- Work in continuous spirals unless stated. Do not join or turn. Mark the first stitch of every round.
- Stuff as directed, a little at a time. The back of the head needs extra filling to form Mewtwo’s elongated skull.
- Parenthetical math confirms the stitch count of that round.
- Leave long tails (12–18 in / 30–45 cm) on pieces that are sewn on.
- The neck tube (Head Rnds 21–25) is Mewtwo’s collar; it is sewn directly to the body. Do not close the head.
Head
With A, work in a continuous spiral.
Rnd 1: 6 sc in MR. (6)
Rnd 2: Inc in each st around. (6 increases → 6 + 6 = 12 ✓)
Rnd 3: (Sc in next st, inc) 6 times. (6 increases → 12 + 6 = 18 ✓)
Rnd 4: (Sc in next 2 sts, inc) 6 times. (6 increases → 18 + 6 = 24 ✓)
Rnd 5: (Sc in next 3 sts, inc) 6 times. (6 increases → 24 + 6 = 30 ✓)
Rnd 6: (Sc in next 4 sts, inc) 6 times. (6 increases → 30 + 6 = 36 ✓)
Rnd 7: (Sc in next 5 sts, inc) 6 times. (6 increases → 36 + 6 = 42 ✓)
Rnds 8–15: Sc in each st around. (42 sts; 8 rounds)
Safety eyes: Insert 10 mm safety eyes between Rnds 11 and 12, 8 stitches apart, centered on the face. Do not fasten the washers until you are happy with placement. The face is the side opposite your stitch marker if you keep the marker at the back of the head.
Rnd 16: (Sc in next 5 sts, dec) 6 times. (6 decreases → 42 − 6 = 36 ✓)
Rnd 17: Sc in each st around. (36)
Rnd 18: (Sc in next 4 sts, dec) 6 times. (6 decreases → 36 − 6 = 30 ✓)
Rnd 19: Sc in each st around. (30)
Rnd 20: (Sc in next 3 sts, dec) 6 times. (6 decreases → 30 − 6 = 24 ✓)
Stuff the head firmly now. Pack extra filling into the back of the skull (Rnds 8–15) so the head is slightly longer front-to-back than it is tall.
Rnd 21 (collar ridge): Sc blo in each st around. (24)
Rnds 22–25: Sc in each st around. (24 sts; 4 rounds)
Stuff the neck tube moderately so it holds a cylinder but can still be sewn. FO, leaving a 18 in (45 cm) tail. Do not close. The opening stays at 24 sts.
Body
With A, start at the bottom.
Rnd 1: 6 sc in MR. (6)
Rnd 2: Inc in each st around. (12)
Rnd 3: (Sc in next st, inc) 6 times. (18)
Rnd 4: (Sc in next 2 sts, inc) 6 times. (24)
Rnd 5: (Sc in next 3 sts, inc) 6 times. (30)
Rnd 6: (Sc in next 4 sts, inc) 6 times. (6 increases → 30 + 6 = 36 ✓)
Rnds 7–10: Sc in each st around. (36 sts; 4 rounds)
Rnd 11: (Sc in next 4 sts, dec) 6 times. (6 decreases → 36 − 6 = 30 ✓)
Rnds 12–17: Sc in each st around. (30 sts; 6 rounds)
Rnd 18: (Sc in next 3 sts, dec) 6 times. (6 decreases → 30 − 6 = 24 ✓)
Rnds 19–21: Sc in each st around. (24 sts; 3 rounds)
Stuff firmly, with slightly more filling in the chest (Rnds 12–18) than at the waist. FO, leaving a 18 in (45 cm) tail. Opening is 24 sts to match the neck tube.
Arms (make 2)
Each arm starts with three fingers that are joined into a 12-st round, then worked up to the shoulder.
Fingers (make 3 per arm; 6 total)
With A:
First and second fingers (make 2 per arm):
Rnd 1: 4 sc in MR. (4)
Rnds 2–4: Sc in each st around. (4 sts; 3 rounds)
FO, leaving a 6 in (15 cm) tail. Do not stuff (the tube is too small); the yarn itself fills it.
Third finger (do not fasten off):
Rnd 1: 4 sc in MR. (4)
Rnds 2–4: Sc in each st around. (4)
Join fingers and work the arm
Rnd 5 (joining): Sc in each of the 4 sts of the third finger; sc in each of the 4 sts of the second finger; sc in each of the 4 sts of the first finger. (4 + 4 + 4 = 12 ✓)
Use the finger tails to sew shut any small holes between the fingers.
Rnds 6–17: Sc in each st around. (12 sts; 12 rounds)
Stuff the hand (finger-join area) firmly and the rest of the arm lightly, or insert a pipe cleaner cut ½ in (1.3 cm) shorter than the arm. FO, leaving a 12 in (30 cm) tail.
Legs (make 2)
With A, start at the foot.
Rnd 1: 6 sc in MR. (6)
Rnd 2: Inc in each st around. (12)
Rnd 3: (Sc in next st, inc) 6 times. (6 increases → 12 + 6 = 18 ✓)
Rnds 4–5: Sc in each st around. (18 sts; 2 rounds)
Rnd 6: (Sc in next st, dec) 6 times. (6 decreases → 18 − 6 = 12 ✓)
Rnds 7–16: Sc in each st around. (12 sts; 10 rounds)
Stuff the foot firmly and the leg moderately, or insert a pipe cleaner. FO, leaving a 12 in (30 cm) tail.
Optional toes: With A, embroider three short, parallel stitches across the front of each foot (Rnd 4), or sew three tiny 4-sc circles in a row on the toe edge.
Tail
With A. Stuff as you go — firmly at the base, lightly toward the tip. A pipe cleaner or craft wire, folded at the tip and worked in as you stuff, lets the tail curve for balance.
Rnd 1: 6 sc in MR. (6)
Rnd 2: Inc in each st around. (12)
Rnd 3: (Sc in next st, inc) 6 times. (18)
Rnds 4–7: Sc in each st around. (18 sts; 4 rounds)
Rnd 8: (Sc in next 4 sts, dec) 3 times. (3 decreases → 18 − 3 = 15 ✓)
Rnds 9–11: Sc in each st around. (15 sts; 3 rounds)
Rnd 12: (Sc in next 3 sts, dec) 3 times. (3 decreases → 15 − 3 = 12 ✓)
Rnds 13–16: Sc in each st around. (12 sts; 4 rounds)
Rnd 17: (Sc in next 2 sts, dec) 3 times. (3 decreases → 12 − 3 = 9 ✓)
Rnds 18–20: Sc in each st around. (9 sts; 3 rounds)
Rnd 21: (Sc in next st, dec) 3 times. (3 decreases → 9 − 3 = 6 ✓)
Rnds 22–24: Sc in each st around. (6 sts; 3 rounds)
Rnd 25: Dec 3 times. (3 decreases → 6 − 3 = 3 ✓)
FO. Thread the tail through the remaining 3 sts, pull closed, and weave in.
Ears (make 2)
With A.
Rnd 1: 4 sc in MR. (4)
Rnd 2: (Sc in next st, inc) 2 times. (2 increases → 4 + 2 = 6 ✓)
Rnd 3: (Sc in next 2 sts, inc) 2 times. (2 increases → 6 + 2 = 8 ✓)
Rnd 4: (Sc in next 3 sts, inc) 2 times. (2 increases → 8 + 2 = 10 ✓)
Rnd 5: (Sc in next 4 sts, inc) 2 times. (2 increases → 10 + 2 = 12 ✓)
Rnds 6–8: Sc in each st around. (12 sts; 3 rounds)
FO, leaving a 12 in (30 cm) tail. Flatten. Do not stuff, or put a pinch of filling only at the base so the ear stands.
Inner ears (make 2)
With B.
Rnd 1: 4 sc in MR. (4)
Rnd 2: (Sc in next st, inc) 2 times. (6)
Rnd 3: (Sc in next 2 sts, inc) 2 times. (8)
Rnd 4: Sc in each st around. (8)
FO, leaving a 10 in (25 cm) tail. Flatten and sew to the front of each ear, centered, with the points matching.
Belly patch
With B, worked as an oval in a continuous round.
Ch 10.
Rnd 1: Sc in 2nd ch from hook, sc in next 7 ch, 3 sc in last ch; rotate and work along the other side of the chain: sc in next 7 ch, 2 sc in the same ch as the first sc. (1 + 7 + 3 + 7 + 2 = 20 ✓)
Rnd 2: Inc, sc in next 7 sts, inc in next 3 sts, sc in next 7 sts, inc in next 2 sts. (6 increases → 20 + 6 = 26 ✓)
Rnd 3: Sc in next st, inc, sc in next 7 sts, (sc in next st, inc) 3 times, sc in next 7 sts, (sc in next st, inc) 2 times. (6 increases → 26 + 6 = 32 ✓)
Rnd 4: Sc in next 2 sts, inc, sc in next 7 sts, (sc in next 2 sts, inc) 3 times, sc in next 7 sts, (sc in next 2 sts, inc) 2 times. (6 increases → 32 + 6 = 38 ✓)
FO, leaving an 18 in (45 cm) tail. The oval should measure about 2½ in long by 1¾ in wide (6.5 × 4.5 cm).
Muzzle
With B.
Ch 6.
Rnd 1: Sc in 2nd ch from hook, sc in next 3 ch, 3 sc in last ch; rotate and work along the other side: sc in next 3 ch, 2 sc in the same ch as the first sc. (1 + 3 + 3 + 3 + 2 = 12 ✓)
Rnd 2: Inc, sc in next 3 sts, inc in next 3 sts, sc in next 3 sts, inc in next 2 sts. (6 increases → 12 + 6 = 18 ✓)
Rnd 3: Sc in each st around. (18)
FO, leaving a 12 in (30 cm) tail. Flatten slightly. A tiny pinch of stuffing behind the muzzle is optional.
Assembly
Pin every piece before sewing. Use matching yarn and small whipstitches or mattress stitch. Sew through both loops unless noted.
1. Face (do this before joining head to body).
Sew the muzzle to the head, centered, with the top edge 1 rnd below the safety eyes (about Rnds 13–16). The muzzle should sit on the lower front of the head.
With black yarn or floss, embroider a small, shallow “W” or two tiny vertical nostrils on the muzzle, and a short straight or slightly downturned mouth just below. Keep the expression narrow and calm.
Optional: add a touch of pink blush at the outer corners of the muzzle.
2. Ears.
Sew each ear to the top of the head over Rnds 4–8, about 4 sts to the outside of each eye line, so they tilt slightly outward and a little back. The inner-ear (cream) side faces forward. Catch both layers of the flattened ear.
3. Head to body.
Match the 24-st opening of the neck tube (Head Rnd 25) to the 24-st opening of the body (Body Rnd 21). The BLO ridge (Head Rnd 21) should sit just above the join and read as Mewtwo’s collar. Sew all the way around, adding a last bit of stuffing at the neck before closing the seam so the head does not wobble.
4. Belly.
Sew the cream oval to the front of the body, pointed end toward the neck, starting just under the collar seam and ending near Body Rnds 8–9. Keep it centered.
5. Arms.
Sew the open end of each arm to the sides of the body over Body Rnds 18–20 (shoulder), with the fingers pointing down. Set them slightly forward so they rest beside the belly, not on the back.
6. Legs.
Sew the open end of each leg to the lower sides of the body over Body Rnds 4–8, angled slightly forward and about 4 sts apart at the inner edges. This stance, plus the tail, lets the figure stand.
7. Tail.
Sew the base (Rnds 1–4 area) to the lower back of the body over Body Rnds 6–10, centered. Curve the tail down and then slightly out so it acts as a third support. If you did not use wire, a few extra stitches on the underside of the tail, tacking it to itself in a gentle S-curve, will hold a pose after steaming.
Finishing
- Weave in every remaining end on the inside or under a seam.
- Tug the safety-eye washers once more to confirm they are tight.
- Shape the elongated skull with your fingers; the extra back-of-head stuffing should make a smooth dome, not a ball.
- If the figure leans, restuff the tail base or take a deeper stitch when attaching the tail.
- Optional: with a strand of A, make 2–3 tiny straight stitches at each fingertip for claw marks.
- Steam lightly from a distance if needed; do not press the stuffing flat.
Your Mewtwo is ready to stand, sit with the tail wrapped, or pose with wired limbs.
Disclaimer: This pattern was generated by AI and should be reviewed for accuracy before use. While we strive for quality, AI-generated content may contain errors. Please verify measurements, stitch counts, charts, and instructions before beginning your project. Generated by purlJam.uk
Love this pattern?
Save this pattern to your free PurlJam libraryAccess your pattern anytime
Bookmark this page to access your pattern anytime