Type
Knitting
Difficulty
intermediate
Category
blanket
AI Thinking Process
Planning
Verification
Pattern
Mind the Gap Throw
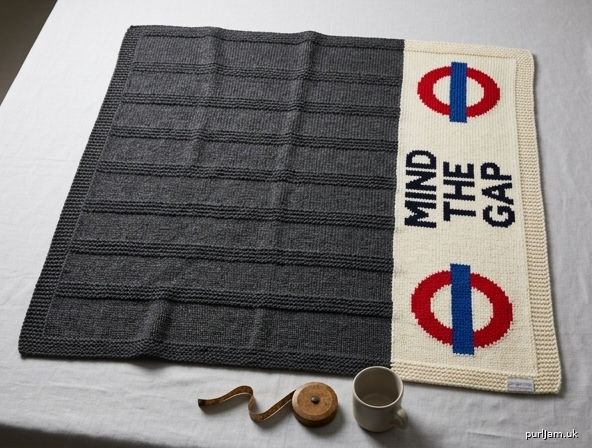
A square worsted throw worked flat in a garter-ridge texture, with a vertical cream panel along the right edge. Two simplified London Underground–style roundels sit at the top and bottom of the panel, with the words MIND THE GAP stacked between them.
Skill level: Intermediate (intarsia colour-block panel, garter-ridge texture, duplicate-stitch or charted colourwork motifs).
Finished measurements
About 40 × 40" (102 × 102 cm) after wet blocking, based on the gauge below.
Stitch count and row count are fixed at 180 stitches and 240 rows as requested. Changing gauge will change the finished size.
Yarn
Worsted weight (medium / category 4).
Sample palette (adjust to taste; keep the roundel clearly red-and-blue on cream):
| Role | Color | Amount |
|---|---|---|
| MC | Charcoal gray or deep navy (main field and borders) | 1100 yd (1005 m) |
| CC1 | Cream or off-white (panel ground) | 160 yd (146 m) |
| CC2 | Bright red (roundel ring) | 45 yd (41 m) |
| CC3 | Royal blue (roundel bar) | 30 yd (27 m) |
| CC4 | Near-black or dark navy (lettering) | 25 yd (23 m) |
A wool or wool-blend worsted that blooms with blocking will give the cleanest motif edges.
Needles
- US 8 / 5 mm, 32" (80 cm) circular needle, or size needed to obtain gauge
- Optional: one size smaller needle for binding off
Worked flat; the circular needle is only to hold 180 stitches comfortably.
Notions
- 2 stitch markers
- Bobbin or small ball for CC1 (panel)
- Tapestry needle
- Blocking wires or pins
- Optional: printed motif chart if one is supplied with this pattern later
Gauge
18 stitches and 24 rows = 4" (10 cm) in stockinette stitch, blocked.
Swatch in stockinette and also work a few garter-ridge repeats. The main field is mostly stockinette so it should match the panel row-for-row. If your ridge fabric is much shorter than stockinette, go up one needle size for the textured section only, or block firmly.
Abbreviations (US)
BO — bind off
CC — contrast color
CO — cast on
k — knit
MC — main color
p — purl
pm — place marker
RS — right side
slm — slip marker
st(s) — stitch(es)
St st — stockinette stitch (knit RS, purl WS)
WS — wrong side
Pattern notes
- The throw is worked in one piece, bottom up.
- Stitches 1–8: left garter border in MC (knit every row).
- Stitches 9–156: textured field in MC (148 sts).
- Stitches 157–180: vertical colourwork panel in CC1 stockinette (24 sts). This is the strip down the right side.
- Place markers after stitch 8 and after stitch 156 and slip them every row. (8 + 148 + 24 = 180 ✓)
- At the panel marker, twist MC and CC1 on the WS each row (intarsia join) so a hole does not form. Do not strand MC across the panel.
- Stitch 180: knit every row in CC1 (garter selvedge) so the stockinette panel edge does not roll. Center the roundels and lettering on the remaining panel stitches.
- Motifs are added in duplicate stitch after the knitting is complete (recommended at this level), or worked in intarsia/stranding from a colourwork chart if one is provided. This written pattern does not rely on a chart being present.
- Do not weave in panel tails until after duplicate stitch, in case you want to unpick and restitch a letter.
Stitch guide
Garter stitch (border)
Knit every row.
Garter-ridge field (worked over the 148 sts between markers):
- Row 1 (RS): Knit.
- Row 2 (WS): Purl.
- Row 3 (RS): Knit.
- Row 4 (WS): Purl.
- Row 5 (RS): Knit.
- Row 6 (WS): Knit.
Rows 1–4 are stockinette; Rows 5–6 make one raised garter ridge.
Panel (24 sts): Stockinette in CC1, except knit the last stitch of every RS row and the first stitch of every WS row (the selvedge) so stitch 180 is garter.
Throw
Cast on
With MC and US 8 / 5 mm needle, long-tail CO 180 sts.
Set-up row (WS)
K8, pm, k148, pm, k1 in MC. Drop MC. Join CC1 and k23. (180 sts)
The CC1 section is the start of the panel. From here, always work stitches 157–180 in CC1.
Bottom border
Work 12 rows as follows, beginning with a RS row (rows 1–12 of the throw):
RS rows: With MC, k8, slm, k148, slm; with CC1, k24.
WS rows: With CC1, k1, p22, k1; slm; with MC, k148, slm, k8.
Twist the two yarns at the panel marker on every WS row. (12 border rows ✓)
Body
Work the 6-row Garter-ridge repeat 36 times (216 rows; throw rows 13–228):
Row 1 (RS): With MC, k8, slm, k148, slm; with CC1, k24.
Row 2 (WS): With CC1, k1, p22, k1; slm; with MC, p148, slm, k8.
Row 3 (RS): With MC, k8, slm, k148, slm; with CC1, k24.
Row 4 (WS): With CC1, k1, p22, k1; slm; with MC, p148, slm, k8.
Row 5 (RS): With MC, k8, slm, k148, slm; with CC1, k24.
Row 6 (WS): With CC1, k1, p22, k1; slm; with MC, k148, slm, k8.
After 36 repeats you have 216 body rows. (12 + 216 = 228 rows so far ✓)
Keep the panel in CC1 stockinette with a garter selvedge on stitch 180 throughout. Do not work garter ridges across the panel — that surface stays smooth for the motifs.
Top border
Work 12 rows as for the bottom border (throw rows 229–240):
RS rows: With MC, k8, slm, k148, slm; with CC1, k24.
WS rows: With CC1, k1, p22, k1; slm; with MC, k148, slm, k8.
(12 + 216 + 12 = 240 rows ✓)
Bind off
With RS facing, bind off knitwise in pattern (MC across the border and field, CC1 across the panel), keeping the bind-off even with the fabric — not tight. Cut both yarns, leaving a 6" (15 cm) tail of CC1 at the panel corner.
Motif placement (panel, stitches 157–180)
Work on the RS of the CC1 panel after binding off, before or after blocking. Duplicate stitch is the default method. If a colourwork chart is supplied with this pattern, use it for stitch-by-stitch colour and ignore nothing in the written placement below.
Intended colours
- Panel ground: cream (already knit in CC1)
- Roundel ring: red (CC2)
- Roundel bar: royal blue (CC3), a solid horizontal bar through the middle of each ring
- Lettering: dark navy or black (CC4)
Lower roundel
A simplified London Underground roundel near the bottom of the panel, sitting just above the bottom garter-ridge / border zone. Draw a circle that fills most of the panel width but leaves the garter selvedge and a stitch or two of cream at each side. Fill a red ring; leave the inner disc cream; work a blue bar straight across the center of the ring. Do not add UNDERGROUND lettering on the bar — the blanket’s text is MIND THE GAP.
Lettering
Between the two roundels, stack the words MIND, THE, and GAP in that order, reading from the top of the throw down, in bold condensed capital letters. Center each word in the panel. Keep even cream space between the three words, and even cream space between the word block and each roundel. Letters should sit clearly inside the cream strip, not on the selvedge.
Upper roundel
A matching roundel near the top of the panel, just below the top border, same size and colours as the lower roundel.
Balance
The two roundels should look like the same motif. The word block should sit optically in the middle of the remaining cream. If you are working without a chart, graph the letters and circles on knitter’s graph paper first (remembering that stockinette stitches are wider than they are tall) and adjust until the ring looks circular after a small blocked swatch.
Optional knit-in colourwork
If you prefer to strand or intarsia the red, blue, and lettering while knitting the panel, do so on RS knit / WS purl rows of the panel only, keeping stitch 180 in CC1 garter. Hold contrast colours to the WS. Still follow the same top-to-bottom order: lower roundel, MIND / THE / GAP, upper roundel.
Finishing
- Weave in MC ends on the WS of the textured field. Weave CC1 ends along the intarsia join.
- Work duplicate-stitch motifs (unless already knit in). Weave CC2, CC3, and CC4 ends on the WS of the panel only.
- Wet block to 40 × 40" (102 × 102 cm). Pin the panel flat so the stockinette strip does not draw in or roll; the left garter border should lie in a straight line. Let dry completely.
- Steam the duplicate stitch lightly from the WS if the letters sit up. Do not flatten the garter ridges.
No seaming. The left garter border, top and bottom garter bands, and the graphic right panel are the decorative frame.
Stitch map (every row)
| Stitches | Section | Stitch count |
|---|---|---|
| 1–8 | Left garter border (MC) | 8 |
| 9–156 | Garter-ridge field (MC) | 148 |
| 157–180 | Vertical panel (CC1; motifs in CC2–CC4) | 24 |
| Total | 180 ✓ |
Row map: 12 bottom border + 216 body (36 × 6) + 12 top border = 240 ✓
Disclaimer: This pattern was generated by AI and should be reviewed for accuracy before use. While we strive for quality, AI-generated content may contain errors. Please verify measurements, stitch counts, charts, and instructions before beginning your project. Generated by purlJam.uk
Love this pattern?
Save this pattern to your free PurlJam libraryAccess your pattern anytime
Bookmark this page to access your pattern anytime