Type
Knitting
Difficulty
intermediate
Category
blanket
AI Thinking Process
Planning
Verification
Pattern
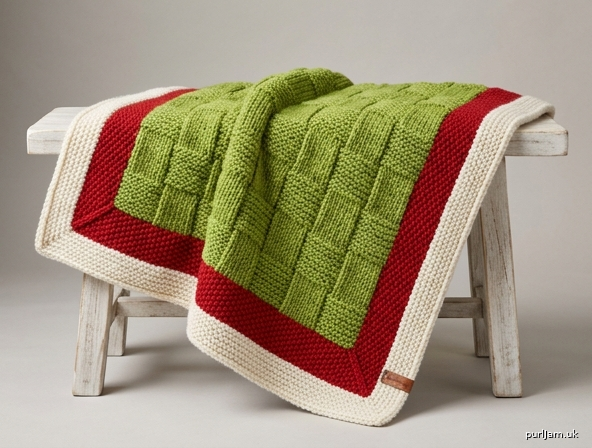
The Grinch Throw
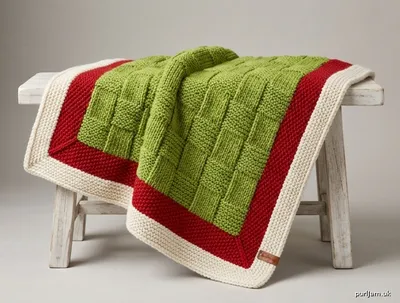
A textured holiday blanket in Grinch green, Santa red, and cream fur trim
A reversible 50 × 60 in (127 × 152.5 cm) throw: an 8×8 basketweave field in classic Grinch green, framed with a mitered Santa-hat border in seed stitch and a creamy garter “fur” trim finished with I-cord. Worsted weight, hand knit, intermediate.
Skill Level
Intermediate. You should be comfortable with knit/purl texture, picking up stitches, working in the round, and simple mitered increases. No charts, cables, or lace.
Finished Measurements
Blocked, including border
- Width: 50 in (127 cm)
- Length: 60 in (152.5 cm)
Center panel (before border)
- 40 in wide × 50 in long (101.5 × 127 cm)
Border depth
- 5 in (12.5 cm) on all four sides: 3 in (7.5 cm) red seed stitch + 2 in (5 cm) cream garter
Measurements are after wet-blocking. Individual results vary with gauge and blocking.
Yarn
Worsted weight (CYC 4), wool or wool-blend preferred for stitch definition and blocking.
MC — Grinch Green: 1350 yd / 1235 m (about 7 skeins at 220 yd / 200 m) CC1 — Santa Red: 450 yd / 410 m (about 3 skeins at 220 yd / 200 m) CC2 — Cream / Off-White: 375 yd / 345 m (about 2 skeins at 220 yd / 200 m)
Yardage includes a swatch and I-cord bind-off. Textured stitches use more yarn than stockinette; do not reduce quantities.
Color notes: Choose a bright, slightly yellowish green (not forest or sage). Red should read as Santa-hat true red. Cream should be warm off-white, not stark bleached white.
Needles
- US 8 / 5 mm, 40 in (100 cm) circular, for the center panel (worked flat)
- US 8 / 5 mm, 60 in (150 cm) circular, for the border (worked in the round)
A 47 in (120 cm) circular can serve for both if you do not mind crowding on the border. Do not drop needle size for the border; the I-cord edge is the firming finish.
Notions
- 4 stitch markers (lockable preferred for corners), plus 1 unique marker for round beginning
- Tapestry needle
- Scissors
- Blocking mats and pins (or wires)
Gauge
16 stitches and 24 rows = 4 in (10 cm) in Basketweave Pattern on US 8 / 5 mm, blocked.
Work a 24-st × 32-row swatch (1½ pattern repeats wide, 2 repeats tall), block, and measure the center 16 sts / 24 rows.
Gauge check: 16 sts = 4 in → 4 sts per in ✓. 160 sts ÷ 4 sts per in = 40 in center width ✓.
If you have too many stitches per 4 in, go up a needle size. If too few, go down a size. Row gauge mainly affects how many basketweave repeats you knit before the center hits 50 in; follow the length measurement, not a row target.
Abbreviations (US)
- BO — bind off
- CC1, CC2 — contrast colors 1 and 2
- CO — cast on
- k — knit
- m1L — make 1 left (lift strand between sts from front to back, k through back loop)
- m1R — make 1 right (lift strand between sts from back to front, k through front loop)
- MC — main color
- p — purl
- pm — place marker
- rep — repeat
- rnd(s) — round(s)
- RS — right side
- sl — slip (purlwise unless noted)
- sm — slip marker
- ssk — slip, slip, knit (left-leaning decrease)
- st(s) — stitch(es)
- WS — wrong side
- wyib — with yarn in back
- wyif — with yarn in front
Pattern Notes
- The center is worked flat. The border is picked up and worked in the round with mitered increases at four corners so the frame lies flat.
- Basketweave, seed stitch, and garter are all reversible. Weave ends into matching colors and the throw can be used either side up.
- Join new balls at a side edge of the center, or at a corner of the border, never in the middle of a block.
- Do not cut MC until the center is bound off. Cut and join CC1, then CC2, at the border.
- Stitch counts stay at 160 for the entire center panel. Count at the end of Rows 8 and 16 of every repeat.
- Border depth is measured, not counted. Seed stitch often has a tighter row gauge than basketweave; knitting to 3 in / 2 in keeps the 50 × 60 in finished size honest.
- Slip the first stitch of every center-panel row purlwise wyif. This chain edge makes pickup faster and cleaner.
Stitch Patterns
Basketweave Pattern
Multiple of 16 sts. 16-row repeat.
Row 1 (RS): *K8, p8; rep from * to end. Row 2 (WS): *K8, p8; rep from * to end. Rows 3–8: Rep Rows 1–2 three more times (8 rows of the same blocks). Row 9 (RS): *P8, k8; rep from * to end. Row 10 (WS): *P8, k8; rep from * to end. Rows 11–16: Rep Rows 9–10 three more times (8 rows of the offset blocks).
Rep Rows 1–16 for pattern.
Check: 160 sts ÷ 16 = 10 repeats per row ✓. Each 8-st block is 2 in wide at gauge (8 ÷ 4 sts per in = 2 in) ✓.
Seed Stitch in the Round
Worked on an even number of stitches.
Rnd 1: *K1, p1; rep from * to end. Rnd 2: *P1, k1; rep from * to end.
Rep Rnds 1–2. Knit the purls and purl the knits of the round below so knits and purls checkerboard.
Garter Stitch in the Round
Rnd 1: Knit. Rnd 2: Purl. Rep Rnds 1–2. Each 2-round pair makes one garter ridge.
Instructions
Center Panel (MC)
With MC and 40 in circular needle, using a long-tail cast-on, CO 160 sts.
Setup row (WS): Sl 1 wyif, purl to end.
Work Basketweave Pattern, slipping the first st of every row purlwise wyif, until the piece measures 50 in (127 cm) from the cast-on edge, ending with Row 8 or Row 16 of the pattern (a complete 8-row block).
Check: 50 in × 6 rows per in ≈ 300 rows, or about 18–19 full 16-row repeats. End when the tape says 50 in, on Row 8 or 16 ✓.
Bind off in pattern on the RS, keeping the bind-off as elastic as the fabric. Do not bind off tightly. Cut MC, leaving a 6 in tail.
Blocked center should measure 40 × 50 in (101.5 × 127 cm). Block now if the fabric is very wavy; otherwise you may block once at the end.
Border
Switch to the 60 in circular needle.
With CC1 (red) and RS facing, beginning at the right-hand corner of the bound-off edge (top-right as you look at the RS):
- Pick up and knit 160 sts across the bound-off edge (1 st per bound-off st) ✓.
- Pick up 1 extra corner st in the corner. Pm in this st (place the marker on the corner st, or place markers on both sides of it so it is clearly the corner st).
- Pick up and knit 225 sts down the left long edge (3 sts for every 4 slipped edge sts / rows). Check: 50 in × 4.5 pickup sts per in = 225 ✓.
- Pick up 1 extra corner st, pm on it.
- Pick up and knit 160 sts across the cast-on edge (1 st per cast-on st) ✓.
- Pick up 1 extra corner st, pm on it.
- Pick up and knit 225 sts up the remaining long edge.
- Pick up 1 extra corner st, pm on it. This last corner is also the beginning of the round: place the unique beginning-of-round marker before this corner st.
774 sts on the needle (160 + 160 + 225 + 225 + 4 corner sts = 774) ✓. 774 is even, as required for seed stitch ✓.
If a long edge wants slightly more or fewer stitches to lie flat, adjust by 2 sts (keep the count even) and distribute extra pickups near the corners, not in a clump.
Join to work in the round. From here, the four marked stitches are the corner stitches.
Santa-Hat Band (CC1, seed stitch)
Setup rnd: Work Seed Stitch Rnd 1 around, knitting each marked corner st. Slip markers as you come to them.
Increase rnd: *Work in established seed stitch to the marked corner st, m1R, k the corner st, m1L; rep from * 3 more times. (8 sts increased: 774 + 8 = 782 ✓.)
Even rnd: Work in seed stitch around, working each m1 so it continues the checkerboard (knit it if it sits above a purl, purl it if it sits above a knit). Knit each corner st.
Rep Increase rnd and Even rnd until the red border measures 3 in (7.5 cm) from the pickup ridge, ending with an Even rnd.
Cut CC1, leaving a 6 in tail.
Fur Trim (CC2, garter stitch)
Join CC2 (cream).
Ridge pair:
- Knit rnd (increase): *Knit to marked corner st, m1R, k the corner st, m1L; rep from * 3 more times. Knit to end.
- Purl rnd (even): Purl around, slipping markers.
Rep this 2-rnd ridge pair until the full border (red + cream) measures 5 in (12.5 cm) from the pickup ridge — that is, 2 in (5 cm) of cream. End with a purl rnd.
Check: 3 in red + 2 in cream = 5 in border. 40 in + 5 in + 5 in = 50 in width ✓. 50 in + 5 in + 5 in = 60 in length ✓.
I-Cord Bind-Off (CC2)
Using a knitted cast-on, CO 3 sts onto the left needle at the beginning of the round.
Every step: K2, ssk (the 3rd I-cord st together with the next border st), then slip the 3 sts now on the right needle back to the left needle purlwise. Tug the working yarn firmly at the back so the cord sits round.
Rep until 3 I-cord sts remain and all border sts have been consumed. Graft the 3 I-cord sts to the 3 cast-on I-cord sts with Kitchener stitch, or bind them off and sew the cord ends together at the beginning-of-round corner.
Finishing
- Weave in all ends on the WS of matching-color sections. Do not carry a green tail into the red band or a red tail into the cream trim.
- Wet-block to 50 × 60 in (127 × 152.5 cm). Pin the I-cord edge out to a smooth rectangle; do not stretch the basketweave until the blocks look square (each block ≈ 2 × 1⅓ in before blocking, evening to a clear 8×8 grid).
- Let dry completely before removing pins.
- Steam the mitered corners lightly if they cup, holding the iron above the fabric — do not press basketweave flat or you will lose the woven texture.
Care: Hand wash cool, roll in a towel, and lay flat to dry. If using superwash wool, still lay flat; do not machine-dry.
Schematic (blocked)
CC2 cream garter + I-cord     2 in
CC1 red seed                  3 in
┌──────────────────────────────┐
│ ████ cream 2 in ████████████ │  60 in
│ ██ red 3 in ████████████████ │  (152.5 cm)
│ ██ ┌──────────────────── ┐ ██ │
│ ██ │                    │ ██ │
│ ██ │   MC basketweave   │ ██ │
│ ██ │   40 × 50 in       │ ██ │
│ ██ │   160 sts          │ ██ │
│ ██ │                    │ ██ │
│ ██ └──────────────────── ┘ ██ │
│ ████████████████████████████ │
└──────────────────────────────┘
         50 in (127 cm)
Texture & Color Story
The green basketweave is the Grinch’s shaggy coat — deep, squishy, and reversible. The red seed-stitch frame is the Santa hat that never quite stays on. The cream garter ridges with I-cord are the fur trim. No duplicate stitch, no intarsia face: the character is in the palette and the textures.
If you want a quieter throw, work the entire border in MC and keep CC1/CC2 for a two-round pinstripe only. Finished size is unchanged.
Disclaimer: This pattern was generated by AI and should be reviewed for accuracy before use. While we strive for quality, AI-generated content may contain errors. Please verify measurements, stitch counts, charts, and instructions before beginning your project. Generated by purlJam.uk
Love this pattern?
Save this pattern to your free PurlJam libraryAccess your pattern anytime
Bookmark this page to access your pattern anytime