Type
Crochet
Difficulty
beginner
Category
amigurumi
AI Thinking Process
Planning
Verification
Pattern
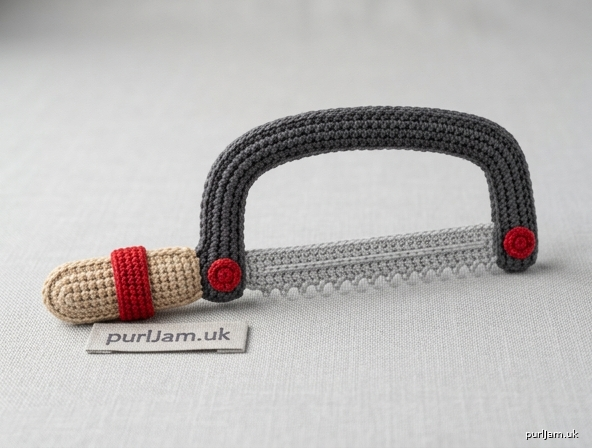
Mini Hacksaw Accessory
Flat crochet tool for a skeleton amigurumi
A small, lightweight hacksaw worked from simple amigurumi shapes: a long oval blade, three flat rectangles for a C-shaped frame, a tiny oval handle, and two red rivets plus a red grip band. Picot stitches form the saw teeth; surface slip stitch adds a metal groove. The finished tool is flat enough for a skeleton hand to hold and is not stuffed except for an optional pinch in the handle.
Skill level: Advanced
Skills used: Magic ring, working in rows and rounds, long-oval foundation, picot, surface slip stitch, mattress stitch, steam blocking a curve
Finished size
About 2¾" (7 cm) long × 1¼" (3.2 cm) high × ¼" (6 mm) thick, measured after blocking.
Size is designed for a 6–8" (15–20 cm) skeleton amigurumi. To scale: lace weight + 1.75 mm hook for a smaller doll; DK + 3.0 mm hook for a larger doll.
Materials
Yarn: Sport weight (category 2), cotton strongly recommended for stitch definition and a flat, “metal” hand. Acrylic will work but blooms more and holds a curve less crisply.
- Color A (blade): light gray — 8 yd / 7 m
- Color B (frame): dark gray — 12 yd / 11 m
- Color C (handle): beige / tan — 5 yd / 4.5 m
- Color D (details): red — 2 yd / 2 m
Hook: US B-1 / 2.25 mm (or the hook needed to match gauge; go down, not up, if the fabric is loose)
Notions:
- Yarn needle
- Stitch marker
- Pins
- Scissors
- Optional: a pinch of polyester fiberfill for the handle
- Optional: fabric stiffener or diluted white glue for a firmer blade
- Optional: a small cylindrical object about 2–2½" (5–6.5 cm) across for blocking the frame curve (spice jar, marker barrel)
Gauge
28 sc and 32 rows = 4" (10 cm) in single crochet, worked tightly with US B-1 / 2.25 mm.
That is 7 sc and 8 rows = 1" (2.5 cm).
Work more tightly than you would for a soft toy. Gaps between stitches will make the blade look lacy instead of metallic and will let the teeth collapse. Adjust hook size until a 7-sc swatch measures 1" (2.5 cm) and the fabric does not show daylight.
Abbreviations (US)
- ch — chain
- sc — single crochet
- sl st — slip stitch
- inc — increase (2 sc in the same stitch)
- MR — magic ring
- st(s) — stitch(es)
- rnd — round
- FO — fasten off
- RS — right side
- WS — wrong side
- picot — ch 2, sl st in the 2nd ch from the hook
- [ ] — stitch count at end of row/round
- ✓ — count check
Pattern notes
- US crochet terminology throughout. US spelling (color, gray, center, fiber).
- The blade and frame are not stuffed. Flatten every piece as you work. A pinch of fiberfill in the handle is optional and should not puff it into a ball.
- Do not join or turn unless the instructions say so. Where a round is joined, the join is a slip stitch in the first sc.
- Leave long tails on every piece (8–12" / 20–30 cm) for seaming.
- Invisible decrease is not required; this pattern uses sc, sl st, and picot only.
- Pin before you sew. The C-shape of the frame is set during assembly and locking the curve with steam, not by short-row math.
- Teeth are worked along one long edge of the blade only — the cutting edge, facing away from the frame.
- Gauge affects whether the skeleton can hold the tool. If your 19-st blade is longer than 3" (7.5 cm), drop a hook size.
Blade (make 1)
Color A. Long oval, flattened. Do not stuff.
Ch 20.
Rnd 1: 3 sc in 2nd ch from hook, sc in next 17 ch, 3 sc in last ch; rotate and work along the opposite side of the foundation chain, sc in next 17 ch. [40]
(3 + 17 + 3 + 17 = 40 ✓)
Sl st in first sc to join. FO, leaving a 12" (30 cm) tail.
Flatten the oval into a long, thin rectangle. Each long side has 17 sc; each short end has a 3-sc cap. Finished blade before teeth: about 2¾" (7 cm) long × ⅜" (1 cm) wide.
Saw teeth
With RS facing, join Color A with a sl st in the first of the 17 sc along one long edge (this will be the cutting edge, opposite the frame).
Teeth row: picot, sl st in next sc; repeat from * across the 17 sc. [17 picots on 17 sl sts ✓]
FO and weave the short tail into the blade. Keep the 12" (30 cm) joining tail at one short end for sewing the blade to the frame.
The opposite long edge stays smooth — that edge faces the inside of the C-frame.
Frame (Color B)
Three flat rectangles. Do not stuff. Work tightly so the posts stand without collapsing.
Top rail (make 1)
Ch 18.
Row 1: Sc in 2nd ch from hook and in each ch across. [17]
(18 ch − 1 skipped ch = 17 sc ✓)
Rows 2–3: Ch 1, turn, sc in each st across. [17]
FO, leaving a 10" (25 cm) tail. Piece measures about 2⅜" (6 cm) long × ⅜" (1 cm) wide (17 sts ÷ 7 sts per inch ≈ 2.4"; 3 rows ÷ 8 rows per inch ≈ 0.4").
Front post (make 1)
Ch 4.
Row 1: Sc in 2nd ch from hook and in each ch across. [3]
(4 ch − 1 = 3 sc ✓)
Rows 2–9: Ch 1, turn, sc in each st across. [3]
(9 rows total ✓)
FO, leaving an 8" (20 cm) tail. Piece measures about 1⅛" (2.8 cm) long × ⅜" (1 cm) wide (9 rows ÷ 8 = 1.125").
Back post (make 1)
Ch 4.
Row 1: Sc in 2nd ch from hook and in each ch across. [3]
Rows 2–11: Ch 1, turn, sc in each st across. [3]
(11 rows total ✓)
FO, leaving an 8" (20 cm) tail. Piece measures about 1⅜" (3.5 cm) long × ⅜" (1 cm) wide (11 rows ÷ 8 = 1.375"). The extra length sits under the handle.
Handle (make 1)
Color C. Tiny oval, flattened.
Ch 5.
Rnd 1: 2 sc in 2nd ch from hook, sc in next 2 ch, 3 sc in last ch; rotate and work along the opposite side of the foundation chain, sc in next 2 ch, 1 sc in the same ch as the beginning 2-sc. [10]
(2 + 2 + 3 + 2 + 1 = 10 ✓)
Sl st in first sc to join. FO, leaving an 8" (20 cm) tail. Flatten into a small oval about ⅝" (1.6 cm) long × ⅜" (1 cm) wide. Do not stuff, or use only 2–3 wisps of fiberfill so the handle stays flat.
Red details (Color D)
Rivets (make 2)
Rnd 1: 4 sc in MR, sl st in first sc to join. [4]
FO, leaving a 6" (15 cm) tail. Cinch the ring closed so the piece is a tight disc about ¼" (6 mm) across. These sit at the blade-to-frame joints.
Handle band (make 1)
Ch 6.
Row 1: Sc in 2nd ch from hook and in each ch across. [5]
(6 ch − 1 = 5 sc ✓)
FO, leaving a 6" (15 cm) tail. This wraps the handle like a short grip stripe.
Assembly
Use mattress stitch or whip stitch with matching tails. Pin every join and check the silhouette before you commit.
1. Build the C-frame.
Lay the top rail horizontally, RS up. Pin the front post to the right short end of the rail so the top 2 rows of the post overlap the rail (overlap = 2 rows ÷ 8 = ¼"). Pin the back post to the left short end the same way. The longer back post hangs slightly below the front post — that is the handle side.
Sew the overlaps with Color B. Exposed front post = 9 − 2 = 7 rows (⅞" / 2.2 cm). Exposed back post = 11 − 2 = 9 rows (1⅛" / 2.8 cm). Assembled height at the front ≈ 7 rows + 3 rail rows = 10 rows = 1¼" (3.2 cm) ✓.
2. Set the curve.
Pin the inverted-U into a gentle C: posts angled slightly outward, top rail bowed up in the center. Steam-block over a small jar or marker (hold the iron above the work; do not crush the stitches). Let it dry fully. The extra length of the 17-st rail across a slightly narrower opening is what holds the arch — no wire.
3. Set the blade.
Lay the blade across the open mouth of the C, smooth long edge toward the rail, teeth pointing down and away from the frame. Each short end of the blade should meet the inner face of a post, about 1–2 rows up from the bottom of the front post. The 17-st cutting edge aligns with the 17-st rail above it.
Sew each blade end to its post with Color A, catching only the smooth (inner) edge and the end caps so the picots stay free. The blade is the structural bar that locks the C; sew firmly.
4. Attach the handle.
Wrap or lay the beige oval across the lower back post (the longer post), covering the bottom 4–5 rows. Sew all around with Color C. The handle sits at the bottom of the tool, slightly thicker than the frame, still flat enough to slide into a crocheted hand.
5. Red details.
- Sew one red rivet over the front blade-to-post joint (the classic tension-knob position).
- Sew the second red rivet at the handle side, where the blade meets the back post, or on the handle itself near the frame.
- Wrap the red band around the beige handle and sew the short ends together at the back. Tack it down so it cannot slide.
6. Blade groove (optional but recommended).
With Color A (or a leftover scrap of Color B for more contrast), surface slip stitch a single straight line down the center of the blade, end to end, on the RS. This reads as the groove in a metal hacksaw blade. Keep the line on the smooth half of the blade so it does not distort the teeth.
Finishing
Weave in every remaining tail on the WS, splitting plies as needed so nothing bumps the flat silhouette.
Block the whole tool flat under a light weight, with the frame still curved in the C and the teeth lying in a straight line. A shot of steam on the WS sets the shape.
Optional stiffening: For a blade that stays ruler-straight, paint the WS of the blade only with fabric stiffener or 1:1 white glue and water. Do not saturate the teeth or they will glue together. Dry flat.
Do not overstuff, do not add wire, and do not back the piece with felt if you want it to stay lightweight. At ¼" (6 mm) thick it should sit in a skeleton amigurumi’s hand; sew or glue it between the fingers, or leave it as a removable accessory.
Schematic (RS, teeth down)
         Color B top rail (17 sc)
      _______________________
     |                       |
     |                       |     Color B posts
     |     Color A blade     |
     |   =================   |     smooth edge up
     |   v v v v v v v v v   |     17 picot teeth down
     |                       |
   [ handle ]  (C)     (D) (D)
    beige + red band     red rivets at blade joints
Checklist
- Blade: 40-st oval, flattened, 17 picots on one long edge only.
- Frame: 17 × 3 rail, 3 × 9 front post, 3 × 11 back post, sewn into a blocked C.
- Handle: 10-st beige oval at the bottom of the back post.
- Red: 2 discs (4 sc each) near blade joints; 5-sc band on the handle.
- No stuffing in blade or frame; tool remains flat, about 2¾" × 1¼" × ¼".
Disclaimer: This pattern was generated by AI and should be reviewed for accuracy before use. While we strive for quality, AI-generated content may contain errors. Please verify measurements, stitch counts, charts, and instructions before beginning your project. Generated by purlJam.uk
Love this pattern?
Save this pattern to your free PurlJam libraryAccess your pattern anytime
Bookmark this page to access your pattern anytime