Type
Crochet
Difficulty
beginner
Category
amigurumi
AI Thinking Process
Planning
Verification
Pattern
Mini Mark X Car
Crochet Toy — Simple Shapes (Sedan)
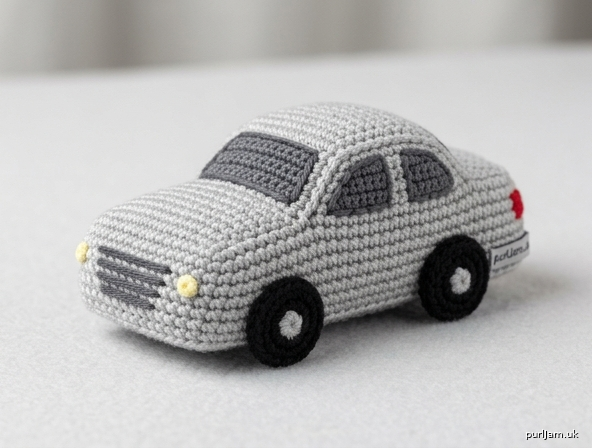
A beginner amigurumi sporty sedan, about 2½" (6 cm) long — keychain scale. The body is a stuffed oval loaf, the cabin a smaller oval set toward the back (leaving a hood), with four disc wheels and embroidered Mark X-style details (grille, headlights, taillights, windows).
Skill level: Beginner
Skills used: Chain, single crochet, increase, decrease, magic ring, working in a spiral, sewing pieces, simple embroidery.
Finished size
About 2½" long × 1¼" wide × 1¼" tall (6 cm × 3 cm × 3 cm), including wheels, using worsted yarn and the hook/gauge below.
Yarn
Worsted weight (category 4).
- MC (main color): about 30 yd / 27 m — silver, gray, black, white, or red (classic Mark X colors)
- CC1 Black: about 10 yd / 9 m — wheels
- CC2 Dark gray or black: scraps — windows
- CC3 White or pale yellow: scraps — headlights
- CC4 Red: scraps — taillights
- Optional small amount of MC or light gray for hubcaps
A cotton or acrylic worsted both work; acrylic is springier for a plush car.
Hook and notions
- US E-4 (3.5 mm) crochet hook, or 1–2 sizes smaller than the yarn label so stitches are tight
- Polyester fiberfill stuffing
- Yarn needle
- Stitch marker
- Scissors
- Straight pins (for placement before sewing)
- Optional: keychain finding and a jump ring
Gauge
5 sc and 5 rnds = 1" (2.5 cm) in single crochet, worked tightly in a spiral.
Gauge is a size guide, not a fabric-drape target. If your car is much larger than 2½" (6 cm) long, go down a hook size or work more tightly. If it is much smaller, go up a hook size.
Abbreviations (US)
- ch — chain
- sc — single crochet
- inc — increase (2 sc in the same stitch)
- dec — decrease (single crochet 2 stitches together)
- MR — magic ring
- rnd — round
- st(s) — stitch(es)
- sl st — slip stitch
- FO — fasten off
- MC / CC — main color / contrasting color
Notes
- Work in a continuous spiral unless told to join. Do not slip-stitch to join and do not chain at the start of rounds. Place a stitch marker in the first stitch of every round and move it up as you go.
- Work tightly so stuffing does not show.
- Stuff as you go. It is hard to fill a closed mini piece later.
- Invisible decrease (insert hook in front loops only of the next 2 sts, yarn over, pull through both, yarn over, pull through 2) gives a smoother body; a regular sc2tog is fine for beginners.
- The body and cabin start by crocheting around both sides of a foundation chain to make an oval. Keep the chain flat — do not twist it.
- Stitch counts are shown in brackets at the end of each round, with a check on increase/decrease math.
- This toy has no safety eyes. Embroider all details. Sew wheels on very firmly. Not recommended for children under 3 years.
Magic ring alternative: If you prefer not to use a MR, ch 2, work the stated number of sc into the 2nd ch from the hook, then continue as written.
Pattern
Body (make 1 — MC)
The stuffed loaf that forms the chassis, hood, and trunk.
Ch 8.
Rnd 1: 2 sc in 2nd ch from hook, sc in next 5 ch, 3 sc in last ch; rotate the chain so you can work along the opposite side of the foundation chain (do not twist), sc in next 5 ch, 1 sc in the same ch as the beginning 2 sc. [16]
(2 + 5 + 3 + 5 + 1 = 16 ✓)
Rnd 2: Inc in next 2 sts, sc in next 5 sts, inc in next 3 sts, sc in next 5 sts, inc in last st. [22]
(6 increases → 16 + 6 = 22 ✓)
Rnds 3–5: Sc in each st around. [22]
(3 even rounds — body walls)
Rnd 6: Dec in next 2 sts, sc in next 5 sts, dec in next 3 sts, sc in next 5 sts, dec in last st. [16]
(6 decreases → 22 − 6 = 16 ✓)
Stuff the body firmly, pushing fill into both pointed ends so the loaf stays long, not round. Do not overstuff into a ball — a Mark X is a low sedan.
Rnd 7: Dec 8 times. [8]
(8 decreases → 16 − 8 = 8 ✓)
Add a little more stuffing if needed.
Rnd 8: Dec 4 times. [4]
(4 decreases → 8 − 4 = 4 ✓)
FO, leaving a 8" (20 cm) tail. Thread the tail through the front loops of the remaining 4 sts, pull closed, and weave in. The closed face is the underside of the car.
Cabin / roof (make 1 — MC, or a darker shade of MC for a two-tone roof)
A smaller oval, sewn onto the rear two-thirds of the body so a hood remains at the front.
Ch 6.
Rnd 1: 2 sc in 2nd ch from hook, sc in next 3 ch, 3 sc in last ch; rotate, work along the opposite side of the foundation chain, sc in next 3 ch, 1 sc in the same ch as the beginning 2 sc. [12]
(2 + 3 + 3 + 3 + 1 = 12 ✓)
Rnd 2: Inc in next 2 sts, sc in next 3 sts, inc in next 3 sts, sc in next 3 sts, inc in last st. [18]
(6 increases → 12 + 6 = 18 ✓)
Rnd 3: Sc in each st around. [18]
Rnd 4: Dec in next 2 sts, sc in next 3 sts, dec in next 3 sts, sc in next 3 sts, dec in last st. [12]
(6 decreases → 18 − 6 = 12 ✓)
Stuff lightly — the cabin should sit as a shallow dome, not a ball.
Rnd 5: Dec 6 times. [6]
(6 decreases → 12 − 6 = 6 ✓)
FO, leaving a 12" (30 cm) tail for sewing. Close the 6-st hole the same way as the body, but keep the long tail attached for assembly.
Wheels (make 4 — CC1 black)
Flat discs. Do not stuff.
Rnd 1: 6 sc in MR. Pull ring closed. [6]
Rnd 2: Sc in each st around. [6]
FO, leaving a 8" (20 cm) tail. Flatten each wheel into a disc. Optional: with MC or light gray, make 1 French knot in the center of each wheel for a hubcap before sewing the wheel on.
Assembly
Pin every piece before you sew. Use matching yarn and small whipstitches. Hide knots inside the stuffed pieces.
1. Cabin
Place the body so the longer oval axis runs front to back. Pin the cabin on top, shifted toward the rear, covering about the back two-thirds of the body. About one-third of the body length should stay clear in front as the hood. The cabin’s long axis should match the body’s long axis. Whipstitch all around the cabin base, catching body stitches underneath. The roof should look like a low sedan greenhouse, not a centered dome.
2. Wheels
Pin two wheels on each long side of the body:
- Front pair just behind the hood / under the front of the cabin
- Rear pair under the back of the cabin / near the trunk All four wheels should sit at the same height so the car rests level. Sew each wheel on firmly with several passes through the wheel and into the body. These are the pieces most likely to be pulled — stitch them extra securely.
3. Face the car
The front is the end with the longer hood in front of the cabin. The back is the end where the cabin sits closer to the edge.
Details (embroidery)
Use a yarn needle and short lengths of yarn. Keep stitches small and snug so they do not snag.
Windows (CC2 dark gray or black)
- Windshield: A wide trapezoid on the front face of the cabin (wider at the bottom).
- Side windows: A small rectangle or rounded rectangle on each side of the cabin.
- Rear window (optional): A smaller trapezoid on the back of the cabin.
Use satin stitch or closely packed straight stitches. Do not stitch so deep that you pull the cabin out of shape.
Front grille (MC darker, black, or dark gray)
On the front of the body, below the windshield and above the bottom edge, work 3–4 short horizontal straight stitches stacked as a sporty grille.
Headlights (CC3 white or pale yellow)
Two French knots (or two tiny satin-stitch ovals), one on each side of the grille. Mark X models often have bold front lamps — keep them low and wide, not like cartoon eyes.
Taillights (CC4 red)
Two French knots or small horizontal satin stitches on the rear of the body, one each side.
Optional extras
- A single straight stitch in black along each side of the body as a character line.
- Two tiny gray stitches on the hood as fake vents.
- Surface slip stitch in a darker tone around the windshield for a window frame.
Weave in every embroidery tail inside the body or cabin.
Finishing
- Steam is not required. If the body looks puffy, roll it gently between your palms to lengthen the loaf.
- Check that all four wheels touch a table at once; restitch any that sit high.
- Weave in remaining ends.
- Optional keychain: Sew a jump ring through a few firm stitches at the roof center, then attach the keychain finding. Reinforce that spot with extra stitches so the ring cannot pull out.
Color recipes (optional)
- Silver Mark X: MC light gray / silver; black wheels; dark gray windows; white headlights; red taillights.
- Black Mark X: MC black; dark charcoal windows (so they still read); silver hubcaps.
- Two-tone: MC silver body, darker gray or black cabin.
Beginner troubleshooting
- Oval twisted after Rnd 1: Frog the join and re-work along the underside of the chain so it lies flat.
- Car looks like a potato, not a sedan: Less stuffing in the cabin; more stuffing packed into the ends of the body; cabin must sit toward the back.
- Gaps showing stuffing: Hook is too large or stitches are loose — drop to US 4 (3.5 mm) or US D-3 (3.25 mm) and work tighter.
- Wheels wobble: Flatten them fully and sew through the same body stitches several times.
- Larger or smaller car: For a bigger toy, add 1 even round on the body and cabin, or use bulky yarn. For a smaller toy, use DK yarn and a US D-3 (3.25 mm) hook with the same counts.
Stuff, sew, embroider, and you have a mini Mark X ready for a shelf or a keyring.
Disclaimer: This pattern was generated by AI and should be reviewed for accuracy before use. While we strive for quality, AI-generated content may contain errors. Please verify measurements, stitch counts, charts, and instructions before beginning your project. Generated by purlJam.uk
Love this pattern?
Save this pattern to your free PurlJam libraryAccess your pattern anytime
Bookmark this page to access your pattern anytime