Type
Crochet
Difficulty
beginner
Category
amigurumi
AI Thinking Process
Planning
1. **Design Strategy**:
- Target: A miniature vinyl record, 1.5 inches in diameter, for a refrigerator magnet
- Since this is a magnet (flat item), NOT a stuffed toy — this is a critical design decision. No stuffing needed; the piece should be flat or very lightly padded
- A vinyl record is a flat circle/disc shape — black with a colored center label circle
- Key visual details: black outer ring, small colored center label (often red or yellow), center hole suggestion
- At 1.5 inches, this is VERY small — we need to work with fingering or sport weight yarn for accuracy, BUT the template specifies worsted weight
- With worsted weight and a tight hook (E-4 / 3.5mm), a magic ring → Rnd 1 (6 sc) → Rnd 2 (12 sc) typically yields ~1.5–1.8 inches
- Strategy: Use worsted weight with a US E-4 (3.5mm) hook, working just 2 rounds of increase to create a flat disc approximately 1.5 inches
- Two flat circles sewn together (back-to-back) with a magnet sandwiched inside — this is better than stuffing for a flat record shape
- Color scheme: Black main color, contrasting color for center label (red, yellow, or white)
- Construction: Two identical flat circles made separately, magnet inserted between, whip stitched together
- Embellishments: Center label in contrasting yarn (small circle sewn on), French knot or small circle for center hole
2. **Construction Plan**:
- Make TWO flat circles in black (front and back of the record)
- Each flat circle: Magic ring, increase rounds to create a flat disc ~1.5 inches
- Gauge check: With worsted + E-4 hook, tight gauge = approximately 5 sc = 1 inch
- Flat circle math:
- Rnd 1: 6 sc in magic ring = ~0.5 inch diameter
- Rnd 2: inc in each st = 12 sc = ~0.9–1.0 inch diameter
- Rnd 3: (sc, inc) around = 18 sc = ~1.3–1.4 inch diameter
- Rnd 4: (2 sc, inc) around = 24 sc = ~1.5–1.6 inch diameter ✓
- So 4 rounds brings us to ~1.5 inches — perfect
- For the center label: Small flat circle in contrasting color
- Rnd 1: 6 sc in magic ring = ~0.4–0.5 inch diameter
- Rnd 2: inc in each st = 12 sc = ~0.7–0.8 inch diameter
- This creates a label circle about half the diameter of the record ✓
- Assembly: Sew label circle to front disc, place magnet between front and back discs, whip stitch together
- Magnet: Small disc magnet (10–12mm / ~0.4–0.5 inch diameter recommended)
- For grooves texture: Surface slip stitch in slightly lighter black or charcoal — optional detail
- Center hole: French knot or small embroidery stitch in white or contrasting color
3. **Quality Assurance**:
- FLAT CIRCLE issue: Standard amigurumi increases create a flat circle only when done correctly — each round adds 6 stitches. Let's verify:
- Rnd 1: 6 sts (start)
- Rnd 2: 12 sts (+6) ✓
- Rnd 3: 18 sts (+6) ✓
- Rnd 4: 24 sts (+6) ✓
- This is the standard flat circle formula — each round increases by 6, which keeps it flat ✓
- MAGNET safety: Must note the magnet is not safe for small children — include safety note
- SIZE accuracy: At 1.5 inches, this is keychain-size range per template (5–6cm = ~2–2.4 inches, so our item is on the very small side). May suggest the crocheter work a gauge swatch
- YARN choice: Worsted weight will be slightly chunky for 1.5 inches — acknowledge this and suggest fingering or sport weight as alternatives if crocheter wants more precise sizing
- The pattern needs to be beginner-friendly — keep instructions simple and clear
- MAGNET placement: Between the two discs before final seaming — clearly instruct this
4. **Final Calculations**:
- Gauge (tight, E-4 hook, worsted): ~5 sc = 1 inch (tight amigurumi gauge)
- Flat circle diameter estimates:
- After Rnd 1 (6 sc): ~0.5 inch
- After Rnd 2 (12 sc): ~0.9 inch
- After Rnd 3 (18 sc): ~1.3 inch
- After Rnd 4 (24 sc): ~1.5–1.6 inch ✓ TARGET ACHIEVED
- Center label:
- After Rnd 1 (6 sc): ~0.5 inch
- This is about 1/3 the final record diameter — visually accurate for a vinyl label
- Rnd 2 optional: 12 sc = ~0.7–0.8 inch — more prominent label
- Will offer both options
- Magnet recommendation: 10mm (0.4 inch) disc magnet — fits well between the two circles
- Total yarn needed: Very small amount — less than 5 yards black, less than 2 yards label color
- Finished dimensions with worsted: approximately 1.5 inches (3.8 cm) diameter
- Note: If using DK or sport weight, the finished size will be closer to 1.25 inches — mention this
Verification
[PRE-FLIGHT CHECKS]
1. **Completeness**:
- ✅ Pattern name and description included
- ✅ Materials list (yarn, hook, extras)
- ✅ Gauge section
- ✅ Finished size stated
- ✅ Abbreviations list
- ✅ Notes/tips for beginners
- ✅ Step-by-step instructions with stitch counts in brackets
- ✅ Assembly instructions
- ✅ Embellishment details (center label, center hole)
- ✅ Magnet attachment guidance
2. **Consistency**:
- ✅ Flat circle math verified: 6 → 12 → 18 → 24 sts (adds 6 per round = flat circle formula confirmed)
- ✅ Center label circle: 6 sts in Rnd 1 (~0.5 inch) — proportionally correct for a vinyl label
- ✅ Gauge (tight worsted + E-4): ~5 sc per inch → 24 sts circumference at Rnd 4 = ~1.5 inch diameter ✓
- ✅ Two discs construction is appropriate for a flat magnet object
- ✅ No stuffing used (flat magnet, not a plushie) — deviation from template noted and justified
3. **Constraints**:
- ✅ Size target: ~1.5 inch diameter addressed
- ✅ Beginner difficulty maintained — only sc, magic ring, increases used
- ✅ Refrigerator magnet construction addressed (magnet placement between discs)
- ✅ Vinyl record visual details addressed (black disc, colored center label, center hole)
- ✅ US terminology throughout
- ✅ Imperial measurements first, metric in parentheses
- ✅ Worsted weight yarn specified as requested
4. **Safety/Math**:
- ✅ Round-by-round stitch counts verified:
- Rnd 1: 6 [6] ✓
- Rnd 2: 6 × 2 = 12 [12] ✓
- Rnd 3: (sc, inc) × 6 = 6 sc + 6 inc = 18 [18] ✓
- Rnd 4: (2 sc, inc) × 6 = 12 sc + 6 inc = 24 [24] ✓
- Label Rnd 1: 6 [6] ✓
- Label Rnd 2 (optional): 6 × 2 = 12 [12] ✓
- ✅ Safety note for magnets included (not for children under 3)
- ✅ Yarn quantity is realistic for the size
- ✅ Note about yarn weight alternatives (DK/sport) for more precise 1.5-inch sizing included
- ✅ No UK crochet terms used
- ⚠️ Minor note: Template is for stuffed toys, but this pattern intentionally omits stuffing in favor of a flat magnet construction — this is documented and justified in the pattern notes
Pattern
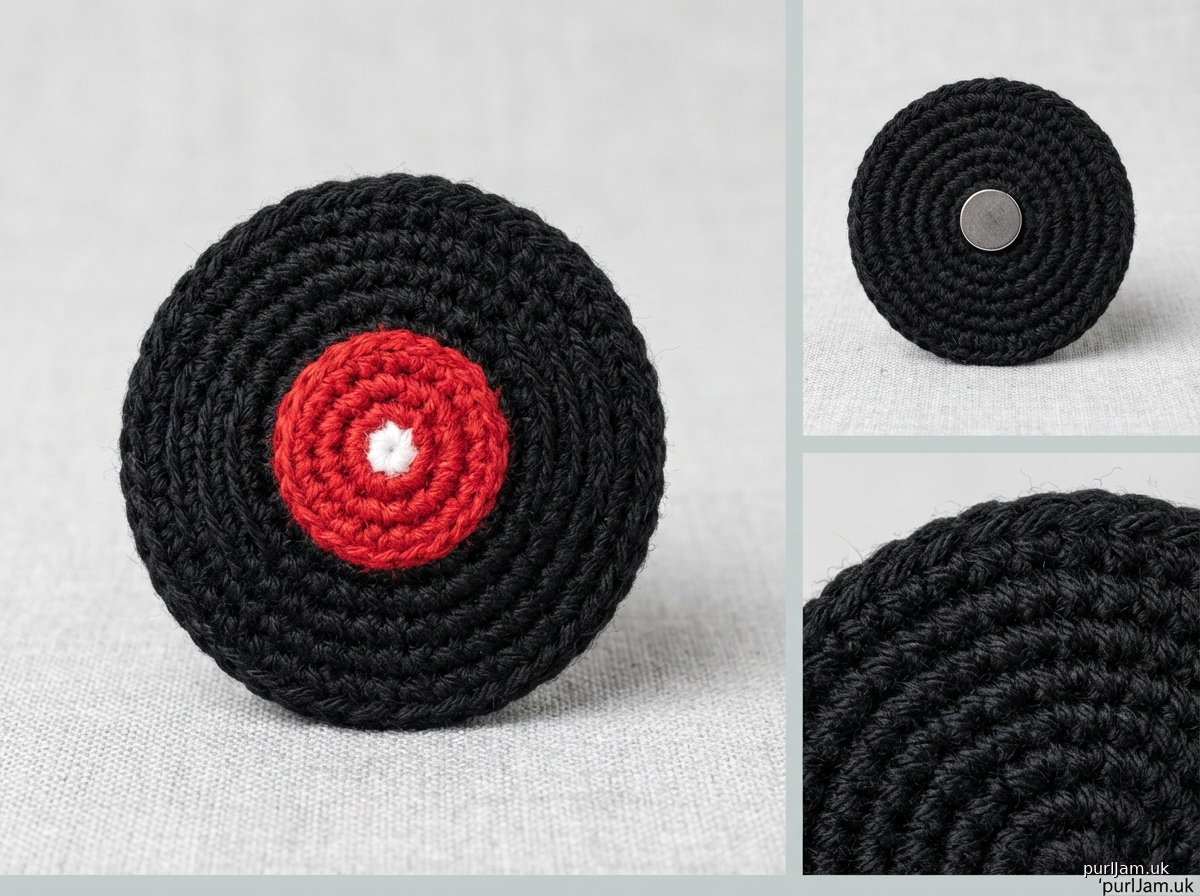
---

# Mini Vinyl Record Refrigerator Magnet
### A Beginner Crochet Pattern

---

## About This Pattern

This fun little pattern creates a flat crocheted vinyl record approximately **1.5 inches (3.8 cm)** in diameter — the perfect size for a refrigerator magnet! Two flat circles are crocheted and joined together with a small disc magnet sandwiched inside. A tiny center label circle is added on top for an authentic look.

> **Designer's Note:** This pattern is adapted from standard flat-circle construction rather than stuffed sphere construction. Because this is a flat magnet rather than a plushie, no fiberfill stuffing is used. The two-disc assembly keeps the finished piece slim, tidy, and fully functional as a magnet.

---

## Finished Size

- **Diameter:** Approximately 1.5 inches (3.8 cm)
- **Thickness:** Approximately 0.25 inch (6 mm) once assembled

> **Size Note:** Finished size is highly dependent on your personal gauge. Work tightly! If you crochet loosely or prefer a more precisely sized result, try **DK weight (3)** yarn with a **US D-3 (3.25 mm)** hook, which will bring the diameter closer to 1.25–1.4 inches (3.2–3.5 cm). A quick gauge swatch is always recommended before beginning.

---

## Materials

| Item | Details |
|---|---|
| **Main Color (MC)** | Worsted weight (4) yarn in **black** — less than 5 yards (4.6 m) |
| **Contrasting Color (CC)** | Worsted weight (4) yarn in **red** (or yellow, white, or your favorite label color) — less than 2 yards (1.8 m) |
| **Crochet Hook** | US E-4 (3.5 mm) |
| **Magnet** | 1 small round disc magnet, approximately 10 mm (0.4 inch) diameter |
| **Yarn Needle** | For assembly and weaving in ends |
| **Stitch Marker** | To track beginning of rounds |
| **Scissors** | |
| **Strong Craft Glue** *(optional)* | To secure magnet, such as E6000 or super glue |

> **Magnet Safety Warning:** This finished item contains a small magnet and is not suitable for children under 3 years of age. Keep away from individuals with pacemakers or other implanted medical devices.

---

## Yarn & Hook Recommendations

- **Suggested yarns:** Lion Brand Pound of Love, Red Heart Super Saver, Caron Simply Soft (all worsted weight)
- **Hook:** Go **1–2 sizes smaller** than the yarn label recommends to achieve a tight, firm fabric with no gaps — this is standard amigurumi technique

---

## Gauge

**Tight amigurumi gauge (recommended):**
5 sc = 1 inch (2.5 cm)
4 rounds = 1 inch (2.5 cm)

> Gauge is important for achieving the correct 1.5-inch finished size. Work tightly!

---

## Abbreviations

| Abbreviation | Meaning |
|---|---|
| **sc** | single crochet |
| **inc** | increase — work 2 sc in the same stitch |
| **sl st** | slip stitch |
| **ch** | chain |
| **rnd(s)** | round(s) |
| **st(s)** | stitch(es) |
| **MC** | main color (black) |
| **CC** | contrasting color |
| **[ ]** | stitch count at end of round |

---

## Notes for Beginners

1. **Magic Ring:** This pattern begins with a magic ring (also called a magic circle). If you are not yet comfortable with the magic ring, you may substitute: **ch 2, work the first round of sc into the 2nd chain from the hook.** Pull the starting tail snugly to close the center.
2. **Working in continuous rounds:** Do not join or turn at the end of each round unless instructed. Place a stitch marker in the first stitch of each round and move it up as you work.
3. **Flat circle formula:** Each round of this pattern increases by exactly 6 stitches. This is what keeps your circle flat. If your circle starts to cup upward, your gauge is too tight. If it starts to ruffle, your gauge is too loose — try tightening your tension.
4. **Right side vs. wrong side:** The right side (smooth side) of your sc fabric should face outward on both discs.

---

## Pattern Instructions

---

### PART 1: RECORD DISC (Make 2 in MC — Black)

You will make two identical flat circles. These form the front and back of the vinyl record.

**Rnd 1:** Make a magic ring. Work 6 sc into the magic ring. Pull the ring closed snugly. Place stitch marker. **[6]**

**Rnd 2:** Work 2 sc (inc) in each stitch around. **[12]**
*(You are working 1 increase in every stitch — 6 increases total)*

**Rnd 3:** \*(sc in next st, inc in next st)\* — repeat from \* to \* around. **[18]**
*(Alternating: 1 plain sc, then 1 increase — 6 increases total)*

**Rnd 4:** \*(sc in each of next 2 sts, inc in next st)\* — repeat from \* to \* around. **[24]**
*(2 plain sc, then 1 increase — 6 increases total)*

Sl st in next stitch to close the round. Fasten off, leaving a **12-inch (30 cm) tail** on the **first disc** for seaming. Fasten off and weave in the tail on the **second disc**.

> ✅ **Stitch count check:** After Rnd 4 you should have 24 stitches. Count carefully before fastening off!
> - Rnd 1: 6 sts ✓
> - Rnd 2: 6 × 2 = 12 sts ✓
> - Rnd 3: 6 sc + 6 inc = 18 sts ✓
> - Rnd 4: 12 sc + 6 inc = 24 sts ✓

---

### PART 2: CENTER LABEL CIRCLE (Make 1 in CC)

This small circle represents the center label on the vinyl record.

**Rnd 1:** Make a magic ring. Work 6 sc into the magic ring. Pull the ring closed snugly. **[6]**

Sl st in next stitch to close the round. Fasten off, leaving a **6-inch (15 cm) tail** for sewing.

> **Optional larger label:** For a slightly more visible label circle, continue to Round 2:
> **Rnd 2:** Work 2 sc (inc) in each stitch around. **[12]**
> Sl st to close. Fasten off with a 6-inch (15 cm) tail.
>
> The single-round label (6 sts) gives a diameter of approximately 0.4–0.5 inch (10–12 mm). The two-round label (12 sts) gives approximately 0.7–0.8 inch (18–20 mm). Choose whichever looks best to your eye!

---

## Assembly

**Step 1 — Attach the center label:**
Using the yarn tail and a yarn needle, sew the **CC label circle** to the **right side (smooth side)** of one of the black discs, centering it as precisely as possible. Use a whip stitch around the edge of the label circle, pulling snugly so it lies flat. Weave in and secure the end on the wrong side.

**Step 2 — Mark the center hole:**
Using a small length of **white or contrasting yarn** and your yarn needle, embroider a small French knot or a few tiny straight stitches at the very center of the CC label circle to represent the center hole of the record. Alternatively, a tiny dot of white craft paint may be used after assembly. Weave in all ends.

> **French Knot Instructions (beginner tip):** Bring needle up through the center point. Wrap yarn around needle 2 times. Insert needle back into fabric right next to the exit point (not the same hole). Pull through to create a small raised dot.

**Step 3 — Add the magnet:**
Hold both record discs with **wrong sides facing each other** (right/smooth sides facing outward). Place the **10 mm disc magnet** between the two discs, in the center. If desired, add a small drop of craft glue to the magnet face and press it against the wrong side of the **back disc** (the plain one without the label). Allow to dry if using glue.

> **Tip:** Check that the magnet is oriented with its **attracting side facing the back** of the assembly (so it will stick to the refrigerator).

**Step 4 — Seam the discs together:**
Using the **long 12-inch (30 cm) tail** from the first disc and a yarn needle, whip stitch the two discs together through the outer edge stitches, working around all 24 stitches. Keep the magnet centered as you sew.

Pull each stitch snugly so the seam is tidy and the edges align neatly. When you have worked all the way around, pull the yarn snugly to close any final gap.

**Step 5 — Finish:**
Knot the yarn securely, then weave the tail between the two layers of the disc to hide it. Trim any excess.

---

## Optional Embellishments

| Detail | How To |
|---|---|
| **Groove lines** | Using a slightly lighter shade of black or dark gray yarn and a yarn needle, embroider 1–2 loose concentric circles of surface slip stitch on the front disc (between the label and the outer edge) to suggest the record's grooves |
| **Artist label text** | Using a fine-tip permanent marker or fabric paint pen, write a tiny band name or "45 RPM" on the CC label circle after assembly |
| **Shiny finish** | Lightly mist the finished disc with fabric stiffener spray and press flat while drying to give it a slight sheen and crisp shape |
| **Keychain version** | Before seaming, attach a small jump ring and keychain finding through one of the outer edge stitches |

---

## Finished Dimensions Reference

| Component | Diameter |
|---|---|
| Record disc (each) | ~1.5 inches / 3.8 cm |
| Label circle (1 rnd) | ~0.4–0.5 inch / 10–12 mm |
| Label circle (2 rnds) | ~0.7–0.8 inch / 18–20 mm |
| Disc magnet (recommended) | 10 mm / 0.4 inch |

---

## Yarn Quantity Summary

| Color | Amount Needed |
|---|---|
| Black (MC) — both discs | Less than 5 yards (4.6 m) |
| Label color (CC) | Less than 2 yards (1.8 m) |

> This pattern is an excellent stash-buster and works beautifully with yarn scraps!

---

## Skill Level Reference

**Stitches used:** magic ring, sc, inc (2 sc in one stitch), sl st, whip stitch, French knot (optional)
**Techniques used:** working in continuous rounds, flat circle construction, two-piece assembly

---

*Pattern designed for personal use. Finished items may be sold in small quantities with credit to the designer.*

---
Disclaimer: This pattern was generated by AI and should be reviewed for accuracy before use. While we strive for quality, AI-generated content may contain errors. Please verify measurements, stitch counts, and instructions before beginning your project. Generated by purlJam.uk
Access your pattern anytime
Bookmark this page to access your pattern anytime