Type
Knitting
Difficulty
beginner
Category
pullover
AI Thinking Process
Planning
Verification
Pattern
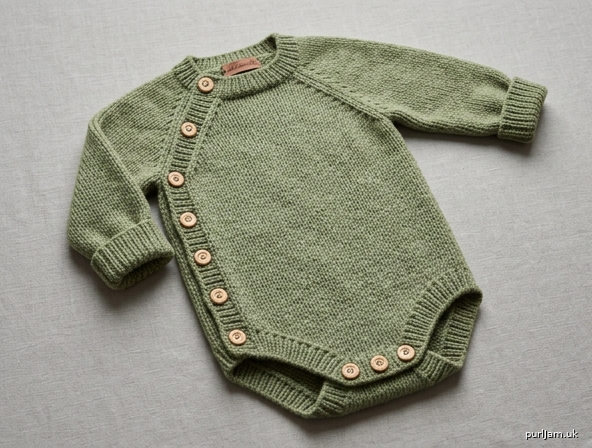
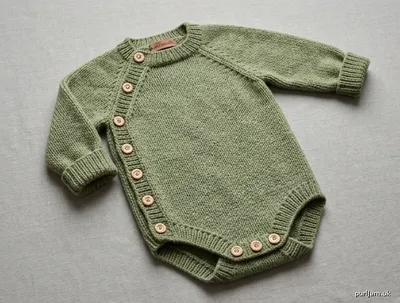
Newborn Side-Fastening Raglan Onesie
Top-Down Seamless Baby Onesie in Chunky Yarn
Difficulty: Beginner
Sizes: 0–3 months (3–6 months)
To fit chest: 16 (18)" / 40.5 (45.5) cm
Finished chest: 18 (20)" / 45.5 (51) cm (includes ~2" positive ease)
Finished length (shoulder to crotch): 12 (13.5)" / 30.5 (34.5) cm
Shown in size 0–3 months. Instructions are for smallest size with larger size in parentheses. When only one number is given, it applies to both sizes.
Features
- Seamless top-down raglan construction (no itchy seams)
- Side button fastening from underarm to crotch for easy dressing
- Crotch button band for quick diaper changes
- Soft crew neck and ribbed cuffs/leg openings
- Extra body length for diaper room
- Designed for machine-washable chunky yarn
Yarn
Chunky / bulky weight yarn (CYC 5); approx 220 (280) yd / 200 (255) m
Recommended: Soft superwash wool, cotton-acrylic blend, or baby acrylic. Must be machine-washable and soft against newborn skin.
Example: Cascade 128 Superwash, Bernat Softee Chunky Baby, or similar (14 sts = 4").
Needles
- US 10 / 6 mm circular needle, 16–24" / 40–60 cm (body)
- US 10 / 6 mm DPNs or magic-loop circular (sleeves)
- US 9 / 5.5 mm circular and DPNs (ribbing) — optional one size smaller for neater edges
- Or size needed to obtain gauge
Notions
- Stitch markers (4 raglan + 1 BOR)
- Stitch holders or waste yarn
- Tapestry needle
- 11 (12) buttons, ½–⅝" / 12–15 mm diameter (soft-edged)
- Sewing needle and thread to match yarn
Gauge
14 sts and 20 rows/rnds = 4" / 10 cm in Stockinette stitch (St st) on larger needles, blocked.
Check gauge. Change needle size if needed. Row gauge affects yoke depth and body length.
Abbreviations (US)
- BO: bind off
- BOR: beginning of round
- CO: cast on
- k: knit
- k2tog: knit 2 together (right-leaning decrease)
- m1L: make 1 left (lift bar between sts from front to back, k through back loop)
- m1R: make 1 right (lift bar between sts from back to front, k through front loop)
- p: purl
- pm: place marker
- rnd(s): round(s)
- RS: right side
- ssk: slip-slip-knit (left-leaning decrease)
- st(s): stitch(es)
- St st: Stockinette stitch (k on RS / rnds; p on WS)
- WS: wrong side
- wyif: with yarn in front
- yo: yarn over
Construction Notes
Worked top-down. Yoke begins flat to create the left-side button band, then joins in the round after the placket. Sleeves are placed on hold, underarm stitches cast on, and body continues. Side button band runs along the left underarm-to-crotch edge. Crotch is finished flat with a buttonhole band; leg openings are worked in the round. All buttonholes are simple yo, k2tog.
Beginner tip: Use locking markers on raglan lines and count stitches after every increase row/rnd. Try the onesie on the baby (or a similarly sized doll) before finishing the crotch.
PATTERN
Neckband
With smaller needles and using a long-tail cast-on, CO 44 (48) sts. Do not join; work flat.
Row 1 (RS): *K1, p1; rep from * to end.
Row 2 (WS): *K1, p1; rep from * to end.
Rep Rows 1–2 once more (4 rows rib total).
Change to larger needles.
Set-Up for Raglan (button band established)
Set-up Row (RS): K5 (left front button band), pm, k2 (left front), pm, k8 (10) (left sleeve), pm, k14 (14) (back), pm, k8 (10) (right sleeve), pm, k2 (right front), k5 (right front edge — will become side of neck).
44 (48) sts; 5 band sts outside first marker.
Note: The 5 sts at the beginning of RS rows are the permanent left-side button band and are always worked in garter st (knit every row). The final 5 sts of the row are worked in St st until the side fastening begins at the underarm.
Yoke (worked flat with raglan increases)
Raglan Inc Row (RS): K5 (band), sm, *k to 1 st before marker, m1R, k1, sm, k1, m1L; rep from * 3 more times, k to end.
8 sts increased.
WS Row: K5 (band), p to last 5 sts, k5.
Rep last 2 rows 7 (8) more times.
Total 8 (9) raglan inc rows worked.
Stitch count: 108 (120) sts.
Work even in pattern (k5 band, St st between markers, k5 at end of RS / beg of WS) until yoke measures 4¼ (4½)" / 11 (11.5) cm from CO edge, ending after a WS row.
(Armhole depth is measured along the raglan line.)
Divide Body and Sleeves
Divide Row (RS): K5 (band), sm, k to marker (left front), remove marker, place next 24 (28) sleeve sts on holder, remove marker, CO 4 sts using backward-loop cast-on (underarm), pm (new side marker), remove next marker, k across 30 (32) back sts, remove marker, place next 24 (28) sleeve sts on holder, remove marker, CO 4 sts (underarm), k remaining right-front sts to end (including final 5 sts).
Body sts: 68 (72) sts (includes 5-st button band).
Place a removable marker in the center of the left underarm CO sts to indicate start of side-button section.
Body
Continue working flat (the left edge remains open for side fastening).
Next Row (WS): K5, p to last 5 sts, k5.
Next Row (RS): K5, k to end.
Work even in St st with 5-st garter button bands at each edge until body measures 6½ (7½)" / 16.5 (19) cm from underarm, ending after a WS row.
(This length includes diaper ease; adjust if desired.)
At the same time, work buttonholes on left band (beg of RS rows) as follows:
On RS rows approximately every 1¼" / 3 cm (about every 6 rows), work:
Buttonhole Row (RS): K1, k2tog, yo, k2, knit to end.
Work 6 (7) buttonholes evenly spaced along the side band from underarm to crotch. Final buttonhole should sit ~¾" / 2 cm above crotch division.
Crotch Division and Front/Back Flaps
Mark center: Place a marker at the exact center of the current row (between sts 34 & 35 for size 0–3m; between 36 & 37 for size 3–6m).
Next Row (RS): K5, k until 8 (9) sts before center marker, BO next 16 (18) sts for crotch opening (remove center marker as you go), k to end (including final 5 band sts).
You now have two separate sections: Left/Front section and Right/Back section.
Place the Right/Back section sts on a holder. Continue on Left/Front sts only.
Front Crotch Flap
Working on Left/Front sts only (approx 26 (27) sts):
Next Row (WS): K5, p to last 5 sts, k5.
Work 4 rows even in established pattern (garter bands + St st).
Buttonhole Row (RS): K5, k3 (3), [k2tog, yo, k3] twice, k2tog, yo, k to last 5 sts, k5. (3 buttonholes)
Next Row (WS): K5, p to last 5 sts, k5.
Work 2 more rows even.
BO all sts knitwise on RS.
Back Crotch Flap
Return held Right/Back sts to needle with WS facing. Rejoin yarn.
Next Row (WS): K5, p to last 5 sts, k5.
Work 8 rows even in established pattern (no buttonholes — buttons will be sewn here).
BO all sts knitwise on RS.
Leg Openings
With RS facing, larger DPNs (or magic loop), and beginning at center of one underarm-side crotch edge, pick up and knit 28 (32) sts evenly around one leg opening (pick up ~1 st per row along flap edges and across any remaining crotch BO sts).
Pm for BOR and join to work in the rnd.
Change to smaller needles if desired.
Ribbing rnd: *K1, p1; rep from * to end.
Work 6 rnds total in k1, p1 rib.
BO loosely in rib.
Repeat for second leg.
Sleeves (make 2)
Place 24 (28) held sleeve sts onto larger DPNs (or magic-loop needle). With RS facing, rejoin yarn at center of underarm.
Pick up and knit 2 sts along first half of underarm CO, k across sleeve sts, pick up and knit 2 sts along remaining underarm CO.
28 (32) sts. Pm for BOR.
Work in St st (knit every rnd) for 1" / 2.5 cm.
Decrease rnd: K1, k2tog, k to last 3 sts, ssk, k1. (2 sts dec)
Rep Decrease rnd every 6th rnd 3 (4) more times.
20 (22) sts remain.
Work even until sleeve measures 5½ (6½)" / 14 (16.5) cm from underarm, or 1¼" / 3 cm less than desired finished length.
Change to smaller needles.
Cuff: *K1, p1; rep from * to end.
Work 6 rnds rib.
BO loosely in rib.
Finishing
Weave in all ends securely on WS.
Block: Gently wet-block or steam-block to measurements. Do not stretch ribbing. Lay flat to dry.
Buttons:
- Sew 6 (7) buttons on the right-side body edge (the edge without buttonholes), opposite the side buttonholes, spaced to match.
- Sew 3 buttons on the WS of the back crotch flap, opposite the front crotch buttonholes.
Neck and band reinforcement (optional but recommended for newborns): With tapestry needle and yarn, work a row of slip-stitch crochet or whipstitch along the inside of the button bands for stability.
Check that all buttonholes fit the buttons snugly but allow easy fastening.
Wear & Care
- Always fasten side and crotch buttons when dressing; never pull over baby’s head roughly.
- Machine wash gentle cycle cold, tumble dry low or lay flat — follow your yarn label.
- Inspect buttons before each wear; re-sew if loose.
Schematic Measurements (blocked)
- Chest circumference: 18 (20)" / 45.5 (51) cm
- Yoke depth (neck to underarm): 4¼ (4½)" / 11 (11.5) cm
- Body underarm to crotch: 6½ (7½)" / 16.5 (19) cm
- Sleeve length underarm to cuff: 6¾ (7¾)" / 17 (19.5) cm
- Leg opening rib: 1¼" / 3 cm
Inline Math Validation (key points)
- CO 44 (48) ✓
- 8 (9) raglan inc rows × 8 sts = +64 (72) → 44+64=108 (48+72=120) ✓
- Sleeves removed 24+24=48 (28+28=56); underarms +4+4=+8; fronts+back 108-48+8=68 (120-56+8=72) ✓
- Side buttonholes 6 (7) + crotch 3 = 9 (10) buttons on bands; total buttons 11 (12) includes extras for security ✓
Congratulations! Your soft, practical newborn side-fastening raglan onesie is ready. Perfect for gifting or everyday snuggles.
Disclaimer: This pattern was generated by AI and should be reviewed for accuracy before use. While we strive for quality, AI-generated content may contain errors. Please verify measurements, stitch counts, charts, and instructions before beginning your project. Generated by purlJam.uk
Love this pattern?
Save this pattern to your free PurlJam libraryAccess your pattern anytime
Bookmark this page to access your pattern anytime