Type
Crochet
Difficulty
intermediate
Category
amigurumi
AI Thinking Process
Planning
Verification
Pattern
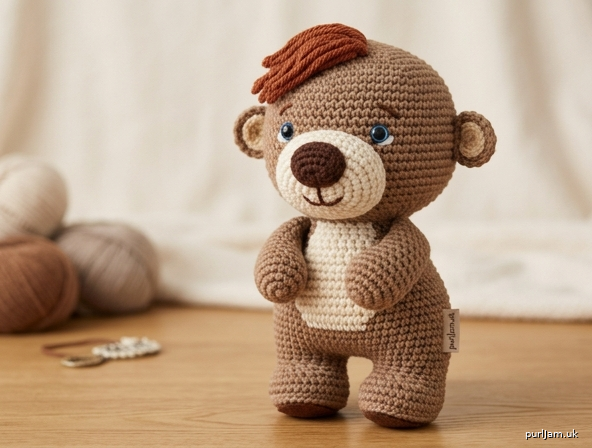
Ollie the Woodland Critter – Chunky Amigurumi Pattern
Difficulty: Advanced
Finished Size: Approximately 8–9″ (20–23 cm) tall when made with chunky yarn
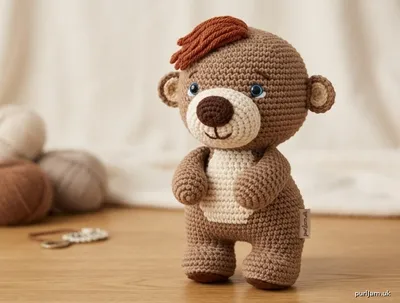
A chubby, upright cartoon woodland animal with an oversized round head, cream muzzle and chest, reddish-brown swooping hair, blue eyes, and tiny limbs. Worked in continuous spirals of single crochet.
Materials
- Yarn (chunky / bulky weight 5):
– Main color (MC): warm medium brown – 80 yd (73 m)
– Contrasting cream (CC): light cream – 30 yd (27 m)
– Hair: reddish-brown – 15 yd (14 m)
– Inner ear: light tan – 5 yd (5 m)
– Nose: dark chocolate brown – 5 yd (5 m)
– Small amount of blue and white for eye embroidery (or use 12 mm blue safety eyes with white highlight paint/embroidery) - Hook: US E-4 (3.5 mm) – go down a size from yarn label for tight amigurumi gauge
- 12 mm blue safety eyes (or embroider)
- Polyester fiberfill
- Stitch marker
- Yarn needle
- Straight pins
- Optional: dark brown felt or embroidery floss for foot pads
Gauge
14 sc × 14 rnds = 4″ (10 cm) in continuous sc worked tightly.
Exact gauge is less critical than a dense fabric that hides stuffing; adjust hook if stitches are loose.
Abbreviations (US terms)
- mr: magic ring
- sc: single crochet
- inc: 2 sc in same stitch
- invdec: invisible decrease (insert hook FLO of next 2 sts, yo, pull through both, yo, pull through 2 loops)
- st(s): stitch(es)
- rnd(s): round(s)
- BLO: back loop only
- FLO: front loop only
- fo: fasten off
- [ ]: total stitch count after round
Work in continuous spiral unless noted. Do not join rounds. Mark first st of each rnd and move marker up.
Pattern Notes
- Stuff firmly as you go, especially head and body, before openings become too small.
- Invisible decreases keep surface smooth.
- Color changes: finish last yarn-over of previous st with new color.
- All measurements assume chunky yarn + 3.5 mm hook; finished piece stands upright on flat feet.
1. Head (MC – medium brown)
Stuff firmly near the end.
Rnd 1: 6 sc in mr [6]
Rnd 2: inc in each st around [12]
Rnd 3: (sc, inc) around [18]
Rnd 4: (2 sc, inc) around [24]
Rnd 5: (3 sc, inc) around [30]
Rnds 6–12: sc in each st around [30] (7 rnds)
Insert 12 mm blue safety eyes between rnds 9 and 10, 7 sts apart, centered on face. Add white highlight embroidery or paint now if desired.
Rnd 13: (3 sc, invdec) around [24]
Rnd 14: (2 sc, invdec) around [18]
Rnd 15: (sc, invdec) around [12]
Stuff head very firmly, shaping full cheeks and rounded forehead.
Rnd 16: invdec around [6]
FO, thread tail through front loops of remaining 6 sts, pull tight to close. Weave in end.
Head should measure ~4″ (10 cm) diameter.
2. Muzzle (CC – cream)
Rnd 1: 6 sc in mr [6]
Rnd 2: inc in each st around [12]
Rnd 3: (sc, inc) around [18]
Rnds 4–5: sc in each st around [18]
FO, leaving 18″ (45 cm) tail for sewing. Lightly stuff.
Sew muzzle to lower front of head so top edge sits just below eyes and bottom curves under chin area. The muzzle should look slightly full and extend downward.
3. Nose (dark chocolate brown)
Rnd 1: 6 sc in mr [6]
Rnd 2: (sc, inc) around [9]
Rnd 3: sc in each st around [9]
FO, leaving long tail. Flatten into a large oval, lightly stuff to raise it, and sew centered on upper muzzle covering much of the top half. Embroider or shape edges round.
4. Hair Tuft (reddish-brown)
Make 5–6 layered strands or small shaped pieces:
For each strand: ch 8, sc in 2nd ch from hook and next 6 ch. FO.
Alternatively work a small flat triangle:
Row 1: ch 2, 2 sc in 2nd ch [2]
Row 2: ch 1, turn, inc, sc [3]
Row 3: ch 1, turn, sc, inc, sc [4]
FO.
Layer 4–5 pieces, sweep them to one side of forehead, and sew securely just above eyes so hair falls in a medium-length swoop.
5. Ears (make 2)
Outer ear (MC):
Rnd 1: 6 sc in mr [6]
Rnd 2: (sc, inc) around [9]
Rnd 3: (2 sc, inc) around [12]
Rnds 4–5: sc in each st around [12]
FO, leave tail. Do not stuff. Flatten into rounded triangle.
Inner ear (light tan):
Rnd 1: 6 sc in mr [6]
Rnd 2: (sc, inc) around [9]
FO, leave tail. Sew centered on outer ear.
Sew ears low on sides of head (approx. rnds 6–9), slightly angled and floppy.
6. Body (MC with CC chest)
Start with MC.
Rnd 1: 6 sc in mr [6]
Rnd 2: inc in each st around [12]
Rnd 3: (sc, inc) around [18]
Rnd 4: (2 sc, inc) around [24]
Rnd 5: (3 sc, inc) around [30]
Rnd 6: (4 sc, inc) around [36]
Rnds 7–9: sc in each st around [36]
Chest color change (rnd 10): Work first 12 sts in CC (cream), remaining 24 sts in MC. Carry unused yarn inside or cut and rejoin as preferred for clean vertical edges.
Rnds 10–14: continue 12 CC + 24 MC [36] (5 rnds) – cream forms chest patch from neck to upper belly.
Rnd 15: (4 sc, invdec) around [30]
Rnd 16: (3 sc, invdec) around [24]
Rnd 17: (2 sc, invdec) around [18]
Stuff body very firmly into chubby oval, wider at belly.
Rnd 18: (sc, invdec) around [12]
Rnd 19: invdec around [6]
FO, close as for head. Body ~4″ (10 cm) tall.
7. Legs (make 2, MC, joined to body)
Work each leg, then join.
Rnd 1: 8 sc in mr [8]
Rnd 2: (sc, inc) around [12]
Rnds 3–5: sc in each st around [12]
Rnd 6: (sc, invdec) × 4 [8]
Lightly stuff foot area only; leave top open. FO first leg.
Make second leg identically but do not FO.
Join legs to lower body: Position legs side-by-side under body. Sc around both leg openings and into body base stitches (approx. 16–18 sts total around joined section), adjusting to keep legs close together and standing. Continue any remaining body closure if needed. Weave ends. Legs should be short, sturdy, and slightly thicker at feet so piece stands.
8. Arms (make 2)
Start with lighter brown for paw (or MC if preferred), change to MC after rnd 3.
Rnd 1: 6 sc in mr [6]
Rnd 2: (sc, inc) around [9]
Rnd 3: sc in each st around [9] (paw)
Change to MC.
Rnds 4–7: sc in each st around [9]
Lightly stuff. FO, leave long tail.
Slightly bend at “elbow” (middle) and sew both arms to upper front chest so paws rest together in front of body.
9. Tail (MC)
Rnd 1: 6 sc in mr [6]
Rnd 2: sc in each st around [6]
FO, leave tail. Lightly stuff or leave unstuffed. Sew low on center back of body as a tiny rounded bump.
10. Assembly & Facial Details
- Pin head to top of body (short neck – sew directly). Add extra stuffing through neck opening if needed for firm join, then whip-stitch securely all around.
- Pin and sew ears, arms, and tail as described.
- Embroider small curved smile in dark brown directly beneath nose.
- Optional: embroider or felt dark brown oval pads on flat bottoms of feet.
- Weave in all ends. Shape cheeks, belly, and hair with fingers.
Finishing
- Ensure feet sit flat so Ollie stands upright.
- Check that all sewn parts are secure (especially for gift/child use).
- Spot-clean only; do not machine wash.
Yes stitch-count checks (examples):
Head Rnd 5: (3 sc, inc) × 6 = 30 ✓
Body Rnd 6: (4 sc, inc) × 6 = 36 ✓
Body Rnd 15: (4 sc, invdec) × 6 = 30 ✓
Arm Rnd 2: (sc, inc) × 3 = 9 ✓
Your chunky Ollie is ready for forest adventures!
Disclaimer: This pattern was generated by AI and should be reviewed for accuracy before use. While we strive for quality, AI-generated content may contain errors. Please verify measurements, stitch counts, and instructions before beginning your project. Generated by purlJam.uk
Love this pattern?
Save this pattern to your free PurlJam libraryAccess your pattern anytime
Bookmark this page to access your pattern anytime