Type
Crochet
Difficulty
beginner
Category
amigurumi
AI Thinking Process
Planning
Verification
Pattern
One-Piece Devil Fruit
Beginner amigurumi — simple shapes
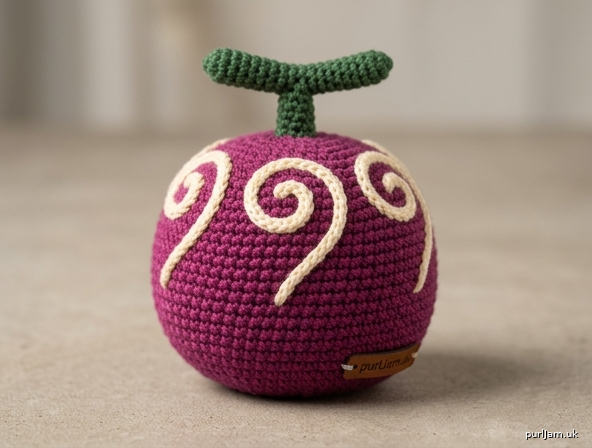
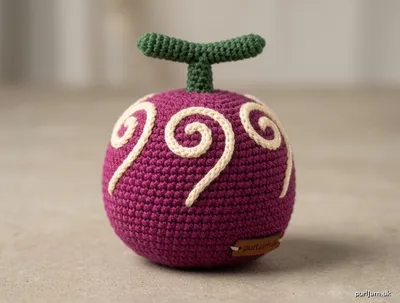
A plump fantasy fruit with a short stem and raised swirl markings, worked in one piece from the base to the stem tip. No sewing, no separate parts — only surface swirls at the end. Perfect as a desk toy, bag charm (add a finding), or first amigurumi.
Skill level: Beginner
Construction: One piece, bottom up, continuous spiral
Finished size: Approximately 11cm (4¼in) tall including stem, and 6.5cm (2½in) wide, using worsted yarn and a 3.5mm hook.
Materials
Yarn — worsted weight (Aran / 10-ply), acrylic or cotton
Small amounts only (the fruit uses roughly 20–25g of the main colour):
| Colour | Role | Amount (approx.) | Suggested shade |
|---|---|---|---|
| A | Stem | 5g | Forest green or brown |
| B | Fruit | 20–25g | Purple, magenta, or deep pink |
| C | Swirls | 5g | Pale pink, cream, or white |
Other
- Crochet hook 3.5mm (US E-4 / UK 9) — or 4.0mm for a slightly larger, softer fruit
- Polyester fibre filling
- Yarn needle
- Stitch marker
- Scissors
A 4.0mm hook will give a fruit closer to 12–13cm tall. Go down a hook size if your fabric is loose and filling shows.
Tension (gauge)
Tension is not critical for fit, but the fabric must be firm so the filling does not show.
Guide: After Rnd 6 (36 dc), the circle should measure about 6–6.5cm (2½in) across.
If your circle is much larger and gappy, drop to 3.0mm. If it is stiff and cupping hard, try 4.0mm.
Abbreviations (UK crochet terms)
This pattern uses UK stitch names throughout.
| Abbreviation | Meaning |
|---|---|
| ch | chain |
| dc | double crochet (US single crochet / sc) |
| inc | increase — 2 dc in the same stitch |
| dc2tog | double crochet 2 together (decrease) |
| sl st | slip stitch |
| st(s) | stitch(es) |
| rnd(s) | round(s) |
| MR | magic ring (magic loop) |
| yoh | yarn over hook |
| […] | stitch count at the end of the round |
| ( ) × n | work the instructions inside the brackets n times |
US conversion: UK dc = US sc. There are no trebles in this pattern.
Pattern notes
- Worked in a continuous spiral. Do not join rounds and do not turn.
- Place a stitch marker in the first stitch of every round and move it up as you go.
- The fruit and stem are one piece. You only fasten off once, at the stem tip.
- Stuff the fruit firmly while the opening is still wide enough (after Rnds 15 and 16). It is very difficult to add filling later.
- Change colour on the last yarn-over of the last stitch of the old colour.
- Invisible dc2tog (see Special stitches) gives a smoother fruit; ordinary dc2tog is fine if you prefer.
Special stitches
Magic ring
Wrap yarn around a finger to form a loop, work 6 dc into the loop, then pull the tail to close. If you find a magic ring tricky, ch 2 and work 6 dc into the second ch from the hook, then sew the centre hole shut later.
Invisible dc2tog (recommended)
Insert hook under the front loop only of the next stitch, then under the front loop only of the following stitch (2 loops on hook plus the original loop = 3 loops). Yoh, pull through both front loops (2 loops on hook). Yoh, pull through both remaining loops. Counts as 1 dc.
Ordinary dc2tog
Insert hook in next st, yoh, pull up a loop; insert hook in following st, yoh, pull up a loop; yoh, pull through all 3 loops on hook.
Colour change
On the last dc of the old colour, stop when 2 loops remain on the hook. Yarn over with the new colour and pull through both loops. Work the next round in the new colour. Knot the two tails on the inside, or weave them in later.
Surface slip stitch (for swirls)
With the fruit facing you, insert the hook from front to back under both loops of a stitch, pull up a loop of Colour C. *Insert hook under both loops of the next stitch along your path, yoh, pull through the fabric and the loop on the hook (1 sl st made). Repeat from * along the swirl. Fasten off and weave both tails to the inside.
Fruit and stem
(worked as one piece)
Begin at the base of the fruit with Colour B (purple).
Rnd 1: 6 dc in a magic ring. [6]
Rnd 2: Inc in each st around. [12]
(6 increases → 6 + 6 = 12 ✓)
Rnd 3: (1 dc, inc) around. [18]
(6 increases → 12 + 6 = 18 ✓)
Rnd 4: (2 dc, inc) around. [24]
(6 increases → 18 + 6 = 24 ✓)
Rnd 5: (3 dc, inc) around. [30]
(6 increases → 24 + 6 = 30 ✓)
Rnd 6: (4 dc, inc) around. [36]
(6 increases → 30 + 6 = 36 ✓)
The circle should measure about 6–6.5cm across.
Rnds 7–12: Dc in each st around. [36]
(6 even rounds at 36 sts ✓)
These rounds form the widest part of the fruit.
Rnd 13: (4 dc, dc2tog) around. [30]
(6 decreases → 36 − 6 = 30 ✓)
Rnd 14: (3 dc, dc2tog) around. [24]
(6 decreases → 30 − 6 = 24 ✓)
Rnd 15: (2 dc, dc2tog) around. [18]
(6 decreases → 24 − 6 = 18 ✓)
Stuff the fruit firmly now. Push filling right down into the base so the bottom is round, not flat. Do not under-stuff — a firm fruit holds the swirl pattern better.
Rnd 16: (1 dc, dc2tog) around. [12]
(6 decreases → 18 − 6 = 12 ✓)
Add a little more filling if needed, packing it up toward the top.
Rnd 17: Dc2tog around. [6]
(6 decreases → 12 − 6 = 6 ✓)
The opening should sit at the top centre of the fruit, ready for the stem.
Change to Colour A (green) on the last yarn-over of Rnd 17.
Stem
Rnds 18–22: Dc in each st around. [6]
(5 rounds on 6 sts ✓)
Stuff the stem lightly with tiny pinches of filling as you go, or leave it unstuffed for a softer look. A cocktail stick can help push filling into the stem.
Close the stem: Fasten off, leaving a 15cm tail. Thread the tail onto a yarn needle, pass it through the front loop only of each of the remaining 6 stitches, and pull tight to close the hole. Weave the tail down through the centre of the stem and into the fruit. Trim.
The fruit is complete as a single piece. Only the swirls remain.
Swirls
The swirls are surface slip stitches in Colour C. They are not separate pieces and need no sewing.
Placement
- You will work 5 swirls, spaced evenly around the fruit.
- Start each swirl 2 rounds below the stem (on the upper part of the fruit, where the fabric is still fairly wide).
- At 36 stitches around, start a new swirl every 7 stitches (5 × 7 = 35; the last gap is 8 stitches — this will not show).
Each swirl
- Pull up a loop of Colour C at the starting point.
- Surface slip stitch outward and slightly downward for 3–4 stitches.
- Then curve the path into a comma or spiral: keep stitching in a gentle clockwise (or all anti-clockwise — pick one direction and stay consistent) arc that wraps part-way around the fruit and tapers toward the lower half.
- Each swirl should travel roughly one-third to one-half of the way down the fruit — long enough to read as a spiral, not so long that they collide.
- Fasten off, leaving tails. Flick the tails to the inside with the yarn needle (or pull them through with the hook) and weave in.
Tips for neat swirls
- Keep surface slip stitches snug but do not cinch the fruit.
- If a swirl looks wobbly, unpick that one line and restitch — the fruit fabric will not be harmed.
- Five matching commas around the top, all curving the same way, is the classic devil-fruit look.
- Optional: add a sixth smaller swirl in a gap if the fruit looks sparse.
Finishing
- Weave in any remaining ends, burying them inside the filling.
- Roll the fruit firmly between your palms to even out the stuffing and round the shape.
- If the stem leans, a few hidden stitches with Colour A at the stem base (through the fruit, not around it) will straighten it — this is optional; the piece is already structurally one piece.
- Do not add beads, buttons, or safety eyes. This design has no small parts.
Optional keychain: Thread a metal finding through the stem and close the ring. Do not give a keychain version to children under 3 years.
Colour ideas
Work the same pattern in any fruit colour. The construction does not change.
- Classic swirl fruit: purple fruit, pale pink swirls, green stem
- Sunset: orange fruit, cream swirls, brown stem
- Ocean: teal fruit, white swirls, dark green stem
- Flame: red fruit, gold swirls, brown stem
Use the same Colour C for every swirl so they read as a set.
Size notes
| Change | Result |
|---|---|
| 4.0mm hook | About 12–13cm tall, softer fabric |
| 3.0mm hook | About 9–10cm tall, denser fabric |
| Bulky yarn + 5.0mm hook | About 16–18cm, a plump display fruit |
| DK yarn + 2.5–3.0mm hook | About 8cm, a small charm |
Do not add extra increase rounds unless you also add matching decrease rounds, or the fruit will not close evenly.
Care
Hand wash in cool water, squeeze gently (do not wring), and dry flat. Acrylic versions tolerate a cool wool-cycle wash inside a mesh bag. Reshape the fruit while damp. Do not tumble dry.
Safety
This toy contains fibre filling. Close the stem securely so filling cannot escape. It has no beads or eyes, which makes it more suitable than many amigurumi for older children, but it is not a teething toy. Do not give it to children under 36 months without supervision. Check regularly that the fabric has not worn through.
You have made a one-piece devil fruit. No seams, no assembly — just a swirl of surface stitches on a firm little fruit.
Disclaimer: This pattern was generated by AI and should be reviewed for accuracy before use. While we strive for quality, AI-generated content may contain errors. Please verify measurements, stitch counts, charts, and instructions before beginning your project. Generated by purlJam.uk
Love this pattern?
Save this pattern to your free PurlJam libraryAccess your pattern anytime
Bookmark this page to access your pattern anytime