Type
Crochet
Difficulty
intermediate
Category
amigurumi
AI Thinking Process
Planning
Verification
Pattern
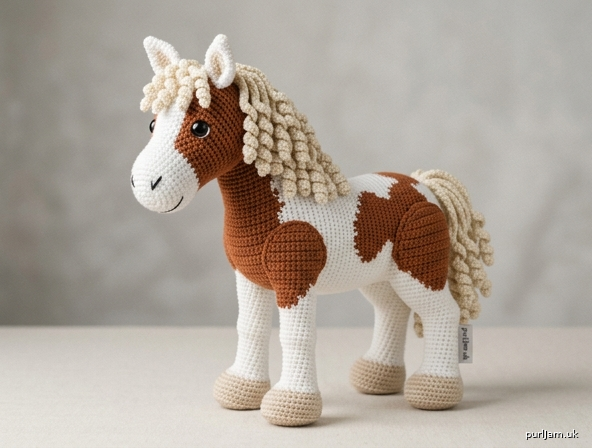
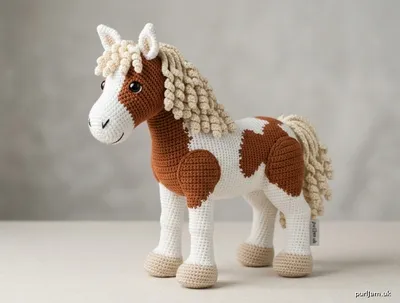
Paint Horse Amigurumi Crochet Pattern
Difficulty: Advanced
Finished Size: Approximately 10 inches (25 cm) long × 9 inches (23 cm) tall when made with worsted weight yarn and recommended hook
Yarn Weight: Worsted (4)
Materials
- Worsted weight yarn (acrylic or cotton blend recommended):
- Main Color (MC) White: 150 yd (137 m)
- Contrast Color (CC) Warm reddish-brown: 80 yd (73 m)
- Hoof Color Light beige: 30 yd (27 m)
- Mane/Tail/Inner Ear Cream: 50 yd (46 m)
- US E-4 (3.5 mm) crochet hook (or size needed to obtain tight gauge)
- 12 mm safety eyes (1 pair)
- Polyester fiberfill stuffing
- Yarn needle
- Stitch marker
- Scissors
- Optional: small amount of black embroidery floss for nostrils/mouth
Gauge
5 sc and 5 rnds = 1 inch (2.5 cm) in continuous sc spiral.
Work tightly so stuffing does not show. Adjust hook size if necessary.
Abbreviations (US Terms)
- MR: magic ring
- ch: chain
- sc: single crochet
- inc: 2 sc in same stitch
- dec: invisible decrease (insert hook in FLO of next 2 sts, yo, pull through both, yo, pull through all 3 loops)
- blo: back loop only
- st(s): stitch(es)
- rnd(s): round(s)
- FO: fasten off
- [ ]: stitch count at end of round
- ( ) × n: repeat instructions in parentheses n times
- PM: place marker
Notes
- Work in continuous spirals unless stated. Do not join rnds. Use a stitch marker to mark the first st of each rnd and move it up as you go.
- Invisible decrease is required for smooth shaping.
- Stuff firmly as you go, especially legs and body, so the horse stands. Do not overstuff the neck joint.
- Color changes for paint patches are freeform: carry or cut yarn and change to CC on any rnds/sections of body, neck, or head as desired to create large irregular reddish-brown patches. Suggested change points are noted; weave ends securely inside.
- Legs are worked identically; the 4th leg continues directly into the joining rnd.
- The seamless leg-to-body construction creates a natural standing posture with front legs under shoulders and back legs under hips.
- Safety first: install safety eyes before closing the head. Secure all sewn parts firmly.
Pattern Instructions
Front Legs (Make 2) and Back Legs (Make 2)
All four legs are identical. Make first three legs completely and FO. On the fourth leg, do not FO; continue to Joining Round.
With light beige (hoof color):
Rnd 1: 6 sc in MR [6]
Rnd 2: inc in each st around [12] (6 inc → 6 + 6 = 12 ✓)
Rnd 3: (sc, inc) around [18] (6 inc → 12 + 6 = 18 ✓)
Rnd 4: blo sc in each st around [18] (creates flat sole)
Rnd 5: (sc, dec) around [12] (6 dec → 18 – 6 = 12 ✓)
Change to MC (white) or CC (reddish-brown) for desired leg patch.
Rnds 6–15: sc in each st around [12] (10 rnds even for sturdy length)
Stuff hoof and leg firmly, keeping sole flat.
FO on first three legs, leaving 12-inch (30 cm) tail for weaving. On fourth leg, do not FO. Proceed immediately to Joining Round with yarn still attached.
Joining Legs to Begin Body
Arrange legs in standing order: Front-Left, Front-Right, Back-Right, Back-Left. Front pair close together; back pair close together; longer bridges form the belly and create natural stance width.
Continuing with yarn from fourth leg (treat it as Back-Left for counting):
Joining Rnd:
Sc in each of next 12 sts of Back-Left leg,
ch 2 (short bridge between back legs),
sc in each of next 12 sts of Back-Right leg,
ch 6 (long side/belly bridge),
sc in each of next 12 sts of Front-Right leg,
ch 2 (short bridge between front legs),
sc in each of next 12 sts of Front-Left leg,
ch 6 (long side/belly bridge).
Join with sl st to first sc of the round to close. [64]
(12 × 4 legs = 48; ch 2 + 6 + 2 + 6 = 16; 48 + 16 = 64 ✓)
PM in first st. This is now Rnd 1 of the Body. The chain bridges sit at belly level; the two short bridges keep each pair close, the two long bridges set front-to-back spacing.
Body
Continue in MC, adding CC patches freely on any rnds for paint-horse markings (suggested: large patches on left shoulder, right flank, and rump). Stuff firmly and continuously from here onward, shaping a rounded belly and broad chest.
Rnd 2: sc in each st around [64]
Rnd 3: (7 sc, inc) around [72] (8 inc → 64 + 8 = 72 ✓)
Rnds 4–8: sc in each st around [72] (5 rnds; body length and depth)
Rnd 9: (10 sc, dec) around [66] (6 dec → 72 – 6 = 66 ✓)
Rnds 10–12: sc in each st around [66]
Rnd 13: (9 sc, dec) around [60] (6 dec → 66 – 6 = 60 ✓)
Rnds 14–16: sc in each st around [60] (chest begins to narrow toward neck)
Rnd 17: (8 sc, dec) around [54] (6 dec → 60 – 6 = 54 ✓)
Rnd 18: sc in each st around [54]
Identify the front opening (centered above the two front legs, roughly 18–20 sts wide). The remaining sts form the rump and back. Continue to Neck without FO.
Neck
Work only across the front opening sts to raise the neck; leave the rear body sts unworked for now (they will be closed later if needed, but stuffing holds shape). For clean transition:
Rnd 19 (neck setup): sc in next 18 sts (front chest opening), skip remaining 36 sts of body for now. Working in these 18 sts only, begin neck spiral. [18]
(If your front alignment differs by 1–2 sts, adjust to center the 18-st opening directly above front legs.)
Rnds 20–21: sc in each st around [18]
Rnd 22: (5 sc, inc) around [21] (3 inc → 18 + 3 = 21 ✓)
Rnds 23–27: sc in each st around [21] (5 rnds; thick cylindrical neck with slight forward curve—lean stitches slightly forward as you work)
Rnd 28: (5 sc, dec) around [18] (3 dec → 21 – 3 = 18 ✓)
Rnds 29–30: sc in each st around [18]
Stuff neck firmly up to the last rnd, maintaining a gentle upward/forward curve. FO, leaving a long 18-inch (45 cm) tail for sewing head. The body rear opening can be whip-stitched closed with matching yarn after final stuffing if any gap remains; most stuffing is already locked in.
Head (worked separately)
With MC (add CC patches freely for face/forehead markings):
Rnd 1: 6 sc in MR [6]
Rnd 2: inc in each st around [12] (6 inc → 6 + 6 = 12 ✓)
Rnd 3: (sc, inc) around [18] (6 inc → 12 + 6 = 18 ✓)
Rnd 4: (2 sc, inc) around [24] (6 inc → 18 + 6 = 24 ✓)
Rnd 5: (3 sc, inc) around [30] (6 inc → 24 + 6 = 30 ✓)
Rnds 6–12: sc in each st around [30] (7 rnds; elongated oval, broad forehead)
Rnd 13: (3 sc, dec) around [24] (6 dec → 30 – 6 = 24 ✓)
Rnds 14–16: sc in each st around [24] (gentle taper toward muzzle end)
Rnd 17: (2 sc, dec) around [18] (6 dec → 24 – 6 = 18 ✓)
Rnd 18: sc in each st around [18]
Insert 12 mm safety eyes on the sides of the head, slightly above the center line and just behind where the muzzle will sit (approximately between Rnds 11–13, spaced 8–10 sts apart for friendly expression). Stuff head firmly, keeping the back flat for neck attachment and the top gently rounded.
Rnd 19: (sc, dec) around [12] (6 dec → 18 – 6 = 12 ✓)
Rnd 20: dec around [6] (6 dec → 12 – 6 = 6 ✓)
FO, weave tail through remaining 6 sts, pull closed, and hide end.
Muzzle
With MC (white):
Rnd 1: 6 sc in MR [6]
Rnd 2: inc in each st around [12]
Rnd 3: (sc, inc) around [18]
Rnd 4: (2 sc, inc) around [24]
Rnds 5–8: sc in each st around [24] (4 rnds; large rounded rectangle/oval, thick and plush)
Rnd 9: (2 sc, dec) around [18]
Stuff lightly-to-moderately so muzzle stays soft but dimensional.
FO, leaving long tail for sewing.
Ears (Make 2)
With MC:
Rnd 1: 4 sc in MR [4]
Rnd 2: (sc, inc) around [6]
Rnd 3: (2 sc, inc) around [8]
Rnd 4: (3 sc, inc) around [10]
Rnds 5–7: sc in each st around [10]
Rnd 8: (3 sc, dec) around [8]
Flatten ear; do not stuff. FO, leaving long tail.
Inner ear (optional cream accent): With cream, embroider or surface-slip-stitch a small oval on the lower inside of each ear before attachment.
Mane (Curled Strands)
With cream: Cut or crochet 18–22 strands.
For each strand:
Ch 22. Starting in 2nd ch from hook, work 2 sc in each ch across. FO.
(The 2-sc increases make the strand curl naturally.)
Make strands of slightly varied lengths (ch 18–26) for a thick, fluffy, realistic look.
Tail (Curled Strands)
With cream: Make 12–14 strands exactly as for mane but longer:
Ch 30, 2 sc in each ch across. FO.
Vary a few lengths (ch 26–34) for fullness.
Assembly
- Finish stuffing body and neck firmly through any remaining openings; close rear body gap with whip stitch if needed. Ensure horse stands flat on all four hooves.
- Pin head to open neck edge so the flat back of the head sits flush and the head is slightly oversized and tilted for a cute expression. Sew securely with the long neck tail using whip stitch or ladder stitch, adding extra stuffing at the joint before final stitches.
- Pin muzzle to the front lower half of the head (centered, covering Rnds 14–18 area). Sew all around with matching yarn. The nose area sits centered on the muzzle.
- Sew ears near the top of the head, slightly angled inward and forward, spaced about 6–8 sts apart.
- Attach mane: Using yarn needle, sew or knot one end of each curled strand firmly along the center line from between the ears, down the crest of the neck, to the base of the neck. Layer strands thickly for a full fluffy mane. Trim ends if desired after attachment.
- Attach tail: Sew or knot the ends of the curled tail strands in a tight cluster at the center of the rump. Layer for fullness.
- Embroider nostrils (two small vertical or V-shaped stitches) centered on the muzzle with black floss or yarn. Add a simple curved mouth stitch below.
- Weave in all remaining ends securely inside the body. Check that every piece is firmly attached (no choking hazards).
Finishing
Steam-block lightly if needed (do not crush curls). Pose legs straight for standing display. The flat-bottomed hooves and firm stuffing allow the horse to stand unaided. Optional: brush mane/tail gently with a soft toothbrush to enhance fluff.
Safety Note
This toy contains safety eyes and is not suitable for children under 3 years without supervision. Ensure all embroidered and sewn parts are double-secured.
Enjoy your realistic yet cuddly paint horse!
Disclaimer: This pattern was generated by AI and should be reviewed for accuracy before use. While we strive for quality, AI-generated content may contain errors. Please verify measurements, stitch counts, and instructions before beginning your project. Generated by purlJam.uk
Love this pattern?
Save this pattern to your free PurlJam libraryAccess your pattern anytime
Bookmark this page to access your pattern anytime