Type
Crochet
Difficulty
beginner
Category
amigurumi
AI Thinking Process
Planning
Verification
Pattern
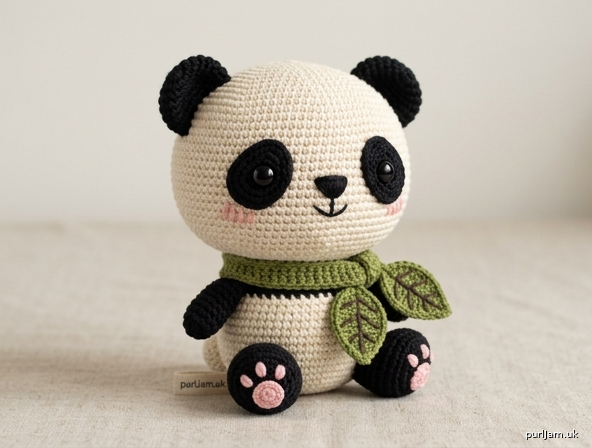
Pandiqo the Chibi Panda
Amigurumi Crochet Pattern
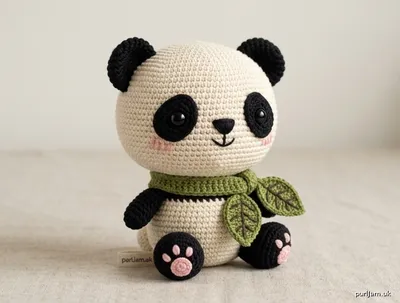
A squat, oversized-head panda with a tiny teardrop body, stubby black limbs, and a removable olive leaf scarf. Worked in continuous single-crochet spirals and sewn together. Named Pandiqo.
Skill level: Beginner
Finished size: About 6½–7 in (16.5–18 cm) tall, sitting, with worsted cotton and a 3.5 mm hook
Construction: Separate pieces in unjoined continuous spirals; stuffed and sewn. Scarf is removable.
Materials
Yarn — worsted weight (4), cotton
- Color A — cream / off-white (head, body, tail): 55 yd / 50 m (1.4 oz / 40 g)
- Color B — deep black (ears, eye patches, arms, legs, face embroidery): 40 yd / 37 m (1 oz / 28 g)
- Color C — olive green (scarf and leaf): 25 yd / 23 m (0.5 oz / 15 g)
- Color D — soft blush pink (cheeks, paw pads): 5 yd / 4.5 m (scrap)
- Color E — dark olive or forest green (leaf veins): 2 yd / 2 m (scrap)
Other
- Hook: US E-4 (3.5 mm), or size needed to work tightly
- 2 plastic safety eyes, 12 mm
- Polyester fiberfill
- Stitch marker
- Yarn needle
- Pins
- Scissors
- Optional: black embroidery floss for a finer nose and mouth
Safety note: Safety eyes are a choking hazard. Do not use them on toys for children under 3 years; embroider the eyes instead.
Gauge
5 sc and 5½ rnds = 1 in (2.5 cm) in continuous sc, unblocked, worked tightly so stuffing cannot show. Gauge is important for size and a firm fabric. If your stitches are loose, drop to US D-3 (3.25 mm).
Abbreviations (US)
| Term | Meaning |
|---|---|
| MR | magic ring |
| ch | chain |
| sc | single crochet |
| inc | increase — 2 sc in the same stitch |
| dec | invisible decrease — insert hook through front loops of next 2 sts, yo, pull through both, yo, pull through 2 |
| hdc | half double crochet |
| dc | double crochet |
| sl st | slip stitch |
| st(s) | stitch(es) |
| rnd(s) | round(s) |
| FO | fasten off |
| [ ] | stitch count at end of round |
Pattern Notes
- Work in continuous spirals. Do not join and do not turn unless a piece is written in rows (scarf only).
- Mark the first stitch of every round and move the marker up.
- Work tightly. Amigurumi fabric should be dense.
- Use the invisible decrease for a smooth surface.
- Stuff as instructed — it is hard to stuff later.
- Magic ring alternative: ch 2, work the Rnd 1 stitches into the 2nd ch from the hook, then pull the tail to close.
- Pin every piece before sewing. Use the yarn tail and a yarn needle; hide joins in matching color.
- Head, body, and tail are Color A. Ears, eye patches, arms, and legs are Color B.
Head (Color A — cream)
Worked from the top of the head down.
Rnd 1: 6 sc in MR [6]
Rnd 2: inc in each st [12] (6 increases → 6 + 6 = 12 ✓)
Rnd 3: (sc, inc) 6 times [18] (6 increases → 12 + 6 = 18 ✓)
Rnd 4: (2 sc, inc) 6 times [24] (6 increases → 18 + 6 = 24 ✓)
Rnd 5: (3 sc, inc) 6 times [30] (6 increases → 24 + 6 = 30 ✓)
Rnd 6: (4 sc, inc) 6 times [36] (6 increases → 30 + 6 = 36 ✓)
Rnd 7: (5 sc, inc) 6 times [42] (6 increases → 36 + 6 = 42 ✓)
Rnd 8: (6 sc, inc) 6 times [48] (6 increases → 42 + 6 = 48 ✓)
Rnds 9–16: sc in each st around [48] — 8 rounds
Rnd 17: (6 sc, dec) 6 times [42] (6 decreases → 48 − 6 = 42 ✓)
Rnd 18: (5 sc, dec) 6 times [36] (6 decreases → 42 − 6 = 36 ✓)
Rnd 19: (4 sc, dec) 6 times [30] (6 decreases → 36 − 6 = 30 ✓)
Rnd 20: (3 sc, dec) 6 times [24] (6 decreases → 30 − 6 = 24 ✓)
Pause here.
Sew the eye patches on now (see Eye Patches and Assembly). Insert the 12 mm safety eyes through the patches and the head, between Rnds 12 and 13, 8 sts apart (count stitches between the posts along Rnd 12). Lock the washers on the inside. Begin stuffing the head firmly and keep stuffing as you decrease.
Rnd 21: (2 sc, dec) 6 times [18] (6 decreases → 24 − 6 = 18 ✓)
Rnd 22: (sc, dec) 6 times [12] (6 decreases → 18 − 6 = 12 ✓)
Rnd 23: dec 6 times [6] (6 decreases → 12 − 6 = 6 ✓)
FO, leaving a 8 in (20 cm) tail. Thread the tail through the front loops of the remaining 6 sts, pull closed, and weave in. Head is a closed sphere.
Body (Color A — cream)
Small teardrop. Start at the wide bottom (sitting base) and taper to the neck.
Rnd 1: 6 sc in MR [6]
Rnd 2: inc in each st [12] (6 increases → 6 + 6 = 12 ✓)
Rnd 3: (sc, inc) 6 times [18] (6 increases → 12 + 6 = 18 ✓)
Rnd 4: (2 sc, inc) 6 times [24] (6 increases → 18 + 6 = 24 ✓)
Rnd 5: (3 sc, inc) 6 times [30] (6 increases → 24 + 6 = 30 ✓)
Rnd 6: (4 sc, inc) 6 times [36] (6 increases → 30 + 6 = 36 ✓)
Rnds 7–11: sc in each st around [36] — 5 rounds
Rnd 12: (4 sc, dec) 6 times [30] (6 decreases → 36 − 6 = 30 ✓)
Rnd 13: sc in each st around [30]
Rnd 14: (3 sc, dec) 6 times [24] (6 decreases → 30 − 6 = 24 ✓)
Rnd 15: sc in each st around [24]
Rnd 16: (2 sc, dec) 6 times [18] (6 decreases → 24 − 6 = 18 ✓)
Rnds 17–18: sc in each st around [18] — 2 rounds (neck)
Stuff firmly, with extra filling in the belly (Rnds 6–11) so the teardrop holds its shape. Do not close. FO, leaving a 12 in (30 cm) tail for sewing the open neck to the head.
Arms (Color B — black; make 2)
Short side-mounted tubes. Do not overstuff.
Rnd 1: 6 sc in MR [6]
Rnd 2: inc in each st [12] (6 increases → 6 + 6 = 12 ✓)
Rnds 3–9: sc in each st around [12] — 7 rounds
Stuff the hand end (Rnds 1–5) lightly; leave the top 2 rounds almost empty so the arm sews flat to the body. FO, leaving a 8 in (20 cm) tail. Leave the top open.
Legs (Color B — black; make 2)
Rounded sitting feet. The magic-ring end is the sole.
Rnd 1: 6 sc in MR [6]
Rnd 2: inc in each st [12] (6 increases → 6 + 6 = 12 ✓)
Rnd 3: (sc, inc) 6 times [18] (6 increases → 12 + 6 = 18 ✓)
Rnds 4–7: sc in each st around [18] — 4 rounds
Rnd 8: (sc, dec) 6 times [12] (6 decreases → 18 − 6 = 12 ✓)
Stuff firmly so the leg stays round. FO, leaving a 10 in (25 cm) tail. Leave the top open for sewing.
Paw pads (Color D — blush pink), embroidered on each sole before assembly:
On the magic-ring end of each leg, embroider a small oval about ½ in (1.25 cm) long in the center of the sole (satin stitch or tightly packed straight stitches). Above it, toward the front of the foot, add 3 tiny oval toe pads in a shallow curve. Weave in ends inside the leg.
Ears (Color B — black; make 2)
Rounded, unstuffed, flattened into a half-circle.
Rnd 1: 6 sc in MR [6]
Rnd 2: inc in each st [12] (6 increases → 6 + 6 = 12 ✓)
Rnd 3: (sc, inc) 6 times [18] (6 increases → 12 + 6 = 18 ✓)
Rnds 4–5: sc in each st around [18] — 2 rounds
Rnd 6: (sc, dec) 6 times [12] (6 decreases → 18 − 6 = 12 ✓)
Do not stuff. Flatten so Rnd 1 sits at the top curve. FO, leaving a 8 in (20 cm) tail. The open edge (Rnd 6) is the edge you sew to the head.
Eye Patches (Color B — black; make 2)
Flat teardrops. The double-crochet cluster is the wide lower end.
Rnd 1: 6 sc in MR [6]
Rnd 2: inc in each st [12] (6 increases → 6 + 6 = 12 ✓)
Rnd 3: sc in next 4 sts, hdc in next st, 2 dc in next st, 2 dc in next st, hdc in next st, sc in next 4 sts [14]
(stitches used: 4 + 1 + 1 + 1 + 1 + 4 = 12 ✓; stitches made: 4 + 1 + 2 + 2 + 1 + 4 = 14 ✓)
FO, leaving a 12 in (30 cm) tail for sewing. Do not stuff. Weave in the starting tail. The two 2-dc stitches sit together at the wide end; the opposite side is the narrower top.
Tail (Color A — cream)
Rnd 1: 6 sc in MR [6]
Rnd 2: (sc, inc) 3 times [9] (3 increases → 6 + 3 = 9 ✓)
Rnds 3–4: sc in each st around [9] — 2 rounds
Stuff lightly. FO, leaving a 6 in (15 cm) tail. Close the opening as you sew it to the body, or whipstitch the last round shut first.
Leaf Scarf (Color C — olive green)
Removable. Do not sew it to Pandiqo.
Scarf band (worked in rows)
Row 1: Ch 61. Sc in 2nd ch from hook and in each ch across [60]
Row 2: Ch 1, turn. Sc in each st across [60]
Row 3: Ch 1, turn. Sc in each st across [60]
FO and weave in the starting tail. Leave a 6 in (15 cm) tail at the finishing end if you prefer to sew the leaf with it; otherwise weave in and use the leaf’s own tail.
The strip is about 12 in (30 cm) long and ¾ in (2 cm) wide — long enough to wrap the 18-st neck and tie.
Leaf (Color C — olive green)
Work around both sides of a foundation chain.
Ch 10.
Starting in the 2nd ch from the hook:
sl st, sc, hdc, dc in next 3 ch, hdc, sc, 3 sc in the last ch (tip);
rotate and work along the opposite side of the chain:
sc, hdc, dc in next 3 ch, hdc, sc, sl st in the same ch as the first sl st.
Count: 8 sts down the first side + 3 sc at the tip + 8 sts up the second side = 19 sts around ✓.
Sl st to the first sl st to join. FO, leaving a 6 in (15 cm) tail. Flatten the leaf.
Veins (Color E — dark olive / forest green):
With a yarn needle, embroider a central vein from the base of the leaf to the tip (backstitch or a single long split stitch). Add 2 or 3 pairs of shorter diagonal veins branching off the center line, pointing toward the tip. Weave in ends on the back of the leaf.
Sew the base of the leaf (the sl-st end, not the 3-sc tip) to one short end of the scarf band so the scarf ends in the leaf.
Face Embroidery
Work on the stuffed, eyed head before sewing it to the body.
Nose (Color B): Using black yarn or floss, embroider a small inverted triangle on the cream fabric, centered between and just below the inner corners of the eye patches (about Rnds 14–15). Fill with satin stitch. Width about ¼ in (6 mm).
Mouth (Color B): From the bottom point of the nose, stitch a short vertical line down 1–2 rounds, then a shallow curved smile to each side (two small diagonal stitches, or one wide V). Keep it small — chibi faces read best with tiny mouths.
Blush (Color D): Below the outer lower edge of each eye patch, make 2 or 3 vertical satin stitches side by side (about ¼ in / 6 mm tall) on the cream head. Do not stitch into the black patch; the blush sits on the cream, just under the eye.
Assembly
Pin every piece. Check symmetry from the front before you sew. Use matching yarn tails and small whipstitches. Stuff any gaps as you close a seam.
1. Eye patches and eyes (if not already done)
Place patches on the head covering roughly Rnds 10–15, angled slightly downward: narrow end up and inward, wide (dc) end down and slightly out. Inner top corners about 4 sts apart; outer lower edges farther apart. Sew all around with black yarn. Push each 12 mm safety-eye post through the center of the wide lower half of the patch and through the head wall between Rnds 12 and 13, 8 sts apart. Fix the washers inside. Then embroider nose, mouth, and blush.
2. Ears
Flattened open edge against the head, spanning Rnds 4–9, on the top-left and top-right. They sit just outside the eye-patch line, about 10–12 sts apart at the crown, slightly tilted out. Sew all around the open edge.
3. Head to body
Center the body’s open 18-st neck on the underside of the head (the closed decrease, around Head Rnds 21–23). The face looks slightly down when the body sits. Whipstitch the neck to the head, adding a last pinch of stuffing before closing.
4. Arms
Sew the open ends to the sides of the body, spanning Body Rnds 14–17, just under the head, pointing slightly forward. The stuffed “hand” end hangs down. They should look short and stubby.
5. Legs
Sew the open ends to the lower front-sides of the body, spanning Body Rnds 4–8, angled forward and slightly out so Pandiqo sits. Soles (with pink paw pads) face down/forward. The legs add about ¾–1 in (2–2.5 cm) to sitting height.
6. Tail
Sew to the lower back of the body, around Body Rnds 5–7, centered.
7. Scarf
Wrap the olive band around the neck and tie it once at one side or in front. Let the leaf hang. Do not stitch the scarf to the panda — it is removable.
Finishing
- Weave in every remaining end inside the toy.
- Roll the head and body between your palms to round the stuffing.
- Tug ears and limbs into a matched pair.
- Check that safety-eye washers are tight and that no fiberfill shows through stitches. If you see gaps, add a few extra surface stitches in matching yarn.
Care: Surface-clean with a damp cloth. Do not machine wash if safety eyes are fitted. Reshape while damp and air dry.
Quick Reference — Piece Counts
| Piece | Color | Max sts | Rounds / rows | Qty |
|---|---|---|---|---|
| Head | A cream | 48 | 23 rnds | 1 |
| Body | A cream | 36 (neck 18) | 18 rnds | 1 |
| Arm | B black | 12 | 9 rnds | 2 |
| Leg | B black | 18 | 8 rnds | 2 |
| Ear | B black | 18 | 6 rnds | 2 |
| Eye patch | B black | 14 | 3 rnds | 2 |
| Tail | A cream | 9 | 4 rnds | 1 |
| Scarf band | C olive | 60 | 3 rows | 1 |
| Leaf | C olive | 19 around | 1 rnd | 1 |
Pandiqo sits about 6½–7 in (16.5–18 cm) tall: oversized round head, tiny teardrop body, short black arms, rounded black legs with pink soles, and an olive leaf scarf you can take on and off.
Disclaimer: This pattern was generated by AI and should be reviewed for accuracy before use. While we strive for quality, AI-generated content may contain errors. Please verify measurements, stitch counts, charts, and instructions before beginning your project. Generated by purlJam.uk
Love this pattern?
Save this pattern to your free PurlJam libraryAccess your pattern anytime
Bookmark this page to access your pattern anytime