Type
Crochet
Difficulty
intermediate
Category
amigurumi
AI Thinking Process
Planning
Verification
Pattern
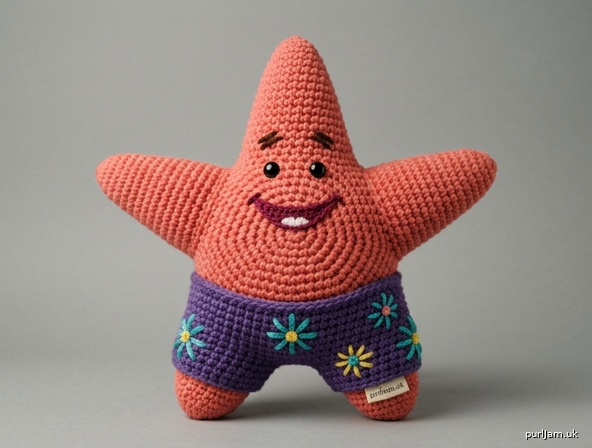
PATRICK THE STAR — Amigurumi Well-Description Pattern
(5-Pointed Star Character, Advanced Amigurumi)
Finished Size
Approximately 10 in (25 cm) tall (body base to top point) x 12 in (30 cm) wide (arm-tip to arm-tip)
Materials
- Bulky weight yarn (#5 Bulky):
- Coral/Salmon Pink (MC) – approx. 170 yds (155 m)
- Purple (CC1, for shorts) – approx. 55 yds (50 m)
- Turquoise/Teal (CC2, flower dots) – approx. 10 yds (9 m)
- Yellow (CC3, flower dots) – approx. 10 yds (9 m)
- Dark Brown or Black (for eyebrows) – small amount
- Maroon or Dark Pink (for mouth) – small amount
- Light Pink (optional, cheeks) – small amount
- Hook: US H-8 (5.0 mm) — sized down one full size from the bulky-label recommendation (typically I-9/5.5 mm) for a tight, stuffing-proof gauge
- 2 safety eyes, 6 mm (Patrick's eyes sit close together and are small)
- Fiberfill stuffing (polyester)
- Yarn needle, straight pins, stitch marker, scissors
Gauge
9 sts x 10 rows = 4 in (10 cm) in sc, worked in continuous spiral. Gauge is critical — a loose gauge will let stuffing show through.
Abbreviations (US terms)
- sc = single crochet
- inc = increase (2 sc in same st)
- dec = invisible decrease (insert hook in front loop only of next 2 sts, yo, pull through both loops, yo, pull through remaining 2 loops)
- st(s) = stitch(es) | rnd(s) = round(s) | sl st = slip stitch
- MC/CC = main color/contrast color
- ( ) x6 = repeat instructions in parentheses 6 times
- [ ] = stitch count at end of round
Construction note: All pieces are worked in continuous spiral rounds (do not join/turn) unless stated otherwise. Use a stitch marker to track the start of each round.
BODY (Torso) — worked in MC
Rnd 1: 6 sc in magic ring [6] Rnd 2: inc in each st around [12] (6 incs → 6+6=12 ✓) Rnd 3: (sc, inc) x6 [18] (12+6=18 ✓) Rnd 4: (2 sc, inc) x6 [24] (18+6=24 ✓) Rnd 5: (3 sc, inc) x6 [30] (24+6=30 ✓) Rnd 6: (4 sc, inc) x6 [36] (30+6=36 ✓) Rnd 7: (5 sc, inc) x6 [42] (36+6=42 ✓) Rnds 8–11: sc even around [42] (4 rounds — this is the widest "equator" of Patrick's torso)
Insert 6 mm safety eyes now, between rnds 8–9, spaced only 5–6 sts apart (Patrick's eyes are small and close-set), positioned in the upper-front third of the body. Set aside 2 sts of clearance above the eyes for the top point later.
Rnd 12: (5 sc, dec) x6 [36] (42−6=36 ✓) Rnd 13: (4 sc, dec) x6 [30] (36−6=30 ✓) Rnd 14: (3 sc, dec) x6 [24] (30−6=24 ✓) Stuff very firmly now, packing evenly into a smooth ball; continue stuffing as you close. Rnd 15: (2 sc, dec) x6 [18] (24−6=18 ✓) Rnd 16: (sc, dec) x6 [12] (18−6=12 ✓) Rnd 17: dec x6 [6] (12−6=6 ✓) Fasten off, leaving a 6 in tail. Weave through remaining 6 sts, pull tight to close.
LEG POINTS (make 2) — worked in MC
Rnd 1: 6 sc in magic ring [6] Rnd 2: inc around [12] (6+6=12 ✓) Rnd 3: (sc, inc) x6 [18] (12+6=18 ✓) Rnd 4: (2 sc, inc) x6 [24] (18+6=24 ✓) Rnds 5–14: sc even around [24] (10 rounds — main leg length) Fasten off leaving an 18 in tail. Do not close the base — this open 24-st edge attaches directly to the body. Stuff moderately-firmly, packing the base extra firmly for standing support.
ARM POINTS (make 2) — worked in MC
Rnd 1: 6 sc in magic ring [6] Rnd 2: inc around [12] (6+6=12 ✓) Rnd 3: (sc, inc) x6 [18] (12+6=18 ✓) Rnds 4–9: sc even around [18] (6 rounds) Fasten off leaving a 12 in tail. Leave the 18-st base open, stuff lightly (arms should be softer/floppier than legs).
TOP POINT (make 1) — worked in MC
Rnd 1: 6 sc in magic ring [6] Rnd 2: inc around [12] (6+6=12 ✓) Rnds 3–5: sc even around [12] (3 rounds) Fasten off leaving a 10 in tail. Leave the 12-st base open, stuff lightly.
SHORTS (Two-Tube Construction) — worked in CC1 (Purple)
Leg Tube (make 2): Ch 24, join with sl st to first ch to form a ring, being careful not to twist. Rnd 1: sc in each ch around [24] Rnds 2–3: sc even around [24] (2 rounds) Fasten off Tube 1 leaving a 6 in tail. Do not fasten off Tube 2 — continue directly into the Joining Round.
Joining Round (Rnd 4 overall): Sc in each of the 24 sts of Tube 2, then sc in each of the 24 sts of Tube 1 [48 sts total] — the two tubes are now joined into one continuous piece worked in the round (this forms the seat).
Rnds 5–6: sc even around [48] (2 rounds — hip/seat coverage) Rnd 7: (6 sc, dec) x6 [42] (48−6=42 ✓) Rnd 8: sc even around [42] Rnd 9: (5 sc, dec) x6 [36] (42−6=36 ✓) Rnd 10: sc even around [36] — waistband Fasten off leaving a 20 in tail for sewing.
Floral appliqués (CC2 & CC3): Embroider 4 small flowers scattered evenly over the shorts: for each flower, work 5 straight/lazy-daisy stitch "petals" radiating from a center point in CC2 or CC3, then a French knot center in the contrasting color. Alternate teal and yellow flowers for a classic Bikini-Bottom print.
FACE (embroidered directly onto body, above the eyes' midline gap and below the top point)
- Eyebrows: Using dark brown/black, backstitch or satin-stitch two short, angled lines above each eye, angled slightly inward toward each other for Patrick's classic quizzical expression.
- Mouth: Using maroon/dark pink, backstitch a wide, upward-curving open smile beneath the eyes (spanning roughly the width between the eyes plus 1–2 sts each side), then fill with satin stitch or chain stitch for a bold, solid look. Optionally add 2–3 small white satin-stitch triangles inside for teeth.
- Cheeks (optional): Two small light-pink satin-stitch circles below the outer edge of each eye.
Safety note: For children under 3, replace safety eyes with fully embroidered eyes (satin-stitch black ovals) to eliminate small-part risk.
ASSEMBLY
- With the body closed, eyes set, and face embroidered, position the top point directly above the eyes/eyebrows at the 12:00 position; pin, then whip stitch the open 12-st base flush to the body, matching stitches evenly around.
- Position the arm points at approximately the 10:00 and 2:00 positions (upper sides of the body), angled slightly upward and outward; whip stitch the open 18-st bases flush to the body.
- Position the leg points at approximately the 7:00 and 5:00 positions (lower sides of the body); splay them outward at roughly a 30–40° angle from vertical rather than straight down — this widened stance is essential for a stable standing/sitting pose and prevents Patrick from tipping over. Whip stitch the open 24-st bases flush to the body, reinforcing the top of the seam (where leg meets body weight-bearing edge) with a few extra passes of yarn.
- Slip the shorts up over both legs until the waistband sits snugly against the body just below the arms. Tack the waistband to the body with small stitches every 1–2 in around, and tack the inner crotch/seat seam securely to the body between the legs so the shorts cannot slide down.
- Weave in all remaining ends. Fluff and reshape stuffing through the fabric, gently steam-block if needed to help the points hold their shape.
Patrick is now ready to guard his rock — well described, sturdily assembled, and ready for Bikini Bottom!
Disclaimer: This pattern was generated by AI and should be reviewed for accuracy before use. While we strive for quality, AI-generated content may contain errors. Please verify measurements, stitch counts, and instructions before beginning your project. Generated by purlJam.uk
Love this pattern?
Save this pattern to your free PurlJam libraryAccess your pattern anytime
Bookmark this page to access your pattern anytime