Type
Crochet
Difficulty
beginner
Category
amigurumi
AI Thinking Process
Planning
Verification
Pattern
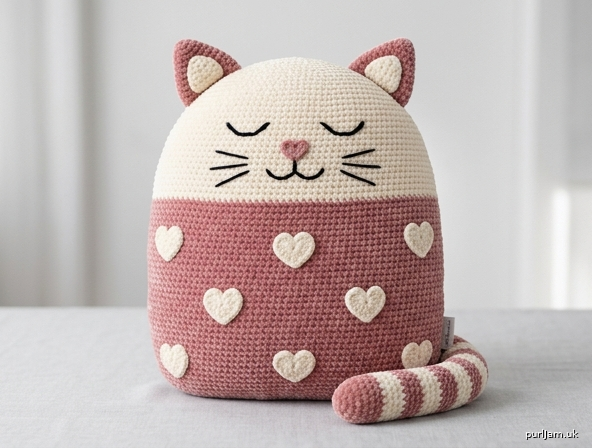
Plush Cat Floor Pillow
Beginner · Hand crochet · US terms · Velvet chenille amigurumi-pillow
A rounded, overstuffed sitting cat floor pillow: cream dome head, dusty-rose body, small pointed ears, curled candy-cane tail, and scattered cream heart appliqués. Front has an embroidered sleepy-cat face; back is plain. Worked with a hook and yarn only (not machine knit, not loom knit).
Finished size: About 17" tall × 14" wide × 4½" deep (43 × 35.5 × 11.5 cm), not including ears or tail. Ears add about 2½" (6.5 cm) above the crown. Tail about 11" (28 cm) before curling.
Materials & Tools
Yarn — velvet / chenille-style plush yarn, 100% polyester, worsted/aran weight (category 4). Choose a yarn with a dense, light-catching nap (a “velvet teddy” hand-feel).
| Color | Role | Amount |
|---|---|---|
| Color A — Cream / Ivory | Head (both panels), ear insets, heart appliqués, tail stripes | 450 yd / 410 m (about 12 oz / 340 g) |
| Color B — Dusty Rose / Blush Pink | Body (both panels), outer ears, most of gusset, most of tail, nose embroidery | 600 yd / 550 m (about 16 oz / 450 g) |
| Color C — Cream / Ivory | Tail contrast stripes | Use Color A (no extra skein) |
| Color D — Black | Eyes, smile, whiskers (embroidery) | 20 yd / 18 m worsted or embroidery wool |
Color C = Color A. One cream yarn does all cream work.
Hook: US I-9 / 5.5 mm (use 5.0 mm if stuffing peeks through; 6.0 mm only if the fabric is too stiff to squish). Tight, dense sc is required.
Notions:
- Polyester fiberfill, soft-fill (not firm toy fill) — 24–32 oz (680–900 g)
- Stitch markers (at least 4)
- Tapestry needle (blunt, large-eye) for seaming
- Embroidery / yarn needle for the face
- Pins or locking clips
- Scissors
- Optional: small pieces of cream felt to back the ear insets
Yarn amounts assume the stated gauge and a dense velvet sc fabric. Velvet does not frog cleanly — buy the full amount before you start.
Abbreviations (US)
| Abbr | Meaning |
|---|---|
| MR | magic ring (magic circle) |
| ch | chain |
| sc | single crochet |
| inc | increase — 2 sc in the same stitch |
| sc2tog | single crochet 2 stitches together (decrease) |
| sl st | slip stitch |
| st(s) | stitch(es) |
| rnd(s) | round(s) |
| RS | right side |
| WS | wrong side |
| FO | fasten off |
| yo | yarn over |
inc always means 2 sc in one stitch. sc2tog is the beginner decrease used throughout (insert hook in next st, yo, pull up a loop, insert hook in following st, yo, pull up a loop, yo, pull through all 3 loops).
Gauge
12 sc × 13 rows = 4" × 4" (10 × 10 cm) in single crochet, with 5.5 mm hook, measured on a blocked-or-patted velvet swatch.
- 3 sc = 1" (2.5 cm)
- 3.25 rows = 1" (2.5 cm)
Work a 5" swatch, measure the inner 4". If you have fewer than 12 sts in 4", go down a hook size (stuffing will show). If you have more than 13 sts in 4", go up a hook size. Velvet hides stitch definition — count with your fingertip in each V.
This gauge is intentionally tight for velvet so the pillow is stuffing-proof.
Pattern Notes
- US crochet only. sc = single crochet (UK dc). Do not substitute UK terms.
- Front and Back panels start with a magic ring, then are worked flat in turned rows so the cream-to-rose change is one clean, straight horizontal row. Ch 1 at the start of every row does not count as a stitch. Turn every row.
- Right side: the nap side you like best. Mark RS of each panel with a scrap of yarn after Row 6.
- Color change (panels): On the last sc of Row 22, work the final yo with Color B. That is the only body color change — no blending, no jagged steps, no stranded floats across the panel.
- Colorwork type: Horizontal block color change (and two-color gusset rounds). This is not stranded Fair Isle on the body. Hearts are not worked into the panel; they are sewn-on appliqués. Charts A–D record color placement and motifs.
- Velvet: Count every row. Do not frog more than once (the nap felts). Keep sc dense enough that you cannot see through the fabric.
- Seaming: Mattress stitch or whip stitch with matching yarn, catching the inner loops so the nap hides the seam.
- Stuffing: Soft and squishable, not rigid. The silhouette should stay pillow-like — no sharp edges.
Charts
This design uses block color-blocking, a two-color gusset, a striped tail, and a heart appliqué motif. It does not use stranded Fair Isle on the body (floats would fight the velvet nap and would violate the clean horizontal split). Read the charts as color/motif maps.
How to read: Row 1 of a chart is the bottom of that chart. RS rows are read right to left; WS rows left to right. For motifs worked in the round (tail, gusset), read every round right to left.
Color key
| Symbol | Color |
|---|---|
| □ | Color A / C — Cream / Ivory |
| ■ | Color B — Dusty Rose |
| ● | Color D — Black (embroidery only; Chart D face map) |
| ▲ | Color B nose (embroidery) |
CHART A: Panel Color-Block (Front & Back)
Schematic of the egg-shaped panel. Each cell is a stitch; row numbers match the written pattern. Width changes as the egg is shaped. Repeat the last symbol of a row to the stitch count in parentheses.
Row 55 (base):  ■■■■■■■■■■■■■■■■■■■■■■■■■■■■■■          (30)
Row 54:         ■■■■■■■■■■■■■■■■■■■■■■■■■■■■■■■■        (32)
Row 53:         ■■■■■■■■■■■■■■■■■■■■■■■■■■■■■■■■■■      (34)
Row 52:         ■■■■■■■■■■■■■■■■■■■■■■■■■■■■■■■■■■■■    (36)
Row 51:         ■■■■■■■■■■■■■■■■■■■■■■■■■■■■■■■■■■■■    (36)
Row 50:         ■■■■■■■■■■■■■■■■■■■■■■■■■■■■■■■■■■■■■■  (38)
Row 49:         ■■■■■■■■■■■■■■■■■■■■■■■■■■■■■■■■■■■■■■■■(40)
Rows 31–48:     ■■■■■■■■■■■■■■■■■■■■■■■■■■■■■■■■■■■■■■■■■■ (42)  ← widest body
Row 30:         ■■■■■■■■■■■■■■■■■■■■■■■■■■■■■■■■■■■■■■■■■■ (42)
Row 29:         ■■■■■■■■■■■■■■■■■■■■■■■■■■■■■■■■■■■■■■■■ (40)
Row 28:         ■■■■■■■■■■■■■■■■■■■■■■■■■■■■■■■■■■■■■■ (38)
Row 27:         ■■■■■■■■■■■■■■■■■■■■■■■■■■■■■■■■■■■■ (36)
Row 26:         ■■■■■■■■■■■■■■■■■■■■■■■■■■■■■■■■ (34)
Row 25:         ■■■■■■■■■■■■■■■■■■■■■■■■■■■■■■ (32)
Row 24:         ■■■■■■■■■■■■■■■■■■■■■■■■■■■■ (30)
Row 23:         ■■■■■■■■■■■■■■■■■■■■■■■■■■ (28)  ← COLOR CHANGE ROW (all Color B)
Rows 6–22:      □□□□□□□□□□□□□□□□□□□□□□□□□□ (26)  ← head, even
Row 5:          □□□□□□□□□□□□□□□□□□□□□□□□□□ (26)
Row 4:          □□□□□□□□□□□□□□□□□□□□□□□□ (24)
Row 3:          □□□□□□□□□□□□□□□□□□ (18)
Row 2:          □□□□□□□□□□□□ (12)
Row 1 (crown):  □□□□□□ (6)
Chart A repeat: there is no stitch repeat — each row is worked once across the stated count. Where it is used: Front Panel and Back Panel, every row. Color management: Cut Color A after Row 22 (leave a 6" tail to weave). Join Color B on the last yo of Row 22. No floats.
CHART B: Mini Heart Motif (9 sts × 9 rows) — appliqué shape map
Use this as the shape reference for the sewn heart, not as tapestry on the body. □ here = background (you do not crochet these). ■ = Color A cream heart.
9: □□□□□■□□□
8: □□□■□■□□□
7: □□■■■■■□□
6: □■■■■■■■□
5: □■■■■■■■□
4: □■■■■■■■□
3: □□■■■■■□□
2: □□□■■■□□□
1: □□□□■□□□□
Key: □ = skip / background (rose panel showing around the appliqué) · ■ = Color A cream heart Repeat: 1 heart = 9 sts × 9 rows at gauge ≈ 3" × 2¾" as a chart; the crocheted appliqué below finishes at 1¾–2" because it is worked as a small shaped motif, not as 9×9 tapestry. Where it is used: after both panels are crocheted; 13 hearts per rose body.
CHART C: Tail Stripe Sequence (12 sts × 36 rnds)
Worked in continuous rounds. Every stitch of a round is the same color (no mid-round change). Read each round right to left; 12 sts per round.
One 6-round repeat:
Rnd 6: □□□□□□□□□□□□   Color C (cream)
Rnd 5: □□□□□□□□□□□□   Color C (cream)
Rnd 4: ■■■■■■■■■■■■   Color B (rose)
Rnd 3: ■■■■■■■■■■■■   Color B
Rnd 2: ■■■■■■■■■■■■   Color B
Rnd 1: ■■■■■■■■■■■■   Color B
Key: ■ = Color B · □ = Color C (Color A) Repeat: Work the 6-round block 6 times = 36 rounds (6 × 6 = 36 ✓). Stitch count per repeat: 12 sts × 6 rnds = 72 sts per stripe block. Color management: Change color on the last yo of the last st of the previous round. Carry the unused color up the inside of the tube for 2–4 rounds, or cut and weave (velvet tails hide inside the stuffing). Do not strand across the 12-st round.
CHART D: Gusset Color Split & Face Map
Gusset (one round, 146 sts): two color changes per round, aligned to the panel neck markers.
Right neck marker → 50 cream sts (head arc) → left neck marker → 96 rose sts (body arc) → right neck marker
□□□□□ … □□□□□  (50 sts Color A)   ■■■■■ … ■■■■■  (96 sts Color B)
        50 + 96 = 146 ✓
Repeat this split for Gusset Rnds 1–15. Twist the two yarns at each marker (intarsia twist) so no hole forms. Unused yarn is carried up at the marker only (a 4½" vertical carry, not a float across the pillow).
Face map (Front Panel only), measurements from the cream head:
Crown (Row 1)
        ·   ·          ear points, ~2" apart at inner corners
          ●     ●      eye arcs, centers 2" apart, 3" down from crown
             ▲         nose, ½" below eye-line, on vertical center
            ● ●        smile + two small down-strokes
      / / /     \ \ \  3 whiskers each cheek
Color-change (Row 23) — keep all embroidery above this line
Front Panel (face side)
Make 1. Color A, then Color B. Work the magic ring, then turned rows. Ch 1, turn at the end of every row (ch-1 does not count as a st).
Crown & head — Color A (Cream)
Row 1: 6 sc in a magic ring. Do not join. Ch 1, turn. [6] Pull the ring closed so the 6 sts sit in a small rounded bump — this is the crown.
Row 2: Inc in each st across. Ch 1, turn. [12] (6 increases → 6 + 6 = 12 ✓)
Row 3: (Sc, inc) 6 times. Ch 1, turn. [18] (6 increases → 12 + 6 = 18 ✓)
Row 4: (2 sc, inc) 6 times. Ch 1, turn. [24] (6 increases → 18 + 6 = 24 ✓)
Row 5: (11 sc, inc) 2 times. Ch 1, turn. [26] (2 increases → 24 + 2 = 26 ✓) Head width is now 26 sts ÷ 3 sts per inch = 8.7" (target 8–9").
Rows 6–22 (17 rows): Sc in each st across. Ch 1, turn. [26] These even rows build the rounded head depth. After Row 22 the cream section is 22 rows ÷ 3.25 = 6.8" tall (40% of 17").
Mark the first and last stitch of Row 22 with locking markers — these are the neck/color-block points used later for the gusset.
Color change: On the last sc of Row 22, finish the last yo with Color B. Drop Color A; leave a 6" tail.
Body — Color B (Dusty Rose)
Row 23 (color-change row — all Color B): Inc, sc 24, inc. Ch 1, turn. [28] (26 + 2 = 28 ✓) This entire row is Color B. The cream/rose join is one straight horizontal line.
Row 24: Inc, sc 26, inc. Ch 1, turn. [30] (28 + 2 = 30 ✓)
Row 25: Inc, sc 28, inc. Ch 1, turn. [32] (30 + 2 = 32 ✓)
Row 26: Inc, sc 30, inc. Ch 1, turn. [34] (32 + 2 = 34 ✓)
Row 27: Inc, sc 32, inc. Ch 1, turn. [36] (34 + 2 = 36 ✓)
Row 28: Inc, sc 34, inc. Ch 1, turn. [38] (36 + 2 = 38 ✓)
Row 29: Inc, sc 36, inc. Ch 1, turn. [40] (38 + 2 = 40 ✓)
Row 30: Inc, sc 38, inc. Ch 1, turn. [42] (40 + 2 = 42 ✓) Belly width is now 42 sts ÷ 3 = 14" (target 13–15"). Rows 23–30 are 8 increase rows × 2 sts = 16 sts added; 26 + 16 = 42 ✓.
Rows 31–48 (18 rows): Sc in each st across. Ch 1, turn. [42] Even rows form the plump lower-body curve.
Row 49: Sc2tog, sc 38, sc2tog. Ch 1, turn. [40] (42 − 2 = 40 ✓)
Row 50: Sc2tog, sc 36, sc2tog. Ch 1, turn. [38] (40 − 2 = 38 ✓)
Row 51: Sc2tog, sc 34, sc2tog. Ch 1, turn. [36] (38 − 2 = 36 ✓)
Row 52: Sc in each st across. Ch 1, turn. [36]
Row 53: Sc2tog, sc 32, sc2tog. Ch 1, turn. [34] (36 − 2 = 34 ✓)
Row 54: Sc2tog, sc 30, sc2tog. Ch 1, turn. [32] (34 − 2 = 32 ✓)
Row 55: Sc2tog, sc 28, sc2tog. [30] (32 − 2 = 30 ✓) Do not ch 1. Fasten off Color B. Weave tails on the WS.
Body is Rows 23–55 = 33 rows ÷ 3.25 = 10.2" (60% of 17"). Full panel = 55 rows ÷ 3.25 = 16.9" plus the magic-ring crown ≈ 17". Base is 30 sts = 10" — a softly rounded sitting bottom, not a point.
Shaping note: Rows 1–5 fan into a semicircular crown. Rows 6–22 are straight-sided head. Rows 23–30 flare into the belly. Rows 49–55 round the base. No sharp corners; stuffing plus the gusset will plump every edge into a pillow curve.
Set Front Panel aside. Do not embroider the face until the panel is finished and you can measure from the crown.
Back Panel
Make 1. Work exactly as the Front Panel, Rows 1–55, same colors, same stitch counts in parentheses. No face embroidery, no hearts until the placement step.
Mark RS, and mark the first and last stitches of Row 22 (neck points) to match the Front.
The two panels must have the same row count and the same 26 / 42 / 30 stitch landmarks so they align when the gusset is joined.
Gusset / Side Panel (pillow depth)
The gusset is worked in joined rounds onto the Front Panel edge, 15 rounds deep, following Chart D so cream stays with the head and rose stays with the body.
Setup. With RS of Front Panel facing you, place (or confirm) markers in both neck points (the two ends of Row 22). You will pick up 146 sc around the silhouette:
| Edge | How to pick up | Count |
|---|---|---|
| Color A head, right side | 1 sc in each row-end of Rows 22–1 | 22 |
| Crown | 1 sc in each of the 6 sts of Row 1 | 6 |
| Color A head, left side | 1 sc in each row-end of Rows 1–22 | 22 |
| Color A subtotal | 50 | |
| Color B body, left side | 1 sc in each row-end of Rows 23–55 | 33 |
| Base | 1 sc in each of the 30 sts of Row 55 | 30 |
| Color B body, right side | 1 sc in each row-end of Rows 55–23 | 33 |
| Color B subtotal | 96 | |
| Total | 146 (50 + 96 = 146 ✓) |
If a corner looks tight, add 1 extra sc in that corner and skip 1 st on a long straight edge so you keep 146. Count twice before Round 2.
Rnd 1: Join Color A with sl st at the right neck marker. Ch 1. Sc in the same st and in each st of the 50-st cream head arc to the left neck marker. Drop A, yarn over Color B and sc in each st of the 96-st rose body arc back to the right neck marker. Sl st to first sc to join. [146] Twist A and B at each marker (Chart D).
Rnds 2–15 (14 rounds): Ch 1, sc in each st around, changing from A to B at the same two markers every round (50 cream, 96 rose). Sl st to join. [146] Do not increase or decrease. The gusset is a straight 4½" wall.
15 rounds ÷ 3.25 = 4.6" depth (target 4–5").
Fasten off both colors, leaving a long Color B tail (~40") for seaming the back later.
Beginner tip: If carrying two yarns for 15 rounds feels fiddly, work Rnds 1–15 as a flat strip instead: ch 15, sc in 2nd ch from hook and across [14], then work 50 rows Color A and 96 rows Color B [146 rows]. Sew the 14-st edges of the strip to Front, matching cream to cream and rose to rose. 14 sts ÷ 3 = 4.7" — same depth.
Ears (make 2, identical)
Each ear is a rose triangle with a smaller cream inner triangle sewn on, then a sc border.
Outer ear — Color B (make 2)
Worked flat. Ch 1, turn every row; ch-1 does not count as a st.
Row 1: Ch 2, 2 sc in 2nd ch from hook. Ch 1, turn. [2]
Row 2: Inc, sc 1. Ch 1, turn. [3] (2 + 1 = 3 ✓)
Row 3: Inc, sc 1, inc. Ch 1, turn. [5] (3 + 2 = 5 ✓)
Row 4: Sc in each st. Ch 1, turn. [5]
Row 5: Inc, sc 3, inc. Ch 1, turn. [7] (5 + 2 = 7 ✓)
Rows 6–8 (3 rows): Sc in each st. Ch 1, turn. [7] Fasten off after Row 8, leaving a 12" tail.
Ear is 8 rows ÷ 3.25 = 2.5" tall and 7 sts ÷ 3 = 2.3" wide at the base.
Inner ear — Color A (make 2)
Row 1: Ch 2, 2 sc in 2nd ch from hook. Ch 1, turn. [2]
Row 2: Inc, inc. Ch 1, turn. [4] (2 + 2 = 4 ✓)
Row 3: Sc in each st. Ch 1, turn. [4]
Row 4: Inc, sc 2, inc. Ch 1, turn. [6] (4 + 2 = 6 ✓)
Row 5: Sc in each st. [6] Fasten off, leaving a 10" tail.
Ear assembly
- Pin the cream inner triangle onto the RS of the rose outer ear, centered, with the points of both triangles aimed the same way and a rose border showing all around the cream.
- With Color A, whip stitch the inner ear in place (tiny stitches through the back loops so they vanish in the nap). Optional: glue or stitch a matching cream felt triangle to the back of the inset for extra dimension.
- Edging (Color B): Join Color B at the left base corner. Sc evenly around the three sides of the rose ear, working through both layers where the inset sits: 1 sc in each row-end, 3 sc in the top point, 1 sc in each st of the base. Sl st to the first sc. [about 24 sc] Fasten off.
Make the second ear identical. Set aside.
Tail (make 1)
Worked in a continuous spiral (no joining). Place a marker in the first st of every round and move it up. Stuff lightly as you go, never packing the first 2" near the open end (that end is sewn to the pillow). Follow Chart C.
With Color B:
Rnd 1: 6 sc in MR. [6]
Rnd 2: (Sc, inc) 3 times. [9] (3 increases → 6 + 3 = 9 ✓)
Rnd 3: (2 sc, inc) 3 times. [12] (3 increases → 9 + 3 = 12 ✓) Tail diameter is 12 sts ÷ 3 ÷ 3.14 ≈ 1.3".
Rnds 4–7: Sc in each st around. [12] Color B (these complete stripe block 1 with Rnds 1–3). Rnds 1–7 are the first rose block (Rnd 1–3 shaping + Rnds 4–7 even = 7 rose rounds at the base; then the 6-round Chart C repeat begins cleanly).
Begin Chart C 6-round repeat, still [12] every round:
Rnds 8–9: Color C (cream), sc around. [12]
Rnds 10–13: Color B, sc around. [12]
Rnds 14–15: Color C, sc around. [12]
Rnds 16–19: Color B, sc around. [12]
Rnds 20–21: Color C, sc around. [12]
Rnds 22–25: Color B, sc around. [12]
Rnds 26–27: Color C, sc around. [12]
Rnds 28–31: Color B, sc around. [12]
Rnds 32–33: Color C, sc around. [12]
Rnds 34–36: Color B, sc around. [12] (3 rounds of rose at the tip instead of 4, so the tail ends rose and the total is 36 rounds.)
36 rounds ÷ 3.25 = 11.1" (target 10–12").
Close the tip: (Sc2tog) 6 times. [6] (12 − 6 = 6 ✓) Fasten off, leaving a 6" tail. Thread through the 6 sts, pull closed, weave in. The other end (Rnd 1) stays open.
Bend the stuffed tube into a gentle C-curve with your hands (velvet holds a curve once stuffed). Do not overstuff or it will stand out stiffly.
Mini Heart Appliqué (make 26)
13 for the Front, 13 for the Back. Each heart is a separate crocheted piece, later hand-sewn onto the rose body. Do not work hearts into the panel stitches.
With Color A, 5.5 mm hook:
Rnd 1 (heart shape): Make a magic ring. Work all of the following into the ring: Ch 2, 3 dc, 2 hdc, 2 sc, ch 1, 1 dc (this dc is the bottom point), ch 1, 2 sc, 2 hdc, 3 dc, ch 2, sl st into the ring. Pull the ring tight so the two lobes sit side by side and a cleft forms at the top. [14 sts + 2 ch-2 sps + 2 ch-1 sps]
Rnd 2 (edging, for a crisp outline): Ch 1. Sc in the first ch-2 sp, sc in next 3 dc, sc in next 2 hdc, sc in next 2 sc, sc in next ch-1, 3 sc in the point dc, sc in next ch-1, sc in next 2 sc, sc in next 2 hdc, sc in next 3 dc, sc in the last ch-2 sp, sl st to the first sc. [21 sc] (14 sc on the sides + 2 in the ch-2 spaces + 1 extra pair at the point: 14 + 2 + 3 at point − 1 already counted = 21 ✓)
Fasten off, leaving an 14" tail for sewing.
Finished heart: about 1¾–2" (4.5–5 cm) wide. If a heart is larger than 2¼", go to 5.0 mm for the remaining hearts so they match.
Optional 3D puff: Before sewing, put a pinch of fiberfill behind the heart and stitch the edging down over it so the heart sits slightly raised.
Face Embroidery Guide (Front Panel only)
Embroider after the Front Panel is crocheted and before or after stuffing — before stuffing is easier. All face work sits on the cream head, above Row 23. Use Color D (black) unless noted. Do not crochet the features in; use surface embroidery only.
Mark the vertical center of the head with a pin (halfway across the 26-st rows = between sts 13 and 14).
1. Eyes — two closed, curved “happy” arcs
- Color D, backstitch or chain stitch.
- Each arc is 1¼" (3 cm) wide, a smooth upward curve (like a lazy U flipped into a smile-on-its-side, or a shallow ∩).
- Place the inner end of each arc 1" (2.5 cm) left and right of center, so the eye centers are 2" (5 cm) apart.
- Place the arcs 3" (7.5 cm) down from the crown (Row 1). That sits them in the middle of the cream head.
- Keep both arcs the same length and the same height. They should read as a sleepy, content cat — no pupils, no open ovals.
2. Nose — small heart or rounded triangle
- Color B (dusty rose), satin stitch.
- ½" (1.3 cm) wide × ⅜" (1 cm) tall.
- Center it on the vertical midline, ½" (1.3 cm) below the eye line (about 3½" / 9 cm down from the crown).
- Fill solidly so it is a little padded oval/heart, not an outline.
3. Mouth — simple curved smile with two cat strokes
- Color D, backstitch.
- A shallow upward curve ¾" (2 cm) wide, centered, ¼" (6 mm) below the nose.
- From each end of the smile, add a short downward stroke about ⅜" (1 cm) long, angled slightly out — a small cat “w”.
4. Whiskers — 3 per cheek
- Color D, straight stitch.
- From a point on each cheek just beside the nose/mouth (about 1¼" / 3 cm left and right of center), stitch 3 straight lines fanning out:
- Upper whisker: slightly up, 2¼" (5.5 cm) long
- Middle whisker: horizontal, 2½" (6.5 cm) long
- Lower whisker: slightly down, 2¼" (5.5 cm) long
- Let the outer tips extend a little past the head width for a playful look. Do not pull tight or the velvet will pucker.
Check symmetry from arm’s length before you knot the ends. Weave all embroidery tails into the WS of the cream fabric.
Heart Appliqué Placement & Sewing
Hearts go only on the rose body (Rows 23–55), Front and Back. None on the cream head.
Count: 13 hearts on the Front body, 13 on the Back body (26 total).
Layout (scattered polka-dot, not a grid):
- Pin all 13 on the Front first, then stand back.
- Keep at least ¾" (2 cm) between heart edges, and at least ½" (1.3 cm) in from the panel edge (the gusset seam will eat a little).
- Stagger them: not in straight rows. A workable Front map, measured from the color-change line down and from the left edge of the rose section:
- Row-band just below the neck: 3 hearts, irregularly spaced
- Mid-belly: 5 hearts, staggered
- Lower belly / above the base curve: 5 hearts, staggered
- Mirror the density on the Back, but do not copy the exact positions — organic scatter should look a little different on each side.
Sew:
- Thread the long Color A tail onto a tapestry needle.
- Whip stitch or mattress stitch through the edging round only, matching cream to cream, so the stitching disappears.
- Sit each heart flush but slightly raised. For the puffy look, add a pinch of fiberfill under the heart after half the edge is sewn, then close.
- The hearts must read as a separate layer — a raised cream patch on the rose velvet, not as stitches worked into the body.
Remove pins as you sew. Weave tails into the WS.
Final Assembly & Stuffing
1. Ears. Pin the two ears to the top of the Front Panel crown, points angled slightly outward (about 10–15° from vertical). Inner corners about 2" (5 cm) apart, outer edges following the head curve. The cream insets face forward. Try the Back Panel against the Front so the ears will sit on the seam line at the top of the gusset — they should be sewn through the Front crown and catch the gusset later if you want them extra secure. With Color B, whip stitch the ear bases firmly to the head. They should stand, not flop.
2. Join Back to gusset. Place Back Panel RS out, matching neck markers to the gusset color changes (cream to cream, rose to rose, 146 to 146). Using matching yarn and mattress stitch or whip stitch, sew the Back to the free edge of the gusset. Leave a 6" (15 cm) opening along the bottom edge for stuffing.
3. Stuff. Use soft polyester fiberfill. Fill the head first (so it is a plump dome, not a pancake), then the belly, then the corners. Pack enough that the egg silhouette is smooth and huggable, with no dents, but press the pillow with your palm — it must squish and rebound. This is a floor pillow, not a rigid toy. Target: overstuffed look, velvety give.
4. Close. Mattress-stitch the 6" gap closed invisibly. Pull the nap over the seam with your thumbnail.
5. Tail. Pin the open end of the tail to the lower back / right side of the rose body, at the gusset, so the C-curve rests naturally against the pillow base (like a cat wrapping its tail around its hip). The first rose stripe sits against the body. With Color B, sew the open round (the original 6 / 12 sts) firmly to the gusset-and-back, then tack the inner side of the C in one or two hidden stitches so the curl stays.
6. Weave in every remaining end inside the stuffed pillow. Tug the velvet nap so no tails peek.
7. Softness check. Squeeze the head, the belly, and the gusset walls. If any area feels board-hard, massage the stuffing to loosen it. If any area dimples, add a handful through a tiny opened seam and reclose.
8. Optional: Steam is not recommended on polyester velvet (it can crush the nap). Pat into shape with your hands and let it sit overnight.
Approximate Finished Dimensions
| Part | Size |
|---|---|
| Pillow body (H × W × D) | 17" × 14" × 4½" (43 × 35.5 × 11.5 cm) |
| Head (cream block) | 8.7" wide × 6.8" tall (22 × 17 cm) |
| Body (rose block) | 14" wide × 10.2" tall (35.5 × 26 cm) |
| Ears (each) | 2.5" tall × 2.3" wide (6.5 × 6 cm) |
| Tail | 11" long × 1.3" diameter (28 × 3.3 cm), then curled |
| Heart appliqués | 1¾–2" wide (4.5–5 cm); 13 per side |
| Overall height with ears | about 19" (48 cm) |
Stitch-Count Recap (for checking as you go)
| Piece | Landmark | Count |
|---|---|---|
| Front / Back Row 1 | crown | 6 |
| Front / Back Row 5–22 | head width | 26 |
| Front / Back Row 23 | color change | 28 |
| Front / Back Rows 30–48 | belly width | 42 |
| Front / Back Row 55 | base | 30 |
| Gusset every rnd | around | 146 (50 A + 96 B) |
| Outer ear Row 8 | base | 7 |
| Inner ear Row 5 | 6 | |
| Tail Rnds 3–36 | 12 | |
| Heart Rnd 2 | edging | 21 |
| Hearts to make | 26 |
All landmark math: 6 + 6 = 12, 12 + 6 = 18, 18 + 6 = 24, 24 + 2 = 26, 26 + 16 = 42, 42 − 12 = 30 (six decrease rows of −2 and one even row), 50 + 96 = 146.
Pattern is for traditional hand crochet with hook and yarn. No machine-knitting, loom-knitting, or crochet-machine instructions are used.
Disclaimer: This pattern was generated by AI and should be reviewed for accuracy before use. While we strive for quality, AI-generated content may contain errors. Please verify measurements, stitch counts, charts, and instructions before beginning your project. Generated by purlJam.uk
Love this pattern?
Save this pattern to your free PurlJam libraryAccess your pattern anytime
Bookmark this page to access your pattern anytime