Type
Crochet
Difficulty
beginner
Category
amigurumi
AI Thinking Process
Planning
Verification
Pattern
PUMPKIN WITCH GNOME
Beginner-Friendly Halloween Amigurumi Crochet Pattern
Digital PDF Crochet Pattern — Not a Finished Physical Item
PAGE 1 — COVER
============================================================
                 PDF CROCHET PATTERN
============================================================

              PUMPKIN WITCH GNOME
     Beginner-Friendly Halloween Crochet Pattern

                         *
                        / \
                       /   \
                      /  ◆  \
                     /       \
                    /_________\
                    \  band  /
                     |  •••  |
                     |  (o)  |
                    /| ~~~   |\
                  (  |  🎃   |  )
                     | orange |
                     | pumpkin|
                    / \     / \
                   [blk]   [blk]

           • small pumpkins  • bats  • moonlight •

         Cute Halloween décor  •  About 6 in tall
              Beginner to Easy-Intermediate
                    US Crochet Terms

============================================================
     This listing is a DIGITAL PDF PATTERN only.
     No physical gnome is included.
============================================================
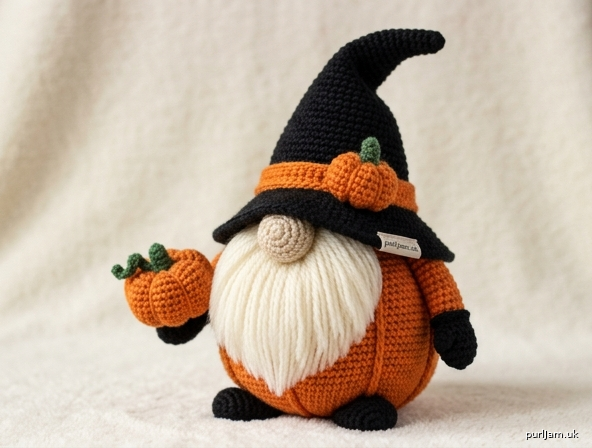
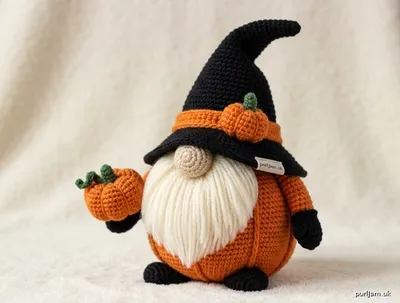
Cover art notes (for your A4 PDF): Full-page cream background. Large gnome centered. Tall black hat with a gentle lean, orange band, tiny pumpkin on the band. Round orange pumpkin body with six soft ridges. Beige nose. Fluffy ivory beard. Small black feet. Mini pumpkin in one hand. Scatter three small pumpkins and two simple bats in the corners. Title in bold black. Subtitle in deep green. “PDF CROCHET PATTERN” in a black bar at the top.
PAGE 2 — MATERIALS & INFORMATION
Yarn (worsted weight / category 4, acrylic or cotton)
- Pumpkin Orange — 40 yd / 37 m (about 20 g)
- Witch Black — 45 yd / 41 m (about 22 g)
- Warm Ivory — 30 yd / 27 m (about 15 g)
- Soft Beige — 5 yd / 4.5 m (about 3 g)
- Deep Green — 8 yd / 7 m (about 4 g)
- Muted Purple — 5 yd / 4.5 m (about 3 g), optional hat-band accent
Any standard worsted yarn works. Acrylic is easy to wash. Cotton gives sharper stitches.
Hook
- US E-4 / 3.5 mm (recommended)
- US G-6 / 4.0 mm for a slightly larger gnome
Use a hook 1–2 sizes smaller than the yarn label so the fabric is tight and stuffing does not show.
Other tools
- Polyester fiberfill stuffing
- Yarn needle (tapestry needle)
- Scissors
- Stitch marker
- Optional: 6 mm safety eyes (2)
- Optional: black embroidery floss
- Optional: pet slicker brush (for fluffing the beard)
- Straight pins (for assembly)
Finished size About 6–6½ in (15–16.5 cm) tall including the hat, with worsted yarn and a 3.5 mm hook. Size will change with yarn, hook, and stuffing.
Difficulty Beginner to easy-intermediate. You need magic ring, single crochet, increase, decrease, and simple sewing.
Gauge 5 sc and 6 rounds = 1 in (2.5 cm), worked tightly in continuous rounds. Gauge is not critical. A looser gauge makes a larger gnome. A tighter gauge makes a smaller gnome. Aim for a firm fabric with no visible gaps.
Terminology US crochet terminology throughout.
Work notes
- Work in a continuous spiral unless told otherwise. Do not join rounds with a slip stitch.
- Place a stitch marker in the first stitch of every round. Move it up as you go.
- Stuff as instructed. Firm stuffing gives a premium shape.
- This pattern has not been physically test-crocheted as a published sample. Crochet a full prototype before selling the PDF. See the Pattern Testing Checklist at the end.
Safety This is a decorative item. If you add safety eyes or other small parts, it is not suitable for children under 3 years.
PAGE 3 — COLOR PALETTE
Cut a 1 in (2.5 cm) yarn wrap for each color and glue it in the box on your PDF.
1. PUMPKIN ORANGE — body, mini pumpkin, hat band, hat pumpkin
Warm roasted-pumpkin orange. Not neon. Not rust-brown.
Swatch box: [ ORANGE ]
2. WITCH BLACK — hat, feet, hands, face stitches
True black. Crisp against the orange.
Swatch box: [ BLACK ]
3. WARM IVORY — beard
Cream / off-white. Softer than stark white.
Swatch box: [ IVORY ]
4. SOFT BEIGE — nose
Light tan, like raw sugar or unbleached almond.
Swatch box: [ BEIGE ]
5. DEEP GREEN — stems, leaf, tendril
Forest / pine green.
Swatch box: [ GREEN ]
6. MUTED PURPLE (optional) — hat band instead of orange, tiny star
Dusty plum. Not bright violet.
Swatch box: [ PURPLE ]
Suggested pairing Orange body + black hat + ivory beard + beige nose + green stems. Use purple only on the hat band or as a tiny embroidered star.
PAGE 4 — ABBREVIATIONS & TECHNIQUES
Abbreviations (US)
- MR — magic ring
- ch — chain
- sc — single crochet
- inc — increase (2 sc in the same stitch)
- dec — decrease (sc 2 stitches together)
- sl st — slip stitch
- hdc — half double crochet
- dc — double crochet
- st / sts — stitch / stitches
- FLO — front loop only
- BLO — back loop only
- FO — fasten off
- R — round
- ( ) × n — repeat the stitches in parentheses n times
How to read a round
R3: (1 sc, inc) × 6 (18)
Means: work 1 sc, then 1 increase. Do that pair 6 times. You will have 18 stitches at the end of the round.
Special techniques (read before you start)
Magic ring (MR) Loop yarn around two fingers. Insert hook, yarn over, pull up a loop, ch 1. Work the required sc into the ring. Pull the tail to close. If you prefer, ch 2 and work the sc into the first chain.
Continuous rounds Do not join. The first stitch of the next round goes into the first stitch of the last round. The marker shows the start.
Increase (inc) Work 2 sc into the same stitch. This adds 1 stitch.
Decrease (dec) Insert hook in the next st, yarn over, pull up a loop (2 loops on hook). Insert hook in the following st, yarn over, pull up a loop (3 loops on hook). Yarn over, pull through all 3 loops. Optional nicer look: invisible decrease — insert hook through the front loop of the next st, then through the front loop of the following st, yarn over, pull through both front loops, yarn over, pull through 2 loops.
FLO brim Work the whole round in the front loop only. The unused back loops make a neat ridge where the brim folds out.
Color change Finish the last stitch of the old color until 2 loops remain on the hook. Yarn over with the new color and pull through both loops. Work the next round in the new color. Leave a 6 in (15 cm) tail to weave in.
Lark’s head knot (beard) Fold one yarn strand in half. Insert hook under a stitch from bottom to top. Catch the fold and pull it through as a loop. Pull the two cut ends through that loop. Tug snug. This is the same knot used for fringe.
Pumpkin ridge wrap Thread a long matching yarn tail. Come up at the top center, go down at the bottom center, wrap around the outside, and pull until a soft groove forms. Repeat around the pumpkin. Do not pull so hard that the shape collapses.
Lean marker (hat) Place a second marker on one side of the hat. On named curve rounds, work hdc (instead of sc) in the 2 stitches at that marker. Same stitch count. Taller stitches make the hat lean that way.
PAGE 5 — BODY
Color: Pumpkin Orange Make: 1 Work: Continuous spiral, tight sc
The body is a squat pumpkin sphere. The magic ring is the bottom. The last round is the top, where the hat will sit.
R1: 6 sc in MR (6)
R2: inc in each st around (12)
(6 increases → 6 + 6 = 12 ✓)
R3: (1 sc, inc) × 6 (18)
(6 repeats, each uses 2 sts and makes 3 sts → 12 used, 18 made ✓)
R4: (2 sc, inc) × 6 (24)
(6 repeats, each uses 3 sts and makes 4 sts → 18 used, 24 made ✓)
R5: (3 sc, inc) × 6 (30)
(6 repeats, each uses 4 sts and makes 5 sts → 24 used, 30 made ✓)
R6: (4 sc, inc) × 6 (36)
(6 repeats, each uses 5 sts and makes 6 sts → 30 used, 36 made ✓)
R7: (5 sc, inc) × 6 (42)
(6 repeats, each uses 6 sts and makes 7 sts → 36 used, 42 made ✓)
R8–R14: sc in each st around (42)
(7 even rounds at 42 sts ✓)
Mark R8 with a scrap of contrasting yarn on the outside. You will use this later for hat and nose placement.
R15: (5 sc, dec) × 6 (36)
(6 repeats, each uses 7 sts and makes 6 sts → 42 used, 36 made ✓)
R16: (4 sc, dec) × 6 (30)
(6 repeats, each uses 6 sts and makes 5 sts → 36 used, 30 made ✓)
R17: (3 sc, dec) × 6 (24)
(6 repeats, each uses 5 sts and makes 4 sts → 30 used, 24 made ✓)
Stuff firmly now. Push stuffing into a squat pumpkin, slightly wider than tall. Add extra stuffing at the bottom so the gnome sits well.
R18: (2 sc, dec) × 6 (18)
(6 repeats, each uses 4 sts and makes 3 sts → 24 used, 18 made ✓)
R19: (1 sc, dec) × 6 (12)
(6 repeats, each uses 3 sts and makes 2 sts → 18 used, 12 made ✓)
Add a last pinch of stuffing.
R20: dec × 6 (6)
(6 decreases → 12 − 6 = 6 ✓)
FO, leaving a 12 in (30 cm) tail. Thread the tail through the remaining 6 front loops. Pull closed. Weave in the end, hiding it inside.
Pumpkin ridges (do this before assembly) Cut a 40 in (100 cm) length of Pumpkin Orange. Anchor at the closed top. Wrap from top center to bottom center 6 times, spacing the wraps like pumpkin segments (about every 7 stitches at the equator). Pull each wrap snug enough to make a shallow groove, not a dented ball. Tie off at the bottom and hide the knot. The body should now look like a small pumpkin, about 3¼ in (8.5 cm) tall and about 3½ in (9 cm) wide.
PAGE 6 — WITCH HAT
Color: Witch Black, plus Pumpkin Orange or Muted Purple for the band Make: 1 tall hat + 1 tiny hat pumpkin + 1 tiny stem
This hat is a long, slow cone. It is not a wide triangle. A marked “lean side” and three hdc rounds give a slight curve. The brim is worked FLO so it folds out on a ridge.
Hat cone and brim
Leave a 6 in (15 cm) starting tail. Stuff the point as you go.
R1: 4 sc in MR (4)
R2: (1 sc, inc) × 2 (6)
(2 repeats, each uses 2 sts and makes 3 sts → 4 used, 6 made ✓)
R3: (2 sc, inc) × 2 (8)
(2 repeats, each uses 3 sts and makes 4 sts → 6 used, 8 made ✓)
R4: sc in each st around (8)
R5: (3 sc, inc) × 2 (10)
(2 repeats, each uses 4 sts and makes 5 sts → 8 used, 10 made ✓)
R6: sc in each st around (10)
R7: (4 sc, inc) × 2 (12)
(2 repeats, each uses 5 sts and makes 6 sts → 10 used, 12 made ✓)
Place the lean marker in one side stitch. Keep this marker on the same side of the hat for every curve round.
R8 (curve): sc around, but work hdc in the 2 sts at the lean marker (12)
R9: (5 sc, inc) × 2 (14)
(2 repeats, each uses 6 sts and makes 7 sts → 12 used, 14 made ✓)
R10: sc in each st around (14)
R11: (6 sc, inc) × 2 (16)
(2 repeats, each uses 7 sts and makes 8 sts → 14 used, 16 made ✓)
R12: sc in each st around (16)
R13: (7 sc, inc) × 2 (18)
(2 repeats, each uses 8 sts and makes 9 sts → 16 used, 18 made ✓)
R14 (curve): sc around, but work hdc in the 2 sts at the lean marker (18)
R15: (8 sc, inc) × 2 (20)
(2 repeats, each uses 9 sts and makes 10 sts → 18 used, 20 made ✓)
R16: sc in each st around (20)
R17: (9 sc, inc) × 2 (22)
(2 repeats, each uses 10 sts and makes 11 sts → 20 used, 22 made ✓)
R18: sc in each st around (22)
R19: (10 sc, inc) × 2 (24)
(2 repeats, each uses 11 sts and makes 12 sts → 22 used, 24 made ✓)
R20 (curve): sc around, but work hdc in the 2 sts at the lean marker (24)
R21: sc in each st around (24)
Stuff the top third of the hat firmly so the point holds. Leave the bottom two-thirds only lightly stuffed so you can bend the lean.
R22 (band): Change to Pumpkin Orange (or Muted Purple). sc in each st around (24) R23: Change back to Witch Black. sc in each st around (24)
Brim (FLO)
R24: FLO (1 sc, inc) × 12 (36)
(12 repeats, each uses 2 sts and makes 3 sts → 24 used, 36 made ✓)
R25: (2 sc, inc) × 12 (48)
(12 repeats, each uses 3 sts and makes 4 sts → 36 used, 48 made ✓)
R26: sc in each st around (48)
R27: sl st in each st around (48)
FO. Weave in the end along the brim edge. Do not close the hat. The 24-st opening sits on the pumpkin body.
Gently bend the hat toward the lean marker. The hdc rounds hold a soft curve. If the brim curls, steam-block it flat from the wrong side. Do not crush the cone.
Tiny pumpkin for the hat band
Color: Pumpkin Orange
R1: 5 sc in MR (5)
R2: inc in each st around (10)
(5 increases → 5 + 5 = 10 ✓)
R3: sc in each st around (10)
R4: dec × 5 (5)
(5 decreases → 10 − 5 = 5 ✓)
Stuff with a tiny pinch. FO, leaving a 8 in (20 cm) tail. Thread through the 5 loops and close.
Wrap the same tail 4 times from top to bottom for mini ridges. Hide the end.
Tiny stem
Color: Deep Green Ch 3. Sl st in 2nd ch from hook and in last ch. FO, leaving a 6 in (15 cm) tail. Sew the stem to the top of the tiny pumpkin. Sew the tiny pumpkin to the hat band, slightly off-center toward the front, on the side opposite the lean (so the hat curves away from the decoration).
Optional star With Muted Purple, embroider a 5-point star of 5 straight stitches on the hat cone, about R12–R16.
PAGE 7 — NOSE
Color: Soft Beige Make: 1
R1: 6 sc in MR (6)
R2: inc in each st around (12)
(6 increases → 6 + 6 = 12 ✓)
R3: sc in each st around (12)
R4: sc in each st around (12)
R5: (1 sc, dec) × 4 (8)
(4 repeats, each uses 3 sts and makes 2 sts → 12 used, 8 made ✓)
Stuff firmly so the nose is a round little dumpling. FO, leaving a 12 in (30 cm) tail for sewing. Do not close the 8-st opening. The opening is the back of the nose and will be sewn flat to the body.
Placement (sew during assembly) Center front of the body. The top of the nose sits on R9 of the body. The bottom of the nose sits on R12. It should sit on a pumpkin ridge or just beside one, not over a deep groove. The nose is about ¾ in (2 cm) across when stuffed.
PAGE 8 — BEARD
Color: Warm Ivory Method: Lark’s head fringe. No crochet fabric.
Cut the strands Cut 36 strands, each 7 in (18 cm) long. Use the same yarn as the rest of the project. Do not mix a fuzzy novelty yarn unless you want a different texture.
Where to attach Work on the finished body, after the nose is sewn, before the hat is sewn. The beard is an inverted rounded triangle under the nose.
Imagine 3 rows of stitches on the front of the body:
- Row A (top), just under the nose, body R12–R13: attach 10 strands in 10 consecutive stitches, centered.
- Row B (middle), body R14–R15: attach 14 strands in 14 stitches, centered (2 extra stitches on each side past Row A).
- Row C (bottom), body R16–R17: attach 12 strands in 12 stitches, centered.
Skip the deep pumpkin grooves if a strand would vanish into a ridge wrap. Sit each knot on the high part of a segment.
How to attach one strand
- Fold the strand in half.
- Insert the hook under the chosen stitch, from the bottom toward the top.
- Pull the folded loop through.
- Pull the two cut ends through the loop.
- Tug until the knot sits against the fabric.
Trimming Leave all strands untrimmed at first. Shake the gnome. Then trim:
- Center length: 2½ in (6.5 cm) hanging below the nose.
- Sides: taper to 1 in (2.5 cm) at each edge.
- Bottom edge: a soft rounded U, not a sharp point and not a straight shelf.
Optional shaping
- Split each worsted strand with a tapestry needle for extra fluff.
- For acrylic, brush very gently downward with a slicker brush. Stop if the yarn pills.
- Steam from 8 in (20 cm) away to set the shape. Do not touch the iron to the beard.
The top of the beard should hide under the hat brim later. Do not sew the beard down. The knots hold it.
PAGE 9 — FEET AND HANDS
Feet (make 2)
Color: Witch Black These are small oval boots. They help the pumpkin sit upright.
R1: 6 sc in MR (6)
R2: inc in each st around (12)
(6 increases → 6 + 6 = 12 ✓)
R3: (1 sc, inc) × 6 (18)
(6 repeats, each uses 2 sts and makes 3 sts → 12 used, 18 made ✓)
R4: sc in each st around (18)
R5: (1 sc, dec) × 6 (12)
(6 repeats, each uses 3 sts and makes 2 sts → 18 used, 12 made ✓)
Stuff lightly. Keep the bottom flat.
R6: dec × 6 (6)
(6 decreases → 12 − 6 = 6 ✓)
FO, leaving a 10 in (25 cm) tail. Thread through the 6 loops and close. Flatten each foot into a small oval about 1 in (2.5 cm) long and ¾ in (2 cm) wide.
Where to attach Bottom of the body, toward the front so the gnome does not roll.
- Inner edges about ½ in (1.3 cm) apart.
- Each foot sits on the closed MR end and the first 2 rounds of the body.
- Angle the toes slightly outward (about 10 o’clock and 2 o’clock if the nose is 12 o’clock). Sew all the way around with the yarn tail. Pull snug so the feet are stable.
Hands (make 2)
Color: Witch Black (witch gloves). For a softer look, use Pumpkin Orange instead.
R1: 6 sc in MR (6)
R2: (1 sc, inc) × 3 (9)
(3 repeats, each uses 2 sts and makes 3 sts → 6 used, 9 made ✓)
R3: sc in each st around (9)
R4: (1 sc, dec) × 3 (6)
(3 repeats, each uses 3 sts and makes 2 sts → 9 used, 6 made ✓)
Stuff with a tiny pinch only. FO, leaving a 10 in (25 cm) tail. Do not close fully. Flatten the opening into a small oval. This is the wrist.
Where to attach Sides of the body, slightly forward.
- Height: body R12–R14 (level with the nose / top of beard).
- Spacing: about 8 sts to the left of center and 8 sts to the right of center at the equator (R8–R14 zone).
- Palms face inward and a little forward, ready to hold the mini pumpkin. Sew the 6-st wrist opening to the body. Hide the tail inside.
There are no separate arm tubes. The hands peek out of the pumpkin like little gloves. This keeps the pattern beginner-friendly.
PAGE 10 — MINI PUMPKIN ACCESSORY
An original squat pumpkin started as a short oval, then shaped with 8 ridges (the gnome body uses 6). Add a short stem, one curled leaf, and a corkscrew tendril.
Colors: Pumpkin Orange, Deep Green, optional Witch Black for a face
Pumpkin body
Color: Pumpkin Orange Start with a chain so the pumpkin is wider than it is tall.
Ch 6.
R1: sc in 2nd ch from hook, sc in next 3 ch, 3 sc in last ch. Turn to the unused side of the chain. Sc in next 3 ch, 2 sc in the last ch (the first ch). (12)
(4 + 3 + 3 + 2 = 12 ✓)
R2: inc in first st, 3 sc, inc in next 3 sts, 3 sc, inc in last 2 sts (18)
(1 + 3 + 3 + 3 + 2 = 12 used; 2 + 3 + 6 + 3 + 4 = 18 made ✓)
R3: (2 sc, inc) × 6 (24)
(6 repeats, each uses 3 sts and makes 4 sts → 18 used, 24 made ✓)
R4–R6: sc in each st around (24)
(3 even rounds ✓)
R7: (2 sc, dec) × 6 (18)
(6 repeats, each uses 4 sts and makes 3 sts → 24 used, 18 made ✓)
R8: (1 sc, dec) × 6 (12)
(6 repeats, each uses 3 sts and makes 2 sts → 18 used, 12 made ✓)
Stuff firmly into a squat oval. Press top and bottom flat.
R9: dec × 6 (6)
(6 decreases → 12 − 6 = 6 ✓)
FO, leaving a 18 in (45 cm) tail. Close the hole. Use the same tail to wrap 8 ridges from top center to bottom center, evenly spaced (about every 3 stitches at the equator). Pull each wrap until you see 8 plump segments. Tie off and hide.
Finished mini pumpkin: about 1¼ in (3 cm) wide and 1 in (2.5 cm) tall, not counting the stem.
Stem
Color: Deep Green
R1: 4 sc in MR (4) R2: sc in each st around (4) R3: sc in each st around (4)
FO, leaving a 8 in (20 cm) tail. Do not stuff. Sew to the top center of the mini pumpkin, covering the ridge-wrap meeting point.
Curled leaf
Color: Deep Green
Ch 8. In 2nd ch from hook: sl st, then sc, hdc, dc, hdc, sc, sl st in last ch. FO, leaving a 6 in (15 cm) tail. The leaf is a small pointed paddle. Sew it at the base of the stem so it leans to one side.
Corkscrew tendril
Color: Deep Green
Ch 10.
Work 2 sc in 2nd ch from hook and in each ch to the end (18 sc).
(9 chains worked, 2 sc each → 18 sc ✓)
The strip will spiral by itself. FO. Sew the starting end next to the stem, opposite the leaf. Let the curl hang.
Optional embroidered face
With Witch Black, on one wide side of the mini pumpkin:
- Two tiny vertical stitches for sleepy eyes, 2 segments apart.
- One small curved smile on the segment between them. Keep it smaller than the gnome’s own nose. This face is optional. The accessory also looks good plain.
How it attaches Sew the mini pumpkin to the right hand (your right when facing the gnome) and tack one side of the pumpkin to the body at about R13–R15 so it does not swing. The tendril should hang outward.
PAGE 11 — ASSEMBLY
Pin every piece before you sew. Use matching yarn. Small, hidden stitches. Check the front view after each step.
1. Body Confirm the MR is the bottom and R20 is the top. Confirm 6 ridges are even. Sit the pumpkin on a table. If it rolls, add a little more stuffing at the bottom through a stitch, then close.
2. Nose Pin at center front, top on body R9, bottom on body R12. Sew around the 8-st opening with the beige tail. Keep the nose round. Do not flatten it.
3. Beard Attach the 36 ivory strands as written on Page 8. Row A under the nose, then Row B, then Row C. Trim to a rounded U: 2½ in (6.5 cm) at center, 1 in (2.5 cm) at the sides. The beard should cover the lower front of the pumpkin and leave the sides of the body visible.
4. Hat Lightly stuff. Bend toward the lean side. Set the 24-st opening on the top of the body. The brim should sit near body R7–R9. The front brim covers the top of the beard by about ¼ in (6 mm) and frames the nose. The nose stays fully visible. Tilt the hat about 15 degrees toward the lean side. Sew through R23 of the hat (the black round under the band) into the top of the body, all the way around. Catch body stitches, not just stuffing. The brim stays free.
5. Hands Sew at body R12–R14, 8 sts left and 8 sts right of center, slightly forward. Right hand (as you face the gnome) will hold the mini pumpkin. Angle that palm a little more forward.
6. Feet Sew to the bottom front, ½ in (1.3 cm) apart, toes out. The gnome should sit without rolling. If it tips back, move both feet 1 round farther forward and restitch.
7. Mini pumpkin Sew to the right hand. Add 3 tacking stitches from pumpkin to body at R13–R15. Arrange the leaf and tendril so they read from the front.
8. Final shaping
- Squeeze the pumpkin body into a squat shape.
- Re-snug any loose ridge wrap.
- Bend the hat tip.
- Fluff and re-trim the beard.
- Make sure the brim is a smooth oval, not a hexagon. You can steam the brim only.
Finished look A round orange pumpkin body, tall leaning black hat, beige nose, ivory beard, black feet and hands, and one small 8-ridge pumpkin with a green stem, leaf, and tendril.
PAGE 12 — FINAL ASSEMBLY VISUAL GUIDE
Use these diagrams when pinning. Arrows show sew points.
FRONT VIEW
              tip (lean →)
                 /|
                / |
               /  |
              / ◆ |     ◆ = tiny hat pumpkin
             /band|
            /_____\
           / brim  \      ← brim sits at body R7–R9
           |  • •  |      ← optional eyes at R8
           |  (o)  |      ← nose R9–R12
           | ~~~~~ |      ← beard Row A
          /| ~~~~  |\     ← beard Rows B–C
        hand        hand
          |  RIDGES |
          |    🎃   |     ← mini pumpkin at right hand
         / \       / \
       foot         foot  ← bottom front
SIDE VIEW
          hat leans this way →
               /
              /
             / |
            |  | brim
            | o|  nose sticks out
            | ~|
            |  |  pumpkin body
           _|  |_
          foot  (back is round, no beard)
BACK VIEW
              / \
             /   \
            /_____\
            |     |
            |  6  |   no beard on the back
            |ridges|
            |     |
             \___/
HAT PLACEMENT
   [ hat R23 sewn to body top ]
   brim free  →  covers beard 1/4 in
   nose stays fully visible
   tilt 15° to lean side
BEARD PLACEMENT
   nose
    |||        Row A  10 strands   body R12–R13
   |||||       Row B  14 strands   body R14–R15
    |||        Row C  12 strands   body R16–R17
   trim to rounded U
ARM / HAND PLACEMENT
   front
     L hand ●--------● R hand
            8 sts   8 sts
            from center
            height: body R12–R14
FOOT PLACEMENT
        nose direction (front)
              ^
        [foot]   [foot]
           0.5 in apart
        on MR / R1–R2
        toes slightly out
PUMPKIN PLACEMENT
   right hand + 3 tacks to body R13–R15
   stem up, tendril out, leaf to the side
PAGE 13 — FINISHING
Weave yarn ends Thread every tail onto a yarn needle. Run it through the stuffing for 1 in (2.5 cm) or more, then cut close. Do not leave knots on the outside. Check the hat band color-change tails especially.
Facial embroidery Traditional gnomes show only a nose. For a friendly Halloween face, add:
- Two small black stitches or French knots at body R8, about 2 sts apart, just above the nose. Keep them tiny so they peek from under the brim.
- Optional: a 3-st curved smile in black or deep orange on the top of the beard, just under the nose. If you use 6 mm safety eyes, insert them at R8, 3 sts apart, before you close the body. Once the washer is on, they cannot come off.
Final shaping Roll the body in your palms. Pinch the hat tip. Fan the beard. Twist the tendril around a pencil if it has relaxed.
Stuffing correction If a dip appears, open 2–3 stitches with the needle, push in extra fiberfill, and ladder-stitch closed. If the body looks like a ball instead of a pumpkin, snug the 6 ridge wraps a little more and flatten top-to-bottom.
Blocking Only the hat brim needs blocking. Pin the brim in a circle on an ironing board. Hold a steam iron 4 in (10 cm) above for 10 seconds. Let dry. Do not steam the beard at close range.
Safety warning for safety eyes Safety eyes are a choking hazard for children under 3 years. This gnome is home décor. If you gift it to a home with toddlers, embroider the eyes instead and sew all pieces extra firmly.
Care instructions
- Surface clean with a damp cloth.
- Air dry.
- Do not machine wash. The beard will felt or tangle, and safety eyes (if used) are not washer-safe.
- Store upright. If the hat slumps, restuff the tip.
What you are selling This file is a digital crochet pattern. It is not a finished gnome.
Finished-item note (for your PDF shop) The maker may sell small numbers of finished gnomes, with credit to the pattern name “Pumpkin Witch Gnome.” Do not resell, copy, or share the written pattern.
PAGE 14 — TROUBLESHOOTING
My stitch count is wrong Count at the end of every round before you move the marker. If you are over, you added an extra inc or missed the marker. If you are under, you skipped a stitch or worked a dec by mistake. For even rounds (no inc/dec), the count must match the previous round exactly. Frog back to the last correct marker rather than “easing in” extra stitches on a small piece.
My body is leaning Stuffing is heavier on one side, or ridge wraps are tighter on one side. Remove the wraps. Restuff from the bottom. Rewrap all 6 ridges with even tension. Sew the feet farther forward.
My hat is too loose The fabric has gaps, or you used a 4.0 mm hook with soft yarn. Redo the hat with a 3.5 mm hook and tighter sc. The hat opening must be 24 sts. If you accidentally ended with more than 24, the hat will slouch on the body. If the brim flops, you skipped R27 (the sl st round) or used a larger hook on the brim only.
My beard looks uneven Count the strands: 10, then 14, then 12. All knots must sit on the same three rows. Trim only after all 36 strands are on. Cut from the center out, checking the front view every few snips. If one side is heavy, pull 2 strands from the heavy side and reattach them on the light side.
My stuffing is showing Stitches are too loose. For remaining pieces, go down a hook size. For the finished body, you can work a matching-color surface sc over a gappy spot, or redo that piece. Dark stuffing shows less under orange than white stuffing.
My pieces don’t line up The nose must be on R9–R12, centered. The hat brim hides R7–R9. If the nose is too high, the brim covers it — take out the hat stitches and sit the hat 1 round higher, or move the nose down 1 round. Hands sit at R12–R14. If a hand covers the beard, move it 2 sts toward the side. Always pin, step back, then sew.
My hat will not curve The hdc stitches drifted off the lean marker as the spiral turned. Next time, move the lean marker up every round so it stays on the same wall of the cone. You can still bend a finished hat after light stuffing and a little steam.
My mini pumpkin looks like a ball The oval start was worked as a ring by mistake, or the 8 wraps are too loose. Rewrap tighter. Press the pumpkin flat between your fingers after stuffing.
My gnome will not sit Feet are too far back, or the bottom is under-stuffed. Restuff the base. Sew feet on the front half of the MR. A tiny bag of plastic pellets in the bottom (inside the stuffing) adds weight for décor use only — do not add pellets if children will handle the gnome.
PATTERN TESTING CHECKLIST
Do not list this pattern as “tested” until you have crocheted a full sample and checked every box. This document is a written original pattern, not a completed physical test.
Crochet and keep notes on:
- [ ] Body (Page 5) — stitch counts R1–R20; squat pumpkin after stuffing; 6 ridge wraps
- [ ] Witch hat cone (Page 6) — counts R1–R23; lean stays on one side; opening is 24 sts
- [ ] Hat brim (Page 6) — FLO R24–R27; brim lies in a circle
- [ ] Tiny hat pumpkin + stem (Page 6) — size vs. band
- [ ] Nose (Page 7) — round, not flat; 8-st back opening sews cleanly
- [ ] Beard (Page 8) — 36 strands; three-row placement; trim shape
- [ ] Feet × 2 (Page 9) — gnome sits without rolling
- [ ] Hands × 2 (Page 9) — size vs. mini pumpkin
- [ ] Mini pumpkin oval (Page 10) — 8 ridges, squat shape
- [ ] Stem, curled leaf, tendril (Page 10)
- [ ] Full assembly (Page 11) — hat, nose, beard, hands, feet, accessory
- [ ] Finished height — target 5½–6½ in (14–16.5 cm) with stated yarn and hook
- [ ] Photo check — front, side, back against Page 12
- [ ] Yarn amounts — weigh leftovers and update yardage if needed
- [ ] Beginner read-through — a second person follows Pages 5–11 with no extra help
- [ ] Safety copy — under-3 warning present if safety eyes are mentioned
- [ ] Math audit — every round count in the sample matches the page
Rounds that most need a physical sample before you sell the PDF
- Hat curve rounds R8, R14, R20 (hdc placement vs. spiral drift)
- Body even section R8–R14 (pumpkin proportions after ridges)
- Hat-to-body sew line (brim vs. nose vs. beard)
- Beard length and strand count after trimming
- Foot placement for sitting
- Mini pumpkin oval + 8 wraps (width vs. height)
- Finished height with your exact yarn and hook
When every box is checked on a real gnome, you may describe that sample as tested. Until then, call this an untested original written pattern.
End of pattern. PUMPKIN WITCH GNOME — Beginner-Friendly Halloween Amigurumi Crochet Pattern Digital PDF only. US crochet terms. Worsted weight. Approx. 6–6½ in (15–16.5 cm) tall.
Disclaimer: This pattern was generated by AI and should be reviewed for accuracy before use. While we strive for quality, AI-generated content may contain errors. Please verify measurements, stitch counts, charts, and instructions before beginning your project. Generated by purlJam.uk
Love this pattern?
Save this pattern to your free PurlJam libraryAccess your pattern anytime
Bookmark this page to access your pattern anytime