Type
Crochet
Difficulty
beginner
Category
amigurumi
AI Thinking Process
Planning
Verification
Pattern
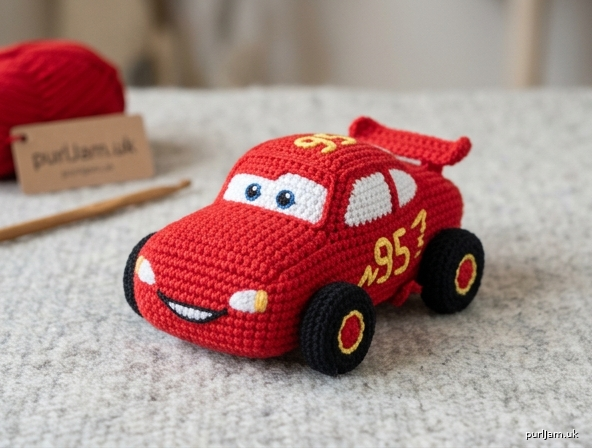
Rayo McQueen (Lightning McQueen) — Small Crochet Toy
Skill level: Beginner
Finished size: About 4½" long × 2½" wide × 2" tall (11.5 × 6.5 × 5 cm), soft handheld plush
Yarn weight: Worsted (4)
A simple-shapes amigurumi race car inspired by Rayo McQueen: red elongated body, four black wheels, and embroidered windshield face with smile and number 95. Uses only single crochet, increases, decreases, and basic sewing—perfect for a first character toy.
Materials
- Worsted weight yarn (4)
- Color A (Red): ~40 yd (37 m) — body
- Color B (Black): ~20 yd (18 m) — wheels, mouth line, pupils
- Color C (White): ~10 yd (9 m) — eyes, teeth, number
- Color D (Blue): small amount — irises (or embroider with scrap)
- Color E (Yellow or gold): small amount — lightning bolt & “95” (optional but classic)
- Hook: US E-4 (3.5 mm) — or size needed for tight fabric (1–2 sizes smaller than yarn label)
- Fiberfill stuffing
- Yarn needle
- Stitch marker
- Pins
- Optional: 6 mm safety eyes (instead of embroidered eyes); black embroidery floss for finer face lines
Gauge
Work tightly so stuffing does not show.
Gauge: 5 sc and 5 rnds = 1" (2.5 cm) in continuous sc rnds.
Exact gauge is not critical; tighter stitches give a neater, firmer car. Finished body before wheels should measure about 4" long × 2" wide.
Abbreviations (US)
| Abbreviation | Meaning |
|---|---|
| ch | chain |
| sc | single crochet |
| inc | increase (2 sc in same st) |
| dec | invisible decrease (sc2tog through front loops) |
| st(s) | stitch(es) |
| rnd(s) | round(s) |
| MR | magic ring (magic circle) |
| FO | fasten off |
| BLO | back loop only |
| [ ] | stitch count at end of rnd |
| ( ) × n | repeat instructions in parentheses n times |
Work in continuous spiral rounds unless noted. Do not join at end of rnds. Mark the first st of each rnd and move marker up.
Notes
- Stuff as you go; the body is hard to fill after closing.
- Invisible dec keeps the surface smooth.
- Car should sit flat: stuff the underside a little less full and gently flatten after closing.
- Pin wheels and check that the car stands level before final sewing.
- Safety: if giving to a baby or pet, embroider eyes only (no safety eyes or glued pieces).
Pattern Instructions
Body (Color A – Red)
Worked as an elongated oval (car chassis + cabin).
Foundation: Ch 10.
Rnd 1: Sc in 2nd ch from hook, sc in next 7 ch, 3 sc in last ch; rotate to work along opposite side of foundation ch, sc in next 7 ch, 2 sc in same ch as first sc of rnd. [20]
(7 + 3 + 7 + 2 = 19… wait—standard oval: sc 8 along (including first), 3 in end, 7 back, 2 in start end = 20 ✓)
Validation: 8 + 3 + 7 + 2 = 20 ✓
Rnd 2: Inc, sc 7, inc × 3, sc 7, inc × 2. [26]
(1 + 7 + 3 + 7 + 2 = 20 sts worked as base; increases add 6 → 26 ✓)
Rnd 3: Sc 1, inc, sc 8, (sc 1, inc) × 3, sc 8, (sc 1, inc) × 2. [32]
(Inc 6 times → 26 + 6 = 32 ✓)
For a small toy we ease back slightly for a neat handheld size:
Rnd 3 (adjusted beginner size): Sc around, placing 2 extra inc evenly on each long side only if you want wider body—use this instead for ~4.5" car:
Rnd 3: Sc 2, inc, sc 9, inc, sc 2, inc, sc 9, inc, sc 2. [30]
(4 increases → 26 + 4 = 30 ✓)
Rnds 4–12: Sc around. [30]
(9 plain rnds for length ≈ 9 × 0.4" ≈ 3.6" plus ends ≈ 4–4.5" total length ✓)
Rnd 13: Sc 2, dec, sc 9, dec, sc 2, dec, sc 9, dec, sc 2. [26]
(4 dec → 30 − 4 = 26 ✓)
Stuff firmly, keeping top rounded and bottom slightly flatter.
Rnd 14: Dec, sc 7, dec × 3, sc 7, dec × 2. [20]
(6 dec → 26 − 6 = 20 ✓)
Rnd 15: Sc around. [20]
Add final stuffing; shape into a smooth race-car oval.
Rnd 16: (Sc 2, dec) × 5. [15]
(5 dec → 20 − 5 = 15 ✓)
Rnd 17: (Sc 1, dec) × 5. [10]
(5 dec → 15 − 5 = 10 ✓)
Rnd 18: Dec × 5. [5]
FO, leaving 8" tail. Thread tail through front loops of remaining 5 sts and pull tight to close. Weave in end.
(5 dec close the hole ✓)
Wheels (make 4 – Color B – Black)
Rnd 1: 6 sc in MR. [6]
Rnd 2: Inc in each st. [12]
(6 inc → 6 + 6 = 12 ✓)
Rnds 3–4: Sc around. [12]
Stuff lightly (wheels should stay disc-like, not balls).
Rnd 5: Dec × 6. [6]
(6 dec → 12 − 6 = 6 ✓)
FO, leaving 10" tail for sewing. Close hole by running yarn through front loops of 6 sts; pull snug. Do not over-stuff—flatten slightly into tire shape.
Optional rim accent (Color E – Yellow): With yellow, surface slip stitch or embroider a small circle on outer face of each wheel before sewing to body.
Spoiler (optional, Color A – Red)
Small flat strip for the rear wing.
Ch 8.
Row 1: Sc in 2nd ch from hook and in each ch across. [7]
Rows 2–3: Ch 1, turn, sc across. [7]
FO, leaving tail for sewing.
Fold in half lengthwise and whipstitch long edges for a thicker spoiler, or leave flat.
Assembly
- Position wheels: Lay body on a flat surface. Pin two wheels on each long side—front pair just behind the “nose,” rear pair near the back third. Bottoms of wheels should sit even so the car stands level. Wheels sit slightly under the body curve.
- Sew wheels: Using wheel tails, sew each wheel securely with whipstitch through both wheel edge and body. Go around twice for strength. Weave in ends.
- Spoiler: Sew to the top rear of the body, centered, standing upright or angled slightly back.
- Face / windshield (front upper third of body):
- Eyes (Color C white): Embroider or satin-stitch two large ovals side by side (about ½" tall).
- Irises (Color D blue): Smaller circles inside white.
- Pupils (Color B black): Tiny French knots or straight stitches in center of each iris. (Or insert 6 mm safety eyes between Rnds 5–7 of body before final stuffing if preferred.)
- Smile (Color B + C): Curve a black outline under the eyes; add 3–4 short white vertical stitches for teeth.
- Number 95 (Color E yellow or Color C white): On each door side (middle of long sides), embroider “95” about ¾" tall with backstitch or chain stitch.
- Lightning bolt (Color E yellow): On the hood/front top or sides, embroider a simple zigzag bolt with backstitch (3–4 short segments).
- Mouth line / bumper detail (optional): A short horizontal black stitch across the very front lower edge.
Weave in every remaining end securely inside the body.
Finishing
- Steam-block very lightly with a damp cloth if yarn allows (do not crush wheels).
- Check that the car sits flat; add a tiny bit more stuffing through a side st if the belly sags, then close.
- For a keychain version: attach a jump ring and keychain finding through a st at the top rear.
Stitch-Count Quick Check (inline validation summary)
| Piece | Key transitions | Count check |
|---|---|---|
| Body start | Ch-10 oval Rnd 1 | 20 ✓ |
| Body Rnd 2 | +6 inc | 26 ✓ |
| Body Rnd 3 | +4 inc | 30 ✓ |
| Body Rnds 4–12 | plain | 30 ✓ |
| Body Rnd 13 | −4 dec | 26 ✓ |
| Body Rnd 14 | −6 dec | 20 ✓ |
| Body close | 20→15→10→5 | all −5 nets ✓ |
| Wheel | 6→12→12→6 | +6 then −6 ✓ |
Care
Surface wash cold, reshape, air dry. Do not machine-wash if safety eyes were used.
Enjoy your pequeño Rayo McQueen—ka-chow!
Disclaimer: This pattern was generated by AI and should be reviewed for accuracy before use. While we strive for quality, AI-generated content may contain errors. Please verify measurements, stitch counts, charts, and instructions before beginning your project. Generated by purlJam.uk
Love this pattern?
Save this pattern to your free PurlJam libraryAccess your pattern anytime
Bookmark this page to access your pattern anytime