Type
Crochet
Difficulty
intermediate
Category
amigurumi
AI Thinking Process
Planning
Verification
Pattern
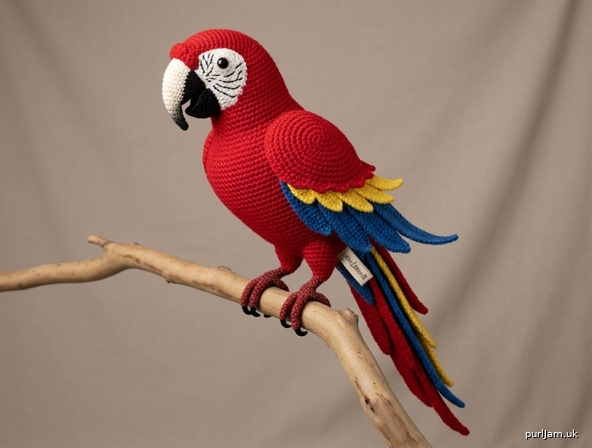
Realistic Scarlet Macaw Amigurumi
Skill level: Advanced intermediate
Finished size: Approx. 14–16 in (35–40 cm) tall from crown to tail tip, worked in worsted weight yarn
Gauge: 5 sc × 5 rnds = 1 in (2.5 cm) with US E-4 (3.5 mm) hook (tight amigurumi gauge; fabric should be dense so stuffing does not show)
Terminology: US crochet terms, continuous spiral rounds unless noted
Abbreviations
- MR: magic ring (adjustable ring)
- sc: single crochet
- inc: 2 sc in same stitch
- dec: invisible decrease (insert hook in FLO of next 2 sts, yo, pull through both, yo, pull through 3 loops)
- ch: chain
- sl st: slip stitch
- st(s): stitch(es)
- rnd(s): round(s)
- FLO / BLO: front / back loop only
- hdc: half double crochet
- dc: double crochet
- tr: treble crochet
- [...] : stitch count at end of round
- ( ) × N : repeat instructions in parentheses N times
Materials (Scarlet Macaw)
Yarn – worsted weight (category 4), approx. total 350–400 yd (320–365 m):
- Color A Red (body, head, upper tail, wing base): 180 yd (165 m)
- Color B Yellow (mid wing layers, chest accent optional): 60 yd (55 m)
- Color C Blue (outer wing layers, lower tail, primary flight accents): 70 yd (64 m)
- Color D White (face patches): 20 yd (18 m)
- Color E Black (beak, facial lines, claws, eye accents): 30 yd (27 m)
- Small scrap of pale horn/ivory or leave beak solid black as preferred
Hooks & notions
- US E-4 (3.5 mm) hook (or size needed for tight gauge)
- 12–14 mm black safety eyes (1 pair)
- Polyester fiberfill, approx. 8–10 oz (firm stuffing)
- Yarn needle, stitch markers, scissors, pins
- 2 pipe cleaners or 18-gauge craft wire lengths (~8–10 in / 20–25 cm each) for legs, plus optional short wires for toe posing
- Optional: fabric glue or fray check for wire ends; sewing pins for assembly
Notes before starting
- Work in continuous spiral; mark first st of every rnd.
- Stuff firmly and evenly as directed—especially head, chest, and beak base—so the bird holds a display pose.
- Invisible dec keeps surface smooth.
- Color changes: finish last yo of previous st with new color.
- Safety: fully enclose all wire. This piece contains wire and small parts; not recommended for children under 3.
Head (Color A Red)
Stuff firmly as you go after eye placement.
Rnd 1: 6 sc in MR [6]
Rnd 2: inc × 6 [12]
Rnd 3: (sc, inc) × 6 [18]
Rnd 4: (2 sc, inc) × 6 [24]
Rnd 5: (3 sc, inc) × 6 [30]
Rnd 6: (4 sc, inc) × 6 [36]
Rnd 7: (5 sc, inc) × 6 [42]
Rnds 8–16: sc around [42] (9 rnds)
Eye placement: Between Rnds 11–12, insert 12–14 mm safety eyes roughly 10–12 sts apart, centered on the face area (leave clear space for white patches). Do not secure washers until face patches are dry-fitted if you prefer; otherwise lock eyes now.
Rnd 17: (5 sc, dec) × 6 [36]
Rnd 18: (4 sc, dec) × 6 [30]
Rnd 19: (3 sc, dec) × 6 [24]
Stuff head very firmly, shaping a slight flattened face front.
Rnd 20: (2 sc, dec) × 6 [18]
Rnd 21: (sc, dec) × 6 [12]
Rnd 22: dec × 6 [6]
Fasten off, weave tail through FLO of remaining 6 sts, pull closed, hide yarn.
Body (Color A Red, optional Color B Yellow chest tint)
Worked from chest/neck toward tail base. Create a prominent rounded chest.
Rnd 1: 6 sc in MR [6]
Rnd 2: inc × 6 [12]
Rnd 3: (sc, inc) × 6 [18]
Rnd 4: (2 sc, inc) × 6 [24]
Rnd 5: (3 sc, inc) × 6 [30]
Rnd 6: (4 sc, inc) × 6 [36]
Rnd 7: (5 sc, inc) × 6 [42]
Rnd 8: (6 sc, inc) × 6 [48]
Rnd 9: (7 sc, inc) × 6 [54]
Rnds 10–12: sc around [54]
Chest shaping (front only): Mark 18 front sts for chest.
Rnd 13: sc in 18 back sts, (sc, inc) × 9 across front [63]
Rnd 14: sc around [63]
Rnd 15: sc in 18 back sts, (2 sc, inc) × 9 across front, sc remaining if needed to close [72] — if count drifts, sc evenly to 72 and mark new start under belly.
Rnds 16–20: sc around [72] (5 rnds) — full rounded chest.
Rnd 21: (10 sc, dec) × 6 [66]
Rnd 22: sc around [66]
Rnd 23: (9 sc, dec) × 6 [60]
Rnds 24–28: sc around [60] (5 rnds)
Rnd 29: (8 sc, dec) × 6 [54]
Rnds 30–33: sc around [54]
Rnd 34: (7 sc, dec) × 6 [48]
Rnds 35–37: sc around [48]
Stuff body very firmly, emphasizing the forward chest curve. Leave neck opening open for later head attachment (or continue if joining as you go).
Rnd 38: (6 sc, dec) × 6 [42]
Rnd 39: (5 sc, dec) × 6 [36]
Rnd 40: (4 sc, dec) × 6 [30]
Rnd 41: (3 sc, dec) × 6 [24]
Add final stuffing. Fasten off leaving 18 in tail for sewing to head. Neck rim should measure ~24 sts to match head base.
Upper Beak (Color E Black) — curved downward
Worked tip to base; slight short-row / strategic inc-dec creates downward curve.
Rnd 1: 4 sc in MR [4]
Rnd 2: (sc, inc) × 2 [6]
Rnd 3: sc around [6]
Rnd 4: (2 sc, inc) × 2 [8]
Rnd 5: sc around [8]
Rnd 6: (3 sc, inc) × 2 [10]
Rnd 7: sc 4, inc, sc 4, inc [12]
Rnd 8: sc around [12]
Rnd 9: sc 5, inc, sc 5, inc [14]
Rnds 10–11: sc around [14]
Curve short rows (work back-and-forth on upper surface only):
Row A: sc 7, turn
Row B: ch 1, sc 7, turn
Row C: ch 1, sc 7, continue in rnd on remaining 7 sts of Rnd 11 [14]
Rnd 12: sc around [14]
Rnd 13: (6 sc, inc) × 2 [16]
Rnd 14: sc around [16]
Stuff tip lightly, base more firmly so beak holds a gentle downward hook. Flatten slightly top-to-bottom. Fasten off leaving long tail for sewing.
(Optional horn tip: first 3 rnds in ivory scrap, then switch to black.)
Lower Beak (Color E Black)
Smaller, slightly cupped.
Rnd 1: 4 sc in MR [4]
Rnd 2: (sc, inc) × 2 [6]
Rnd 3: (2 sc, inc) × 2 [8]
Rnd 4: sc around [8]
Rnd 5: (3 sc, inc) × 2 [10]
Rnds 6–7: sc around [10]
Light stuff. Fasten off with long tail. Shape into a shallow cup that tucks under upper beak.
Face Patches (make 2 — Color D White)
Worked flat as ovals.
Rnd 1: 6 sc in MR [6]
Rnd 2: inc × 6 [12]
Rnd 3: (sc, inc) × 6 [18]
Rnd 4: (2 sc, inc) × 6 [24]
Rnd 5: sc 3, hdc, dc, tr, dc, hdc, sc in next 5, hdc, dc, tr, dc, hdc, sc in remaining sts, sl st to join [24] — elongates into a natural facial oval.
Fasten off leaving long tail. Block lightly flat.
Placement: Center each patch over a safety eye so the eye sits in the middle third of the patch. Sew edges neatly to head with white yarn. Eyes should remain visible and centered.
Facial feather lines (Color E Black embroidery):
With yarn needle and 1–2 plies of black (or embroidery floss), stitch 5–7 thin radiating lines on each white patch: short straight or slightly curved stitches from near the beak edge outward toward the rear of the patch, mimicking macaw bare-skin feather tracts. Keep lines delicate and parallel-ish. Secure ends inside head.
Wings (make 2 — layered for depth)
Each wing = base layer + mid feather layer + outer flight layer. Colors: base red (A), mid yellow (B), outer blue (C). Sew layers stacked for plumage depth.
Wing Base (Color A Red) — largest
Worked flat, oval-ish, then edged.
Row 1: ch 13, sc in 2nd ch from hook and each ch across [12], ch 1, turn
Rows 2–4: sc across [12], ch 1, turn
Row 5: inc, sc 10, inc [14], ch 1, turn
Rows 6–8: sc across [14], ch 1, turn
Row 9: inc, sc 12, inc [16], ch 1, turn
Rows 10–14: sc across [16], ch 1, turn
Row 15: dec, sc 12, dec [14], ch 1, turn
Row 16: sc across [14], ch 1, turn
Row 17: dec, sc 10, dec [12], ch 1, turn
Row 18: dec, sc 8, dec [10], ch 1, turn
Row 19: dec, sc 6, dec [8], fasten off.
Border: join A at start of foundation, sc evenly around entire perimeter (place 3 sc in outer corners for smooth curve), sl st, fasten off with long tail.
Mid Feather Layer (Color B Yellow) — medium
Row 1: ch 11, sc in 2nd ch and across [10], ch 1, turn
Rows 2–3: sc across [10], ch 1, turn
Row 4: inc, sc 8, inc [12], ch 1, turn
Rows 5–9: sc across [12], ch 1, turn
Row 10: dec, sc 8, dec [10], ch 1, turn
Row 11: sc across [10], ch 1, turn
Row 12: dec, sc 6, dec [8], ch 1, turn
Row 13: dec, sc 4, dec [6], fasten off.
Sc border in B; leave tail.
Outer / Flight Layer (Color C Blue) — smallest + tip extension
Row 1: ch 9, sc in 2nd ch and across [8], ch 1, turn
Rows 2–6: sc across [8], ch 1, turn
Row 7: dec, sc 4, dec [6], ch 1, turn
Row 8: sc across [6], ch 1, turn
Row 9: dec, sc 2, dec [4], ch 1, turn
Row 10: sc 4, then ch 6 for primary tip, sl st back along ch and into last sc to form a pointed flight feather. Fasten off.
Sc border in C around main body (not the ch tip if preferred pointed).
Wing assembly: Stack blue on yellow on red, offset slightly toward the trailing edge so colors show as bands. Tack layers together with matching yarn through centers (leave outer edges free for “feather” lift). Make mirror-image second wing. Optional: add 2–3 individual long blue feather strips (ch 10–12, sc back) sewn at wing tip for extra realism.
Legs & Claws (make 2 — Color A Red for upper leg, Color E Black for feet/claws)
Posable with pipe cleaner or wire.
Upper Leg Tube (Color A)
Rnd 1: 6 sc in MR [6]
Rnd 2: (sc, inc) × 3 [9]
Rnds 3–12: sc around [9] (10 rnds — adjust length for scale)
Insert pipe cleaner or wire doubled and bent at top (hook to anchor inside body later). Stuff lightly around wire. Do not close yet.
Foot / Claws (Color E Black)
Continue or join E at end of leg:
Rnd 13: (2 sc, inc) × 3 [12]
Rnd 14: sc around [12]
Toes (work 3 forward toes + 1 rear toe macaw-style):
Toe: ch 5, sc in 2nd ch from hook, sc, hdc, sc, sl st back into next st of rnd. Repeat for 3 adjacent sts (forward toes). Skip 2–3 sts, make 1 longer rear toe: ch 6, sc in 2nd ch, sc, hdc, hdc, sc, sl st into foot.
Sc remaining foot sts to neaten. Stuff foot lightly, bend wire into toe positions if using fine wire in toes, close hole with dec or whip stitch. Shape claws slightly curved. Fasten off.
Repeat for second leg. Legs should be firm enough to support standing or perching when wire is anchored in body.
Tail Feathers (graduated — Colors A, B, C)
Long central pair + shorter side feathers for a macaw silhouette.
Central Long Feathers (make 2 — Color A Red with C Blue tip)
Row 1: ch 8, sc in 2nd ch and across [7], ch 1, turn
Rows 2–20: sc across [7], ch 1, turn (length ~4–5 in; add rows for longer tail)
Tip color change to C:
Rows 21–24: sc across in C [7]
Row 25: dec, sc 3, dec [5], ch 1, turn
Row 26: dec, sc, dec [3], fasten off.
Sc border down long edges for crisp feather look. Optional center vein: backstitch a line in matching yarn.
Side Tail Feathers (make 4 — 2 Color B Yellow, 2 Color C Blue, shorter)
Same as central but only 12–14 rows before tip decreases, and max width 5–6 sts.
Example: ch 6, sc across [5], work 12 rows even, dec to point over 3 rows. Border.
Tail assembly: Layer central red pair longest in middle, yellow next, blue outermost/shortest. Fan slightly. Sew bases together into a flat graduated stack, then sew stack securely to rear body opening / lower back, adding a little stuffing under the base for lift.
Assembly (order matters)
- Face finish: Confirm safety eyes locked through white patches (or through head then cover with patches carefully around posts). Embroider black facial lines. Optional: tiny black stitch at outer eye corner for expression.
- Beak: Pin upper beak centered below eyes on face front, curved tip pointing down and slightly out. Sew firmly around base with black yarn, adding a pinch of stuffing if needed for bulk. Sew lower beak directly under upper so the mouth can be slightly open or closed; ladder-stitch the sides.
- Head to body: Add extra stuffing at neck. Pin head to body neck opening with a slight forward tilt (macaw posture). Whip or ladder stitch with red yarn all around; reinforce.
- Wings: Pin layered wings to sides of body at shoulder height (approx. Rnds 12–18 of body), angled slightly backward and down. Sew along upper third of wing base only so lower feathers drape freely. Mirror placement.
- Legs: Decide standing or perched pose. Insert top wire hooks deep into lower body stuffing (between approx. Rnds 28–35), sew leg tops securely with red yarn through multiple body sts. Bend legs into natural z-shape (upper leg forward, lower back) or straight perch. Shape toes to grip.
- Tail: Sew graduated feather stack to lower rear of body, centered, fanning outward and downward. Stitch through all layers at base.
- Final sculpt: Steam-block wings and tail lightly if yarn allows (do not crush amigurumi stuffing). Adjust chest stuffing from any small opening then close. Weave all ends. Optional: blush cheeks very lightly with red pastel (adult display only).
Finishing Checklist
- Height 14–16 in crown to tail tip ✓
- Beak two-part, upper curved down ✓
- White patches + black line embroidery, eyes centered ✓
- Wings three color layers with free edges ✓
- Rounded chest, long graduated tail ✓
- Wire legs fully enclosed and posable ✓
- All stitch counts closed symmetrically; no gaps showing stuffing
Care
Spot clean only. Do not machine wash (wire + dense stuffing). Display away from prolonged direct sun to preserve red/yellow/blue.
Enjoy your display-worthy Scarlet Macaw — the layered wings and sculpted beak are what sell the realism. Adjust tail length or chest increases by ±2 rnds if you want a slightly larger or more compact bird while keeping the same proportions.
Disclaimer: This pattern was generated by AI and should be reviewed for accuracy before use. While we strive for quality, AI-generated content may contain errors. Please verify measurements, stitch counts, charts, and instructions before beginning your project. Generated by purlJam.uk
Love this pattern?
Save this pattern to your free PurlJam libraryAccess your pattern anytime
Bookmark this page to access your pattern anytime