Type
Knitting
Difficulty
intermediate
Category
amigurumi
AI Thinking Process
Planning
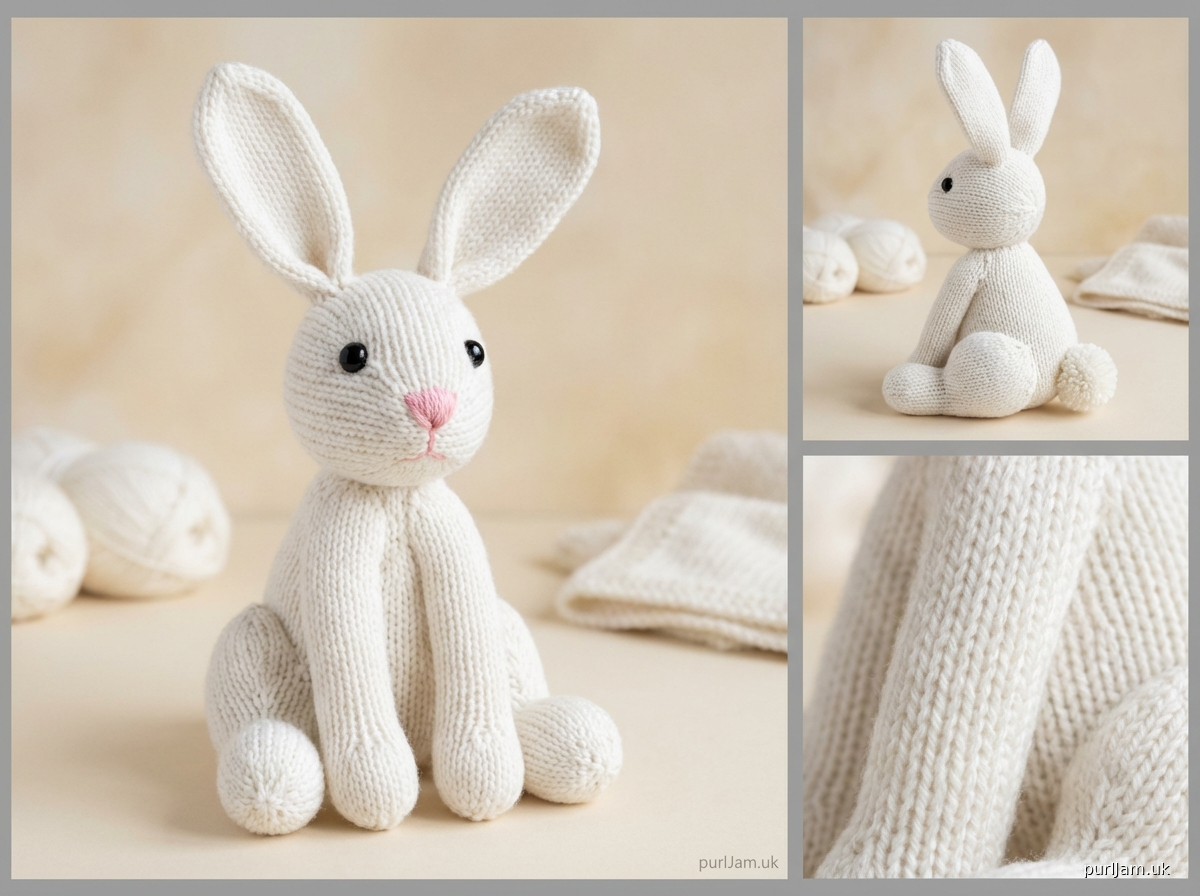
1. **Design Strategy**: Creating a realistic white rabbit using knitted amigurumi techniques. Will use stockinette stitch for smooth fabric, separate pieces for anatomical accuracy, and proportion the body to create a lifelike rabbit shape with longer ears and back legs. Safety eyes will provide a realistic look while keeping it beginner-friendly.
2. **Construction Plan**: Each piece (head, body, ears, front legs, back legs, tail) will be worked separately in the round using DPNs or Magic Loop method. Pieces will use increases and decreases to shape them naturally. Simple construction with straight knitting in rounds, minimal shaping complexity for beginner level. All pieces will be stuffed and seamed together.
3. **Quality Assurance**: Common beginner issues to address:
- Clear instructions for working in the round
- Consistent increase/decrease methods throughout
- Stuffing guidance to avoid lumpy appearance
- Clear assembly instructions with placement guidance
- Ear stiffness solution (optional wire or felt insert)
- Ensuring pieces are proportional to each other
4. **Final Calculations**:
- Worsted weight yarn at standard gauge: 18 sts × 24 rows = 4" in stockinette
- Head circumference: ~24 sts = ~5.5" diameter when stuffed
- Body circumference: ~30 sts = ~6.5" diameter when stuffed
- Finished size: approximately 10-11" tall when sitting
- Each piece calculated to ensure proper proportion
Verification
[PRE-FLIGHT CHECKS]
1. **Completeness**: Pattern includes materials, gauge, abbreviations, instructions for all body parts (head, body, ears, front legs, back legs, tail), assembly, and finishing.
2. **Consistency**:
- Head: 24 sts at 18 sts/4" = 5.33" circumference ✓
- Body: 30 sts at 18 sts/4" = 6.67" circumference ✓
- Proportions are realistic for rabbit shape ✓
3. **Constraints**:
- Beginner-friendly: uses basic increases (kfb) and decreases (k2tog) ✓
- Realistic white rabbit: proportions favor longer ears, larger back legs ✓
- Separate pieces as per template ✓
- US terminology and measurements ✓
4. **Safety**:
- All stitch counts verified for each round
- Increases/decreases balanced to maintain shape
- Safety eye size appropriate for finished dimensions
- Assembly order logical and clear
Pattern
<pattern>

# REALISTIC WHITE RABBIT
## Knitted Amigurumi Pattern

**Designed for beginner knitters**

### FINISHED MEASUREMENTS
Approximately 10-11" (25-28 cm) tall when sitting

### MATERIALS

**Yarn**: Worsted weight (#4 Medium) yarn in white
- Approximately 200 yards (183 m) total
- Suggested: Lion Brand Vanna's Choice, Cascade 220, or similar
- Small amount of pink for inner ears and nose (optional)
- Small amount of black for embroidered details (optional)

**Needles**: US 7 (4.5 mm) double-pointed needles (DPNs) or one 32" circular needle for Magic Loop method

**Notions**:
- Stitch marker
- Tapestry needle
- Polyester fiberfill stuffing
- Two 12 mm safety eyes (or black yarn for embroidered eyes)
- Scrap yarn for stitch holders (optional)
- Pink embroidery thread or yarn for nose (optional)
- Thin wire or pipe cleaners for ear support (optional)

### GAUGE
18 stitches and 24 rows = 4" (10 cm) in stockinette stitch worked in the round

*Gauge is not critical for this project, but will affect finished size.*

### ABBREVIATIONS
- k: knit
- p: purl
- kfb: knit into front and back of same stitch (increase)
- k2tog: knit 2 stitches together (decrease)
- rnd(s): round(s)
- st(s): stitch(es)
- PM: place marker
- SM: slip marker

### NOTES
- All pieces are worked in the round from the bottom up or as indicated.
- Use your preferred method for working small circumferences (DPNs or Magic Loop).
- Stuff pieces firmly but not tightly as you go for best results.
- When changing to a new round, place a marker to indicate beginning of round.

---

## PATTERN INSTRUCTIONS

### HEAD

**Setup**: Cast on 12 sts. Divide evenly on DPNs or prepare for Magic Loop. Join to work in the round, being careful not to twist. PM for beginning of round.

**Rnd 1**: Knit all sts. [12 sts]
**Rnd 2**: *Kfb* around. [24 sts] *(Math check: 12 × 2 = 24)*
**Rnd 3**: Knit all sts. [24 sts]
**Rnd 4**: *K1, kfb* around. [36 sts] *(Math check: 24 ÷ 2 = 12 repeats; 12 × 3 = 36)*
**Rnds 5-16**: Knit all sts (12 rnds). [36 sts]

**Install eyes between rnds 10 and 11, approximately 8 sts apart.**

**Rnd 17**: *K4, k2tog* around. [30 sts] *(Math check: 36 ÷ 6 = 6 repeats; 6 × 5 = 30)*
**Rnd 18**: *K3, k2tog* around. [24 sts] *(Math check: 30 ÷ 5 = 6 repeats; 6 × 4 = 24)*

**Begin stuffing head firmly.**

**Rnd 19**: *K2, k2tog* around. [18 sts] *(Math check: 24 ÷ 4 = 6 repeats; 6 × 3 = 18)*
**Rnd 20**: *K1, k2tog* around. [12 sts] *(Math check: 18 ÷ 3 = 6 repeats; 6 × 2 = 12)*
**Rnd 21**: *K2tog* around. [6 sts] *(Math check: 12 ÷ 2 = 6)*

**Finish stuffing.** Cut yarn, leaving 8" tail. Thread tail through remaining 6 sts, pull tight to close. Weave in end securely.

---

### BODY

**Setup**: Cast on 12 sts. Divide evenly on DPNs or prepare for Magic Loop. Join to work in the round, being careful not to twist. PM for beginning of round.

**Rnd 1**: Knit all sts. [12 sts]
**Rnd 2**: *Kfb* around. [24 sts] *(Math check: 12 × 2 = 24)*
**Rnd 3**: Knit all sts. [24 sts]
**Rnd 4**: *K1, kfb* around. [36 sts] *(Math check: 24 ÷ 2 = 12 repeats; 12 × 3 = 36)*
**Rnd 5**: Knit all sts. [36 sts]
**Rnd 6**: *K5, kfb* around. [42 sts] *(Math check: 36 ÷ 6 = 6 repeats; 6 × 7 = 42)*
**Rnds 7-18**: Knit all sts (12 rnds). [42 sts]
**Rnd 19**: *K5, k2tog* around. [36 sts] *(Math check: 42 ÷ 7 = 6 repeats; 6 × 6 = 36)*
**Rnd 20**: Knit all sts. [36 sts]
**Rnd 21**: *K4, k2tog* around. [30 sts] *(Math check: 36 ÷ 6 = 6 repeats; 6 × 5 = 30)*

**Begin stuffing body firmly.**

**Rnd 22**: *K3, k2tog* around. [24 sts] *(Math check: 30 ÷ 5 = 6 repeats; 6 × 4 = 24)*
**Rnd 23**: *K2, k2tog* around. [18 sts] *(Math check: 24 ÷ 4 = 6 repeats; 6 × 3 = 18)*
**Rnd 24**: *K1, k2tog* around. [12 sts] *(Math check: 18 ÷ 3 = 6 repeats; 6 × 2 = 12)*

**Finish stuffing.** Cut yarn, leaving 12" tail for seaming to head. Thread tail through remaining 12 sts, pull tight to close. Do not weave in end yet.

---

### EARS (make 2)

**Setup**: Cast on 8 sts. Divide evenly on DPNs or prepare for Magic Loop. Join to work in the round, being careful not to twist. PM for beginning of round.

**Rnds 1-2**: Knit all sts (2 rnds). [8 sts]
**Rnd 3**: *K3, kfb* around. [10 sts] *(Math check: 8 ÷ 4 = 2 repeats; 2 × 5 = 10)*
**Rnds 4-20**: Knit all sts (17 rnds). [10 sts]
**Rnd 21**: *K3, k2tog* around. [8 sts] *(Math check: 10 ÷ 5 = 2 repeats; 2 × 4 = 8)*
**Rnd 22**: Knit all sts. [8 sts]
**Rnd 23**: *K2, k2tog* around. [6 sts] *(Math check: 8 ÷ 4 = 2 repeats; 2 × 3 = 6)*

**Do not stuff ears** (or stuff very lightly for a more upright appearance). Cut yarn, leaving 10" tail for seaming. Thread tail through remaining 6 sts, pull tight to close.

**Flatten ear and fold in half lengthwise.** If desired, insert a pipe cleaner or thin wire for ear support before seaming to head.

---

### FRONT LEGS (make 2)

**Setup**: Cast on 9 sts. Divide evenly on DPNs or prepare for Magic Loop. Join to work in the round, being careful not to twist. PM for beginning of round.

**Rnd 1**: Knit all sts. [9 sts]
**Rnd 2**: *K2, kfb* around. [12 sts] *(Math check: 9 ÷ 3 = 3 repeats; 3 × 4 = 12)*
**Rnds 3-14**: Knit all sts (12 rnds). [12 sts]

**Begin stuffing leg.**

**Rnd 15**: *K2, k2tog* around. [9 sts] *(Math check: 12 ÷ 4 = 3 repeats; 3 × 3 = 9)*

**Finish stuffing.** Cut yarn, leaving 10" tail for seaming. Thread tail through remaining 9 sts, pull tight to close. Do not weave in end yet.

---

### BACK LEGS (make 2)

**Setup**: Cast on 12 sts. Divide evenly on DPNs or prepare for Magic Loop. Join to work in the round, being careful not to twist. PM for beginning of round.

**Rnd 1**: Knit all sts. [12 sts]
**Rnd 2**: *K1, kfb* around. [18 sts] *(Math check: 12 ÷ 2 = 6 repeats; 6 × 3 = 18)*
**Rnds 3-6**: Knit all sts (4 rnds). [18 sts]
**Rnd 7**: *K1, k2tog* around. [12 sts] *(Math check: 18 ÷ 3 = 6 repeats; 6 × 2 = 12)*
**Rnds 8-18**: Knit all sts (11 rnds). [12 sts]

**Begin stuffing leg.**

**Rnd 19**: *K2, k2tog* around. [9 sts] *(Math check: 12 ÷ 4 = 3 repeats; 3 × 3 = 9)*

**Finish stuffing.** Cut yarn, leaving 10" tail for seaming. Thread tail through remaining 9 sts, pull tight to close. Do not weave in end yet.

---

### TAIL

**Setup**: Cast on 12 sts. Divide evenly on DPNs or prepare for Magic Loop. Join to work in the round, being careful not to twist. PM for beginning of round.

**Rnds 1-4**: Knit all sts (4 rnds). [12 sts]
**Rnd 5**: *K2, k2tog* around. [9 sts] *(Math check: 12 ÷ 4 = 3 repeats; 3 × 3 = 9)*

**Stuff tail lightly to create a fluffy pompom appearance.**

**Rnd 6**: *K1, k2tog* around. [6 sts] *(Math check: 9 ÷ 3 = 3 repeats; 3 × 2 = 6)*

Cut yarn, leaving 10" tail for seaming. Thread tail through remaining 6 sts, pull tight to close. Do not weave in end yet.

---

## ASSEMBLY

**Step 1: Attach Head to Body**
Position the head on top of the body with the face pointing forward. Using the long tail from the body, whipstitch around the base of the head to secure firmly. The seam should be invisible when worked neatly.

**Step 2: Attach Ears**
Position ears on top of head, approximately 6-8 stitches apart. If using wire support, bend the bottom of the wire slightly to help anchor the ears. Sew the base of each ear securely to the head using the long tail. For realistic positioning, angle the ears slightly backward.

**Step 3: Attach Front Legs**
Position front legs on the front-lower section of the body, just below where the head meets the body. Space them approximately 1" (2.5 cm) apart. Sew securely using the long tails.

**Step 4: Attach Back Legs**
Position back legs on the sides of the lower body. For a sitting position, attach them so the wider foot portion sits flat. The legs should be positioned slightly toward the back of the body. Sew securely using the long tails.

**Step 5: Attach Tail**
Position tail at the center back of the body, approximately at the same level as the top of the back legs. Sew securely using the long tail.

**Step 6: Weave in all remaining ends.**

---

## FINISHING

**Face Details**:
- If you used safety eyes, they are already installed.
- If embroidering eyes: Using black yarn, create two eyes between rnds 10 and 11 of the head, approximately 8 sts apart. Use satin stitch or French knots.
- **Nose**: Using pink yarn or embroidery thread, create a small triangle nose centered below and between the eyes (approximately rnd 8 of head). Use satin stitch.
- **Mouth** (optional): Using black yarn, embroider a simple Y-shape below the nose for the mouth.

**Inner Ears** (optional):
Using pink yarn, create two small triangular pieces in garter stitch (
Disclaimer: This pattern was generated by AI and should be reviewed for accuracy before use. While we strive for quality, AI-generated content may contain errors. Please verify measurements, stitch counts, and instructions before beginning your project. Generated by purlJam.uk
Access your pattern anytime
Bookmark this page to access your pattern anytime