Type
Crochet
Difficulty
beginner
Category
amigurumi
AI Thinking Process
Planning
Verification
Pattern
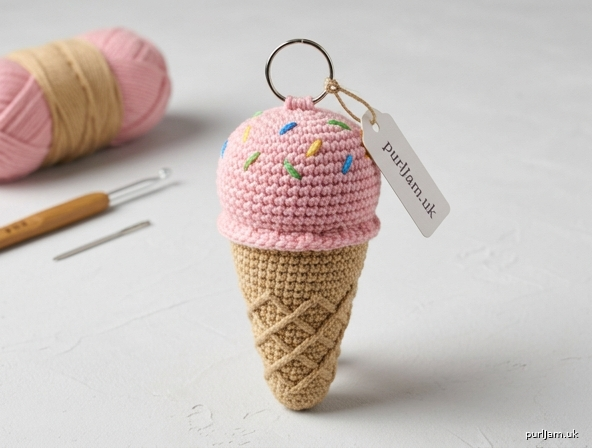
Scoops & Swirls Ice Cream Cone
Crochet Toy Pattern (Simple Shapes)
Skill Level: Intermediate
Finished Size: Approximately 5½ in (14 cm) tall × 2½ in (6.5 cm) wide
Materials
- Worsted weight (4) yarn:
- Color A (cone): 40 yd (37 m) tan or light brown
- Color B (scoop): 30 yd (27 m) pink (or any “flavor” color)
- Color C (optional sprinkles): small amounts of bright contrasting colors
- US E-4 (3.5 mm) crochet hook (or size needed to obtain firm fabric; go down 1–2 sizes from yarn label)
- Polyester fiberfill stuffing
- Yarn needle
- Stitch marker
- Optional: black embroidery floss for face, safety eyes (6 mm), keychain finding
Abbreviations (US Terms)
- ch: chain
- sc: single crochet
- inc: 2 sc in same stitch
- invdec: invisible decrease (insert hook in front loop only of next 2 sts, yarn over, pull through both, yarn over, pull through 2 loops)
- sl st: slip stitch
- st(s): stitch(es)
- rnd(s): round(s)
- BLO: back loop only
- FO: fasten off
- [ ]: total stitch count at end of round
Gauge
5 sc × 5 rnds = 1 in (2.5 cm) in continuous sc worked tightly.
Exact gauge is less critical than a dense fabric that hides stuffing. Adjust hook size if needed.
Notes
- Work in continuous spiral rounds unless stated otherwise. Do not join or turn. Mark first stitch of each round with a stitch marker and move it up.
- Stuff firmly as you go; it is difficult to add stuffing later.
- Use invisible decrease for a smooth surface.
- Pattern uses basic sphere and cone constructions only.
Cone (Color A)
Rnd 1: 4 sc in magic ring. [4]
Rnd 2: (sc, inc) around. [6] (3 inc → 4 + 3 = 6 ✓)
Rnd 3: sc around. [6]
Rnd 4: (2 sc, inc) around. [8] (2 inc → 6 + 2 = 8 ✓)
Rnd 5: sc around. [8]
Rnd 6: (3 sc, inc) around. [10] (2 inc → 8 + 2 = 10 ✓)
Rnd 7: sc around. [10]
Rnd 8: (4 sc, inc) around. [12] (2 inc → 10 + 2 = 12 ✓)
Rnd 9: sc around. [12]
Rnd 10: (5 sc, inc) around. [14] (2 inc → 12 + 2 = 14 ✓)
Rnd 11: sc around. [14]
Rnd 12: (6 sc, inc) around. [16] (2 inc → 14 + 2 = 16 ✓)
Rnd 13: sc around. [16]
Rnd 14: (7 sc, inc) around. [18] (2 inc → 16 + 2 = 18 ✓)
Rnd 15: sc around. [18]
Rnd 16: (8 sc, inc) around. [20] (2 inc → 18 + 2 = 20 ✓)
Rnd 17: sc around. [20]
Rnd 18: (9 sc, inc) around. [22] (2 inc → 20 + 2 = 22 ✓)
Rnd 19: sc around. [22]
Rnd 20: (10 sc, inc) around. [24] (2 inc → 22 + 2 = 24 ✓)
Rnds 21–24: sc around. [24]
Texture (waffle ridges): With Color A still attached, work surface slip stitch in a diagonal grid. Insert hook from front to back under a stitch 2–3 rounds below, yarn over, pull loop through to front and through loop on hook. Repeat every 2–3 stitches, creating 4–5 diagonal lines that spiral gently up the cone. FO Color A, weave in end.
Stuff cone firmly up to Rnd 24. Do not close; leave top open for scoop attachment.
Scoop (Color B)
Rnd 1: 6 sc in magic ring. [6]
Rnd 2: inc in each st around. [12] (6 inc → 6 + 6 = 12 ✓)
Rnd 3: (sc, inc) around. [18] (6 inc → 12 + 6 = 18 ✓)
Rnd 4: (2 sc, inc) around. [24] (6 inc → 18 + 6 = 24 ✓)
Rnds 5–9: sc around. [24]
Rnd 10: (2 sc, invdec) around. [18] (6 dec → 24 – 6 = 18 ✓)
Begin stuffing firmly.
Rnd 11: (sc, invdec) around. [12] (6 dec → 18 – 6 = 12 ✓)
Rnd 12: invdec around. [6] (6 dec → 12 – 6 = 6 ✓)
FO, leaving a 12 in (30 cm) tail. Thread tail through front loops of remaining 6 sts and pull tight to close. Weave in end securely. Shape into a smooth sphere.
Assembly
- Pin the scoop centered on the open top of the cone so the bottom third of the scoop sits inside the cone rim.
- Using Color B (or matching yarn) and yarn needle, whip-stitch the scoop to the cone through both layers, catching the top round of the cone and the corresponding stitches of the scoop. Keep stitches small and even. Add a little extra stuffing just before closing the last 1 in (2.5 cm) if needed for a full look.
- Optional face: With black embroidery floss, stitch two small French-knot eyes and a curved smile on the front of the scoop.
- Optional sprinkles: With Color C scraps, embroider short straight stitches or French knots randomly over the top half of the scoop.
- Optional keychain: Sew a metal keychain finding securely to the top of the scoop.
Weave in all remaining ends. Gently roll the finished toy between your hands to even the stuffing.
Finishing Notes
- Work tightly throughout for a professional amigurumi appearance.
- If the cone leans, redistribute stuffing or add a few extra surface slip-stitch ridges on the lighter side.
- For a taller cone, add 2–4 extra plain sc rounds before Rnd 20.
- For a double scoop, make a second sphere in a different color and stack/sew it on top of the first before attaching to the cone.
- Spot clean only; do not machine wash.
Enjoy your handmade ice-cream cone plush!
Pattern designed for intermediate crocheters using only basic amigurumi shapes.
Disclaimer: This pattern was generated by AI and should be reviewed for accuracy before use. While we strive for quality, AI-generated content may contain errors. Please verify measurements, stitch counts, charts, and instructions before beginning your project. Generated by purlJam.uk
Love this pattern?
Save this pattern to your free PurlJam libraryAccess your pattern anytime
Bookmark this page to access your pattern anytime