Type
Crochet
Difficulty
beginner
Category
amigurumi
AI Thinking Process
Planning
Verification
Pattern
Serial Designation N
Crochet Plush Pattern (Murder Drones–Inspired)
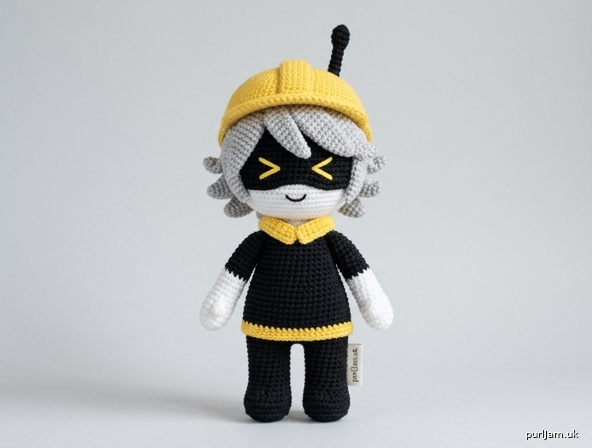
A compact amigurumi portrait of N: black coat-body, white gloves, silver hair, yellow visor, and the signature yellow hard hat. Pieces are simple spheres, cylinders, and a shallow hat—assembled into a recognizable character toy.
Skill level: Intermediate
Finished size: About 7½" (19 cm) tall including hat, in worsted yarn at stated gauge.
Materials
Yarn (worsted / weight 4; acrylic or cotton-acrylic blend)
- Color A – Black: 60 yd / 55 m (about 1.1 oz / 30 g) — head, body, arms, legs, antenna, optional tail/wings
- Color B – Yellow: 35 yd / 32 m (about 0.6 oz / 18 g) — hat, visor, collar
- Color C – Light gray (silver): 25 yd / 23 m (about 0.4 oz / 12 g) — hair
- Color D – White: 10 yd / 9 m (about 0.2 oz / 5 g) — gloves
Notions
- US E-4 (3.5 mm) hook, or size needed to obtain a tight fabric with no stuffing show-through (go down 1–2 sizes from the yarn label)
- Polyester fiberfill
- Yarn needle
- Stitch marker
- Black embroidery floss or a few yards of black fingering/sport yarn (visor expression)
- Optional: yellow felt for the visor instead of crochet; 6" (15 cm) pipe cleaner for a poseable tail; fabric glue for felt
Yarn notes: A smooth, light-colored gray reads as N’s silver hair. Avoid fuzzy novelty yarn for the body—stitch definition matters on a small visor face.
Gauge
6 sc and 7 rnds = 1" (2.5 cm) in single crochet, worked tightly in the round.
Gauge is for size, not drape. If your swatch is larger than 1" (2.5 cm), go down a hook size. A slightly dense fabric is correct.
Abbreviations (US)
- MR — magic ring
- ch — chain
- sc — single crochet
- hdc — half double crochet
- dc — double crochet
- inc — 2 sc in the same stitch
- dec — invisible single-crochet decrease (sc2tog through front loops)
- sl st — slip stitch
- FLO — front loop only
- BLO — back loop only
- st(s) — stitch(es)
- rnd(s) — round(s)
- FO — fasten off
Numbers in brackets [ ] are the stitch count at the end of the round.
Pattern Notes
- Work in a continuous spiral unless a join is written. Do not join or turn at the end of a round. Mark the first stitch of every round and move the marker up as you go.
- Use the invisible decrease for a smooth surface.
- Change color on the last yarn-over of the previous stitch.
- Stuff the head and body firmly; stuff arms, legs, and tail lightly so they stay in proportion.
- Pin every piece before sewing. Small placement shifts change the expression more than any other step.
- This plush has sewn-on parts. It is not a toy for children under 3 years.
Head (Color A – Black)
Stuff firmly as the opening narrows.
Rnd 1: 6 sc in MR. [6]
Rnd 2: Inc in each st. [12] (6 increases → 6 + 6 = 12 ✓)
Rnd 3: (Sc, inc) around. [18] (6 increases → 12 + 6 = 18 ✓)
Rnd 4: (2 sc, inc) around. [24] (6 increases → 18 + 6 = 24 ✓)
Rnd 5: (3 sc, inc) around. [30] (6 increases → 24 + 6 = 30 ✓)
Rnd 6: (4 sc, inc) around. [36] (6 increases → 30 + 6 = 36 ✓)
Rnds 7–12: Sc around. [36] (6 rounds)
Rnd 13: (4 sc, dec) around. [30] (6 decreases → 36 − 6 = 30 ✓)
Rnd 14: (3 sc, dec) around. [24] (6 decreases → 30 − 6 = 24 ✓)
Rnd 15: (2 sc, dec) around. [18] (6 decreases → 24 − 6 = 18 ✓)
Stuff firmly, shaping a slightly tall oval.
Rnd 16: (Sc, dec) around. [12] (6 decreases → 18 − 6 = 12 ✓)
Rnd 17: Dec around. [6] (6 decreases → 12 − 6 = 6 ✓)
FO, leaving a 8" (20 cm) tail. Thread the tail through the front loops of the remaining 6 sts and pull closed. Weave in. The closed point is the bottom of the head (neck).
Visor (Color B – Yellow)
Crochet version
Worked in rows, then edged.
Ch 11.
Row 1: Sc in 2nd ch from hook and in each ch across. [10]
Rows 2–4: Ch 1, turn, sc across. [10]
Do not turn after Row 4. Work sc evenly around the entire rectangle (1 sc in each row-end, 3 sc in each corner). Sl st to first sc. FO, leaving a 12" (30 cm) tail for sewing.
Finished visor is about 1¾" × ¾" (4.5 × 2 cm).
Felt option: Cut a rounded rectangle 1¾" × ¾" (4.5 × 2 cm) from yellow felt.
Expression (black floss): With the visor horizontal, embroider N’s cheerful digital face in the center:
- Two small caret eyes
><(or two tiny vertical ovals) - A short curved smile beneath
Keep the stitches small and centered; the visor is the character’s whole face. Do not add safety eyes—the yellow panel is the eye screen.
Place the visor now, before hair. Pin it on the front of the head, centered left-to-right, with the top edge sitting just below the midline of the even rounds (about Rnds 8–11). Sew around the edge with yellow yarn (or whipstitch felt with matching thread). The visor should read as a wide screen, not a tiny patch.
Hair Cap (Color C – Light Gray)
Leave the bottom open. This sits on the head like a shallow beanie, covering top, back, and sides, and stopping above the visor.
Rnd 1: 6 sc in MR. [6]
Rnd 2: Inc in each st. [12]
Rnd 3: (Sc, inc) around. [18]
Rnd 4: (2 sc, inc) around. [24]
Rnd 5: (3 sc, inc) around. [30]
Rnd 6: (4 sc, inc) around. [36] (6 increases → 30 + 6 = 36 ✓)
Rnds 7–9: Sc around. [36] (3 rounds)
FO, leaving a 18" (46 cm) tail. Do not close.
Pin the cap onto the head so the open edge forms a hairline: it covers the back and sides and sits just above the visor at the front (a thin black strip may show between visor and hair—that is correct). Sew around the open edge with the long tail. The MR center of the cap should sit at the crown.
Bangs (Color C – Light Gray; make 3)
Ch 9.
Row 1: Sl st in 2nd ch from hook, sl st in next ch, sc in next, hdc in next, dc in next 2 ch, hdc in next, sc in last ch. FO, leaving an 8" (20 cm) tail.
The piece is a small pointed lock, wide at the base (starting-chain end) and tapered at the tip.
Side and Back Tufts (Color C – Light Gray; make 5)
Ch 7.
Row 1: Sl st in 2nd ch from hook, sc in next, hdc in next, dc in next 2 ch, hdc in last ch. FO, leaving an 8" (20 cm) tail.
Sew the 3 bangs along the front hairline so they overlap the top edge of the visor slightly (N’s hair always nicks the screen). Sew the 5 tufts around the sides and back of the cap, bases at the hairline, tips pointing out and slightly down, for a messy silver crop. Overlap them; do not space them in a neat ring.
Hard Hat (Color B – Yellow)
Worked as a shallow dome with a small brim. It must fit over the hair, so it is 6 sts larger than the head.
Rnd 1: 6 sc in MR. [6]
Rnd 2: Inc in each st. [12]
Rnd 3: (Sc, inc) around. [18]
Rnd 4: (2 sc, inc) around. [24]
Rnd 5: (3 sc, inc) around. [30]
Rnd 6: (4 sc, inc) around. [36]
Rnd 7: (5 sc, inc) around. [42] (6 increases → 36 + 6 = 42 ✓)
Rnds 8–9: Sc around. [42] (2 rounds)
Rnd 10 (brim): FLO (6 sc, inc) around. [48] (6 increases → 42 + 6 = 48 ✓)
Rnd 11: Sc around. [48]
FO, weave in. The unused back loops of Rnd 10 form a neat ridge where the brim begins.
The hat may be sewn in place or left removable. If sewing, tack it at 4 points under the brim (front, back, both sides) so it sits level and slightly back—not covering the visor.
Hat Antenna (Color A – Black)
Ch 7.
Row 1: Sc in 2nd ch from hook and in each ch across. [6]
FO, leaving a 6" (15 cm) tail. Sew the chain-end (not the FO end) to the crown of the hat so the antenna stands up. A tiny stitch halfway up the antenna, taken into the hat, keeps it from flopping if needed.
Body / Coat (Color A – Black)
Worked from the hem up toward the neck. Stuff firmly as you go, especially at the base so the figure stands.
Rnd 1: 6 sc in MR. [6]
Rnd 2: Inc in each st. [12]
Rnd 3: (Sc, inc) around. [18]
Rnd 4: (2 sc, inc) around. [24]
Rnd 5: (3 sc, inc) around. [30]
Rnd 6: (4 sc, inc) around. [36] (6 increases → 30 + 6 = 36 ✓)
Rnds 7–8: Sc around. [36] (2 rounds)
Rnd 9: (4 sc, dec) around. [30] (6 decreases → 36 − 6 = 30 ✓)
Rnds 10–15: Sc around. [30] (6 rounds)
Rnd 16: (3 sc, dec) around. [24] (6 decreases → 30 − 6 = 24 ✓)
Rnds 17–18: Sc around. [24] (2 rounds)
FO, leaving a 14" (36 cm) tail for sewing to the head. Stuff firmly. The opening is the neck. The wider Rnds 6–8 are the coat hem.
Optional hem flash: With Color B, surface-slip-stitch a round in the exposed front loops of Rnd 6, or work a running stitch around the hem, so a thin yellow lining peeks at the coat edge.
Collar (Color B – Yellow)
Ch 22.
Row 1: Hdc in 3rd ch from hook and in each ch across. [20 hdc]
FO, leaving a 12" (30 cm) tail. Set aside until the head is sewn on.
Arms (make 2)
Begin with Color D (white) for the gloves.
Rnd 1: 6 sc in MR. [6]
Rnd 2: Inc in each st. [12] (6 increases → 6 + 6 = 12 ✓)
Rnds 3–5: Sc around. [12] (3 rounds, white)
Switch to Color A (black).
Rnds 6–14: Sc around. [12] (9 rounds, black)
Stuff lightly—firm at the hand, almost empty at the shoulder.
Rnd 15: (Sc, dec) around. [8] (4 decreases → 12 − 4 = 8 ✓)
FO, leaving a 10" (25 cm) tail. Do not close the remaining hole; flatten the 8 sts and sew the opening shut when attaching to the body (or sew the open ring directly to the body).
Legs (make 2; Color A – Black)
Rnd 1: 6 sc in MR. [6]
Rnd 2: Inc in each st. [12]
Rnds 3–12: Sc around. [12] (10 rounds)
Stuff lightly to firmly, more at the foot (MR end) than at the open top. FO, leaving a 10" (25 cm) tail. Leave the top open for sewing to the body.
Tail (optional; Colors A and B)
N’s thin tail with a yellow tip. Work tightly so the tube holds.
With Color A:
Rnd 1: 6 sc in MR. [6]
Rnds 2–18: Sc around. [6] (17 rounds)
Switch to Color B.
Rnds 19–22: Sc around. [6] (4 rounds)
FO, leaving a 8" (20 cm) tail. Stuff very lightly, or omit stuffing and slide a pipe cleaner inside before sewing for a poseable curve. Sew the Color A end to the lower back of the body, just above the hem, slightly off-center if you prefer a wrap-around pose.
Wings (optional; Color A – Black; make 2)
Simple triangles for Disassembly-Drone N. Skip these if you want Worker-hat N only.
Ch 8.
Row 1: Sc in 2nd ch from hook and in each ch across. [7]
Row 2: Ch 1, turn, dec, sc 3, dec. [5] (7 − 2 = 5 ✓)
Row 3: Ch 1, turn, dec, sc, dec. [3] (5 − 2 = 3 ✓)
Row 4: Ch 1, turn, sc3tog. [1]
FO, leaving a 10" (25 cm) tail. The starting-chain edge is the wing base (sewn to the back). The sc3tog point is the wingtip.
Assembly
Use pins. Check the face from the front at every step.
1. Head to body
Pin the neck opening (body Rnd 18, 24 sts) to the bottom of the head, centered under the visor. The visor faces forward. Sew all the way around with the body tail, adding a last pinch of stuffing at the neck so the head does not wobble.
2. Collar
Wrap the yellow collar around the neck seam, ends meeting at the front, slightly open like a coat lapel. Sew the long edges to the body and head with small stitches, hiding the neck join. Tack the two short ends in a V.
3. Legs
Pin both open tops to the base of the body (Rnds 1–4 area), pointing forward, about ½" (1.3 cm) apart. The figure should stand. Sew each open ring to the body. If it tips, add stuffing through a stitch gap and close.
4. Arms
Flatten each shoulder opening. Pin to the sides of the body at Rnds 16–18 (just under the collar), thumbs / glove color facing forward. Sew in place. Arms should hang to about mid-body, not past the hem.
5. Hat
Set the hat on the hair so the brim clears the visor and bangs. Tack under the brim at four points, or leave unsown if you want it removable.
6. Tail (if using)
Sew to the lower back as written above. Curve it around the hip or let it trail.
7. Wings (if using)
Sew the chain-edge of each triangle to the upper back, just below the collar, points angling up and out. They should sit behind the arms, not on top of the hat.
Finishing
- Weave in every remaining tail on the wrong side or under a sewn seam.
- Steam is not recommended (it can relax tight amigurumi). Shape with your fingers: roll the head, press the hat brim, and fluff the gray locks so they look messy, not combed.
- If the visor expression disappeared under bangs, lift the center bang with one tacking stitch onto the hair cap so both eyes show.
- Optional coat detail: two tiny yellow running-stitch “buttons” stacked on the chest, right of center.
Care: Surface-clean only. Do not machine wash.
Size notes
At this gauge the plush is a handheld 7½" (19 cm). For a keychain version, stop head increases at 24 sts, body at 18–24 sts, and work fewer even rounds; finished height will be about 4–5" (10–13 cm). For a larger desk toy, add one increase round on the head (to 42 sts) and hat (to 48 sts) and extra even rounds on the body; keep limb stitch counts the same so they do not look oversized.
Disclaimer: This pattern was generated by AI and should be reviewed for accuracy before use. While we strive for quality, AI-generated content may contain errors. Please verify measurements, stitch counts, charts, and instructions before beginning your project. Generated by purlJam.uk
Love this pattern?
Save this pattern to your free PurlJam libraryAccess your pattern anytime
Bookmark this page to access your pattern anytime