Type
Crochet
Difficulty
intermediate
Category
amigurumi
AI Thinking Process
Planning
Verification
Pattern
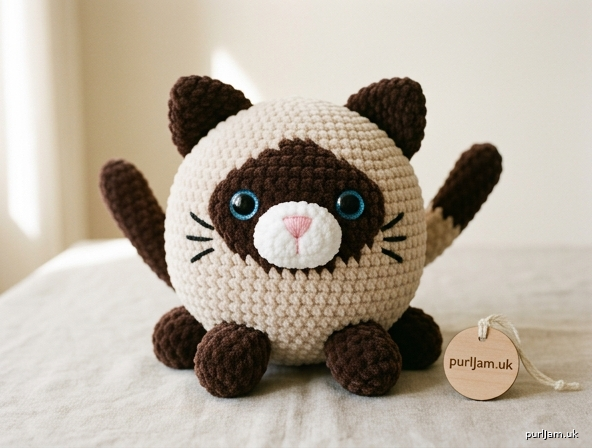
Siamese-Style Squishy Plush Cat Amigurumi Intermediate / Advanced
Finished Size Approximately 7–8" (18–20 cm) tall × 6–7" (15–18 cm) wide when made with super bulky chenille and 6 mm hook.
Materials
- Super bulky (weight 6) chenille yarn:
- Main color (MC): cream or light beige – 80 yd (73 m)
- Contrast color (CC): dark brown, seal point or chocolate – 40 yd (37 m)
- White (for muzzle): 10 yd (9 m)
- Pink scrap (nose)
- Black scrap (whiskers)
- Crochet hook: 5.5–6.5 mm (US I-9 to K-10½); 6 mm recommended
- 14–16 mm glitter blue safety eyes (1 pair)
- Polyester fiberfill stuffing
- Yarn needle
- Stitch marker
- Scissors
- Optional: fabric glue for securing yarn ends inside
Gauge 9 sc and 9 rnds = 4" (10 cm) in continuous sc with 6 mm hook and super bulky chenille. (Gauge is critical for dense fabric that hides stuffing; adjust hook if necessary.)
Abbreviations (US terms)
- MR: magic ring
- sc: single crochet
- inc: 2 sc in same stitch
- dec: invisible decrease (insert hook FLO of next 2 sts, yo, pull through both, yo, pull through 3 loops)
- st(s): stitch(es)
- rnd: round
- FLO: front loop only
- BLO: back loop only
- [ ]: total stitches at end of round
- ( ) × n: repeat instructions in parentheses n times
- FO: fasten off
Notes
- Work in continuous spiral rounds unless stated. Do not join or turn. Mark first st of each rnd and move marker up.
- Chenille can snag; use a blunt needle and gentle tension.
- Stuff firmly as you go to keep the perfect round shape while remaining squishy. Overstuff slightly before final decreases.
- Color changes: work last yarn-over of previous st in new color.
- Invisible decrease keeps surface smooth.
- All seam allowances are whip-stitched with matching yarn unless noted.
Body & Head (one continuous piece – MC) Stuff firmly and continuously from Rnd 12 onward. Shape bottom flat by pressing while stuffing.
Rnd 1: 6 sc in MR [6] Rnd 2: inc in each st around [12] Rnd 3: (sc, inc) around [18] Rnd 4: (2 sc, inc) around [24] Rnd 5: (3 sc, inc) around [30] Rnd 6: (4 sc, inc) around [36] Rnd 7: (5 sc, inc) around [42] Rnds 8–18: sc in each st around [42] (11 rnds) — this forms the lower body; press base flat. Rnd 19: (5 sc, dec) around [36] Rnds 20–22: sc in each st around [36] Rnd 23: (4 sc, dec) around [30] Rnds 24–27: sc in each st around [30] — neck/shoulder transition; continue stuffing firmly. Rnd 28: (3 sc, dec) around [24] Insert 14–16 mm glitter blue safety eyes between Rnds 26 and 27, approximately 6 sts apart and centered low on the face for the cute expression. Begin white muzzle color change if desired (see Face Markings). Stuff head firmly. Rnds 29–32: sc in each st around [24] Rnd 33: (2 sc, dec) around [18] Rnd 34: (sc, dec) around [12] Rnd 35: dec around [6] FO, leaving 8" tail. Thread tail through remaining 6 sts, pull tight to close, weave in securely. Final height of body+head sphere ≈ 7".
Legs (make 4 – MC) Stuff lightly.
Rnd 1: 6 sc in MR [6] Rnd 2: inc in each st around [12] Rnds 3–5: sc in each st around [12] Rnd 6: (2 sc, dec) around [9] FO, leaving 12" tail for sewing. Flatten opening slightly.
Tail (MC with optional CC tip) Stuff lightly as you go; keep firm enough to stand upright.
Rnd 1: 6 sc in MR [6] Rnd 2: (sc, inc) around [9] Rnd 3: (2 sc, inc) around [12] Rnds 4–14: sc in each st around [12] (11 rnds) Rnd 15: (2 sc, dec) around [9] Rnd 16: (sc, dec) around [6] Rnd 17: sc in each st around [6] FO, leaving 12" tail. Weave through final sts if desired for neat tip. Optional: change to CC for last 3 rnds for color-point tip.
Ears (make 2 – MC with CC inner option) Do not stuff.
Rnd 1: 4 sc in MR [4] Rnd 2: (sc, inc) around [6] Rnd 3: (2 sc, inc) around [8] Rnd 4: (3 sc, inc) around [10] Rnd 5: (4 sc, inc) around [12] Rnd 6: sc in each st around [12] FO, leaving 10" tail. Flatten into rounded triangle shape. Optional: surface-crochet or sew a small CC triangle on inner side for color-point.
Face Markings (CC – color-point patches) Option A – Crocheted patches (recommended for chenille):
- Eye patches (make 2): Ch 6, sc in 2nd ch from hook and next 4, turn; sc across 5 sts for 3 rows. FO, leave tail. Shape into soft ovals.
- Forehead blaze: Ch 5, sc across, work 4 rows, decreasing 1 st each end on last 2 rows to form inverted triangle. FO.
- Optional ear tips: small CC triangles (ch 4, sc 3, sc 2, sc 1). Sew patches around eyes, on forehead, and ear tips after eyes are set.
Option B – Embroidery / surface crochet: Using CC, surface-slip-stitch or embroider soft patches around eyes, forehead V, and ear edges after assembly.
White Muzzle With white yarn, embroider or surface-crochet a gentle rounded oval covering lower face between and below eyes (approx 8–10 sts wide × 6 rnds tall). Alternatively work a small separate oval (MR 6, inc to 12, 2 rnds even) and sew on, stuffing very lightly for dimension.
Assembly
- Pin and sew four legs to underside of body. Place front two legs close together (almost touching) centered under the face for sitting pose; back legs spaced evenly toward rear, all pointing slightly forward. Use whip stitch through both layers, adding tiny bit of stuffing at join if needed for roundness. Reinforce each leg with 2–3 extra passes.
- Sew tail at center back, base at approx Rnd 10–12 of body, angled slightly upward so it stands upright. Anchor firmly.
- Sew ears to top of head, slightly forward of center, 4–5 sts apart, angled gently outward. Rounded base sits between Rnds 30–33.
- Attach face markings (eye patches first, then forehead, ear tips). Position eye patches so they frame the safety eyes without covering them.
- Embroider nose: with pink yarn, stitch a small filled triangle (3–4 vertical satin stitches tapering) centered on white muzzle, just below eye level.
- Embroider whiskers: with black yarn, make 3 short straight stitches on each cheek radiating from muzzle sides (approx ¾" long).
- Weave in all ends securely inside the body. Check that every sewn piece is tight; add a drop of fabric glue on interior knots if desired for extra security.
Finishing
- Steam-block very lightly with cool iron held above (never touch chenille) or simply shape by hand while stuffing settles.
- Brush any loose fibers gently.
- Final pose check: cat should sit upright on flat base with front paws together, tail up, head round and eyes low and sparkly.
Your irresistibly cute, round, squishy color-point plush cat is complete! Perfect for gifting, collecting, or market stalls.
(Inline validation examples: Rnd 2: 6 inc → 6+6=12 ✓; Rnd 7: 6 inc → 36+6=42 ✓; Rnd 19: 6 dec → 42-6=36 ✓; Leg Rnd 2: 6 inc → 12 ✓; Tail taper Rnd 15: 3 dec → 12-3=9 ✓.)
Disclaimer: This pattern was generated by AI and should be reviewed for accuracy before use. While we strive for quality, AI-generated content may contain errors. Please verify measurements, stitch counts, charts, and instructions before beginning your project. Generated by purlJam.uk
Love this pattern?
Save this pattern to your free PurlJam libraryAccess your pattern anytime
Bookmark this page to access your pattern anytime