Type
Crochet
Difficulty
beginner
Category
amigurumi
AI Thinking Process
Planning
Verification
Pattern
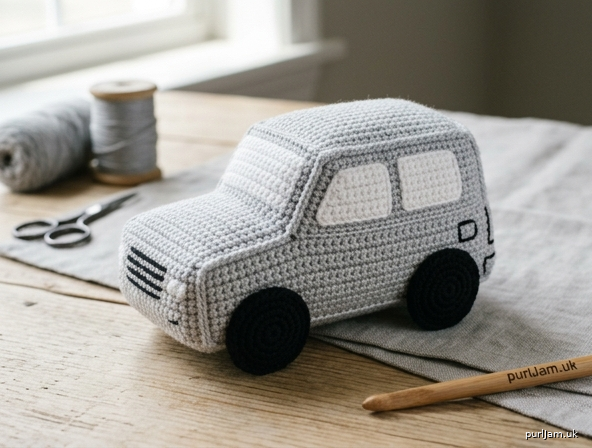
Silver SUV Plush — "2002 Highlander" Crochet Toy
A beginner-friendly amigurumi car in simple box shapes
Inspired by a 2002 silver Toyota Highlander, this plush is built from two stuffed "boxes" (the lower body and the upper cabin) with four flat wheels. It uses only single crochet, increases, and decreases — perfect for confident beginners.
Finished Size
Approximately 4 in (10 cm) long × 2 in (5 cm) wide × 2.5 in (6.5 cm) tall, using worsted-weight yarn.
Skill Level
Beginner
Materials
- Worsted-weight (4) yarn:
- Silver/Light Gray (MC) — main body & cabin — approx. 60 yd
- Black (CC1) — wheels & windows — approx. 25 yd
- Small amount White or Light Blue — window "glass" (optional)
- Hook: US G-6 (4.0 mm)
- Polyester fiberfill stuffing
- Yarn needle (for assembly)
- Stitch marker
- Scissors
- Optional: black embroidery thread for grille/headlight details
Gauge
4 sc × 4.5 rows = 1 in (2.5 cm) in single crochet, worked tightly. Exact gauge is not critical; work firmly so stuffing does not show through.
Abbreviations (US terms)
- ch – chain
- sc – single crochet
- inc – 2 sc in same stitch
- dec – single crochet 2 stitches together (invisible decrease preferred)
- st(s) – stitch(es)
- RS/WS – right side / wrong side
- [ ] – stitch count at end of row/round
Construction Overview
- Body box — 6 flat rectangular panels sewn into a box (this is the SUV's lower half).
- Cabin box — 6 smaller flat panels sewn into a box (the passenger cabin / roof).
- Wheels — 4 flat black disks.
- Assembly — stuff boxes, join cabin to body, attach wheels, add window details.
Work all panels in rows. Turn at the end of every row.
PART 1 — BODY BOX (make in MC)
The body is a rectangular box: 2 large side panels, 2 large top/bottom panels, 2 small end panels.
Large Panels — make 4 (top, bottom, and 2 sides)
Ch 9.
- Row 1: sc in 2nd ch from hook and in each ch across, turn. [8]
- Rows 2–16: ch 1, sc in each st across, turn. [8]
Check: 8 sts × 16 rows ≈ 2 in × 3.5 in ✓ Fasten off, leaving a long tail on 2 of the 4 panels for seaming.
End Panels — make 2 (front bumper end & rear end)
Ch 9.
- Row 1: sc in 2nd ch from hook and in each ch across, turn. [8]
- Rows 2–8: ch 1, sc in each st across, turn. [8]
Check: 8 sts × 8 rows ≈ 2 in × 1.75 in ✓ Fasten off, leaving a long tail.
PART 2 — CABIN BOX (make in MC)
The cabin is a smaller box that sits on top of the body toward the rear (SUV-style).
Roof & Floor Panels — make 2
Ch 7.
- Row 1: sc in 2nd ch from hook and in each ch across, turn. [6]
- Rows 2–9: ch 1, sc in each st across, turn. [6]
Check: 6 sts × 9 rows ≈ 1.5 in × 2 in ✓
Cabin Side Panels — make 2
Ch 7.
- Row 1: sc in 2nd ch from hook and in each ch across, turn. [6]
- Rows 2–6: ch 1, sc in each st across, turn. [6]
Check: 6 sts × 6 rows ≈ 1.5 in × 1.3 in ✓
Cabin End Panels — make 2 (windshield & rear window ends)
Ch 7.
- Row 1: sc in 2nd ch from hook and in each ch across, turn. [6]
- Rows 2–6: ch 1, sc in each st across, turn. [6]
Fasten off all cabin panels, leaving tails for seaming.
PART 3 — WHEELS (make 4 in CC1 — Black)
Worked in continuous rounds. Place a stitch marker in the first st of each round.
- Rnd 1: 6 sc in magic ring. [6]
- Rnd 2: inc in each st around. (6 inc → 6 + 6 = 12) [12]
- Rnd 3: (sc, inc) around. (6 inc → 12 + 6 = 18) [18]
- Rnd 4: sl st in next st to smooth edge.
Fasten off, leaving a long tail for attaching. Each wheel is a flat disk about 1.5 in (4 cm) across.
Check: 6 → 12 → 18 stitch progression correct ✓
PART 4 — WINDOW DETAILS (optional, make 2 in White/Light Blue)
For a simple windshield/side-window look, make small flat rectangles: Ch 5.
- Row 1: sc in 2nd ch from hook and across, turn. [4]
- Rows 2–4: ch 1, sc in each st across, turn. [4]
Fasten off, leaving a tail. These will be sewn onto the cabin sides.
ASSEMBLY
Step 1 — Sew the Body Box
Using MC tails and a yarn needle, whip stitch the panels together with wrong sides facing out (or right sides out for a plush look — beginner's choice):
- Join the 4 large panels edge-to-edge in a ring to form a long tube (top, side, bottom, side).
- Sew one end panel onto one open end (this is the front/bumper).
- Sew the second end panel onto the other end, stuffing firmly with fiberfill before closing the final seam. Keep corners crisp.
Step 2 — Sew the Cabin Box
Repeat the same method with the 6 cabin panels:
- Join roof, side, floor, side into a ring.
- Sew on one cabin end panel.
- Stuff lightly, then sew on the final cabin end panel.
Step 3 — Attach Cabin to Body
- Center the cabin box on the top panel of the body, positioned slightly toward the rear (leave a little more body showing at the front for the "hood").
- Pin in place. Using MC, whip stitch the cabin's floor panel edges all the way around to the body's top panel. Sew securely so it stands straight.
Step 4 — Attach Wheels
- Position 2 wheels on each long side of the body, flush with the bottom edge: one near the front, one near the rear.
- Using the black tails, whip stitch each wheel disk to the body side panel around its edge. Keep all four level so the car sits flat.
Check: 4 wheels, 2 per side, aligned at bottom ✓
Step 5 — Windows & Details
- Sew a white/light-blue window rectangle onto each cabin side panel.
- Optional: with black embroidery thread, add a few horizontal stitches across the front end panel for a grille, and two small vertical stitches on the cabin ends for windshield/rear glass.
- Optional: two small white stitches on the front for headlights.
Finishing
- Weave in all loose ends with the yarn needle.
- Gently shape the boxes with your hands so corners are square and the car sits level.
- Give a light stuffing top-up through any small gap if the body feels soft, then close.
Beginner Tips
- Work tightly: loose sc lets stuffing peek through the seams — go down a hook size if needed.
- Pin before sewing: especially the cabin, so it sits straight and centered.
- Stuff firmly but evenly: overstuffing rounds the corners; understuffing looks saggy. Aim for a firm, boxy feel.
- Count as you go: every large body panel should be 8 sts wide, and every cabin panel 6 sts wide — matching widths make clean seams.
Size Adjustments
- Larger SUV: add 2–4 rows to each body panel length and use bulky (5) yarn with a US 7 (4.5 mm) hook.
- Smaller keychain car: use DK (3) yarn and a US E-4 (3.5 mm) hook; add a keychain finding to the roof.
Enjoy your silver SUV plush!
Disclaimer: This pattern was generated by AI and should be reviewed for accuracy before use. While we strive for quality, AI-generated content may contain errors. Please verify measurements, stitch counts, and instructions before beginning your project. Generated by purlJam.uk
Love this pattern?
Save this pattern to your free PurlJam libraryAccess your pattern anytime
Bookmark this page to access your pattern anytime